Watch the deep dive videos:
Part I
python-oracledb libraryPart II
Part III
Welcome back
I finally had a break in my PM duties to share a small afternoon project [I started a few weeks ago]. I challenged myself to a brief Python coding exercise. I wanted to develop some code that allowed me to connect to my Autonomous Database using either our python-oracledb driver (library) or with Oracle REST Data Services (ORDS).
I undertook this effort as I also wanted to make some comparisons and maybe draw some conclusions from these different approaches.
NOTE: If you don't feel like reading this drivel, you can jump straight to the repository where this code lives. It's all nicely commented and has everything you need to get it to work. You can check that out here.
The test files
Reviewing the code, I’ve created three Python test files. test1.py relies on the python-oracledb library to connect to an Oracle Autonomous database while test2.py and test3.py rely on ORDS (test3.py uses OAuth2.0, but more on that later).
test1.py using the python-oracledb library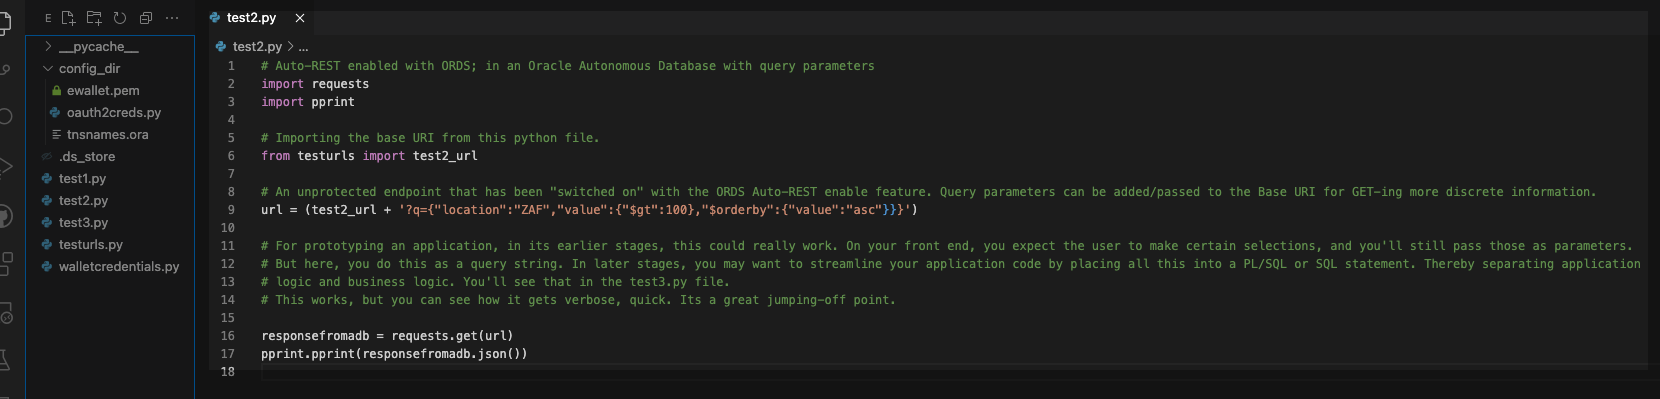
test2.py relies on an unsecured ORDS endpoint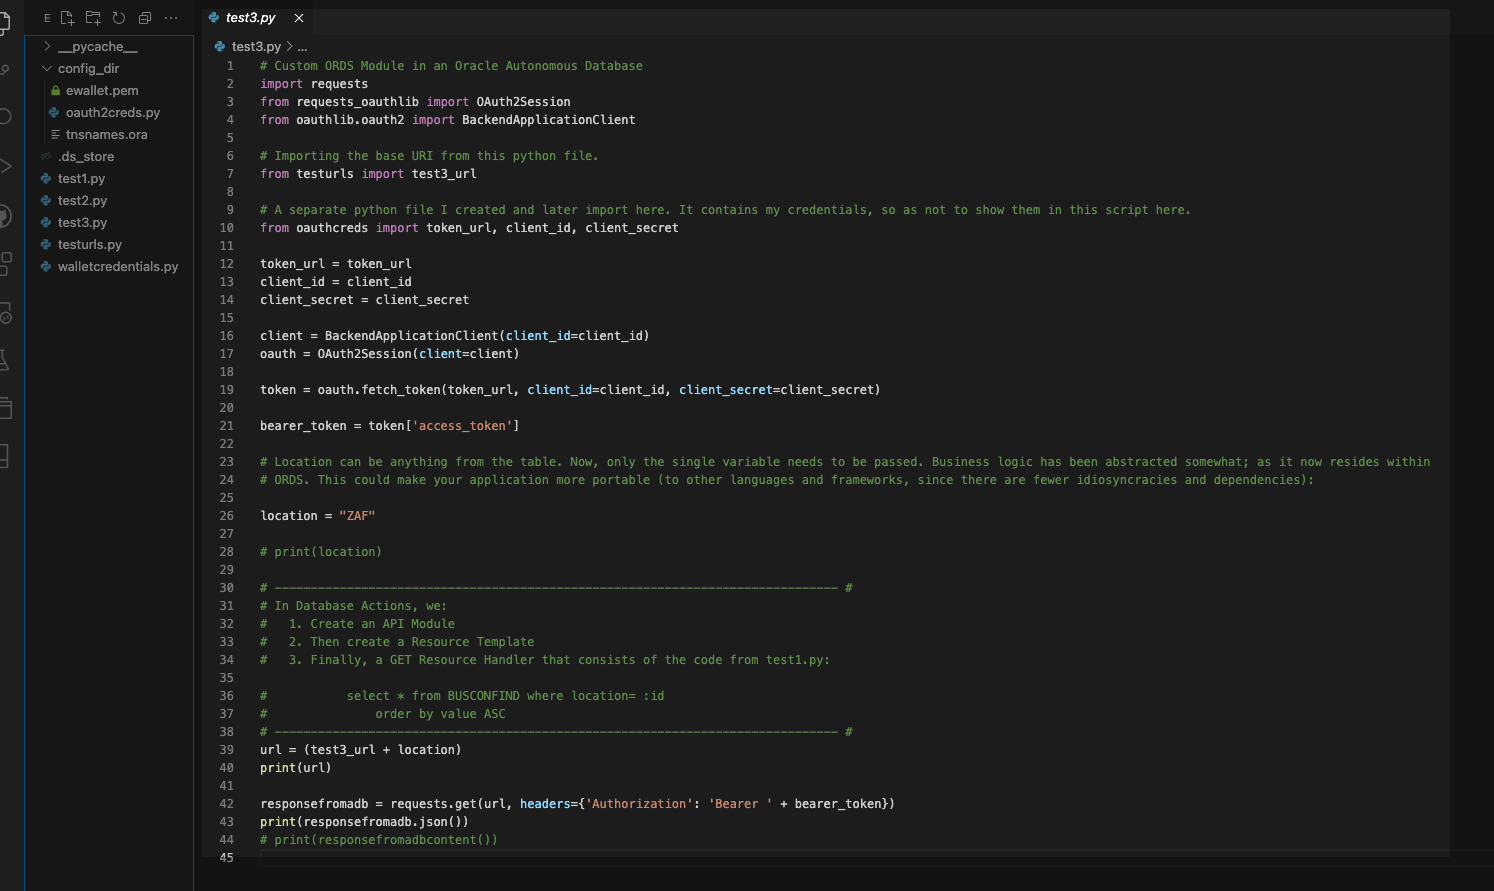
test3.py with ORDS, secured with OAuth2 Configuration
Configuration directory
I set up this configuration directory (config_dir) to abstract sensitive information from the test files. My ewallet.pem and tnsnames.ora files live in this config_dir. These are both required for Mutual TLS (mTLS) connection to an Oracle Autonomous database (you can find additional details on mTLS in the docs here).
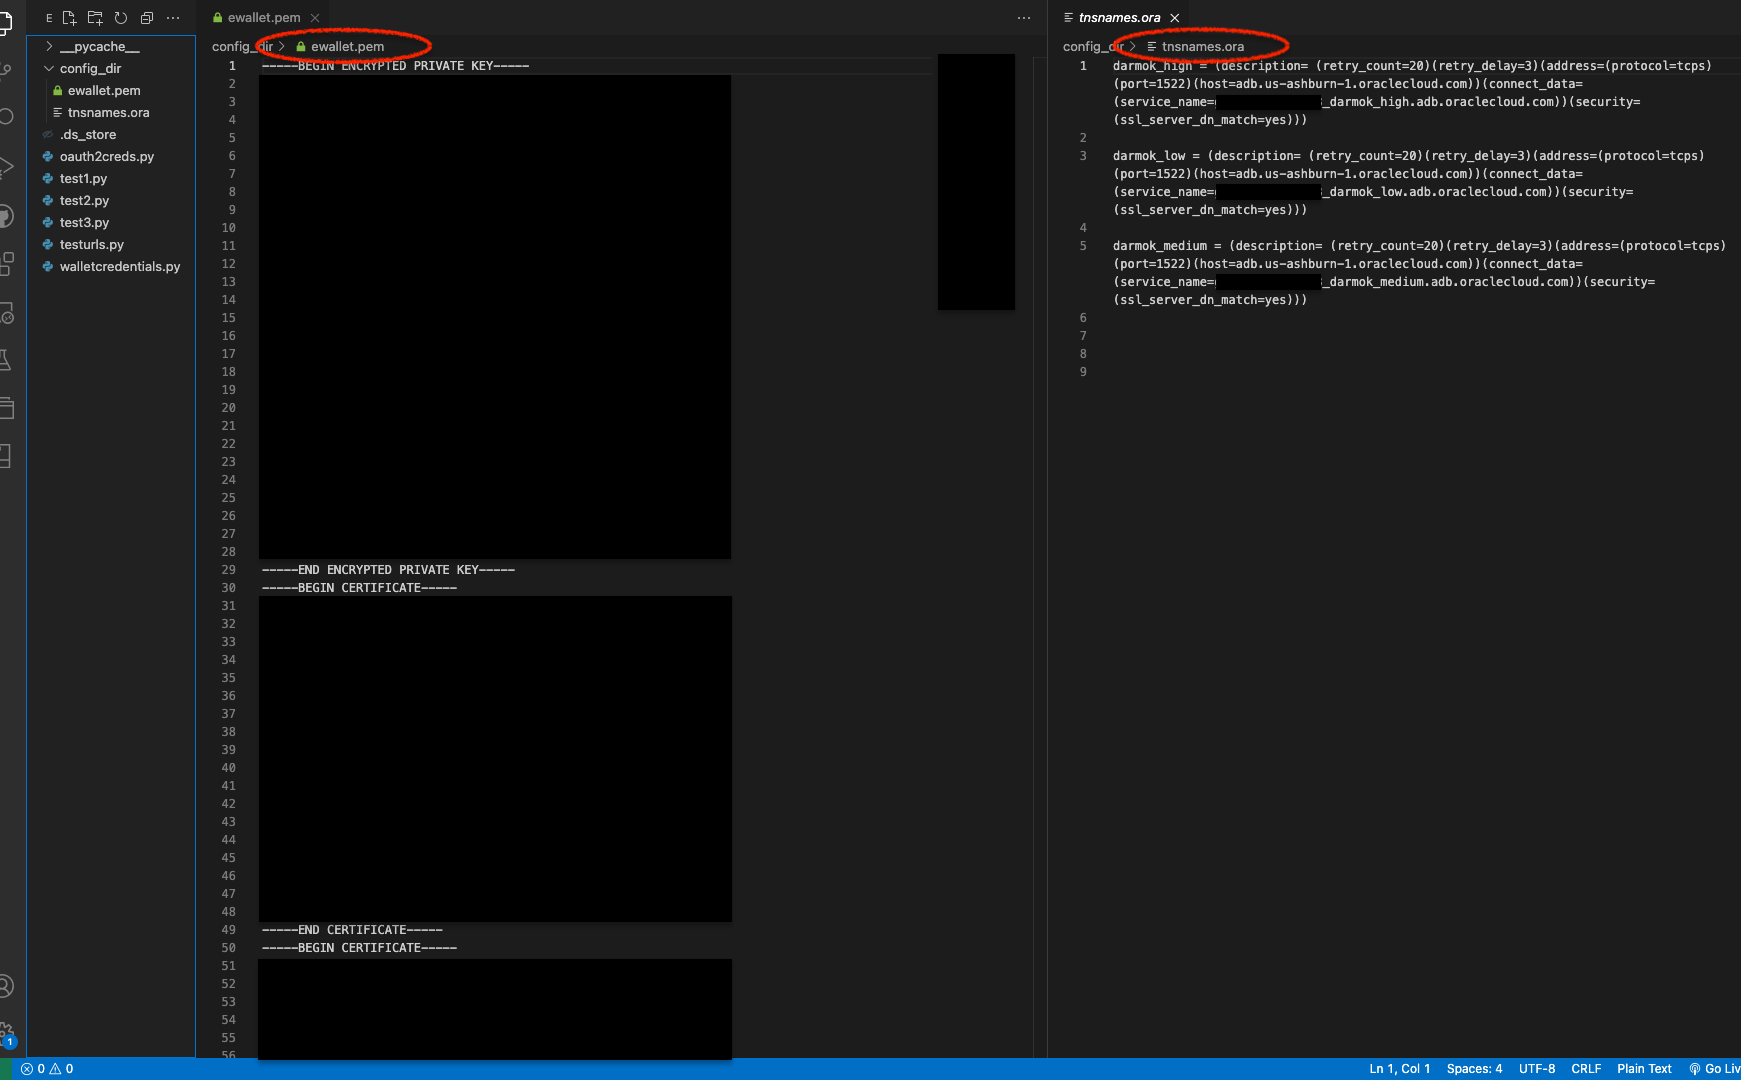
ewallet.pem and tnsnames.ora filesOther files
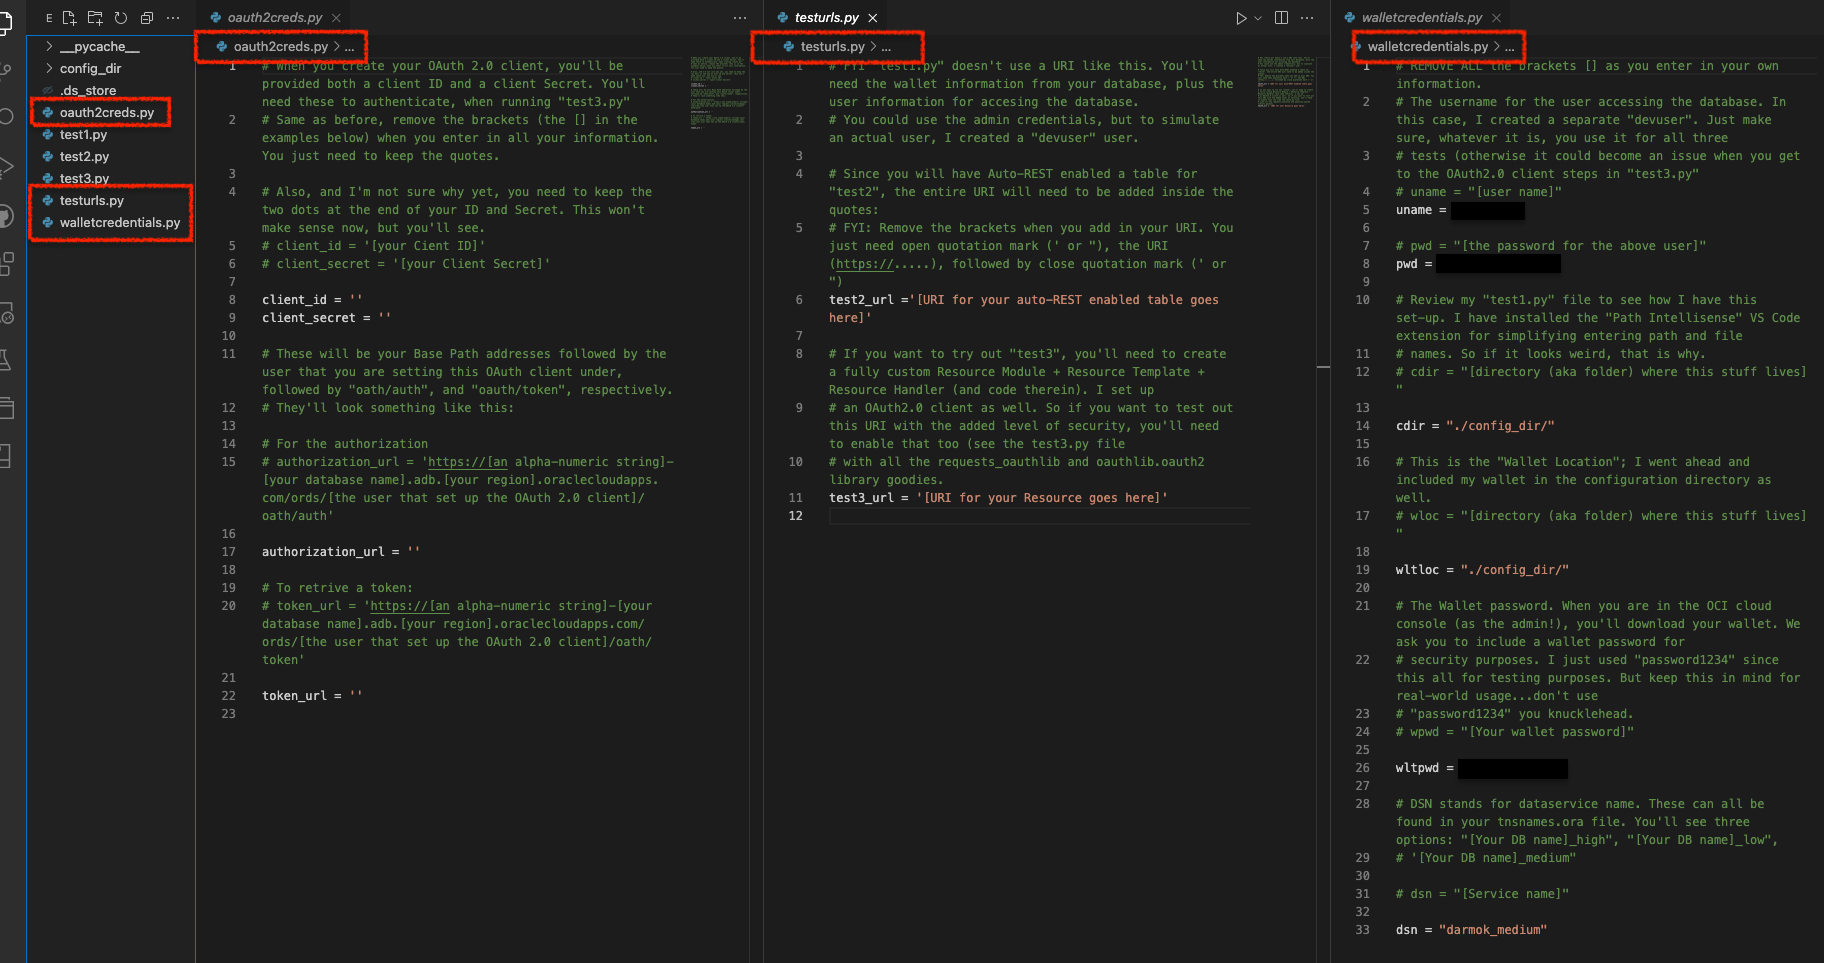
Other files include oauth2creds.py, testurls.py, and walletcredentials.py. Depending on the test case, I’ll use some or all of these files (you’ll see that shortly).
NOTE: If not obvious to you, I wouldn't put any sensitive information into a public git repository.
Connecting with python-oracledb
One approach to connecting via your Oracle database is with the python-oracledb driver (library). An Oracle team created this library (people much more experienced and wiser than me), and it makes connecting with Python possible.
FYI: I’m connecting to my Autonomous Database. If you want to try this, refer to the documentation for using this library and the Autonomous database. You can find that here.
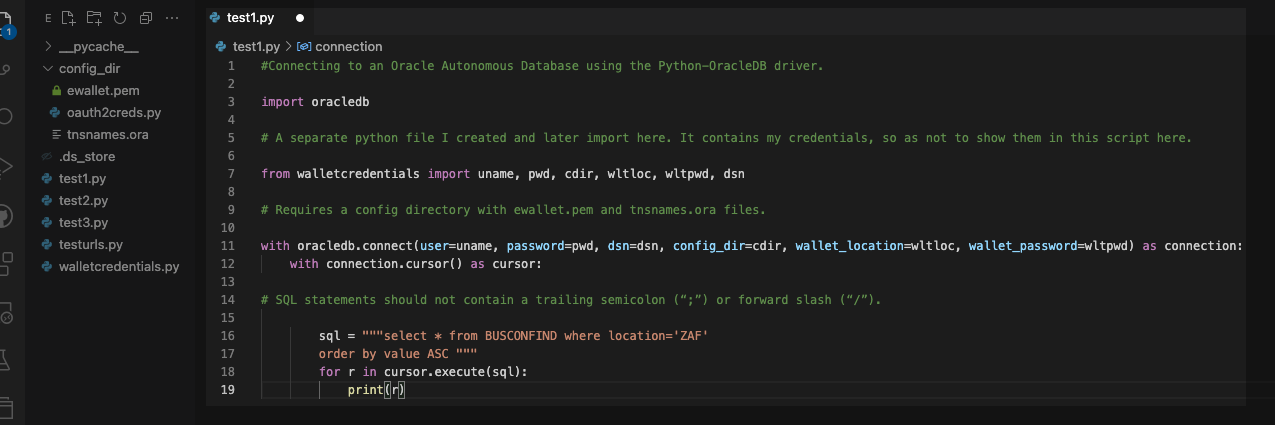
The Python code that I came up with to make this work:
#Connecting to an Oracle Autonomous Database using the Python-OracleDB driver.

import oracledb

# A separate python file I created and later import here. It contains my credentials, so as not to show them in this script here.

from walletcredentials import uname, pwd, cdir, wltloc, wltpwd, dsn

# Requires a config directory with ewallet.pem and tnsnames.ora files.

with oracledb.connect(user=uname, password=pwd, dsn=dsn, config_dir=cdir, wallet_location=wltloc, wallet_password=wltpwd) as connection:
    with connection.cursor() as cursor:

# SQL statements should not contain a trailing semicolon (“;”) or forward slash (“/”).

        sql = """select * from BUSCONFIND where location='ZAF'
        order by value ASC """
        for r in cursor.execute(sql):
            print(r)
In Line 7, you can see how I import the wallet credentials from the walletcredentials.py file. Without that information, this code wouldn’t work. I also import the database username, password, and configuration directory (which includes the ewallet.pem and tnsnames.ora files).
From there, the code is pretty straightforward. However, some library-specific syntax is required (the complete details are in the docs, found here), but aside from that, nothing is too complicated. You’ll see the SQL statement in Lines 16-17; the proper SQL format looks like this:
SELECT  * FROM busconfind WHERE location='zaf'
ORDER BY value ASC;
And here is an example of this SQL output in a SQL Worksheet (in Database Actions):
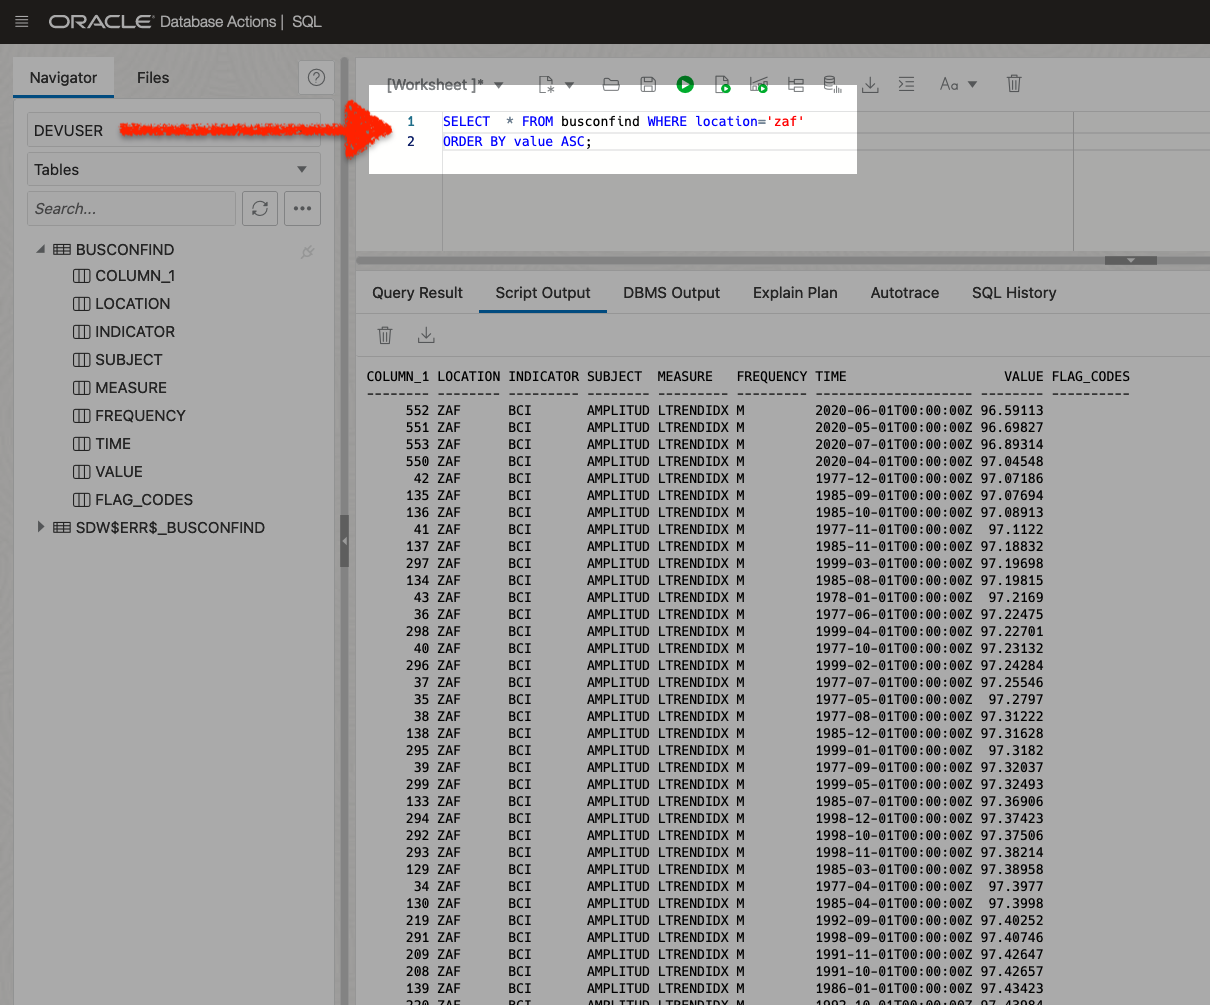
FYI: This is a Business Confidence Index data-set, in case you were curious (retrieved here).
That SQL allows me to filter on a Location and then return those results in ascending order according to the Value column. When I do this using the python-oracledb driver, I should expect to see the same results.
NOTE: You've probably noticed that the SQL in the python file differs from that seen in the SQL Worksheet. That is because you need to escape the single quotes surroundingZAF, as well as remove the trailing semi-colon in the SQL statement. Its all in thepython-oracledbdocumentation, you just have to be aware of this.
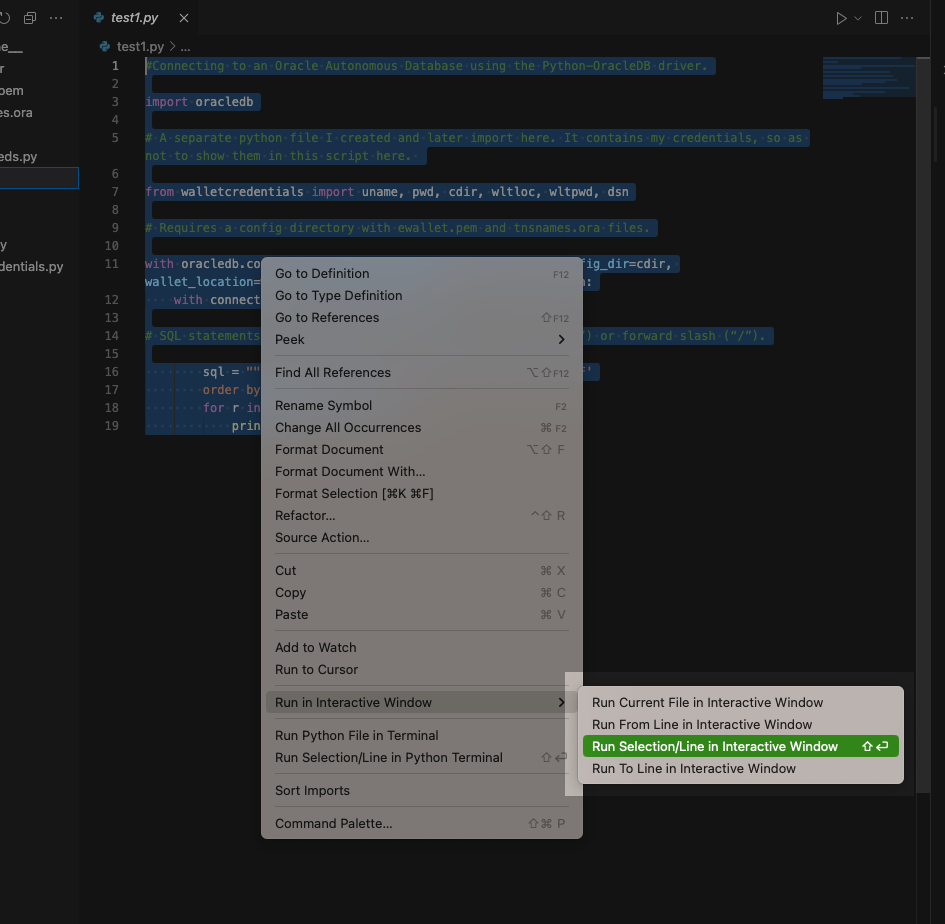
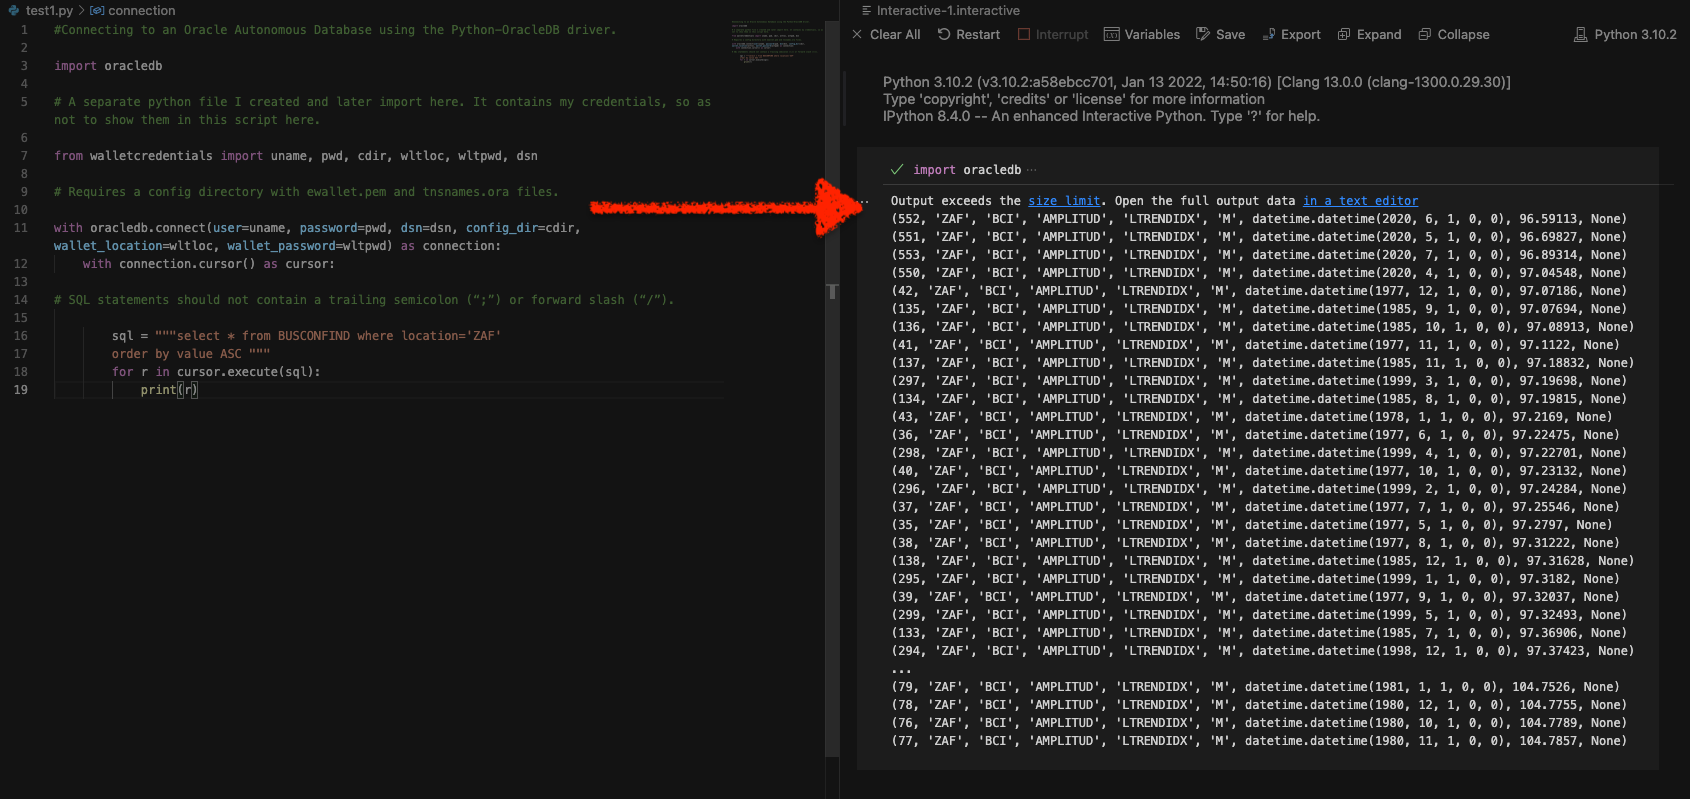
Once I have all the necessary information in my walletcredentials.py file, I can import that into the test1.py file and execute the code. I chose to run this in an Interactive Window (I’m using VS Code), but you can also do this in your Terminal. In the images (from left to right), you’ll see the test1.py file, then a summary of the output from that SQL query (contained in the test1.py code), and finally, the detailed output (in a text editor).
test1.py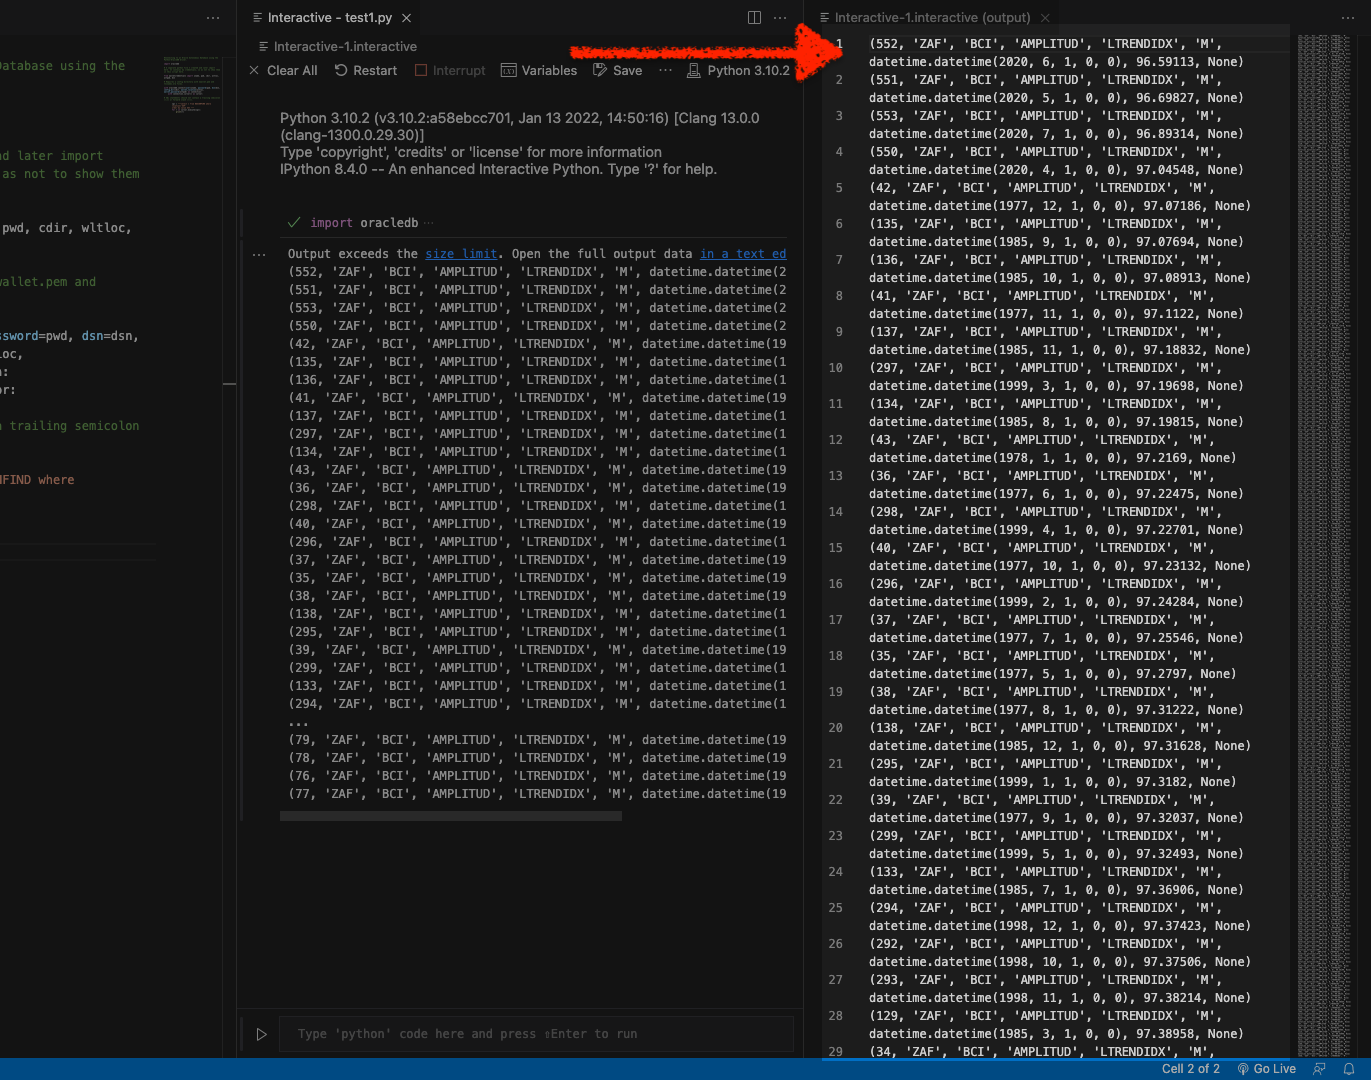
test1.pyWrap-up
For those that have an existing Free Tier tenancy, this could be a good option for you. Of course, you have to do some light administration. But if you have gone through the steps to create an Autonomous database in your cloud tenancy, you probably know where to look for the tnsnames.ora and other database wallet files.
I’m not a developer, but I think it would be nice to simplify the business logic found in this Python code. Maybe better to abstract it completely. For prototyping an application (perhaps one that isn’t micro services-oriented, this could work) or for data- and business analysts, this could do the trick for you. In fact, the data is returned to you in rows of tuples; so turning this into a CSV or reading it into a data analysis library (such as pandas) should be fairly easy!
Connecting via ORDS: sans OAuth2.0
Auto-REST and cURL
I’m still using the “devuser” (although this may be unnecessary, as any unsecured REST-enabled table would do). I’m using the same table as before; the only change I’ve made is to auto-REST enable the BUSCONFIND table for the test2.py code.
In the following images, I’m retrieving the cURL command for performing a GET request on this table.
NOTE: In a recent ORDS update, we made available different shell variations (this will depend on your OS); I've selected Bash.
From there, I take the URI (learn more on URIs) portion of the cURL command and place it into my browser. Since this table is auto-REST enabled, I’ll only receive 25 rows from this table.
NOTE: The ORDS default pagination is limit = 25.
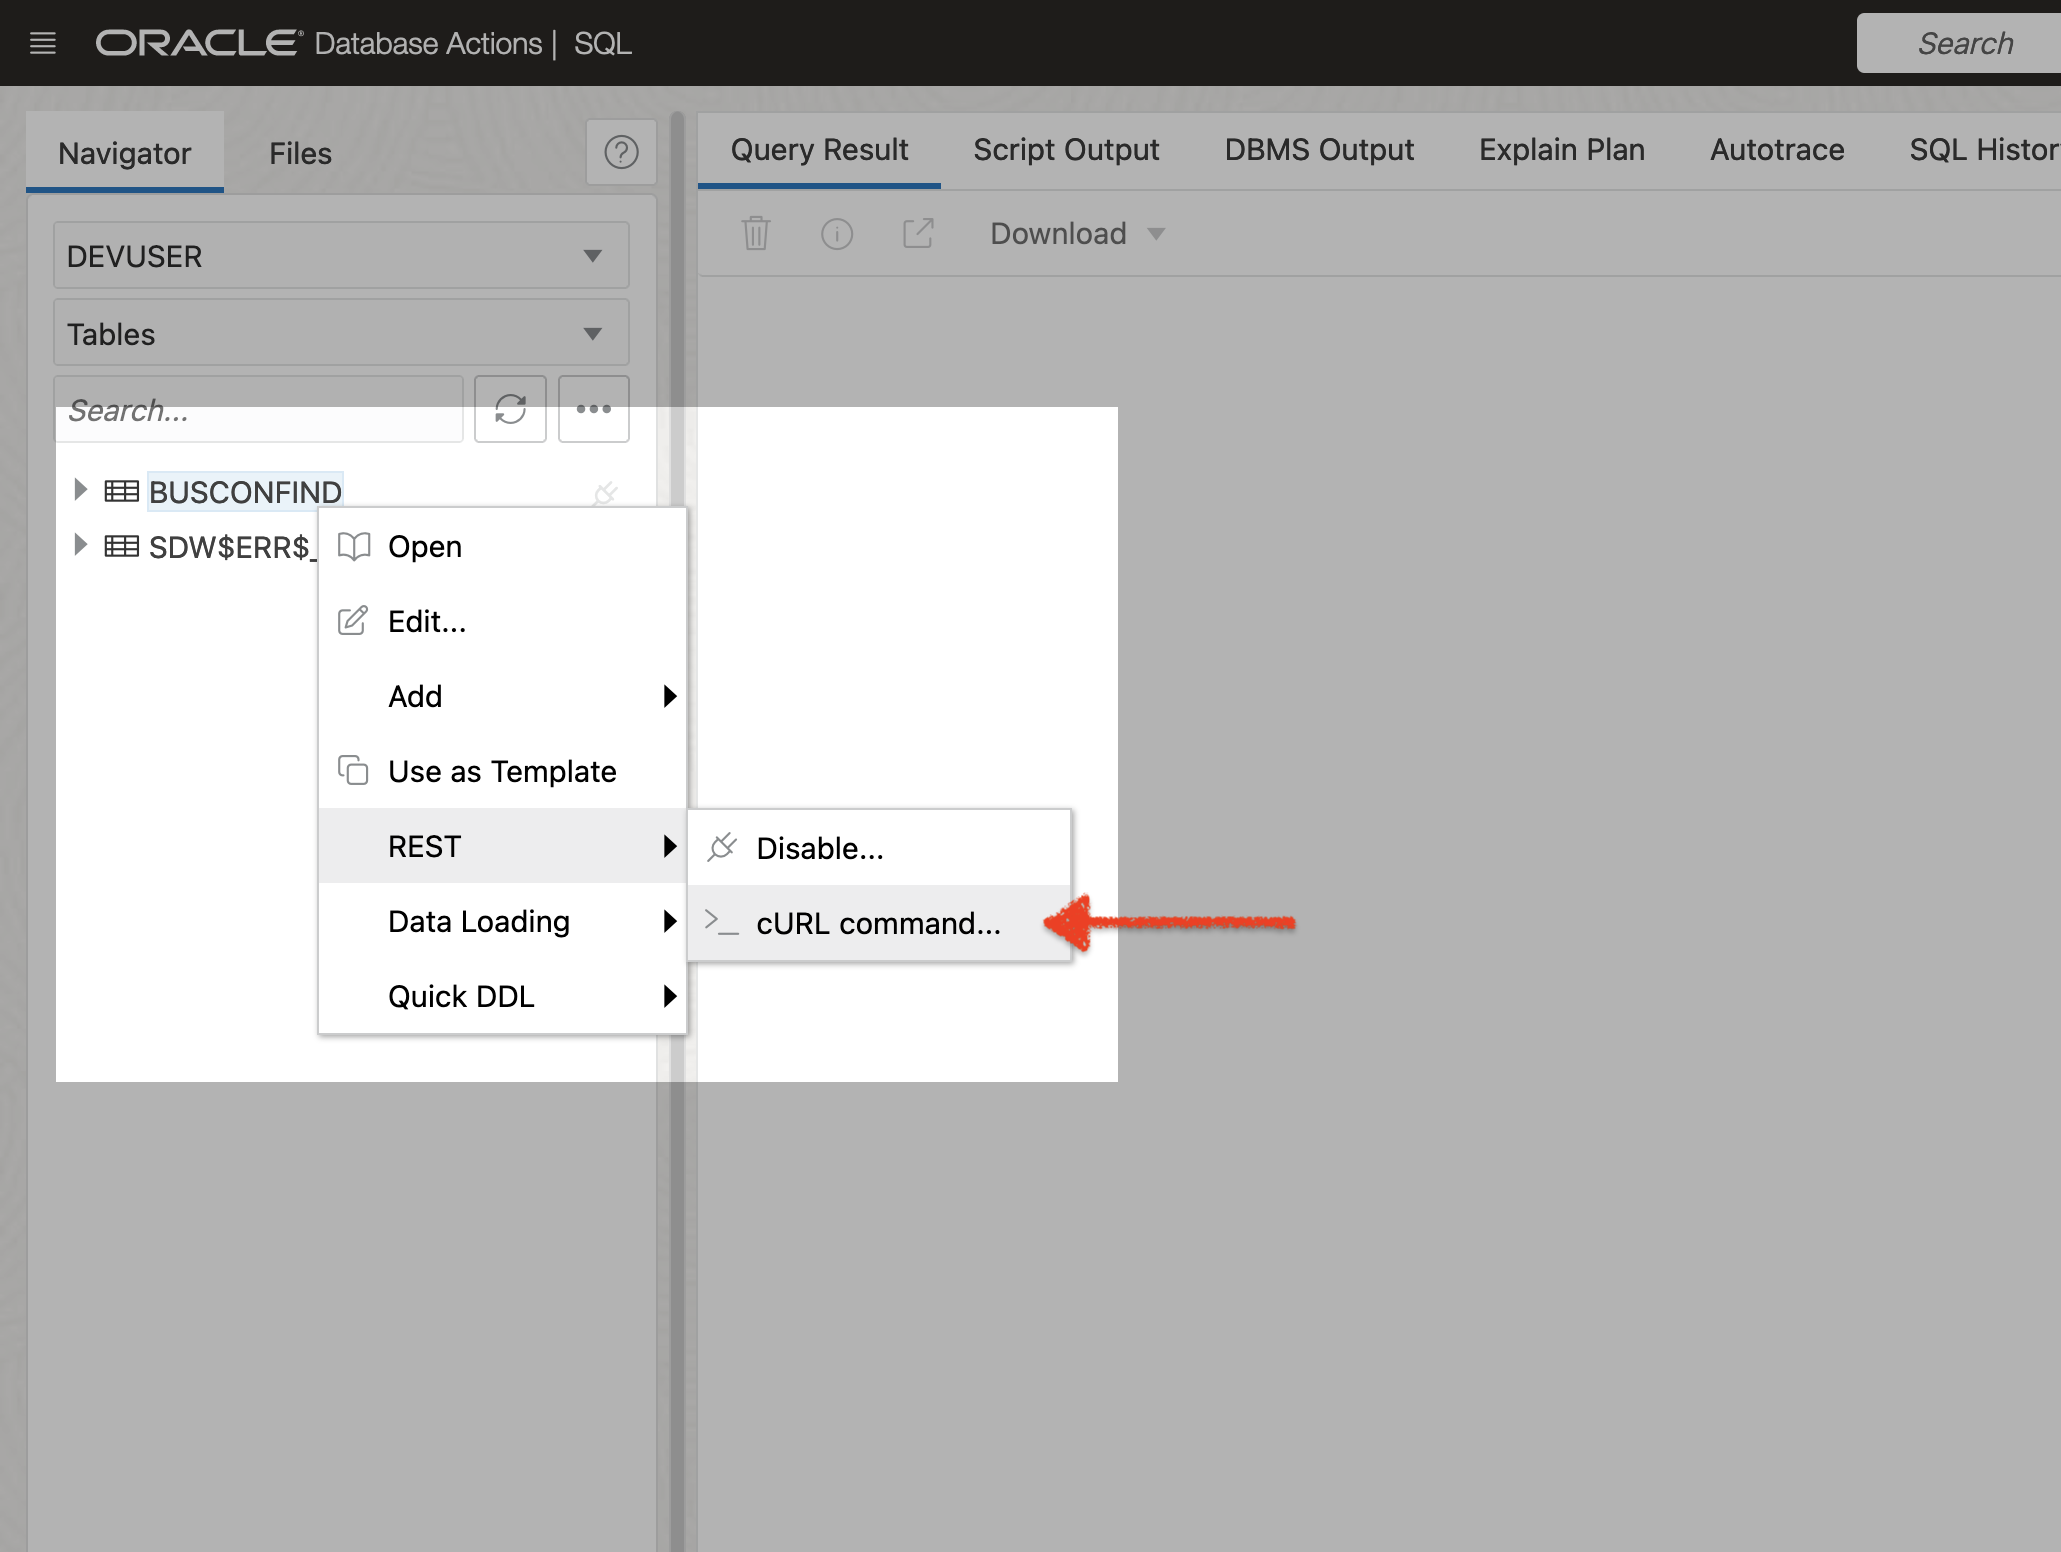
cURL command from an already ORDS REST-enabled table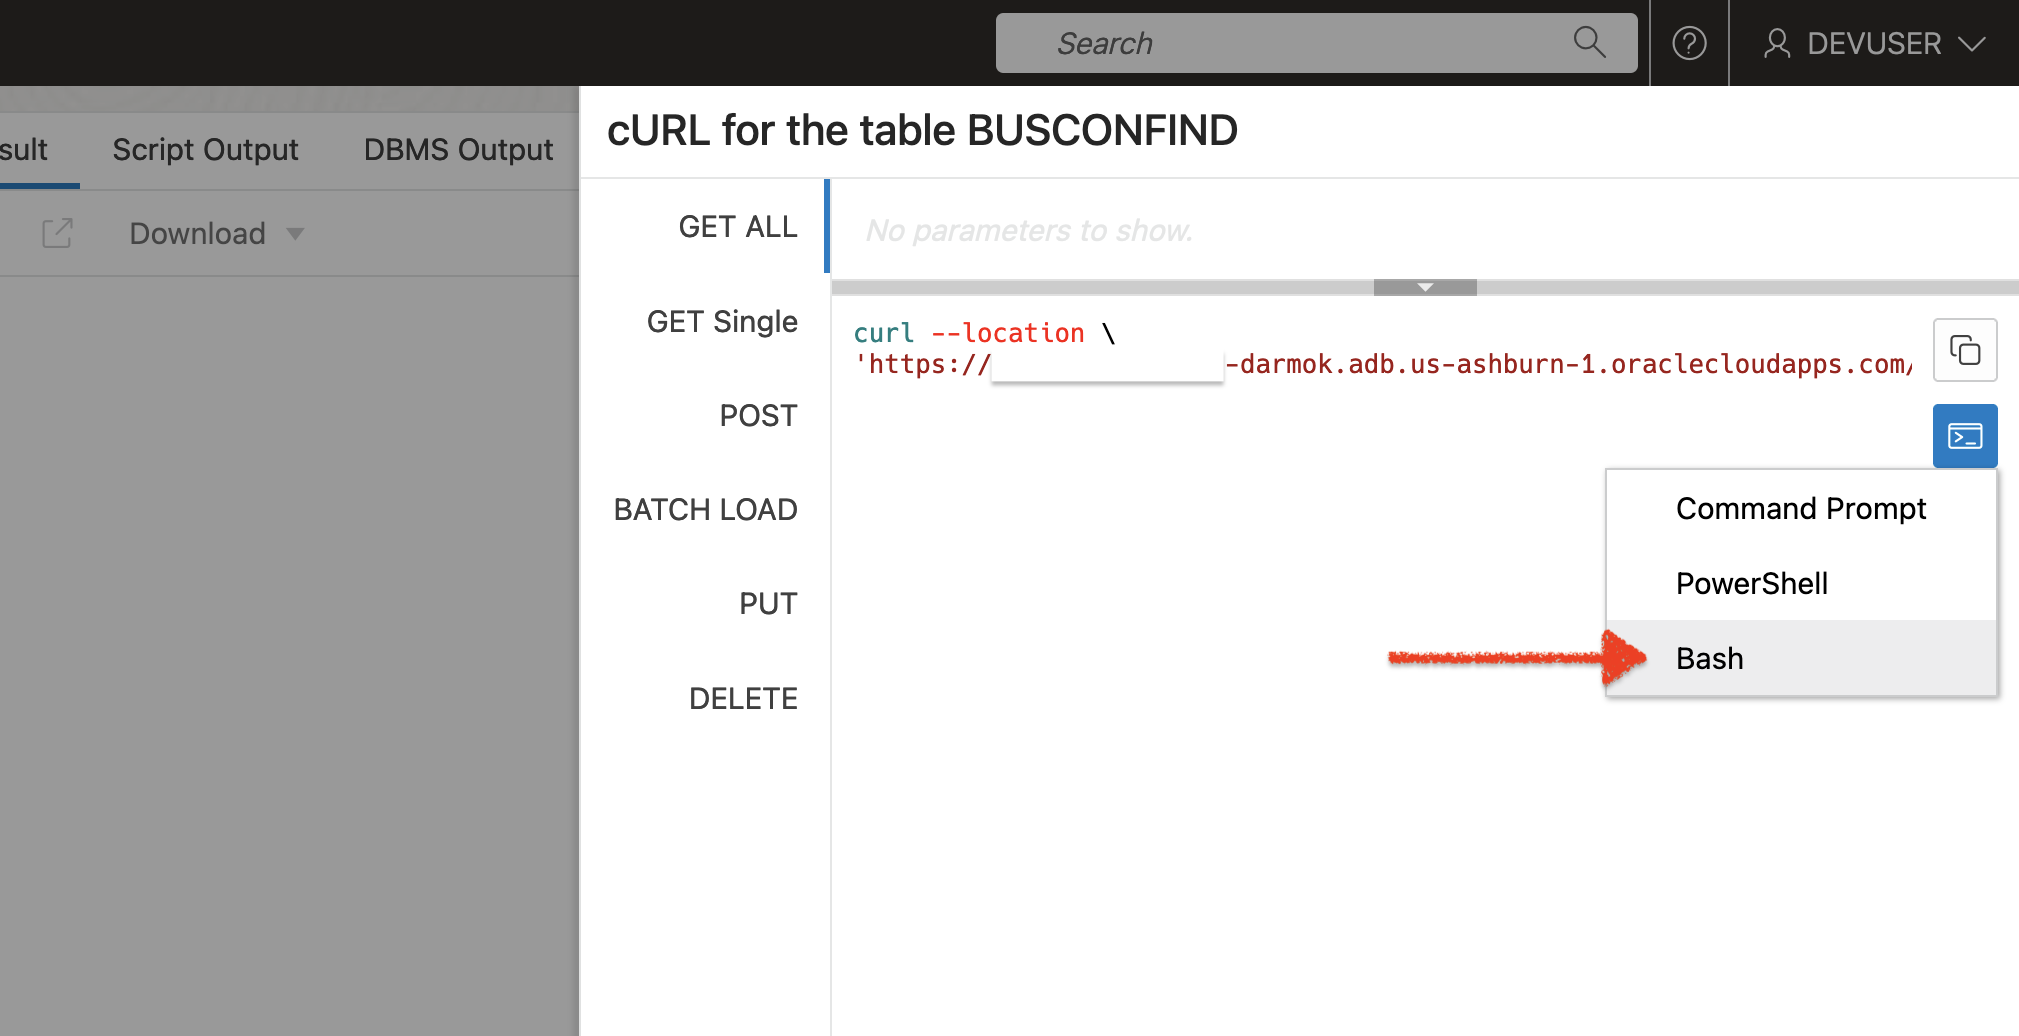
GET request for Bash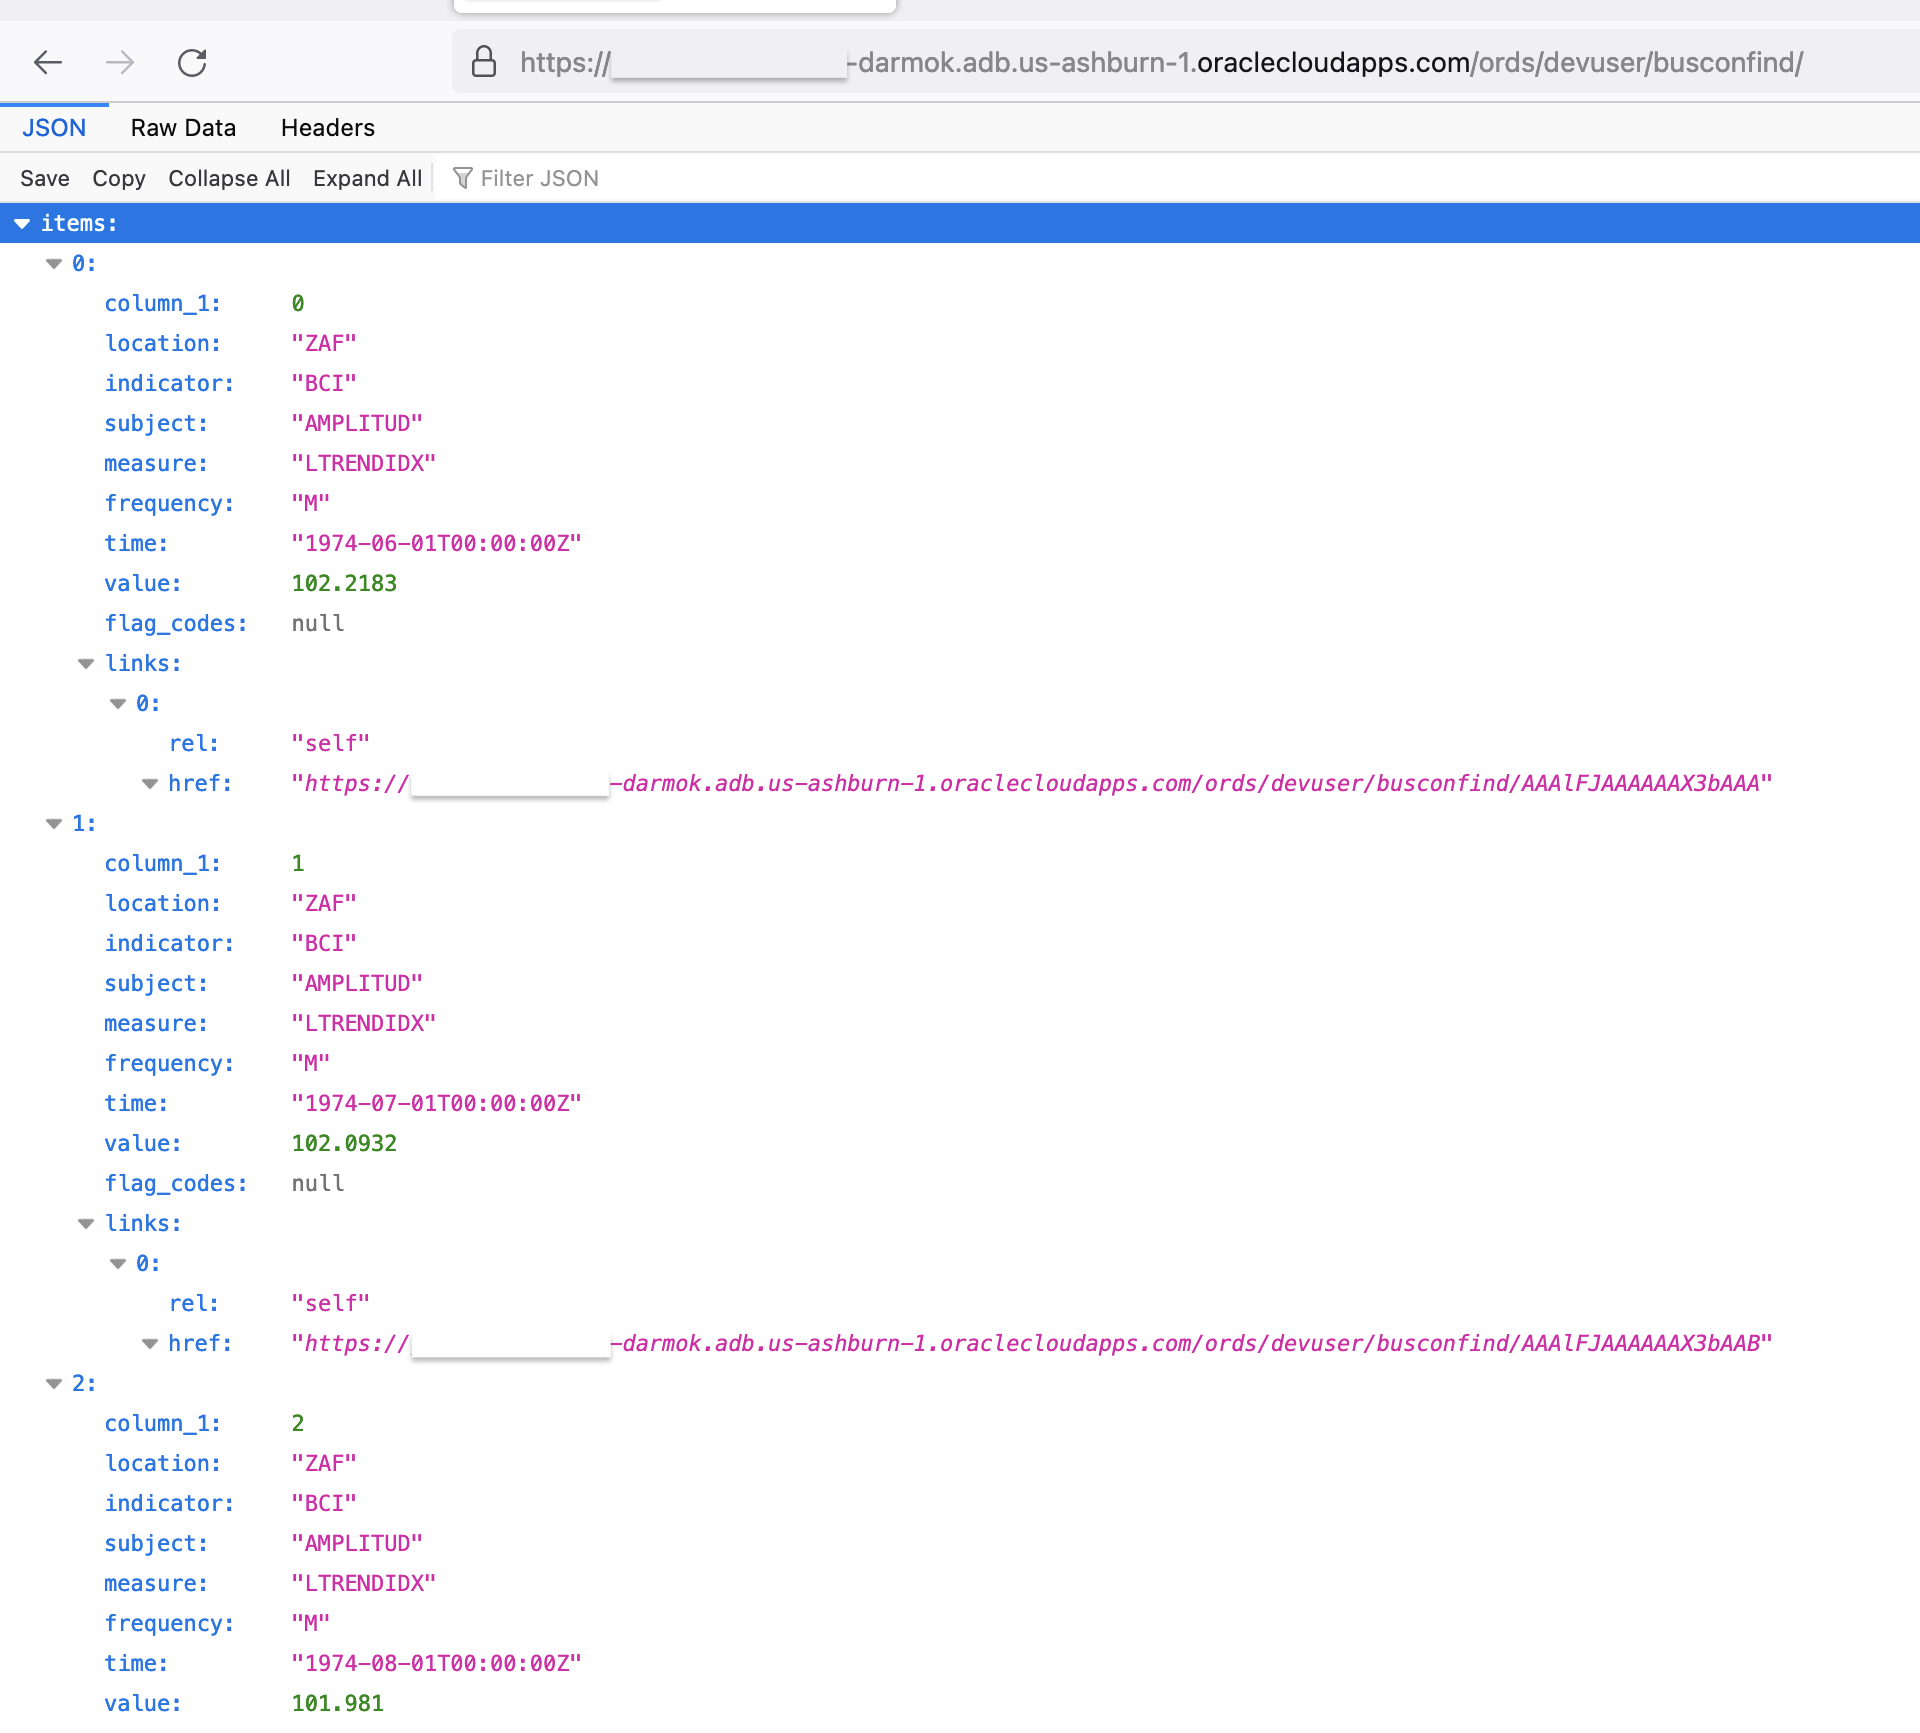
GET response in JSON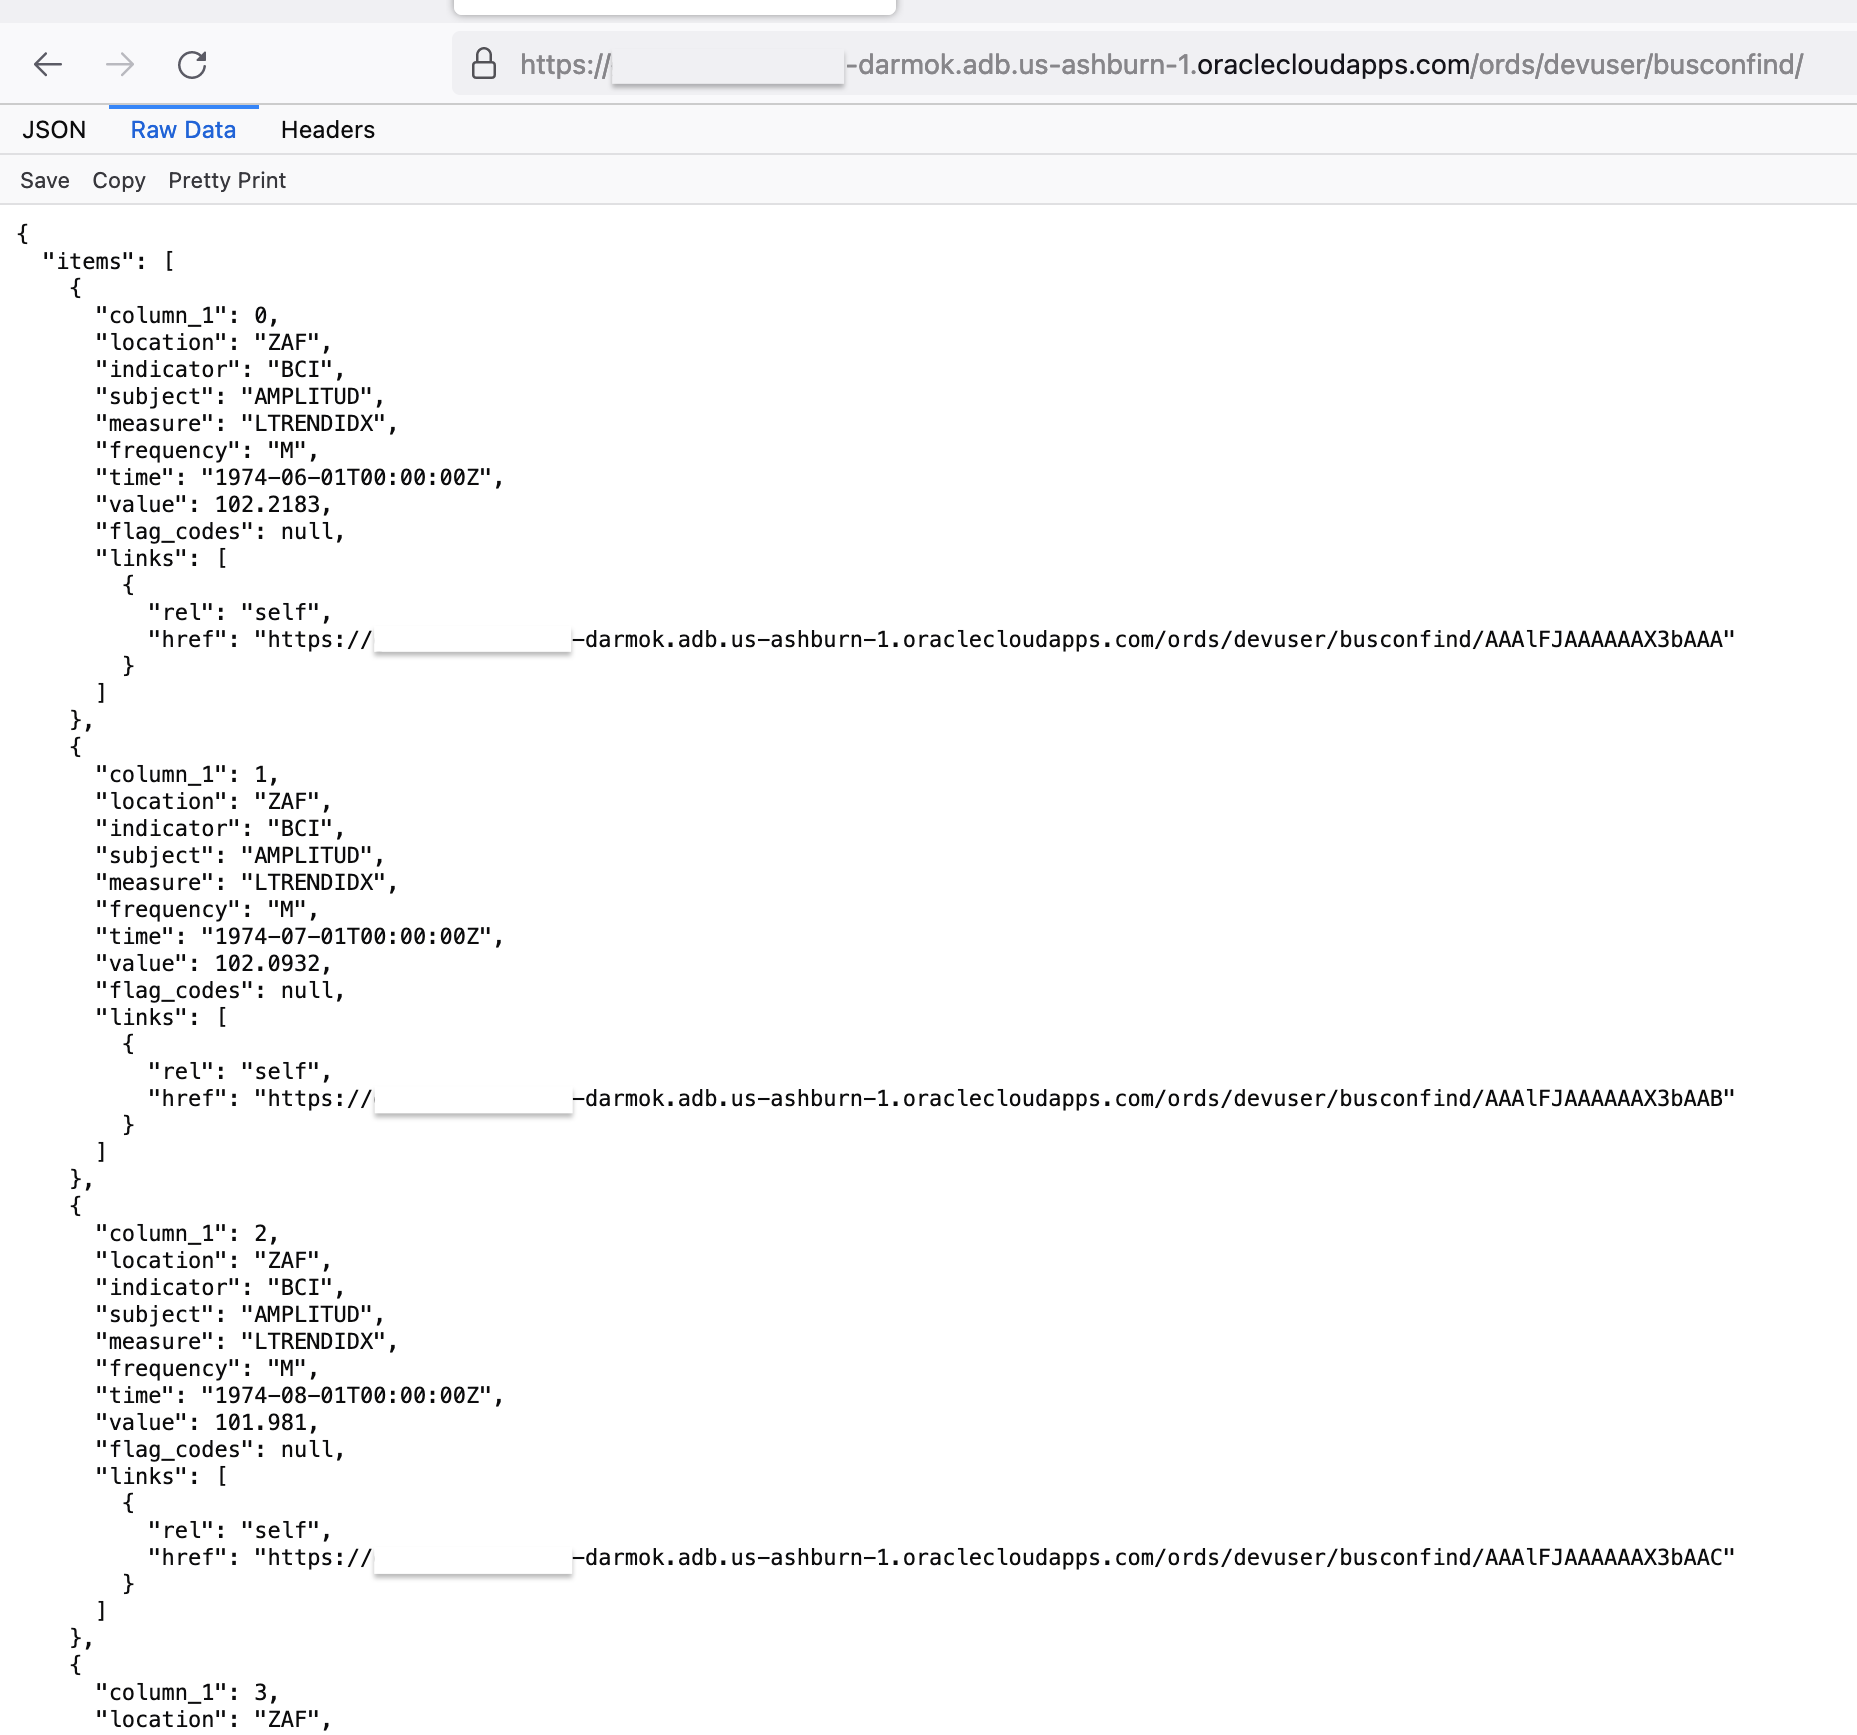
JSON, pretty printedThe code
And the code for this test2.py looks like this:
# Auto-REST enabled with ORDS; in an Oracle Autonomous Database with query parameters.

import requests
import pprint

# Importing the base URI from this python file.

from testurls import test2_url

# An unprotected endpoint that has been "switched on" with the ORDS Auto-REST enable feature.
# Query parameters can be added/passed to the Base URI for GET-ing more discrete information.

url = (test2_url + '?q={"location":"ZAF","value":{"$gt":100},"$orderby":{"value":"asc"}}}')

# For prototyping an application, in its earlier stages, this could really work. On your front end, you
# expect the user to make certain selections, and you'll still pass those as parameters.
# But here, you do this as a query string. In later stages, you may want to streamline your application
# code by placing all this into a PL/SQL or SQL statement. Thereby separating application
# logic and business logic. You'll see this approach in the test3.py file.
# This works, but you can see how it gets verbose, quick. Its a great jumping-off point.

responsefromadb = requests.get(url)
pprint.pprint(responsefromadb.json())
Lines 8 and 13 are the two areas to focus on in this example. In Line 8 imported my URL from the testurls.py file (again, abstracting it, so it’s not in the main body of the code).

test2.py and testurls.py filesAnd then, in Line 13, I appended a query string to the end of that URL. ORDS expects the query parameters to be a JSON object with the following syntax:
[ORDS Endpoint]/?q={"JSON Key": "JSON Value"}The new, complete query string below requests the same information as was requested in the test1.py example:
url = (test2_url + '?q={"location":"ZAF","value":{"$gt":100},"$orderby":{"value":"asc"}}}')This string begins with that same BASE URI for the ORDS endpoint (the auto-REST enabled BUSCONFIND table) and then applies the query string prefix “?q=” followed by the following parameters:
- Filter by the location
"ZAF" - Limit the search of these locations to values (in the
Valuecolumn) greater than ($gt) 100 - Return these results in ascending order (
asc) of theValue column
NOTE: You can manipulate the offsets and limits in the python-oracledb driver too. More info found here. And filtering in queries with ORDS can be found here.
And if I run the test2.py code in the VS Code Interactive Window, I’ll see the following summary output.
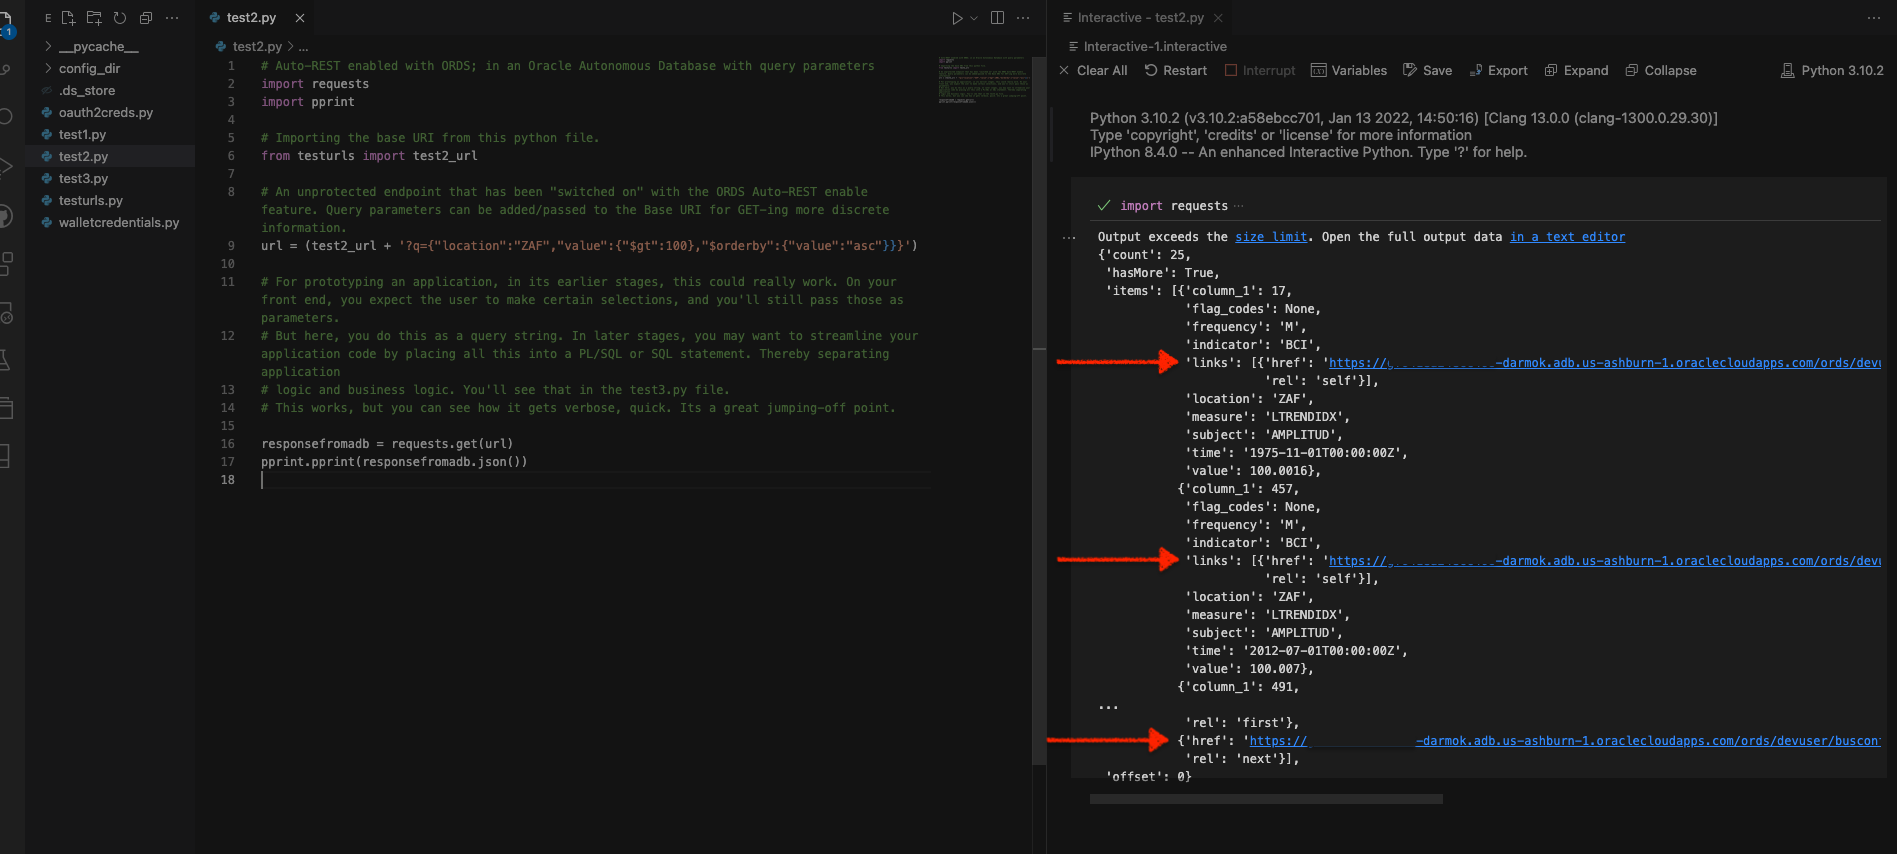
test2.pyHere is a more detailed view in the VS Code text editor:
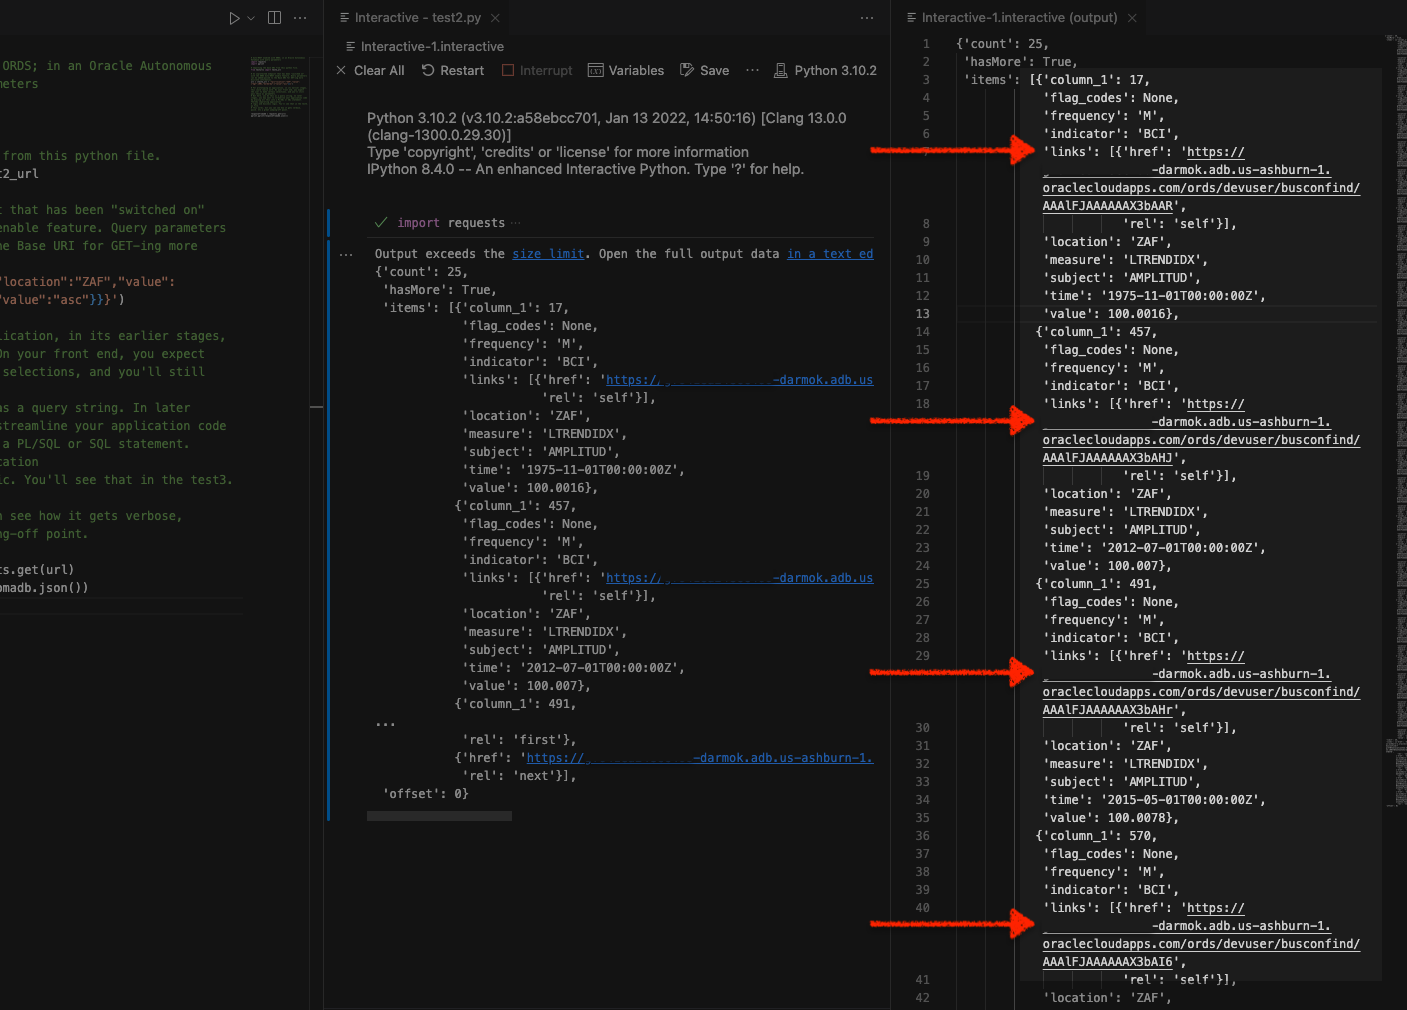
Wrap-up
A slightly different approach, right? The data is all there, similar to what you saw in the test1.py example. There are a few things to note, though:
- The consumer of this ORDS REST API doesn’t need access to the database (i.e. you don’t need to be an admin or have a schema); you can perform
GETrequests on this URI. - The response body is in JSON (ubiquitous across the web and web applications)
- Also, language and framework agnostic (the JSON can be consumed/used widely, and not just with Python)
- You are provided a URI for each item (i.e. entry, row, etc.)
- No need for SQL; just filter with the JSON query parameters
- No business logic in the application code
- Needless to say, no ORMs or database modeling is required for this approach
However…security is, ahem…nonexistent. That is a problem and flies in the face of what we recommend in our ORDS Best Practices.
Connecting via ORDS: secured with OAuth2
Note: This is an abbreviated explanation, I'll be posting an expanded write-up on this example post haste!
Since this is what I’m considering “advanced” (it’s not difficult, there are just many pieces) I’m going to keep this section brief. Long story short, I’ll take those query parameters from above and place them into what is referred to as a Resource Handler.
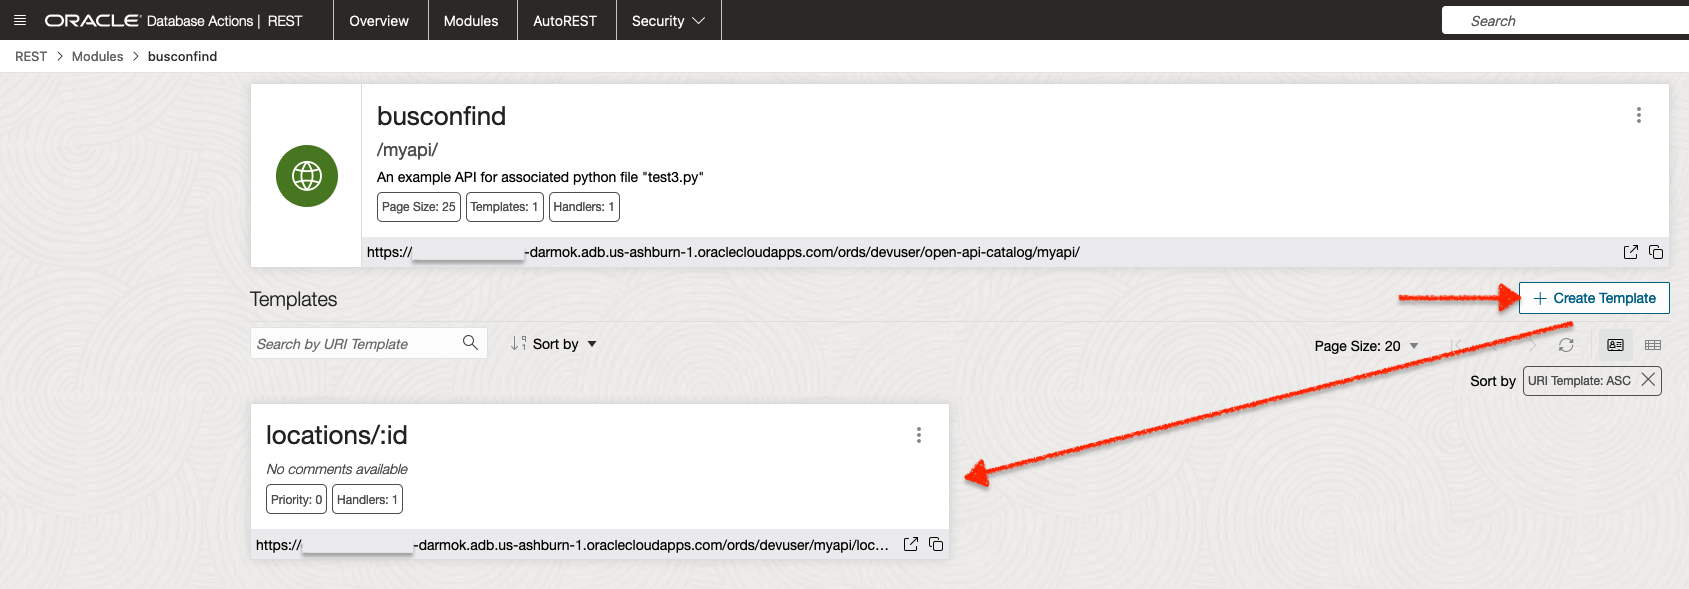
TIME-OUT: Auto-REST enabling a database object (theBUSCONFINDtable in this case) is simple in Database Actions. Its a simple left-click > REST-enable. You saw that in the previous example. You are provided an endpoint and you can use the query parameters (i.e. the JSON{key: value}pairs) to access whatever you need from that object. However, creating a custom ORDS REST endpoint is a little different. First you create a Resource Module, next a (or many) Resource Template/s, and then a (or many) Resource Handler/s. In that Resource Handler, you'll find the related business logic code for that particular HTTP operation (the menu includes:GET,POST,PUT, andDELETE).
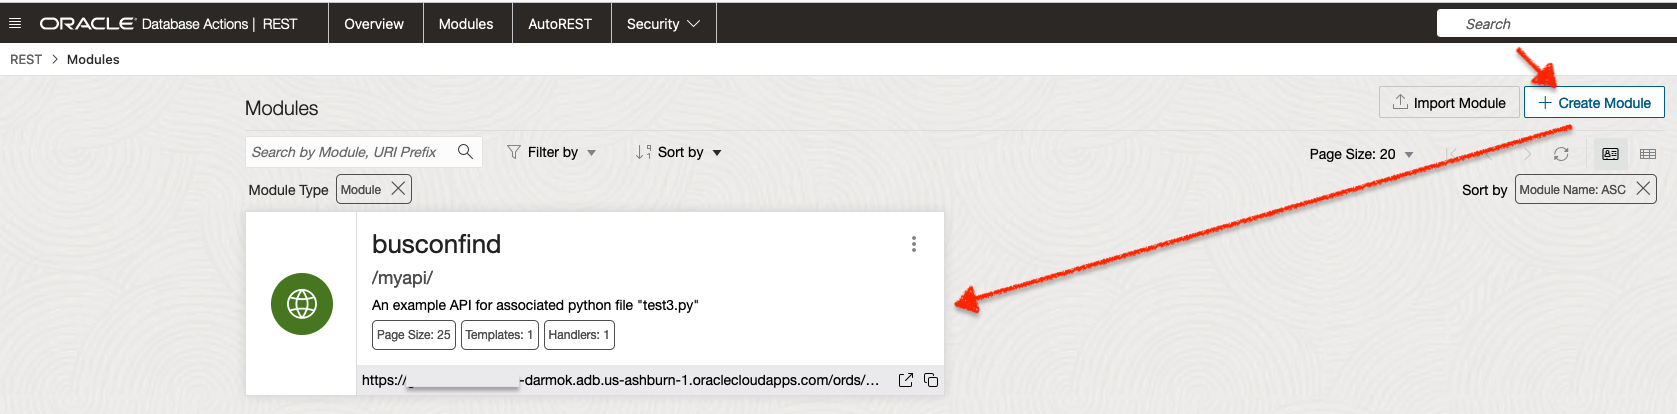
The Resource Module
The process of creating a custom ORDS API might be difficult to visualize, so I’ll include the steps I took along with a sample query (in that Resource Handler) to help illustrate.
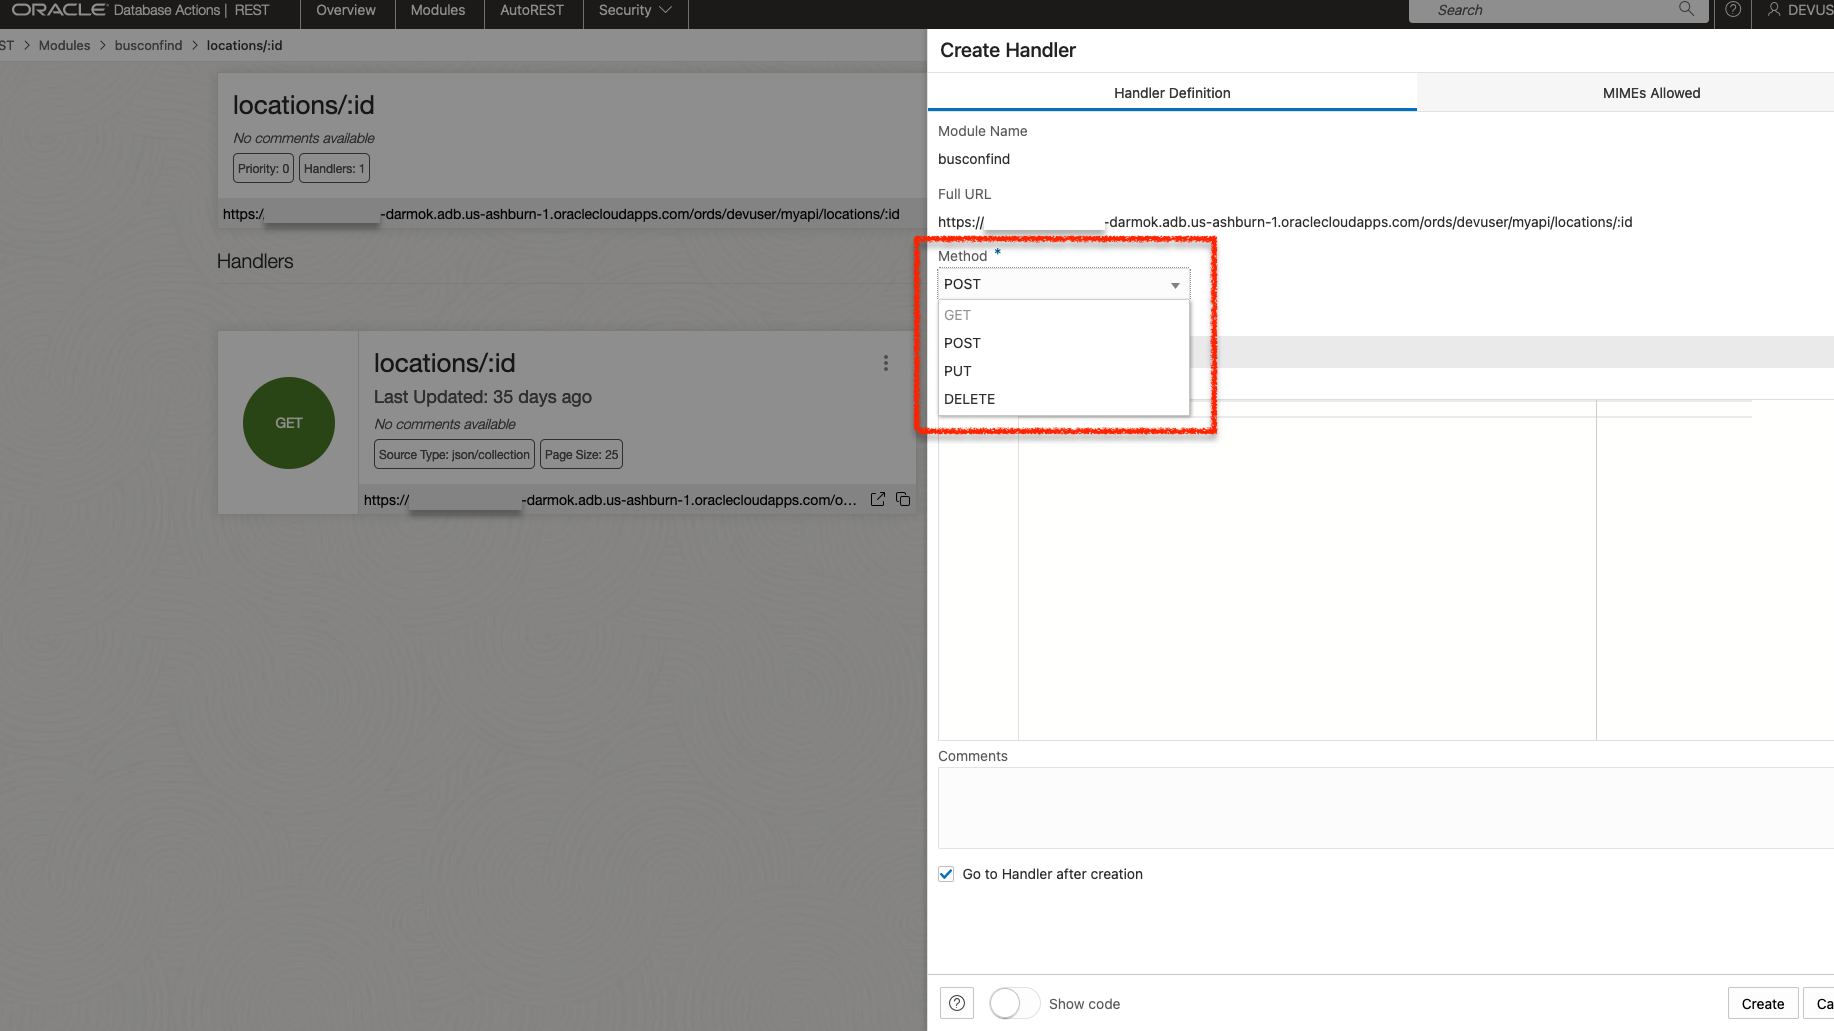
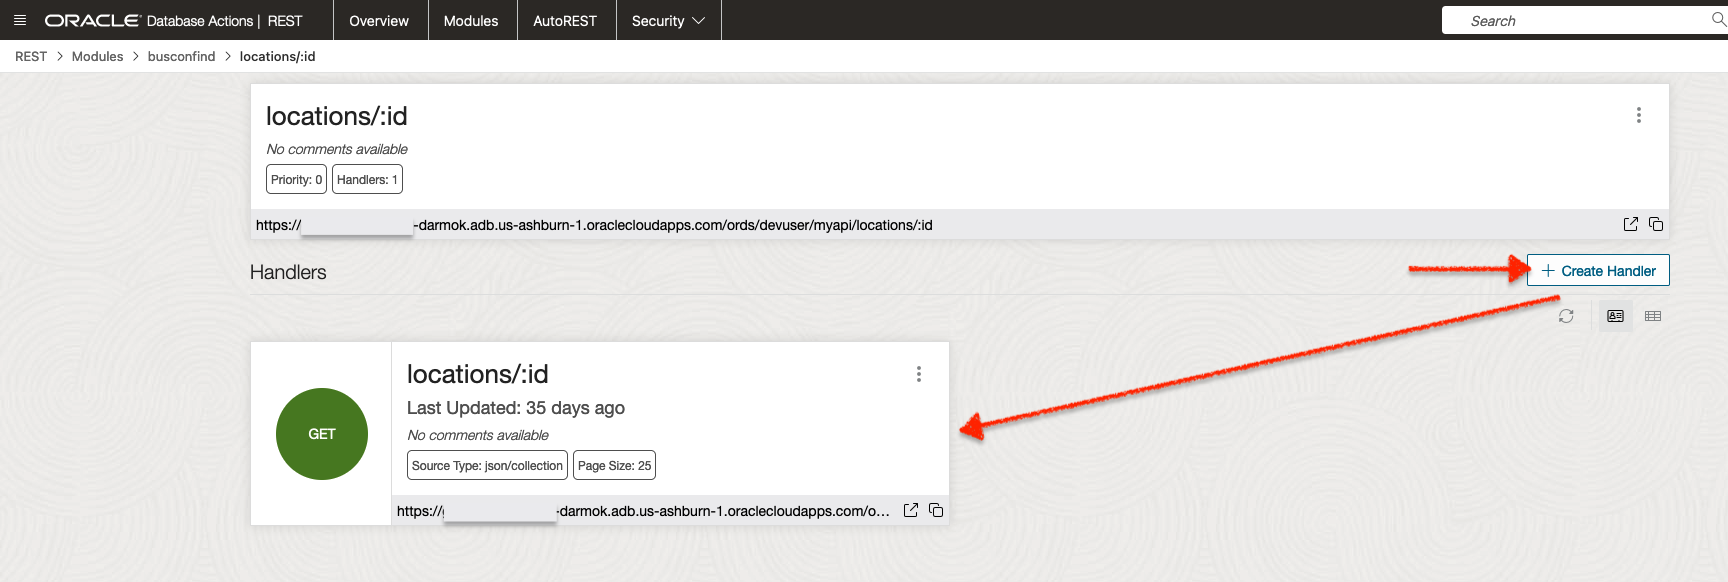
GET Handler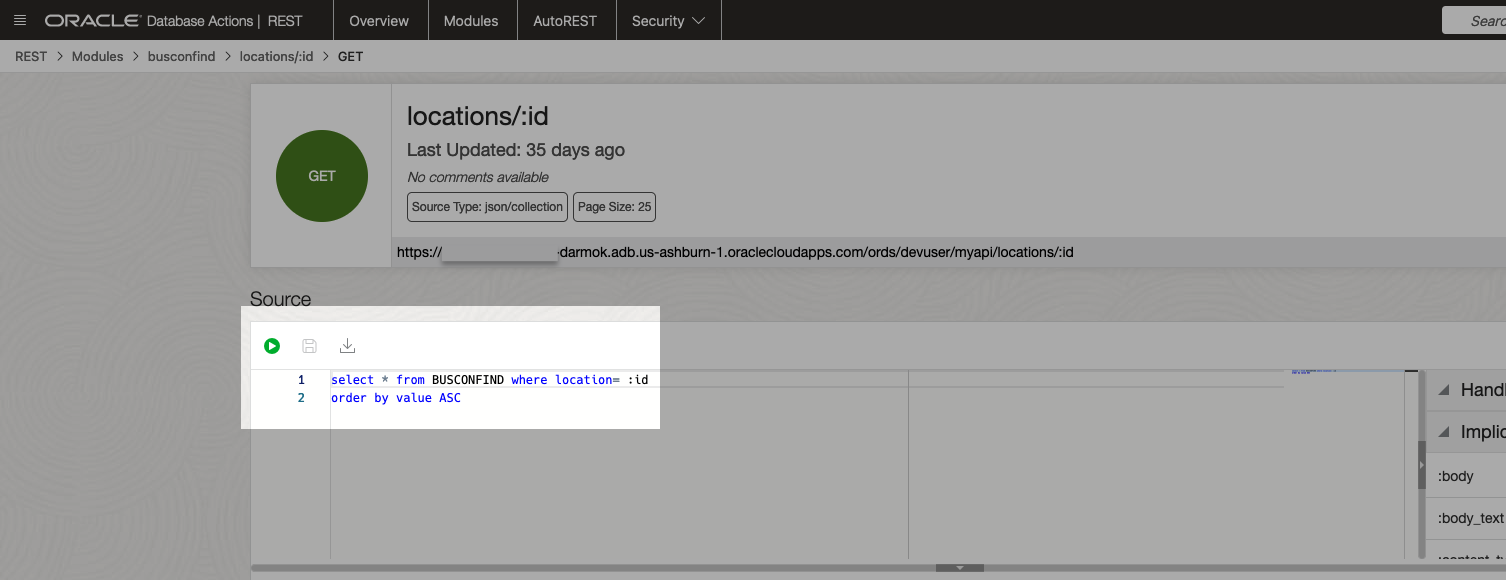
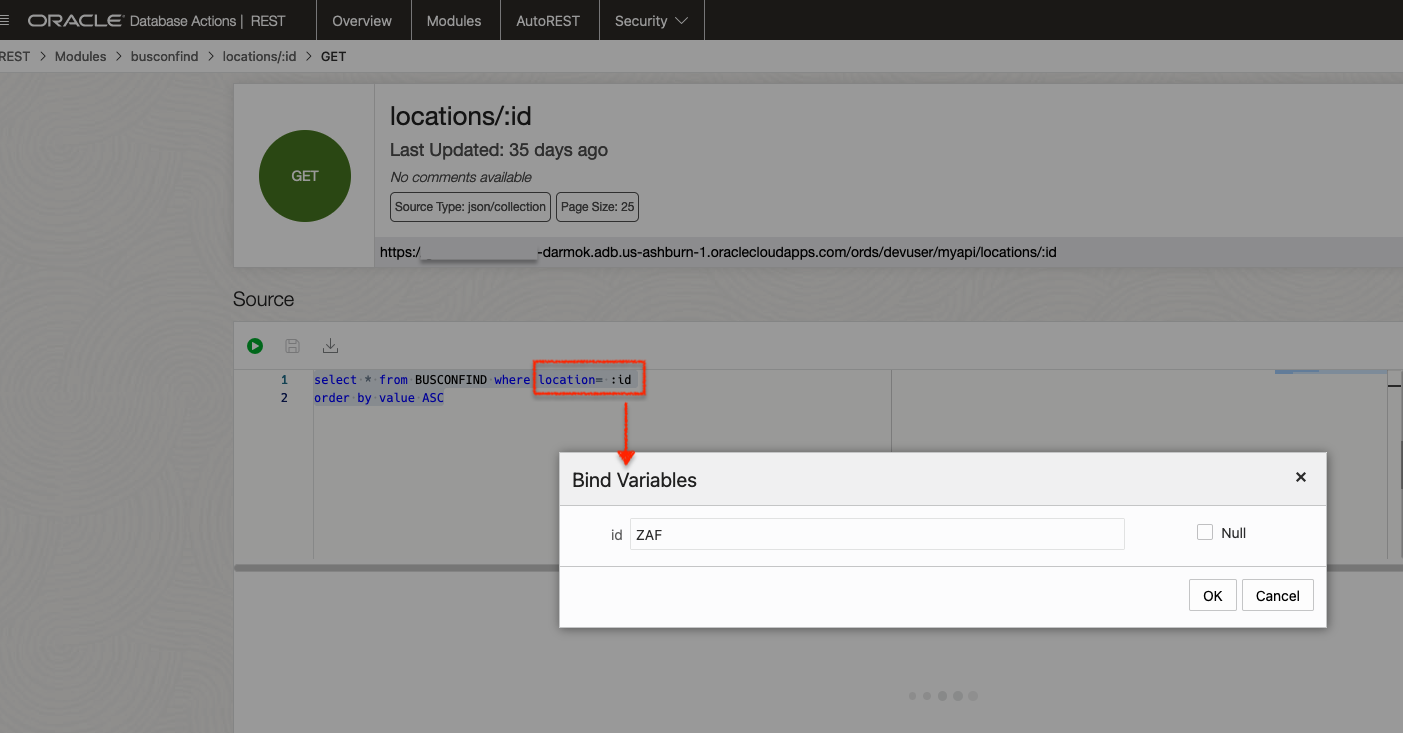
"ZAF" as the location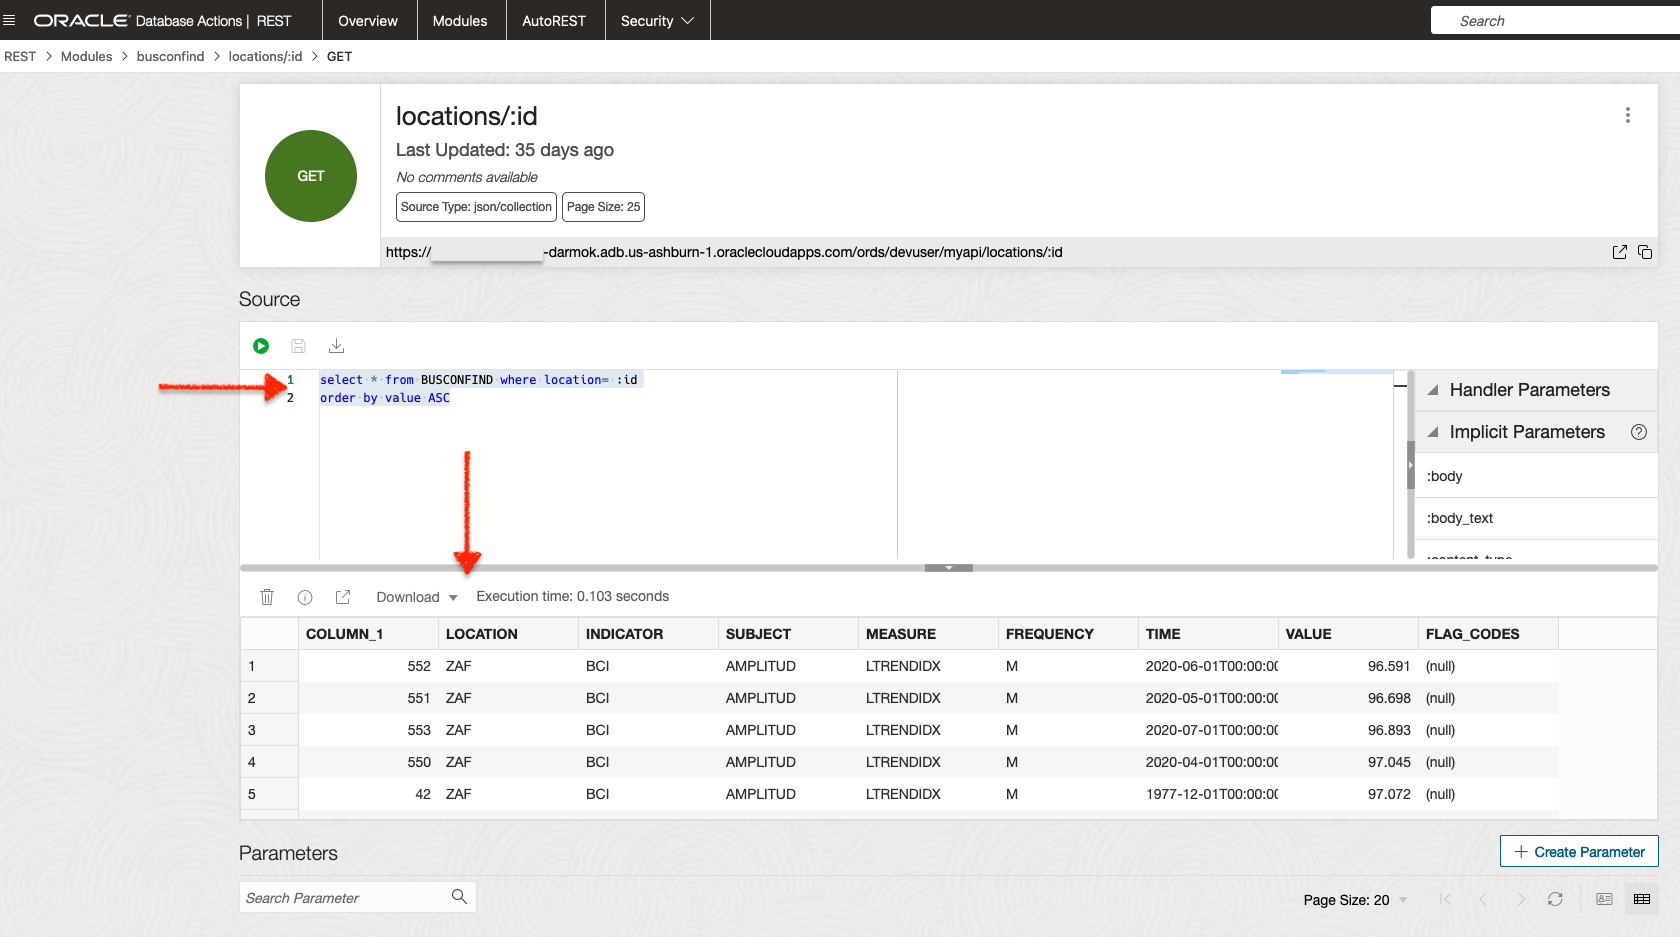
Chances are you may be the administrator of your Always Free tenancy, so you have full control over this. Other times, you might be provided the REST endpoint. In that case, you may not ever have to worry about these steps. Either way, you can see how we’re simulating (as well as both abstracting and keeping the business logic in the database) the query with this final example (test3.py).
Security
The OAuth 2.0 authorization framework enables a third-party application to obtain limited access to an HTTP service, either on behalf of a resource owner by orchestrating an approval interaction between the resource owner and the HTTP service, or by allowing the third-party application to obtain access on its own behalf.
RFC 6749: The OAuth 2.0 Authorization Framework
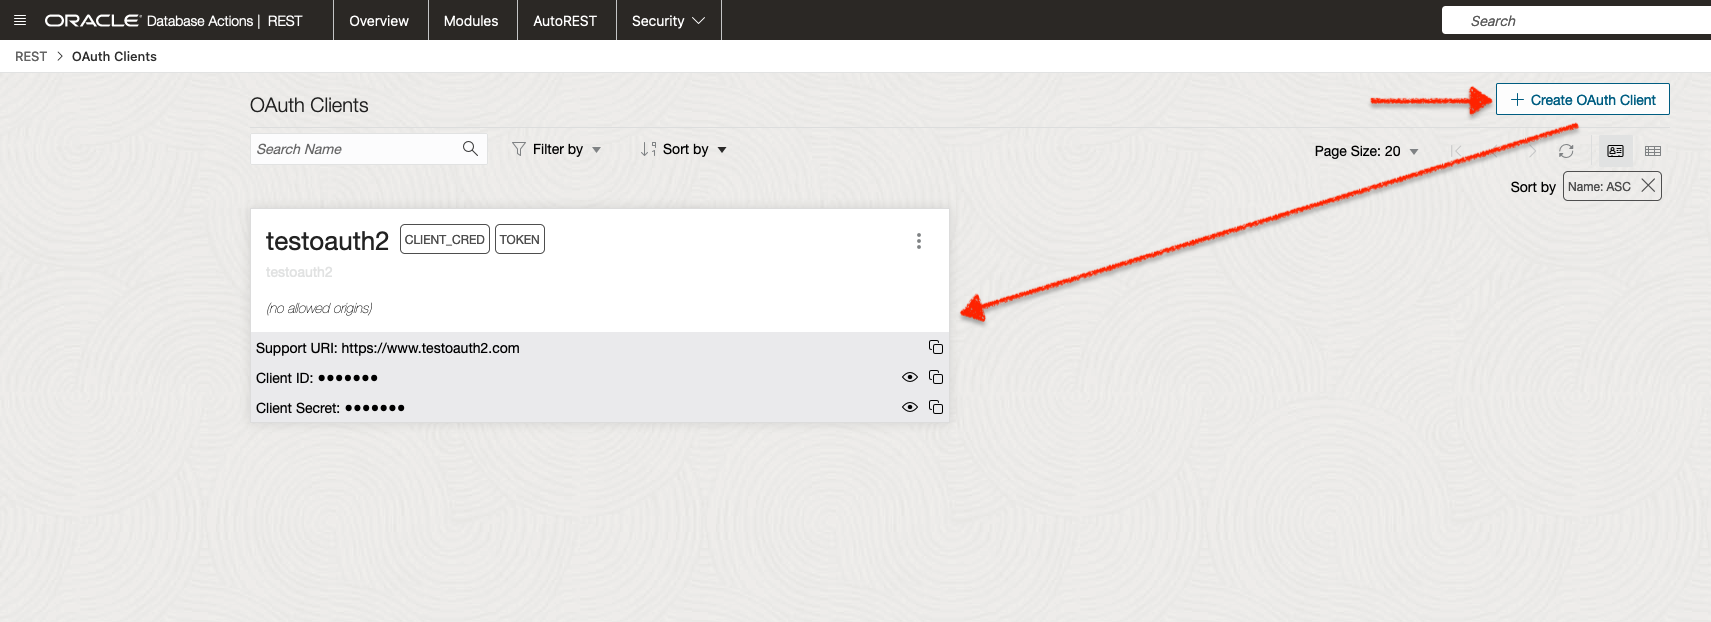
I’ll keep this section brief, but I’m protecting this resource through the aid of an ORDS OAuth2.0 client. I’ve created one here:

And, as you’ll see shortly, I’ll rely on some Python libraries for requesting an Authorization Token to use with the related Client ID and Client Secret. If you want to nerd out on the OAuth2.0 framework, I challenge you to read this.
test3.py example
NOTE: Remember, I'm keeping this section intentionally brief. It deserves a slightly deeper dive, and class is almost over (so I'm running out of time).
The code for this example:
# Custom ORDS Module in an Oracle Autonomous Database.
import requests
from requests_oauthlib import OAuth2Session
from oauthlib.oauth2 import BackendApplicationClient
import pprint
import json
# Importing the base URI from this python file.
from testurls import test3_url
# A separate python file I created and later import here. It contains my credentials,
# so as not to show them in this script here.
from oauth2creds import token_url, client_id, client_secret
token_url = token_url
client_id = client_id
client_secret = client_secret
client = BackendApplicationClient(client_id=client_id)
oauth = OAuth2Session(client=client)
token = oauth.fetch_token(token_url, client_id=client_id, client_secret=client_secret)
bearer_token = token['access_token']
# Location can be anything from the table. Now, only the single variable needs to be passed. Business logic has been abstracted somewhat; as it now resides within
# ORDS. This could make your application more portable (to other languages and frameworks, since there are fewer idiosyncracies and dependencies):
location = "ZAF"
# print(location)
# ------------------------------------------------------------------------------ #
# In Database Actions, we:
# 1. Create an API Module
# 2. Then create a Resource Template
# 3. Finally, a GET Resource Handler that consists of the code from test1.py:
# select * from BUSCONFIND where location= :id
# order by value ASC
# ------------------------------------------------------------------------------ #
url = (test3_url + location)
# print(url)
responsefromadb = requests.get(url, headers={'Authorization': 'Bearer ' + bearer_token}).json()
# This step isn't necessary; it simply prints out the JSON response object in a more readable format.
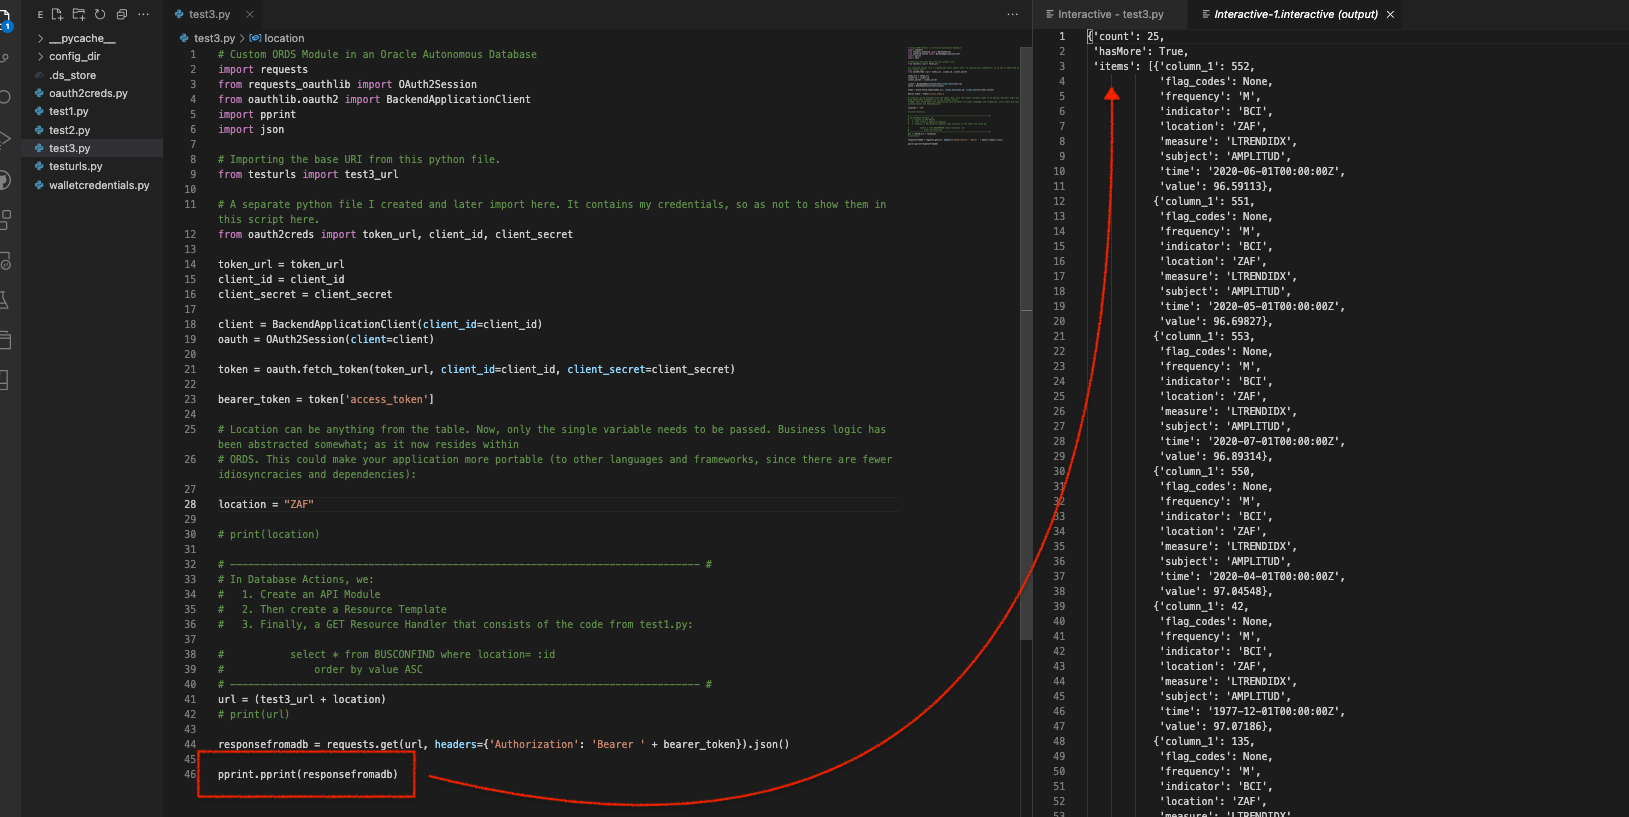
pprint.pprint(responsefromadb)Lines 11 and 16 deserve some attention here. The URL for Line 11 comes from the testurls.py file; seen in the previous example. And the contents from Line 16 come from the oauth2creds.py file. Here are the files, side-by-side:
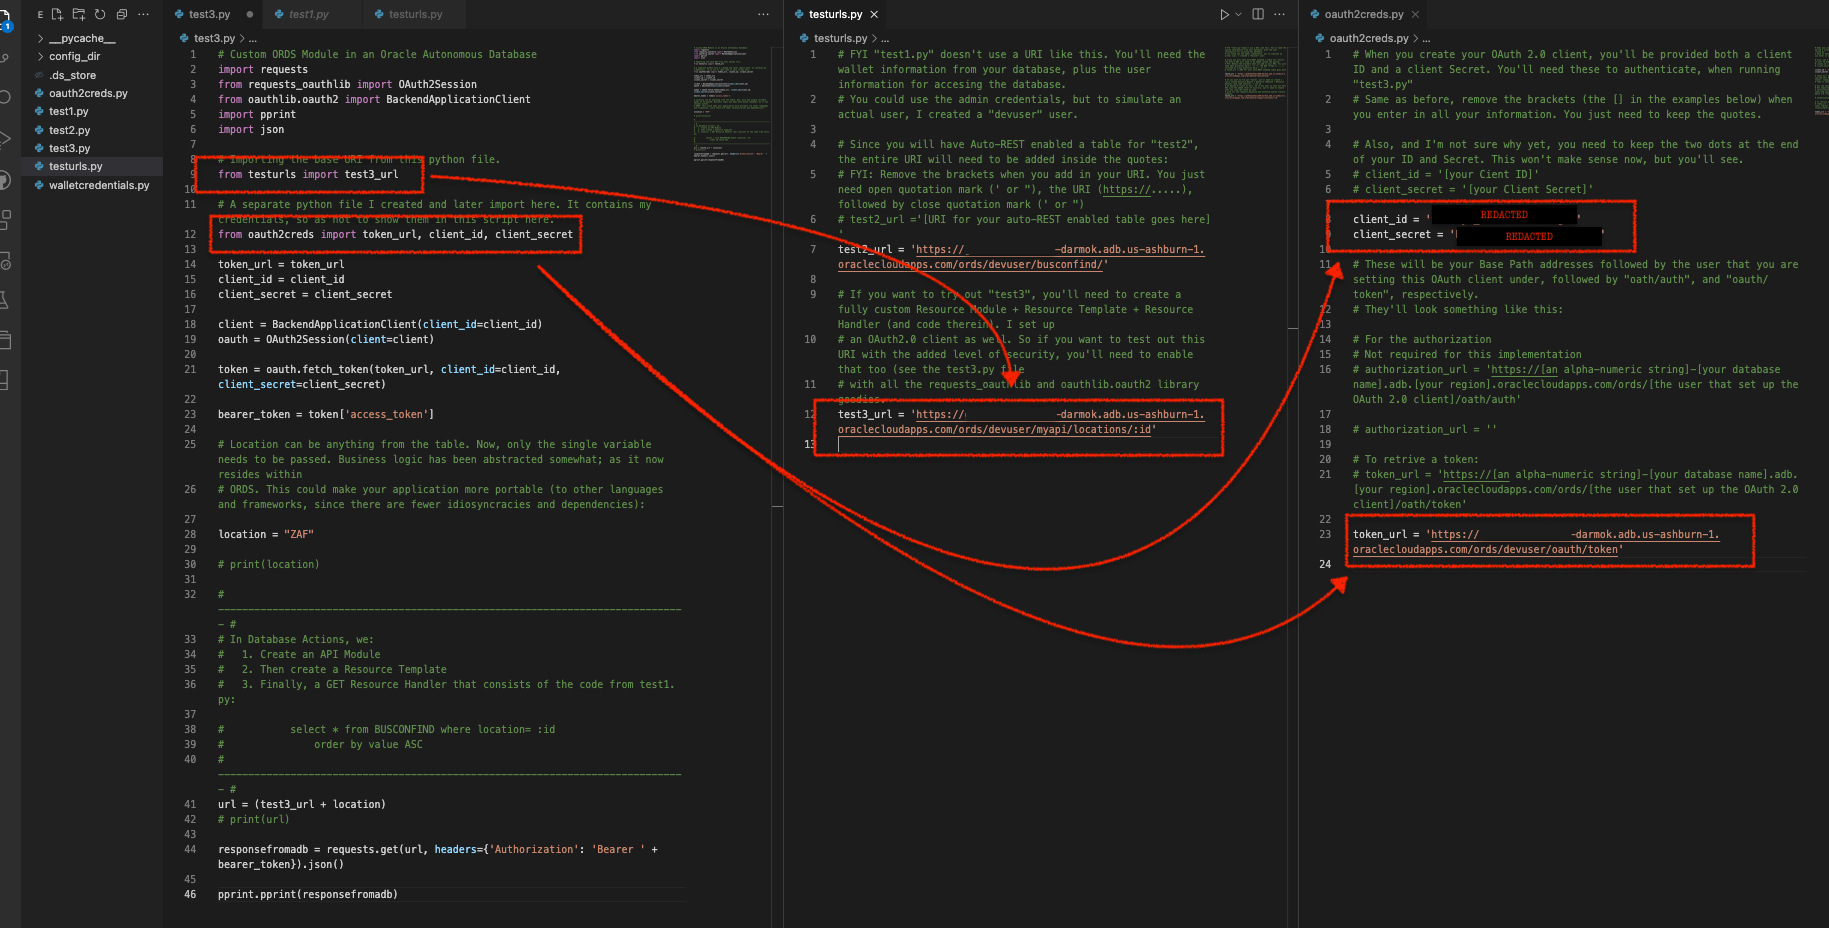
test3.py, testurls.py, and oauth2creds.py filesAs you can see in the testurls.py file, I’m relying on the test3_url for this example. And the OAuth2.0 information you see comes directly from the OAuth Client I created in Database Actions:
If I put that all together, I can execute the code in test3.py and “pretty print” the response in my Interactive Window. But first I need to adjust the Resource Handler’s URI (the one I copied and pasted from the “REST Workshop”). It retains the “:id” bind parameter. But the way I have this Python code set up, I need to remove it. It ends up going from this:
test3_url = 'https://test3_url = 'https://abc123def456ghi789-darmok.adb.us-ashburn-1.oraclecloudapps.com/ords/devuser/myapi/locations/:id'To this:
test3_url = 'https://abc123def456ghi789-darmok.adb.us-ashburn-1.oraclecloudapps.com/ords/devuser/myapi/locations/'Otherwise, if I don’t remove that bind parameter when the code executes, the target URL will end up looking like this:
'https://abc123def456ghi789-darmok.adb.us-ashburn-1.oraclecloudapps.com/ords/devuser/myapi/locations/:idZAF'With that out of the way, I can run this code and review the output.
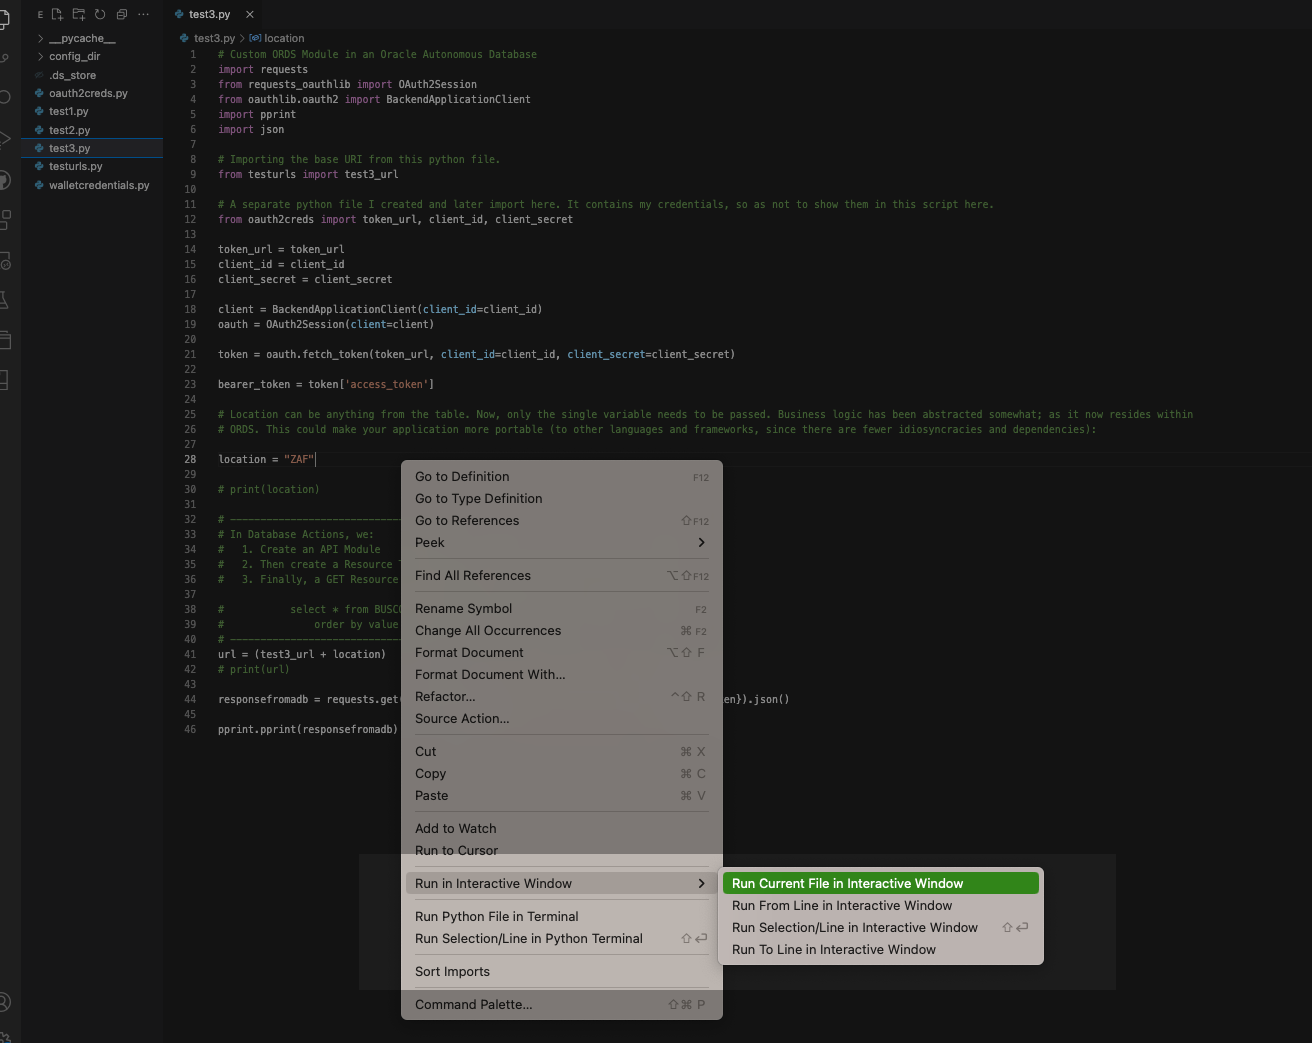
test3.py code in the Interactive Window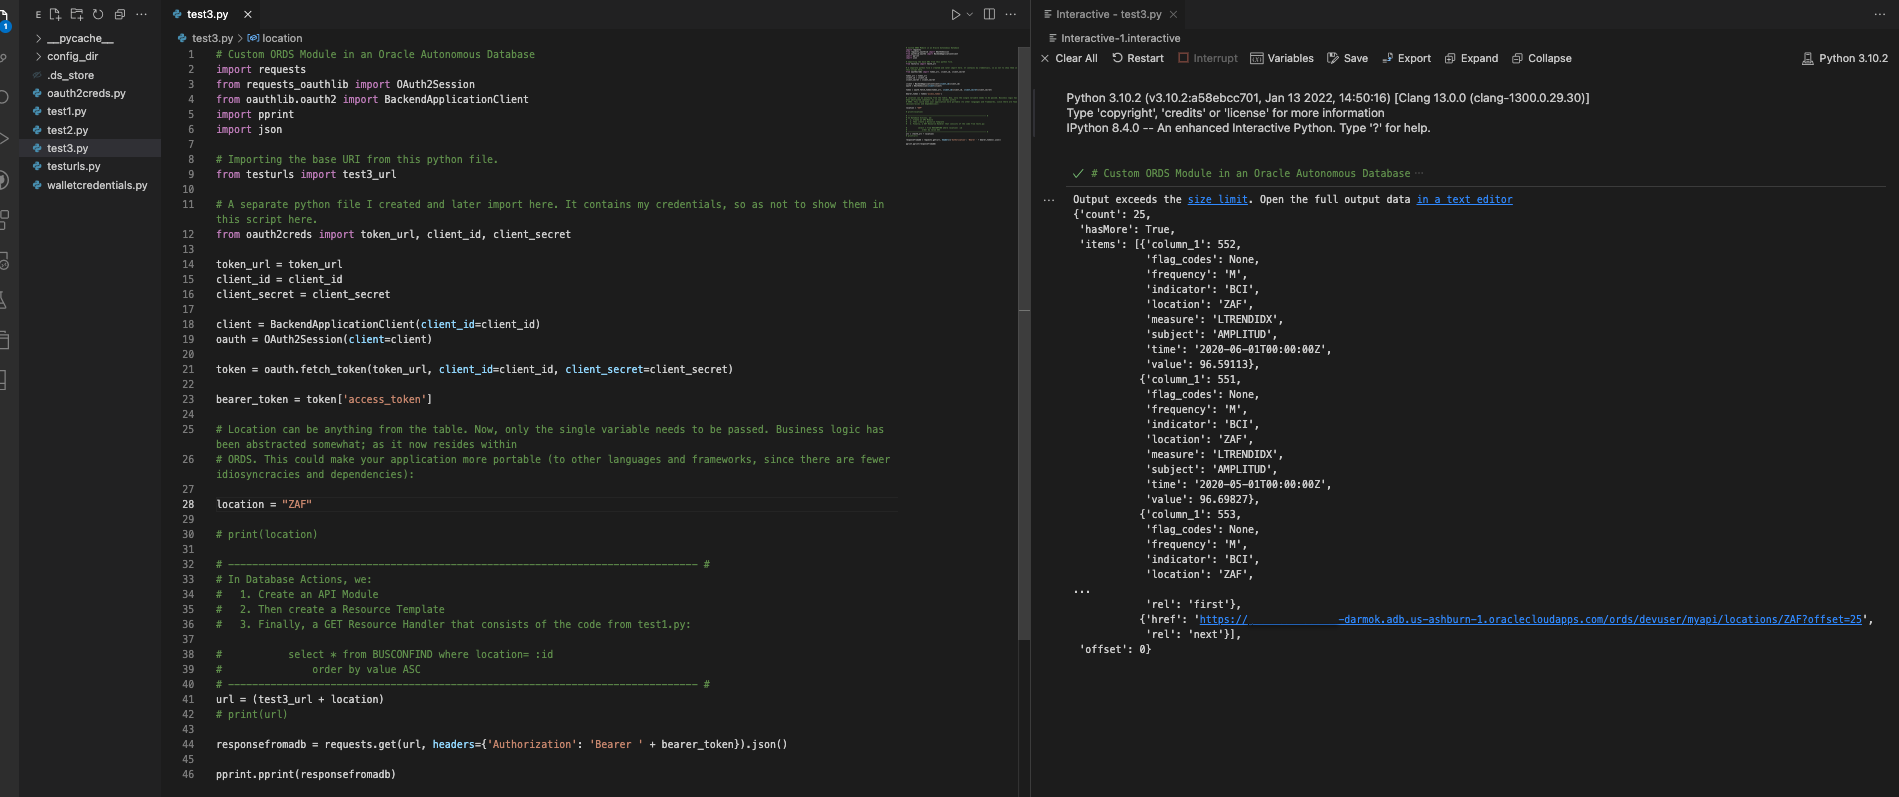
items“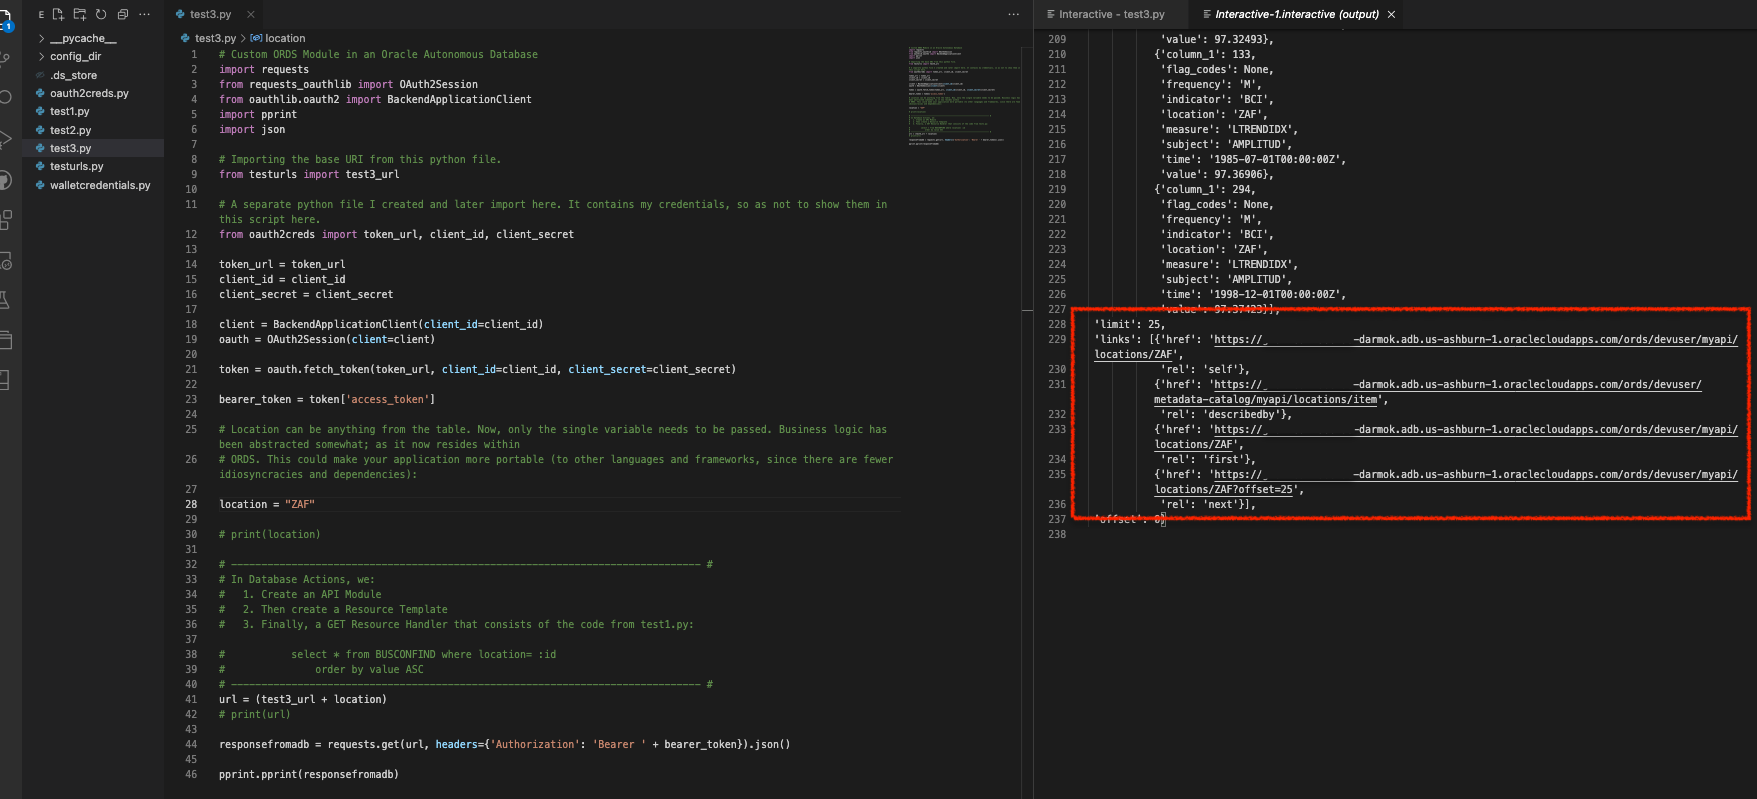
GET response body to see the available links for additional itemsFrom top-to-bottom, left-to-right you’ll see I first execute the code in the Interactive Window. From there I can review a summary of the response to my GET request. That pretty print library allows us to see the JSON array in a more readable format (one that has indentation and nesting); which you can see in the second image. The third image is a more detailed view of the first half of this response. And I include the final image to highlight the helpful URLs that are included in the response body.
Since I know my limit = 25, and the 'hasMore': True (seen in the output in that third image) exists, I know there are more items. You can adjust the limit and offset in subsequent requests, but I’ll save that for another day.
Wrap-up
You can probably tell, but this is like an expansion of the previous example. But instead of relying on the auto-REST enabling, you are in full control of the Resource Module. And while you don’t need to use OAuth2.0 it’s good practice to use it for database authentication. You can see how the response comes through a little differently, compared to the previous example, but still very similar.
In this example, I did all the work, but that might not be the case for you; much of it might be handled for you. The main thing I like about this example is that we rely on stable and popular Python libraries: requests, requests_oauthlib, and oautlib.
The fact that this is delivered as a JSON object is helpful as well (for the same reasons mentioned in the second example). And finally, I enjoy the fact that you only need to pass a single parameter from your (assumed) presentation layer to your application layer; an example might be a selection from an HTML form or drop-down menu item.
The end
We’re at the end of this fun little exercise. As I mentioned before, I will expand on this third example. There are so many steps, and I think it would be helpful for people to see a more detailed walk-through.
And be on the lookout (BOLO) for a video. There’s no way around this, but a video needs to accompany this post.
And finally, you can find all the code I review in this post in my new “blogs” repository on GitHub. I encourage you to clone, fork, spoon, ladle, knife, etc…
Oh and…
Leave a Reply