Containers are kind of like terrariums.
Table of Contents
Click a link to jump straight to that section.
- Intro to Podman
- What I am trying to do
- Getting all the prerequisites
- Installing Podman Part 1
- Resolving X-code (xcrun) problems
- Installing Podman Part 2
- Exploring the Oracle Container Registry
- Getting to know the container
- Reviewing container custom configurations
- Attempting to understand ports
- Starting the Podman Linux VM
- Reviewing database logs
- Changing the default password
- Logging on with SQLcl
- Creating, loading a new table
- SQL query on the new table
- About data persisting in Podman
- Dénouement
Intro to Podman, man
What is Podman?
Podman is a daemonless container engine for developing, managing, and running OCI Containers on your Linux System. Containers can either be run as root or in rootless mode. Simply put: alias docker=podman.
the deets
I’ve spent the past couple of weeks setting up Podman to work on my MacBook.
I really wanted to take advantage of our Oracle Container Registry. While, we have several containers, the one I’m most interested in is the [Ace] freely available Oracle Enterprise Database version 21.3.0.0.
FYI: It can be found in the Database containers category.
I wanted to learn more about containers while also connecting locally (i.e., from my MacBook) via SQLcl to said container. In that scenario, as far as my computer thinks, the container is a production database running elsewhere in the world. Oh, and I’m using Podman instead of Docker to do all this.
A summary of what I intend to do
In short, wanted to:
- provision a database inside a container
- be able to start and stop it at will, and
- be able to connect to it with various Oracle database tools
I began this exercise with SQLcl since it was used in one of my recent posts. But as a follow-on to this article, I’d like to install ORDS on my local computer and then connect again but with ORDS joining the party. But that’s for another time.
Let’s make ah the pizza
But before connecting to this container, you’ll need a lot of prerequisites. As far as “ingredients” go, you’ll need the following:
- Homebrew installed and updated. (If you need to do this, review my recent article for instructions.)
- Podman installed and updated
- Apple X-Code Command Line Tools updated (this is tricky, so check my notes below)
- SQLcl (you can review the installation steps here)
- A sample CSV file (The subject doesn’t matter; I grabbed one from Kaggle – “IMDb’s Top 100 Movies“)
The setup before the setup
Since this was such a huge PITA, I’m going to walk through all the steps I took to make Podman work on my MacBook. I’ve done this about ten times so far to make sure I’m clearly explaining every step I took.
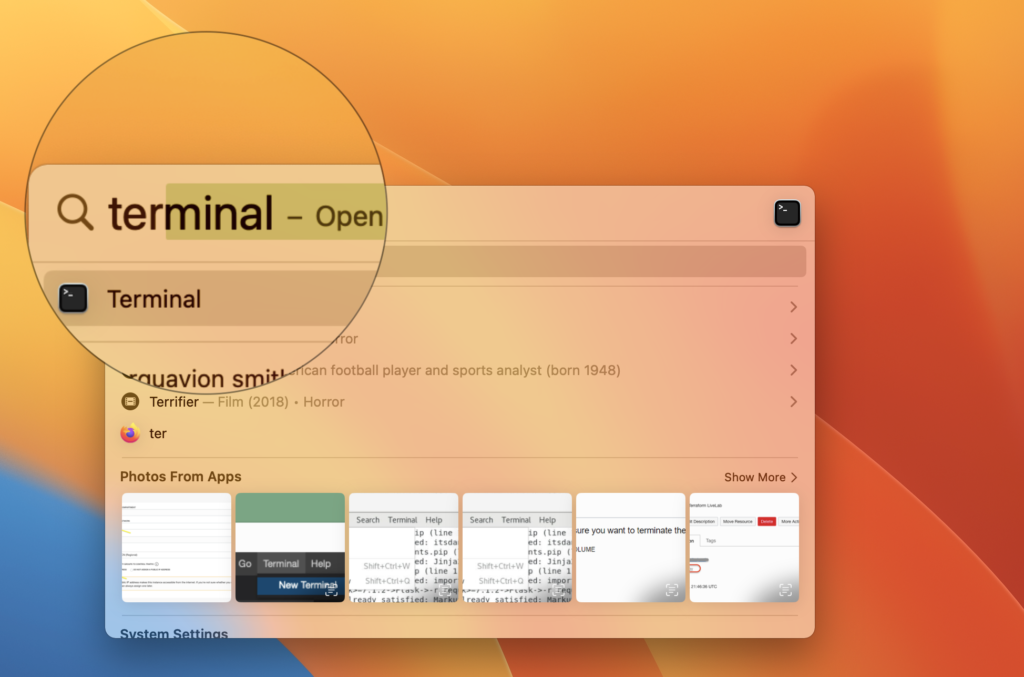
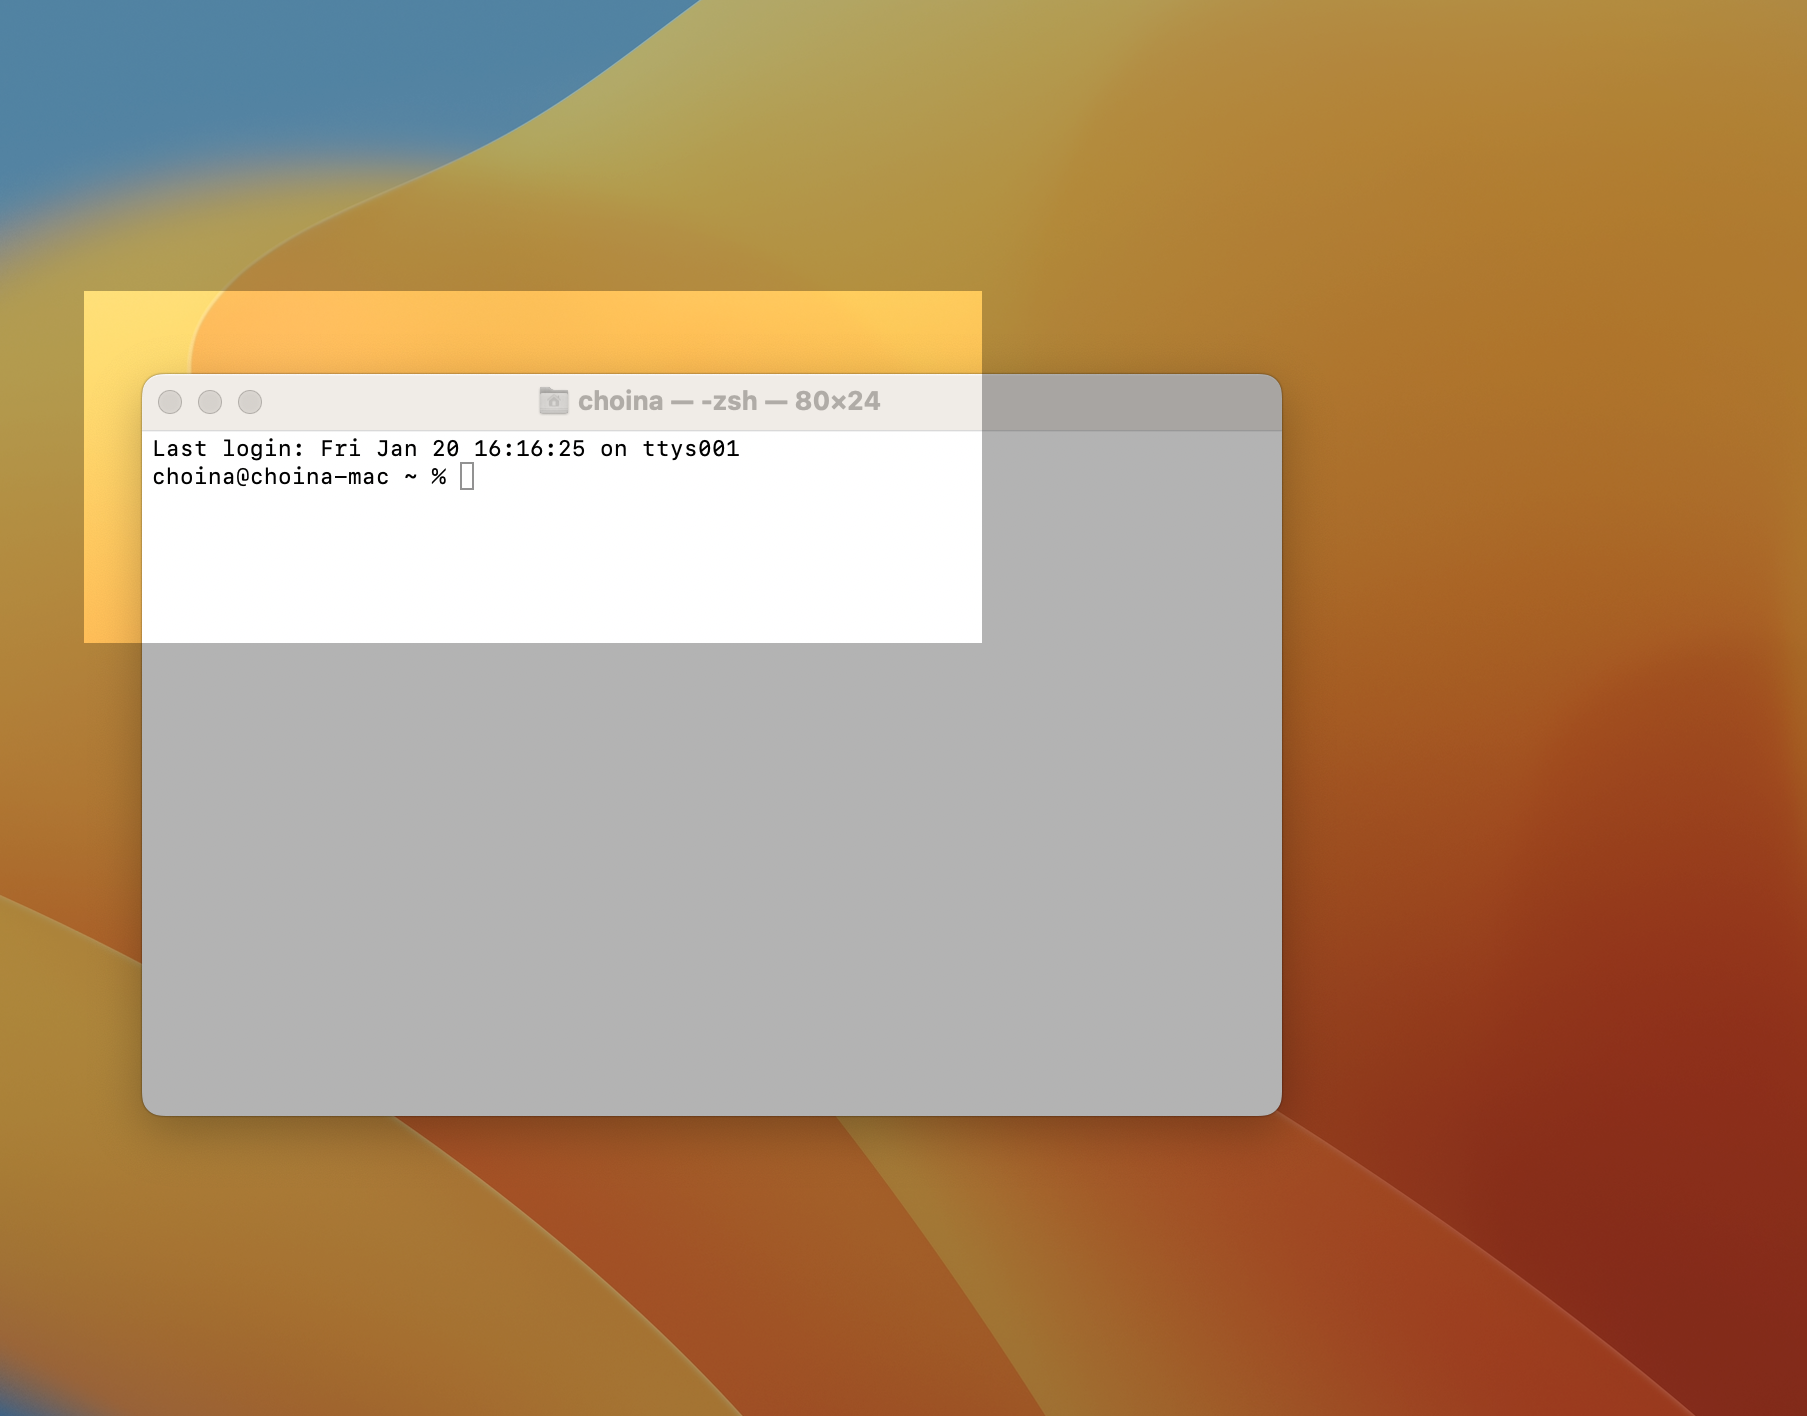
I first opened up a new Terminal session using Spotlight (Left Command + Spacebar). Once in Spotlight, I searched for “terminal” and then hit enter. A new Terminal window will appear.

From there, I reviewed Homebrew using the brew list command. If you’re following along, you’ll see a list similar to mine, depending on what you have installed.

Attempting to install Podman on Mac
The next part is easy. I installed Podman with the following command: brew install podman. Homebrew will run through an auto-update, and eventually, Podman will begin installing.
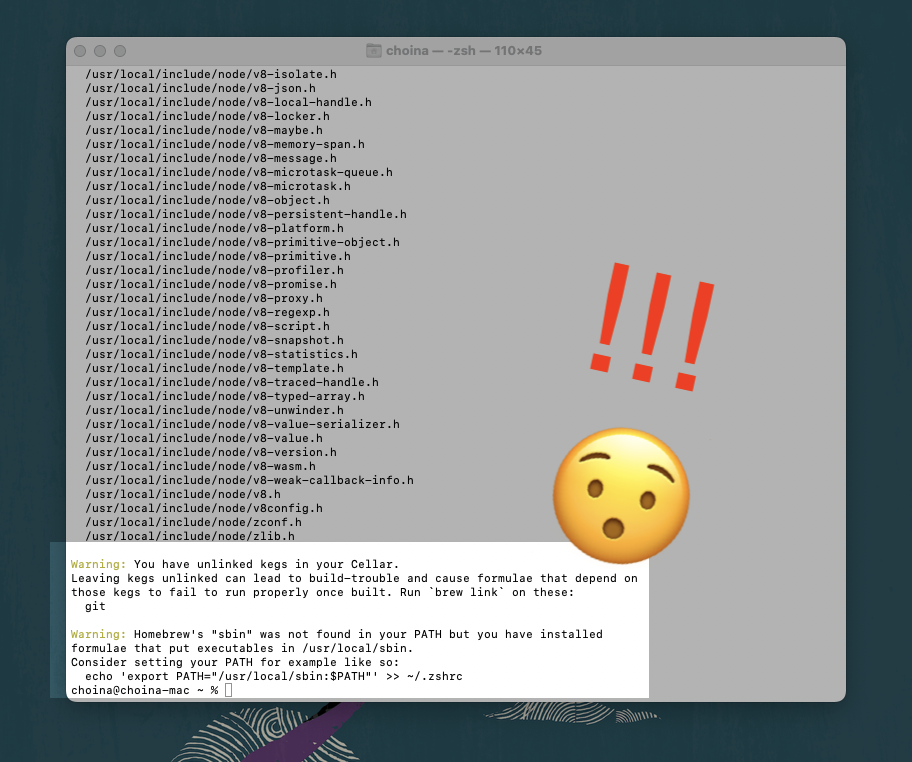
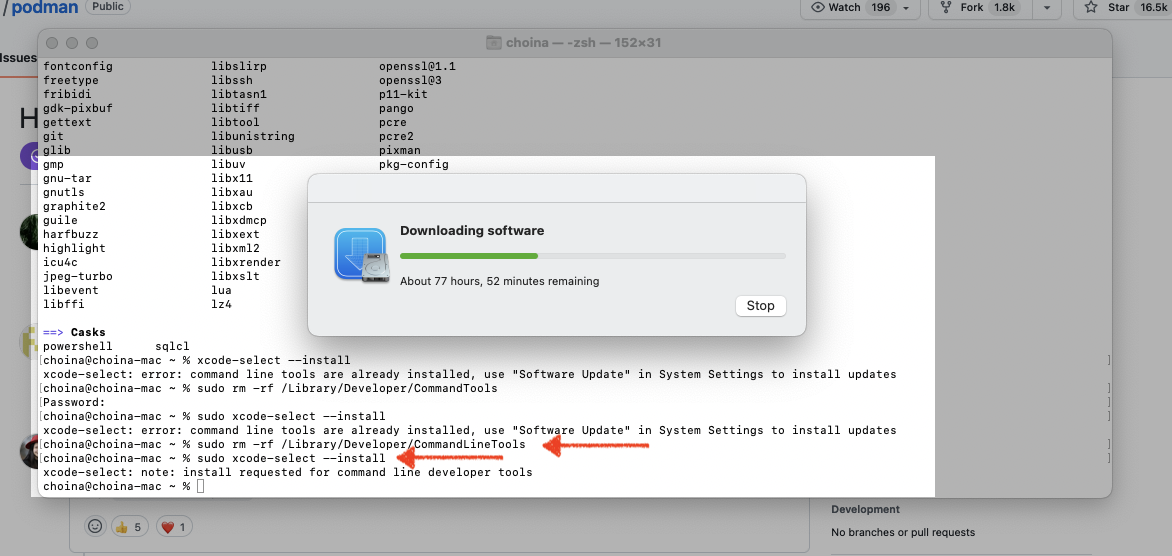
Upon the first installation, and depending on the macOS you are on, you may see a couple of errors appear. I can tell you they will cause issues within Podman later on down the line. So (and without having to take you back down the rabbit hole with me), you’ll need to uninstall Podman with the brew uninstall podman command.
The errors can be seen in this image:

There are a few ways one can remedy this. First, you should uninstall Podman, close your Terminal window, and open up a new Terminal window. I found (via this GitHub issue) that this is a known bug. Some have suggested running the brew doctor command to review a list of possible problems (this will reveal any potential problems Homebrew has discovered). This seems like a good practice, regardless, and I wasn’t aware of this feature until now!
And while writing this article, I did just that and found two errors I’ll need to fix. I’m still trying to figure out what either means, but the one about the executable is troubling.
brew doctor commandX-Code problems
But back to the Podman issue. To resolve the xcrun errors, I stumbled upon a solution buried deep in the recesses of the internet. Long story short, I needed to manually install Apple’s X-Code Command Line tools. But if you try and the installation fails, you have to take an extra step.
The x-tra step
If the xcode-select --install command fails, you have to remove the Command Tools from your machine altogether. I did this with the following command:
sudo rm -rf /Library/Developer/CommandToolsIf you want to bore yourself with this issue, here are some resources I found:
- Apple Developer forum post
- Another Apple Developer forum post
- Mattias’ post on this
- StackOverflow thread
- StackExchange
On sudo
I’ve seen sudo in the past; I wonder if I ever bothered to look up its meaning. Taken directly from the docs:
Sudo (su “do”) allows a system administrator to give certain users (or groups of users) the ability to run some (or all) commands as the superuser or another user, while logging all commands and arguments. Sudo operates on a per-command basis, it is not a replacement for the shell.
A short introduction
Back to our regularly scheduled program…you’ll probably need to enter your system’s password (the thing you use to log on to your computer when it first starts up and/or wakes). And after that, restart your Terminal (I don’t believe I did this, but it’s probably a good idea to restart the Terminal).
Once that new Terminal window fired up, I used the following command to install the latest X-Code Command Line tools:
sudo xcode-select --installReminder, it will not take 78 hours to install this. I just followed the prompts (license terms, the usual stuff, etc.).
NOTE: I suspect we have to do this because for some reason, X-Code Command Line tools are not updated upon every macOS version update. So, who knows when the last time these tools have been updated. This is just a hunch, but in reality, I've no idea what I'm talking about.
Installing Podman, second attempt
Once that installation was completed, I restarted the Terminal and issued the command to install Podman:
brew install podman NOTE: If you want to follow along with the Podman instructions, you can do that here (those are the actual docs, very easy to do).
If all goes well, your output will look something like this:
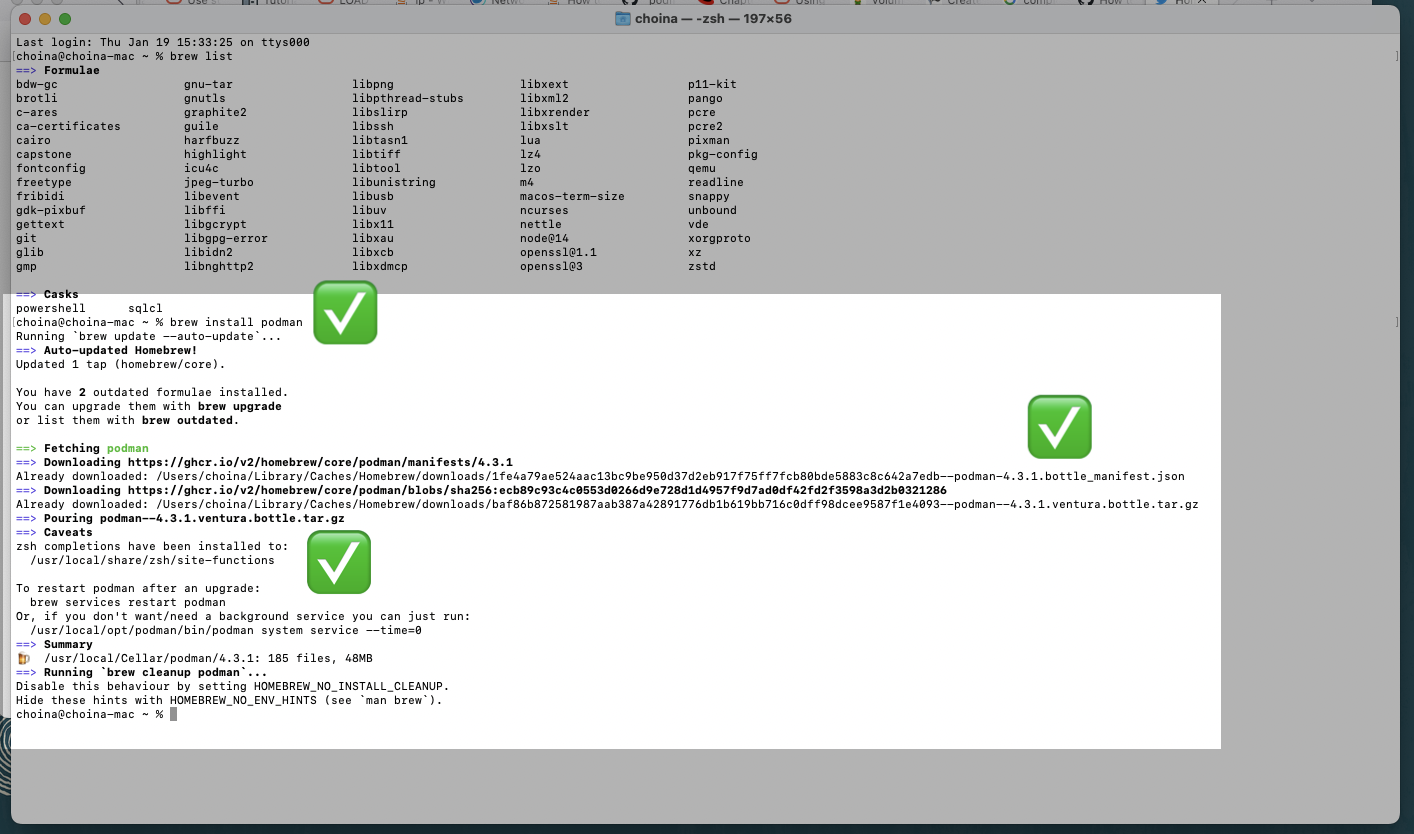
If you issue the brew list command, you’ll see both SQLcl and Podman installed.
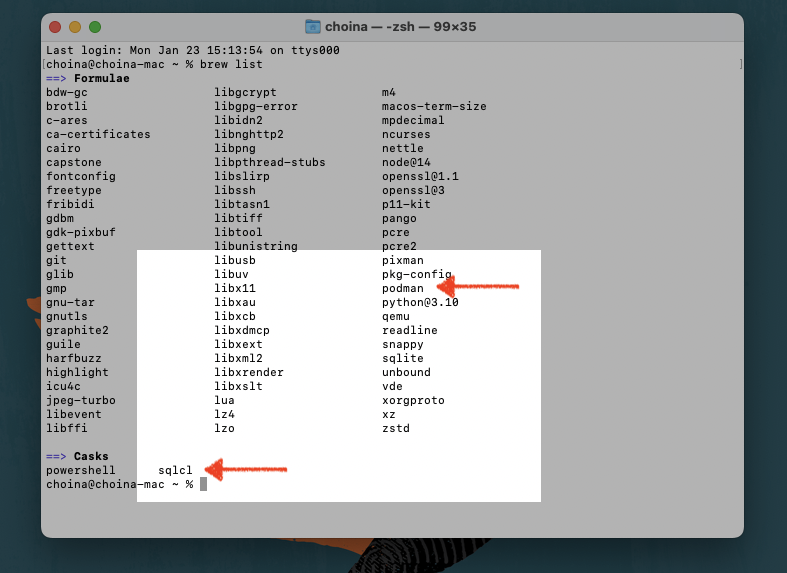
PRO TIP: You can issue the brew upgrade sqlcl command to update to the latest brew-available version of SQLcl.
To the Oracle Container Registry
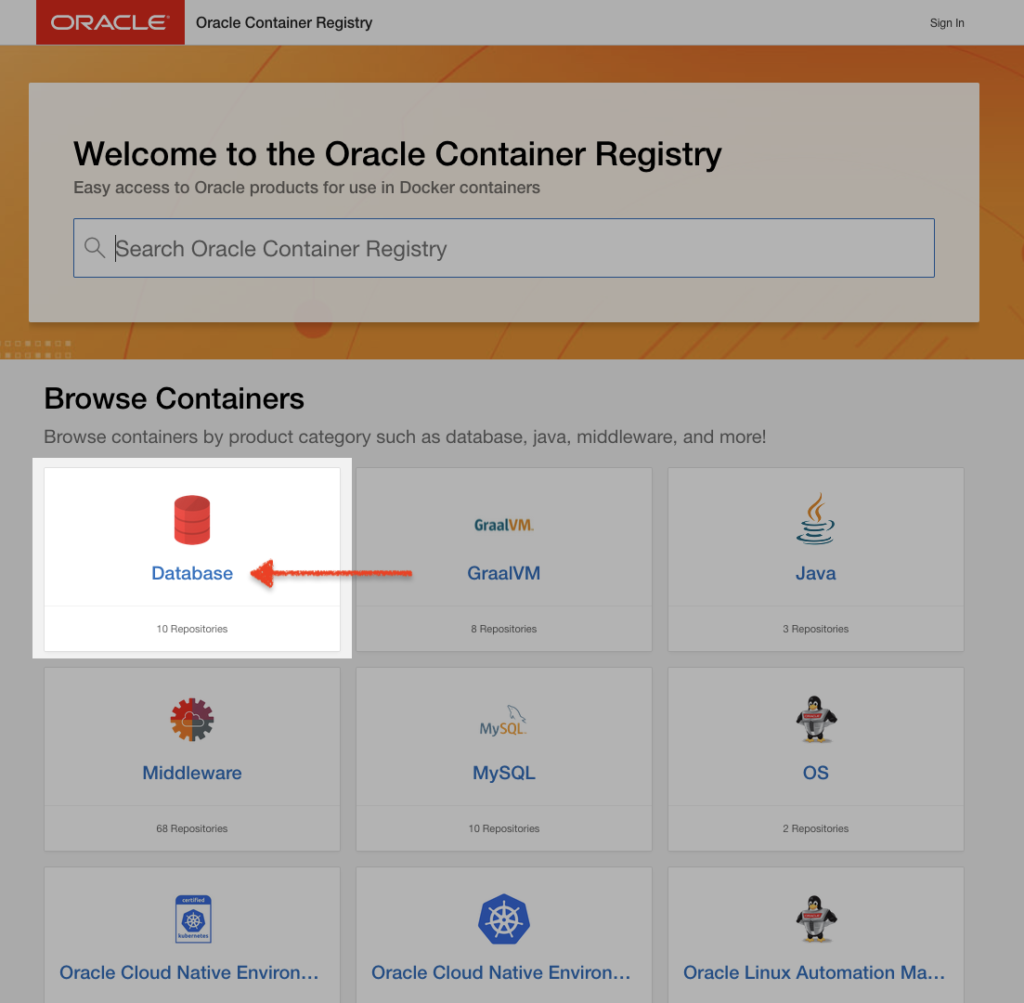
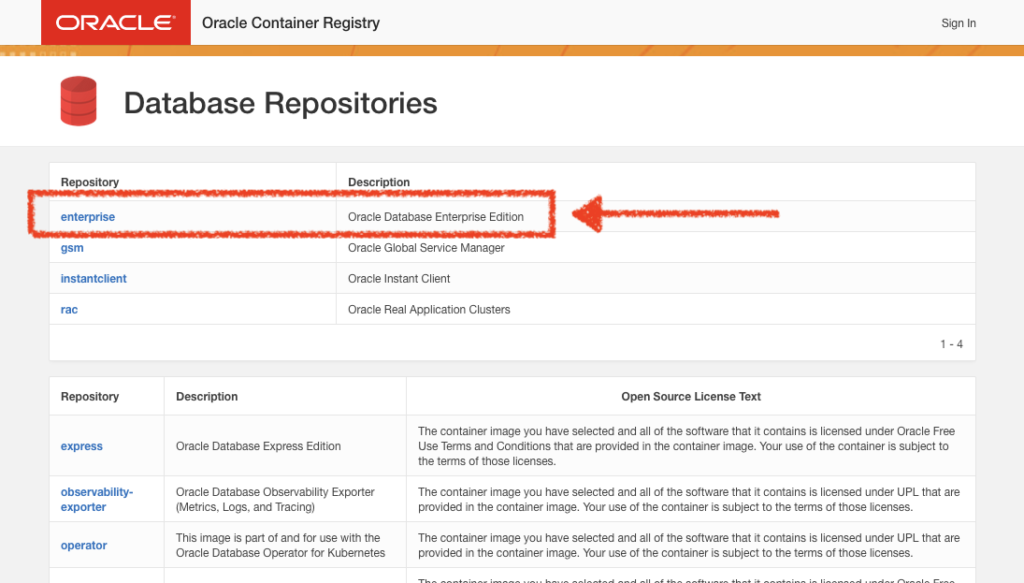
Are we ready yet? Well, almost. Again, if you’re following along, navigate to our Oracle Container Registry site to retrieve the database container for this “recipe.” The path I took was Landing page > Database > Enterprise.
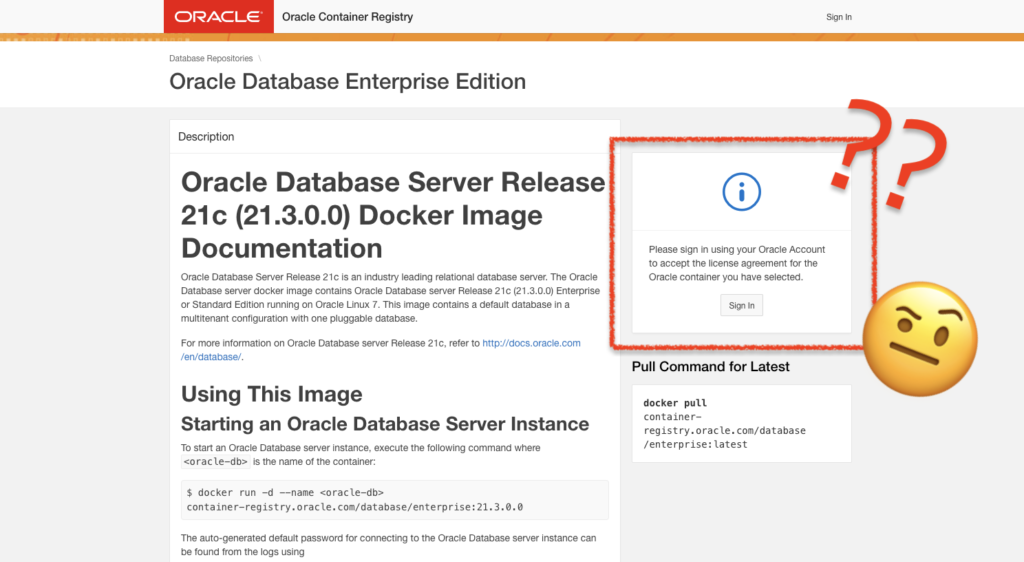
YOU NEED TO SIGN IN for this to work!!! Oh, suuuuure… it’ll seem like it’s working when you’re in Podman, and you’ve tried ten times…but then it just keeps failing, and failing, and failing! So be sure to sign in (or create an account if you haven’t already).
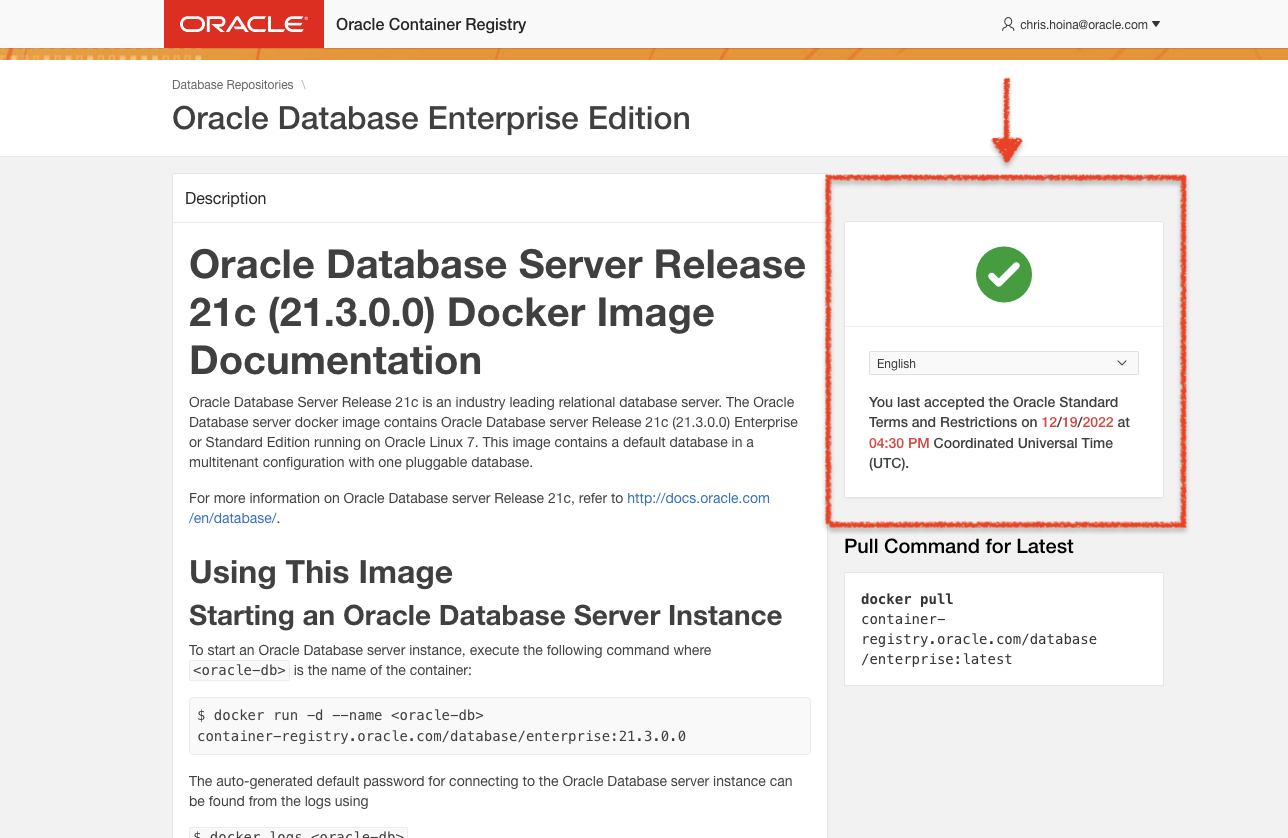
Once signed in and chosen your preferred language, you’ll see this:
PAUSE: reviewing the limitations of this exercise
Alright, so there are a few limitations I should address, and in no particular order:
- Checkpointing containers in Podman
- Volumes in Podman
- Creating the database versus signing on to the database
Checkpointing currently doesn’t work in Podman (at least for Macs on macOS Ventura). This is documented as well. Here’s a GitHub issue I found. I don’t seem to be the only one with the issue. I spent about a day on this trying to get it to work. I couldn’t figure it out; maybe if you’re reading this, you know the secret. Please share if you know!
Secondly, I couldn’t figure out how to mount a volume to a container. I know this is fundamental to containers, but I encountered error after error for days. And for the purposes of this exercise, it isn’t a big deal. Now, if I were on an actual development team, that would be a different story. But I’m too dumb for development, that is why I’m a product manager 🤣!
Finally, working with containers requires a paradigm shift. Shortly you’ll see that I’m setting up a container and “starting” the database therein. Later, I’ll separately log on to that database, using SQLcl, after the database is up and running. They are two different steps.
Working with the container
Looking at this screen you would think, “I’m just going to jump right in and execute the first command I see on this page.” Wrong!
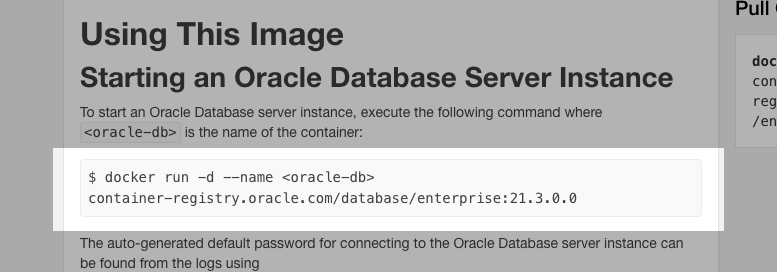
Actually, you do NOT want to do that. You must scroll down to the “Connecting from outside of the container” section. Because I’m going to be connecting to this container from the outside.
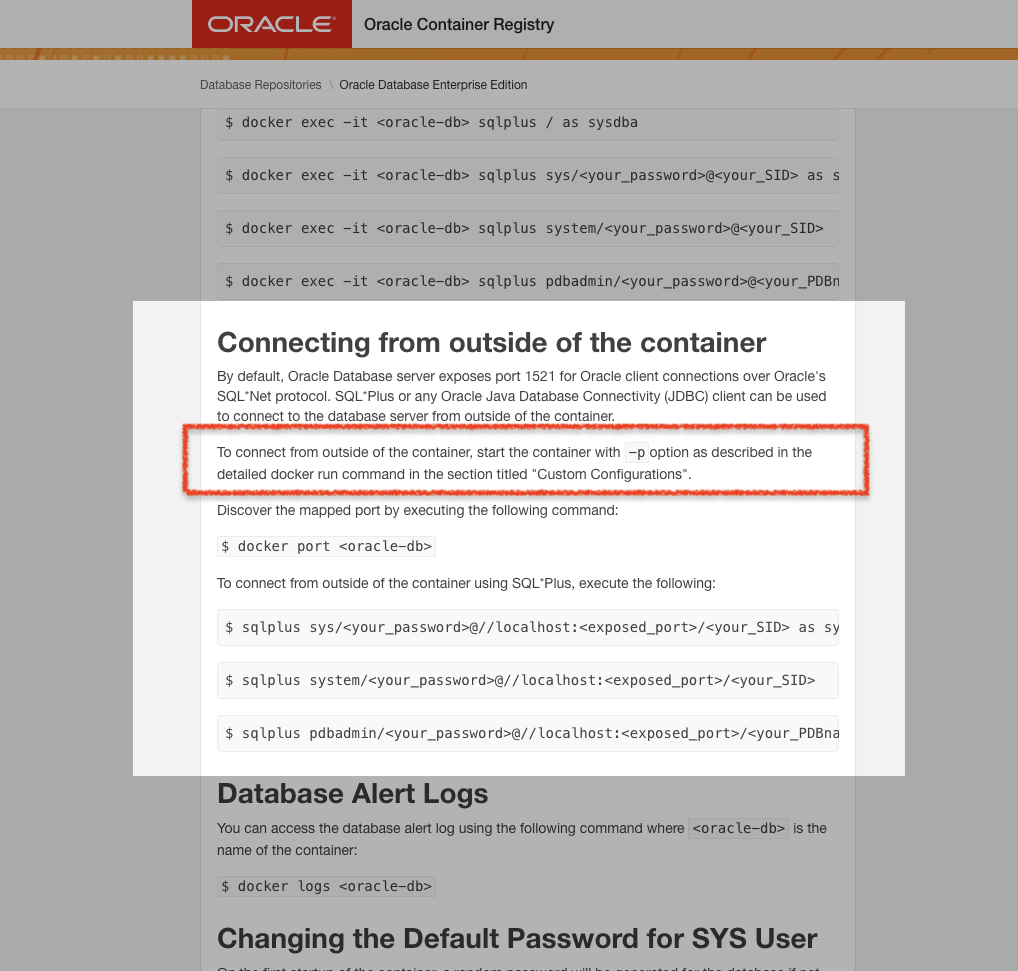
I know this documentation mentions SQL*Plus, but this all applies to SQLcl also. And if you refer to my previous SQLcl post, you can review the logon syntax for logging on. The critical point is that I need to start the container with the -p (or Port) option included. Are you still with me? Let’s take a trip to the “Custom Configurations” section.
Reviewing the custom configurations section
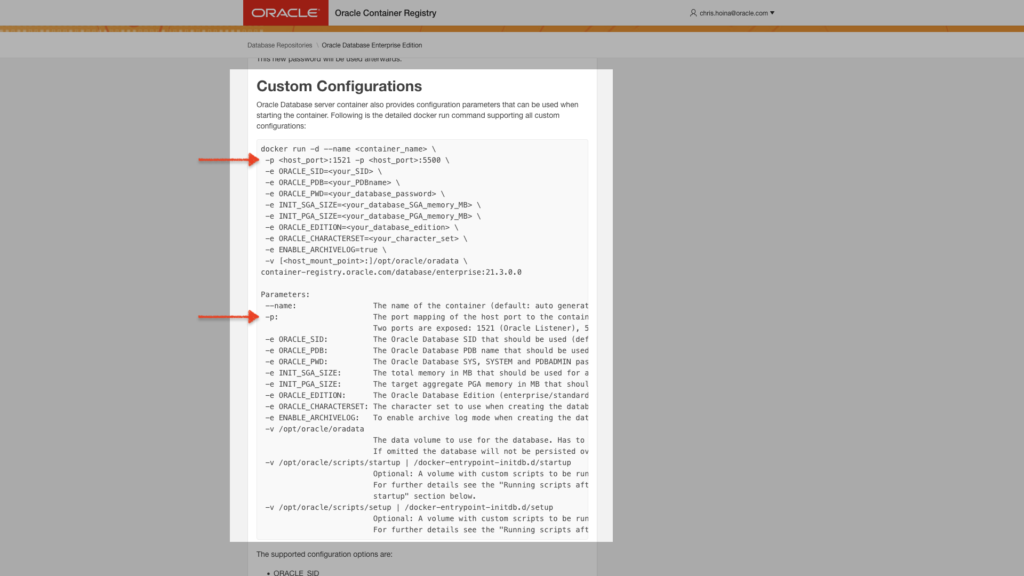
I’ve cleaned up the code block for readability:
docker run -d --name <container_name> \
 -p <host_port>:1521 -p <host_port>:5500 \
 -e ORACLE_SID=<your_SID> \
 -e ORACLE_PDB=<your_PDBname> \
 -e ORACLE_PWD=<your_database_password> \
 -e INIT_SGA_SIZE=<your_database_SGA_memory_MB> \
 -e INIT_PGA_SIZE=<your_database_PGA_memory_MB> \
 -e ORACLE_EDITION=<your_database_edition> \
 -e ORACLE_CHARACTERSET=<your_character_set> \
 -e ENABLE_ARCHIVELOG=true \
 -v [<host_mount_point>:]/opt/oracle/oradata \
container-registry.oracle.com/database/enterprise:21.3.0.0

Parameters:
--name
    The name of the container (default: auto generated

-p
    The port mapping of the host port to the container port.
    Two ports are exposed: 1521 (Oracle Listener), 5500 (OEM Express)

-e ORACLE_SID
    The Oracle Database SID that should be used (default:ORCLCDB)

-e ORACLE_PDB
    The Oracle Database PDB name that should be used (default: ORCLPDB1)

-e ORACLE_PWD
    The Oracle Database SYS, SYSTEM and
    PDBADMIN password (default: auto generated)

-e INIT_SGA_SIZE
    The total memory in MB that should be used for all
    SGA components (optional)

-e INIT_PGA_SIZE
    The target aggregate PGA memory in MB that should be used
    for all server processes attached to the instance (optional)

-e ORACLE_EDITION
    The Oracle Database Edition (enterprise/standard, default: enterprise)

-e ORACLE_CHARACTERSET
    The character set to use when creating the database (default: AL32UTF8)

-e ENABLE_ARCHIVELOG
    To enable archive log mode when creating the database (default: false).
    Supported 19.3 onwards.

-v /opt/oracle/oradata
    The data volume to use for the database. Has to be writable by the
    Unix "oracle" (uid: 54321) user inside the container If omitted the
    database will not be persisted over container recreation.

-v /opt/oracle/scripts/startup | /docker-entrypoint-initdb.d/startup
    Optional: A volume with custom scripts to be run after database startup.
    For further details see the "Running scripts after setup and on
    startup" section below.

 -v /opt/oracle/scripts/setup | /docker-entrypoint-initdb.d/setup
    Optional: A volume with custom scripts to be run after database setup.
    For further details see the "Running scripts after setup and on startup"
    section below
I believe the colons you see throughout the original code block (with certain exceptions) are there for the definitions (you wouldn’t actually include these in your commands). If you are coming from database development, I suspect some may think, “ahh, bind parameter.” I do not think that is the case here.
Ports
You might be asking, in this code block, what the hell am I supposed to be looking at? Well, the container has a “listener”, listening on port 1521. So if I want to connect to the container, I’ll need to “map” to it. I’m not sure if that is what it is called exactly (not a networking guy, don’t claim to be). But the next question is, what is my <host port> (How it is referred to in the code block above)?
Everything matters, and nothing matters
Executing a ping command in my Terminal, to see what my computer’s address is great, but it tells me nothing about the port.
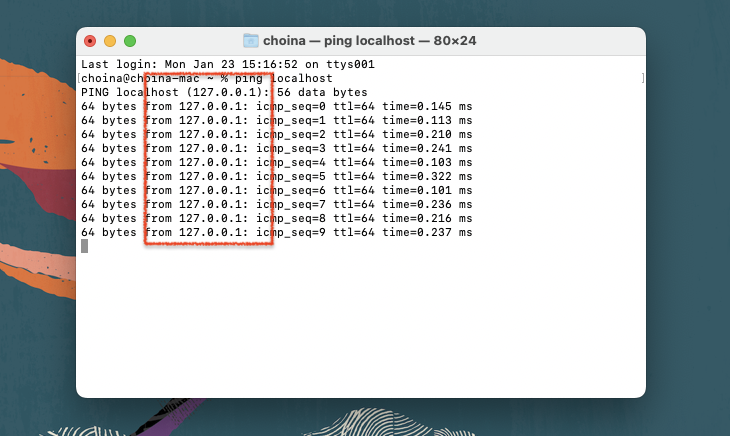
ping localhost to see your IP addressSo I took to the internet to try to figure out the appropriate port…Honestly, I’ve tried searching but I can’t find anything definitive. In the Podman documentation, I see a lot of reference to port 8080; as in localhost:8080.
Care to review it? Here are some search results using “8080” as the search parameter.
Buried in the docs, there is a brief mention of the port and it can be found in the –publish or -p parameter. The way I understand ports on your local machine is that if you omit the local host information, you shouldn’t have any problems. It will just default to…something. So..it doesn’t matter, nothing matters. It’s all an illusion.
I also reviewed the cURL documentation. I found something in the --connect-to option:
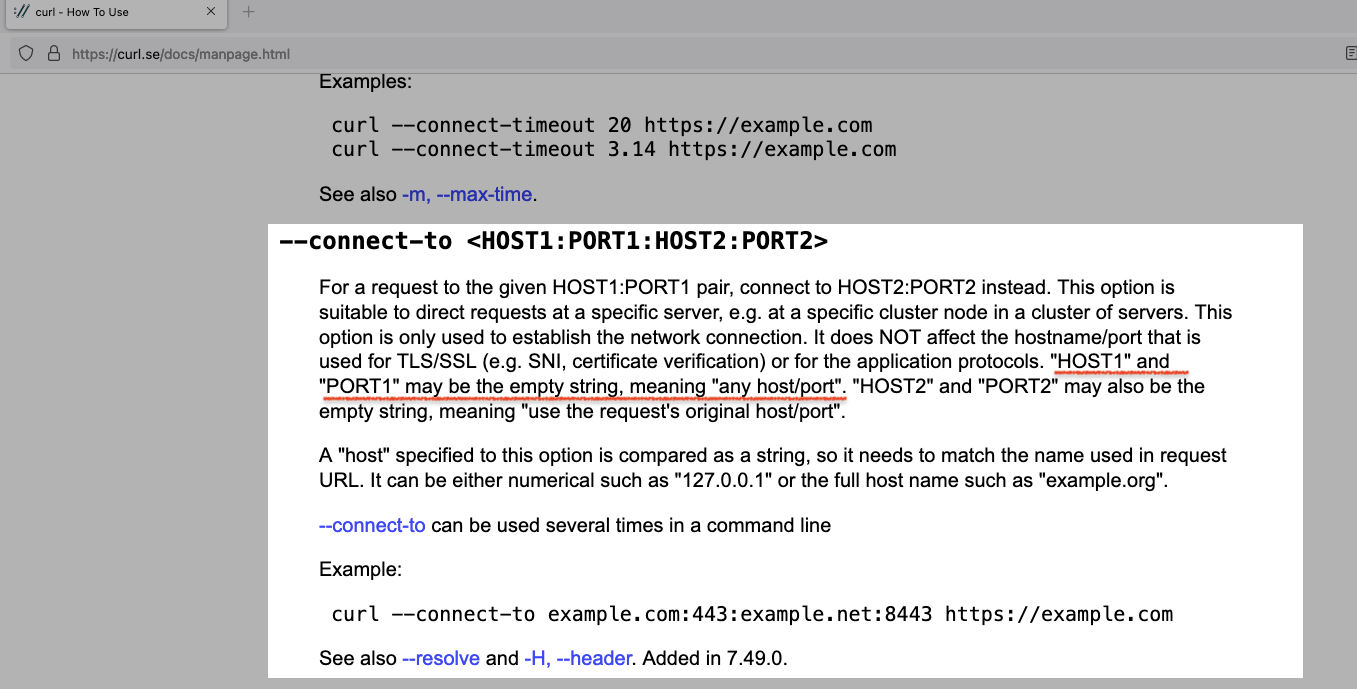
Aaaand, more port nonsense (if you are having trouble sleeping at night, try reading this):
- What does localhost:8080 mean?
- 0.0.0.0, 127.0.0.1, and localhost – what is the difference?
- It looks like Podman uses localhost:8080 in this example
Starting the Podman Linux Virtual Machine
Okay, with all this out of the way, I can finally start to make some progress (almost there, promise).
Remember, you have to start the Podman Linux virtual machine before you do anything (this is in the instruction steps, so review that first (steps for macOS). This is where the container “lives.” Once the virtual machine is up and running.
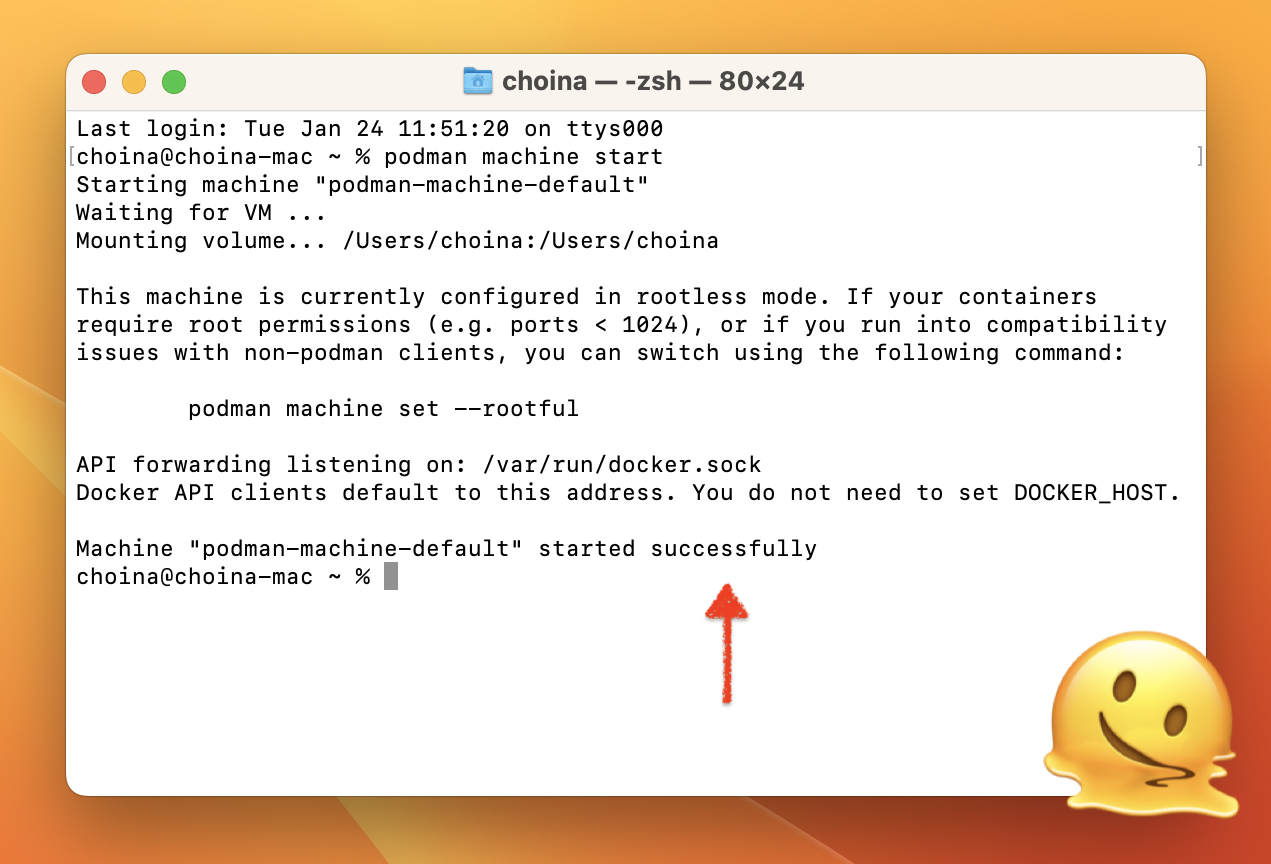
I then grabbed the Oracle container. But, since I’m using Podman I needed to modify the run command, like this:
podman run -d -p :1521 --name myoracledb container-registry.oracle.com/database/enterprise:21.3.0.0REMINDER: Make sure you are logged into the Oracle Container Registry site before you attempt all this!
Assuming you’re still following along, you’ll see something like this in your Terminal:

I used the podman ps command to check the status of the container. You should see something like this:

For several minutes, you’ll continue to see the container status as “starting”. You can do like me and just periodically enter the podman ps command, or you can go do something meaningful with your time. Check back in 10 mins or so. The choice is yours. Either way, you’ll eventually see the status change from “starting” to “healthy”.
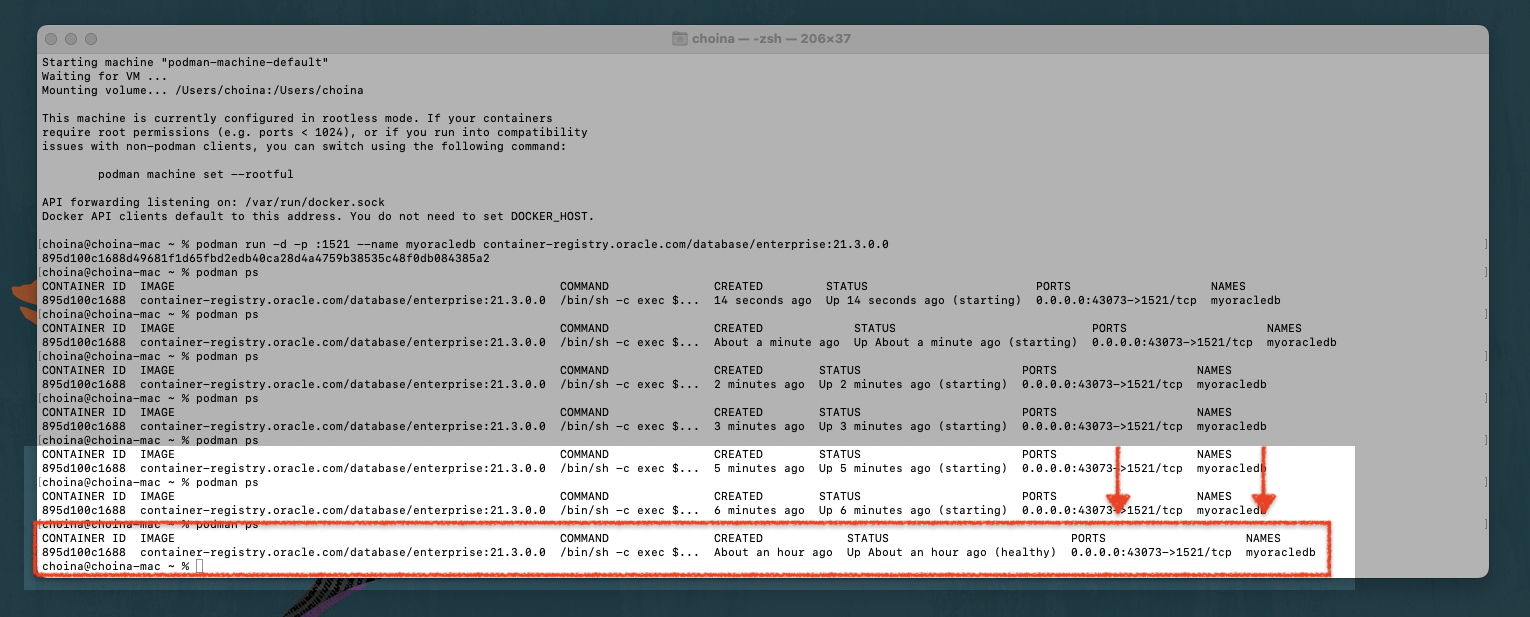
“Healthy” means I now have an Oracle Enterprise database (version 21.3.0.0) running in my Linux virtual machine as a container. I still need to log in with SQLcl, though.
But wait…there’s more
Hold up, I can’t just log into SQLcl. I still have some more setup to do. I need to reset the randomly generated password to one of my choosing. Our instructions tell you to first issue the docker logs + [your database name] command to view your database logs. And from there you should be able to locate it. I couldn’t maybe you can. Let me know if you were able to.
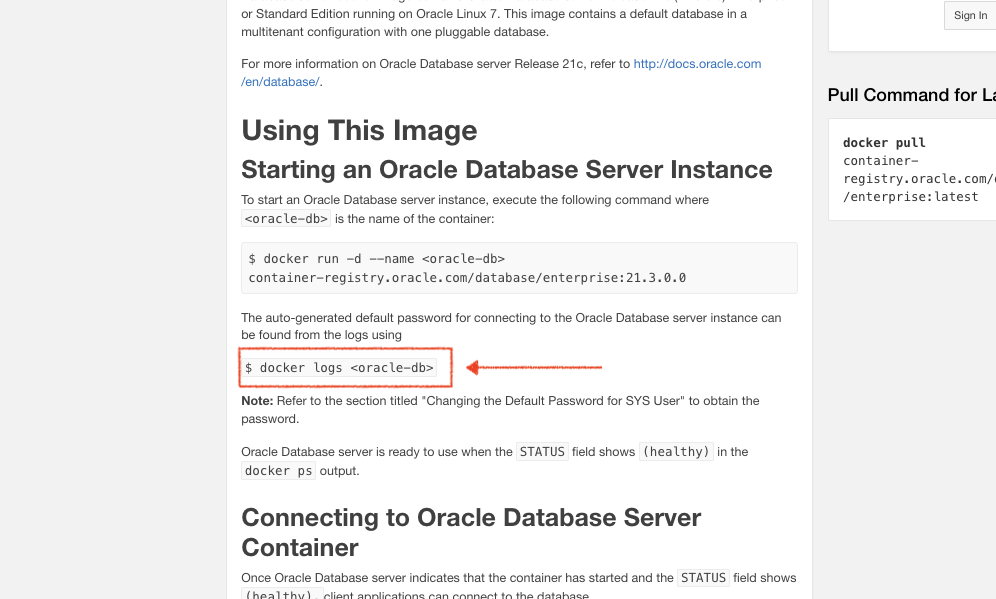
logs commandSince I’m doing this in Podman, that command is slightly modified:
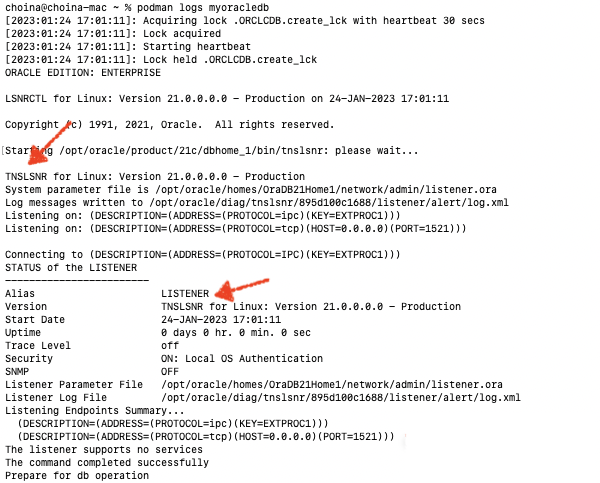
podman logs myoracledbThe printout of that command will appear like this (yours will be very similar). Although I wasn’t able to locate the password, there are still some important pieces of information that you’ll want to review and note.

podman logs [your database name] printoutIn this print out you’ll see things like the local host and port information, and the “Global Database Name” and “System Identifier (SID)” can be seen as well. You’ll see where the log files are located (your temporary password can be retrieved from here) and the database version you are running. Finally, you’ll see the message “DATABASE IS READY TO USE!”
Use the included shell script for changing your password
We are this close to logging onto the database. Even though I couldn’t find the temporary password, it doesn’t matter. You have to change your password anyways. If you refer back to the instructions on the Oracle Container Registry page, there is a section entitled “Changing the Default Password for SYS User” and it reads as such (emphasis added):
On the first startup of the container, a random password will be generated for the database if not provided. The user [must] change the password after the database is created and the corresponding container is healthy.
Using the
docker execcommand, change the password for those accounts by invoking thesetPassword.shscript that is found in the container. Note that the container must be running. For example:$ docker exec <oracle-db> ./setPassword.sh <your_password>Oracle Docs
Easy enough, and since my container is “healthy” at this point, I can execute this script. But since I’m using Podman, the command will look like this:
podman container exec myoracledb ./setPassword.sh password1234And the output of that command will look like this:

I guess it worked. As you can see, my new password is password1234 (pleeeeease, do NOT share that with anybody). And at this point, I’m ridiculously close to logging onto this completely containerized Oracle enterprise database. All I need to do now is log on using the same steps as before (in my previous post).
Connecting from outside the container
Referring back to the Oracle Container Registry docs, I see the following:

NOTE: Remember I'm logging into this container from the outside.
The connect options are cut-off in that image, so let me copy/paste them here. Also, assume where it states “sqlplus” I’ll be connecting with SQLcl. The options are as follows:
$ sqlplus sys/<your_password>@//localhost:<exposed_port>/<your_SID> as sysdba

$ sqlplus system/<your_password>@//localhost:<exposed_port>/<your_SID>

$ sqlplus pdbadmin/<your_password>@//localhost:<exposed_port>/<your_PDBname>
At this point, I can proceed. I have all the ingredients for this “recipe.”
Use the port command, duh
Turns out you can just use the port command to discover the container’s port (I’m guessing this is the route the container uses to communicate with my MacBook – it’s all quite muddled at this point).
Here is the command I executed:
podman port myoracledbAnd here is what was returned:

If you are starting your journey from the MacBook, its address would be 0.0.0.0 with a port of 43073. Data/info flows in and out of that port. And 1521 is a reference to the [bleep blurp 🤖] TCP port at which the Transparent Network Substrate (TNS) Listener is located.
Actually, if you look at the previous output (from the podman logs myoracledb command) you’ll see how all the addresses and ports connect (including the TNS Listener).
It's in the logs, how could you not know this!?
Honestly, this is all ludicrous. You shouldn’t know all this, nobody should! It’s too much to retain, but that’s okay, I’m glad you’re still here…toughing it out with me. Once you get past this first big hurdle, I imagine working with containers is very fun.
Logging on with SQLcl, for real
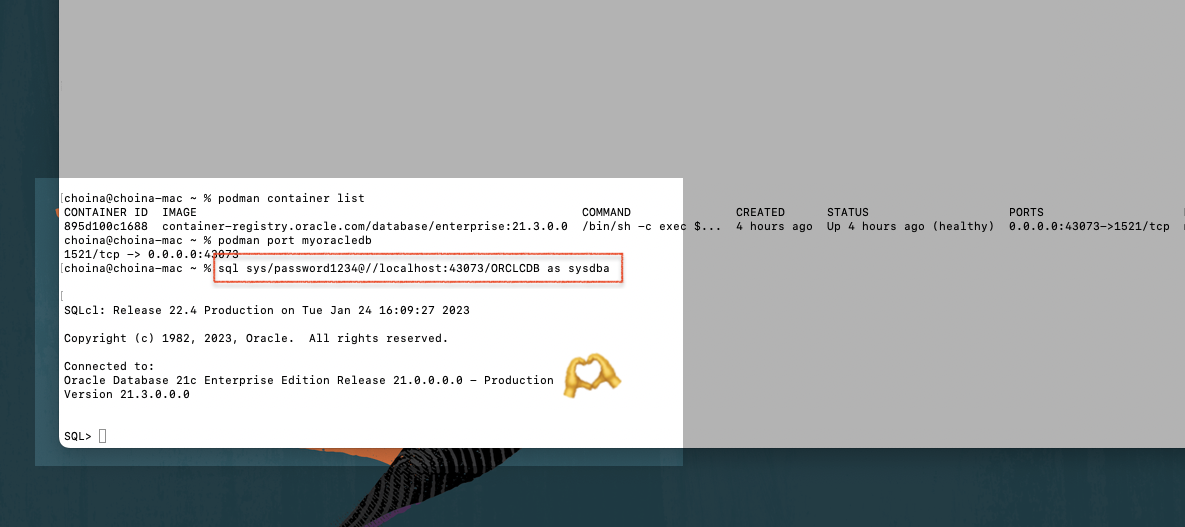
Here is where I actually logged on (or is it logged into?) to this database with SQLcl. Here’s the command I used:
sql sys/password1234@//localhost:43073/ORCLCDB as sysdbaWhich, if you recall is modeled on the original command found in the Oracle Container Registry docs; it looks like this (it’s also a few paragraphs back):
$ sqlplus sys/<your_password>@//localhost:<exposed_port>/<your_SID> as sysdbaNOTE: Exposed port is that where the TNS Listener is located, and the SID is the “System Identifier” – I showed that in the database logs earlier.
And again, I don’t think it matters if you include the localhost port. Here is what the output looked like in my Terminal:
Create and load a new table with SQLcl
Alright, so finally, I’m in! Next, I tested a SQLcl function to see if it worked as expected. I chose the LOAD function. And just as a refresher on the LOAD function I referred to the SQLcl help for in-context assistance. That help looks like this:
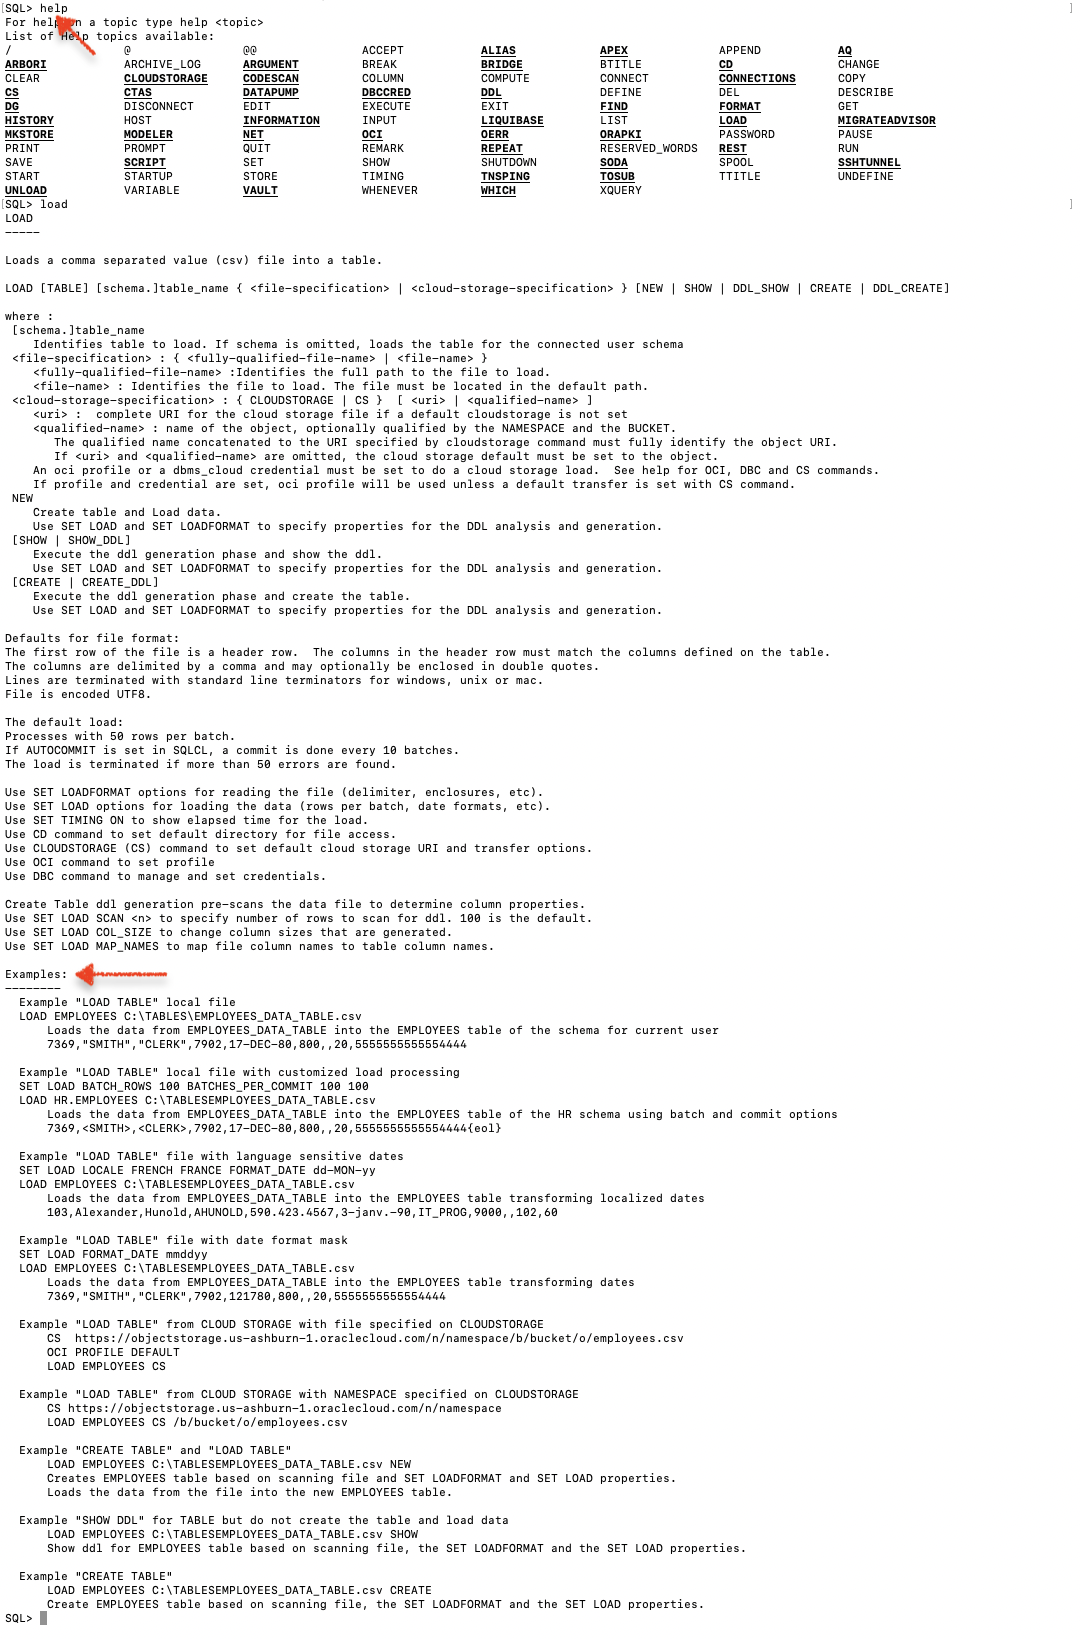
Help and LOAD informationSpecifically, I am going to test out the “CREATE TABLE” and “LOAD TABLE” function. So I scrolled down to the examples for reference.
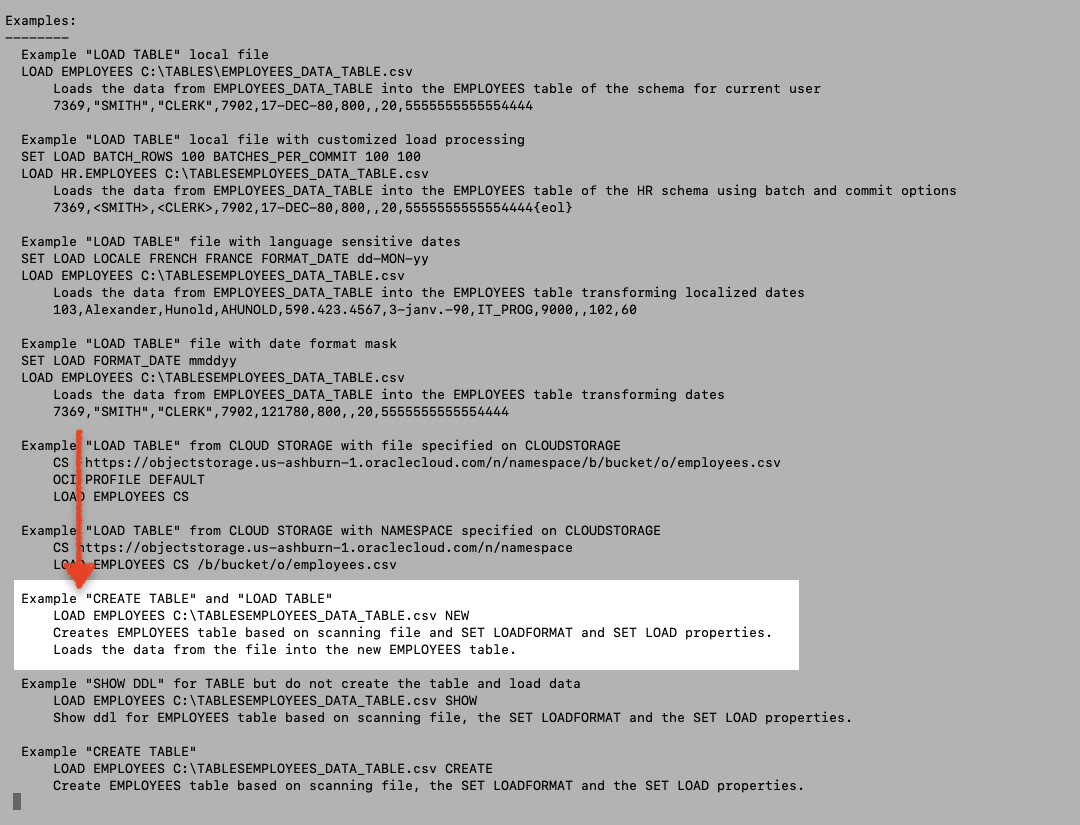
At this point, the commands are pretty straightforward. I decided to use the LOAD NEW command, as seen above.
LOAD...NEW command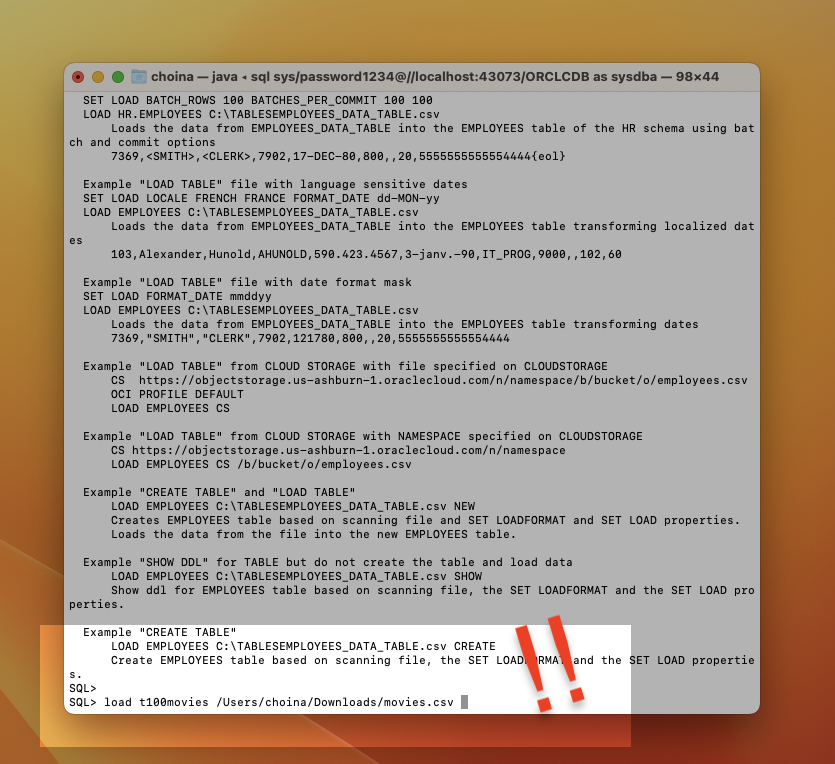
NEW“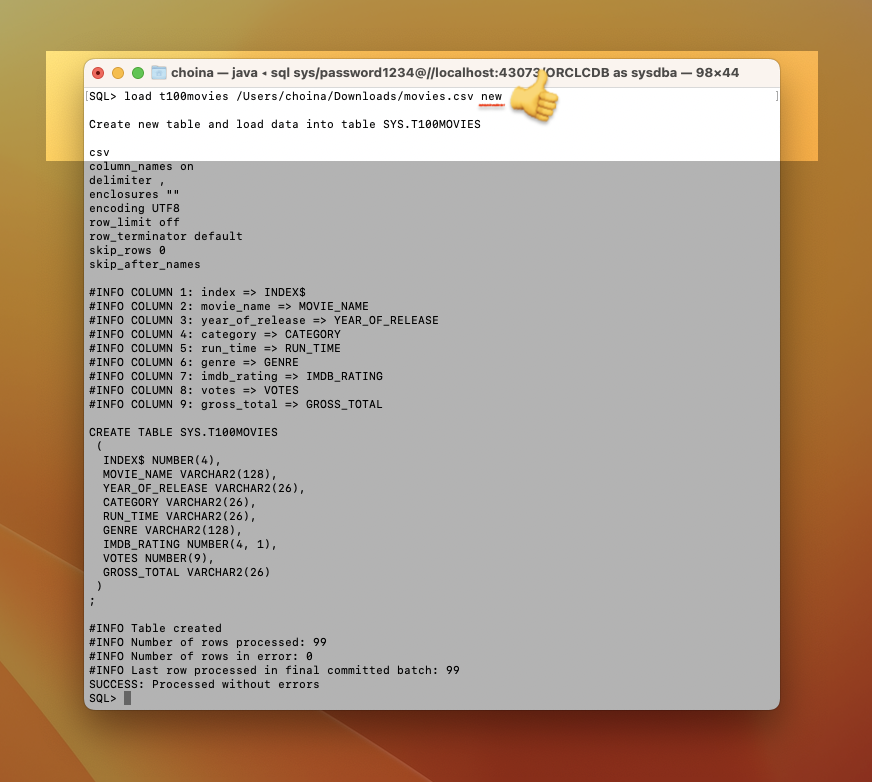
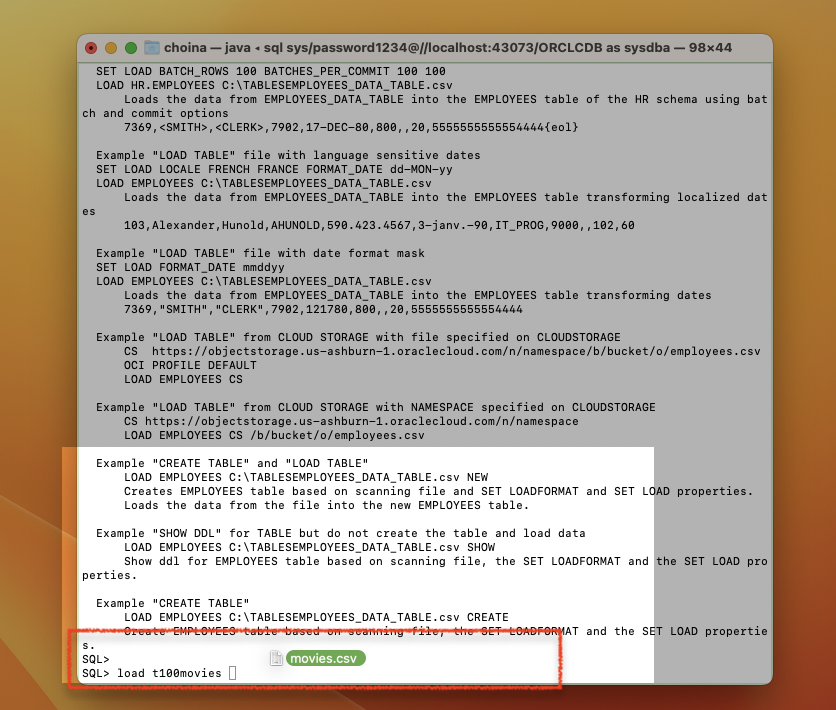
PRO TIP: You can simply drag the file and drop it into Terminal to get the complete file path.
DON’T forget to include the “NEW” at the end of the command. I forgot it the first time and my load failed. If doesn’t break anything, just a silly mistake.
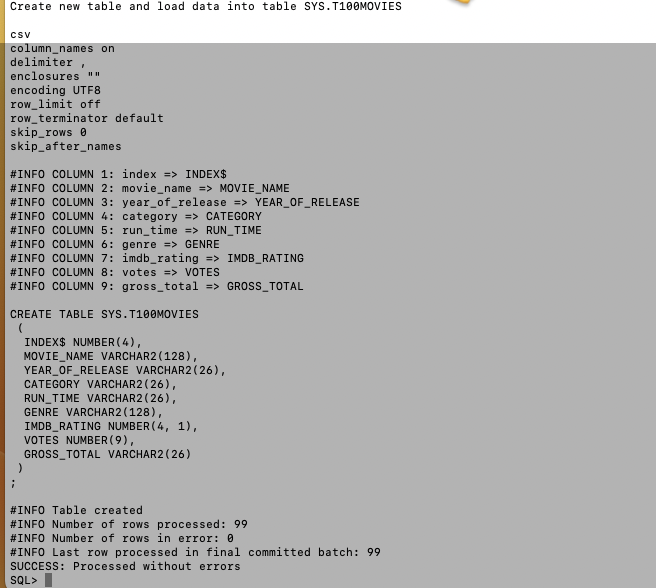
I hit enter, and if you look at that image with the “Ready to execute” caption, everything worked as expected, here it is a zoomed-in (please excuse the gray shading):
SQL queries on the newly created table
Alright, so I have a brand new table. And if you recall, this was a data set that included the IMDb top 100 highest-rated movies of all time.

Well in the next few images, I wanted to test some SQL on the new table. I first searched by genre, with the following SQL:
SELECT DISTINCT genre FROM t100movies;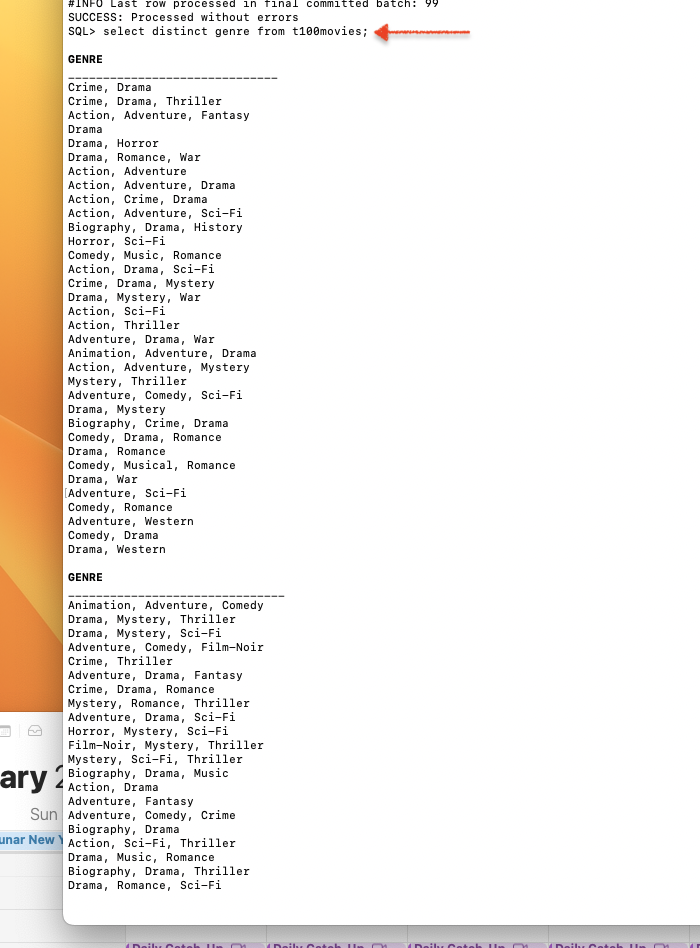
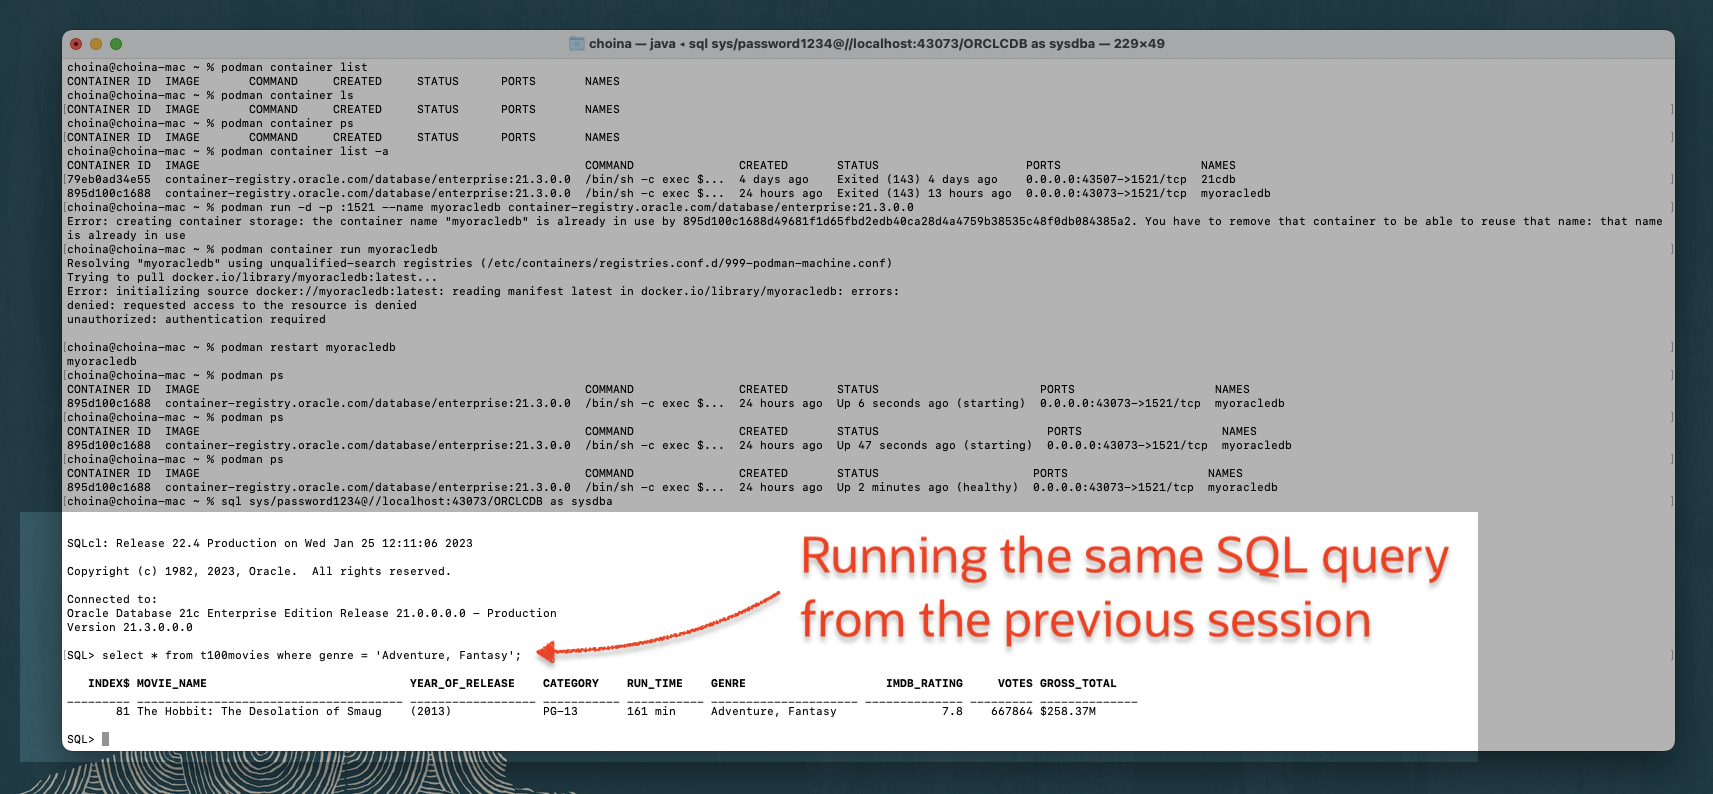
Which returns all the distinct matches. Easy enough right? Then (because I like Adventure and Fantasy) I selected only those films that match those criteria, with this SQL statement:
SELECT * FROM t100movies WHERE genre = 'Adventure, Fantasy';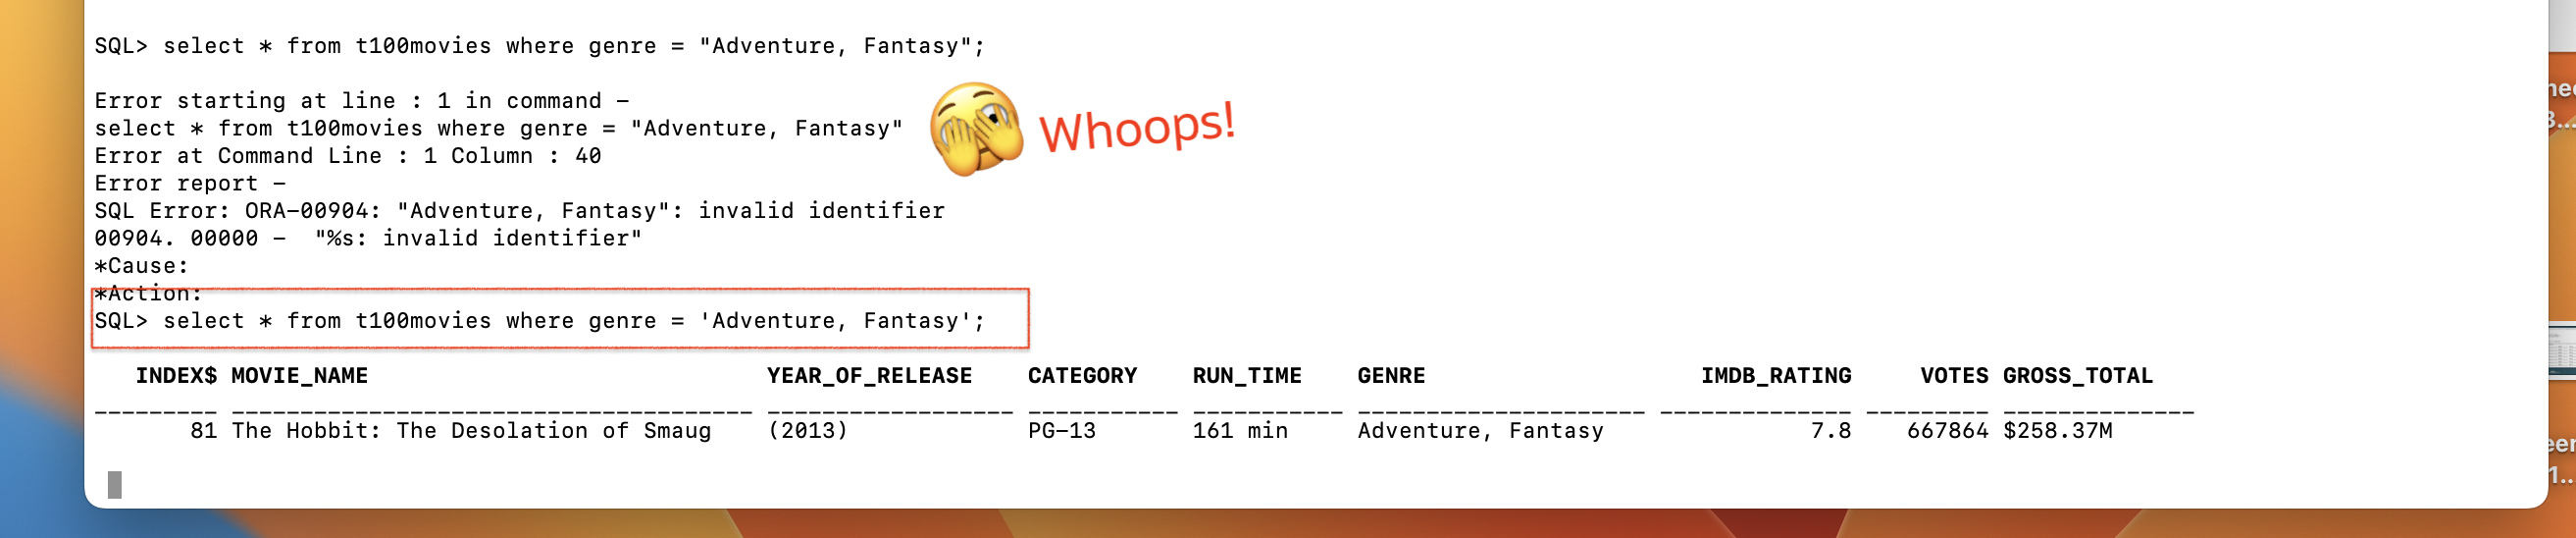
And once I correctly entered the SQL query, I found a single movie in the top 100 that meets those criteria. I’m actually surprised this one made the top 100 list.
Data persists in your container

The files are in the [container]!
Derek Z. and Hansel M.
Okay, but there’s just one more thing. The data persists inside the container even after I’ve stopped it. This isn’t necessarily the focus of this article, but I just wanted to demonstrate that even after shutting everything down, the table still exists.
This is true even after completely stopping my Podman container and shutting down the Podman Linux virtual machine.
The process was as follows:
- Exited out of the SQLcl application
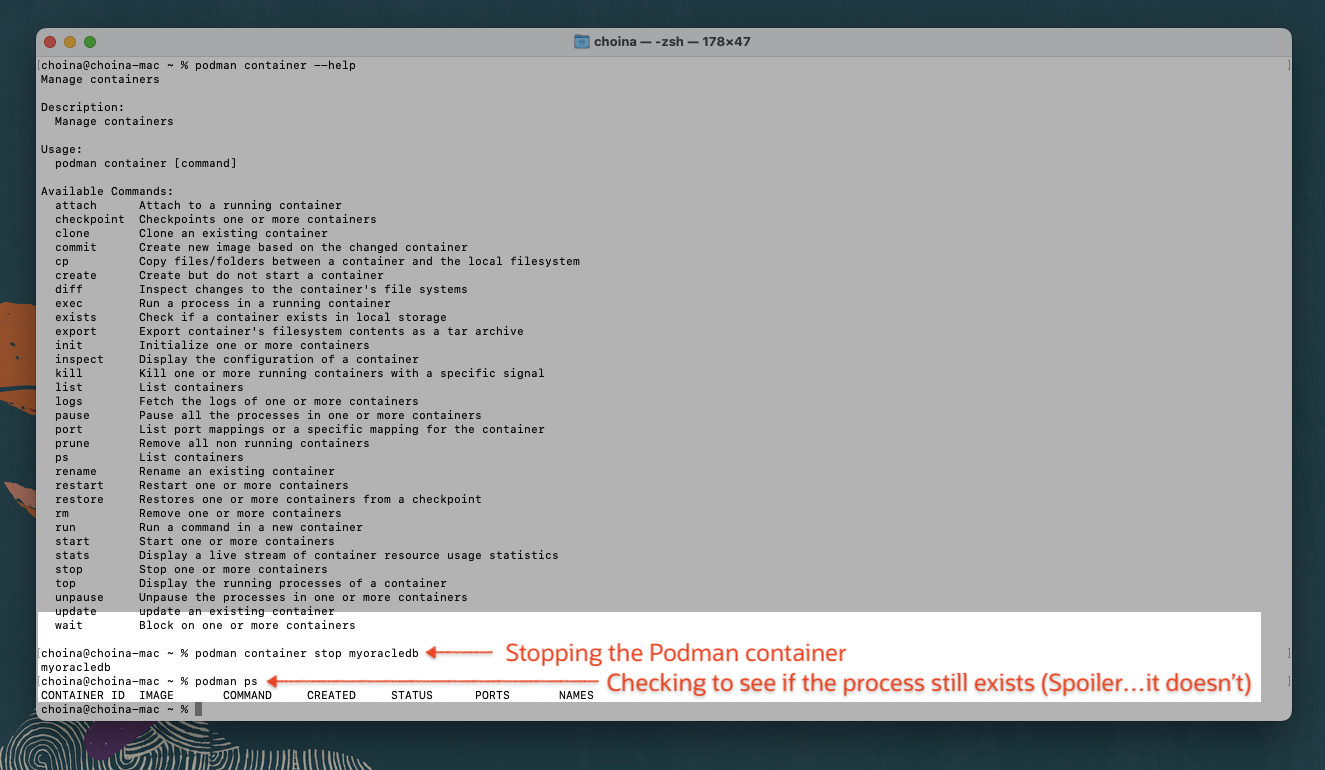
- Stopped the
myoracledbcontainer process - Checked to make sure the process was actually stopped
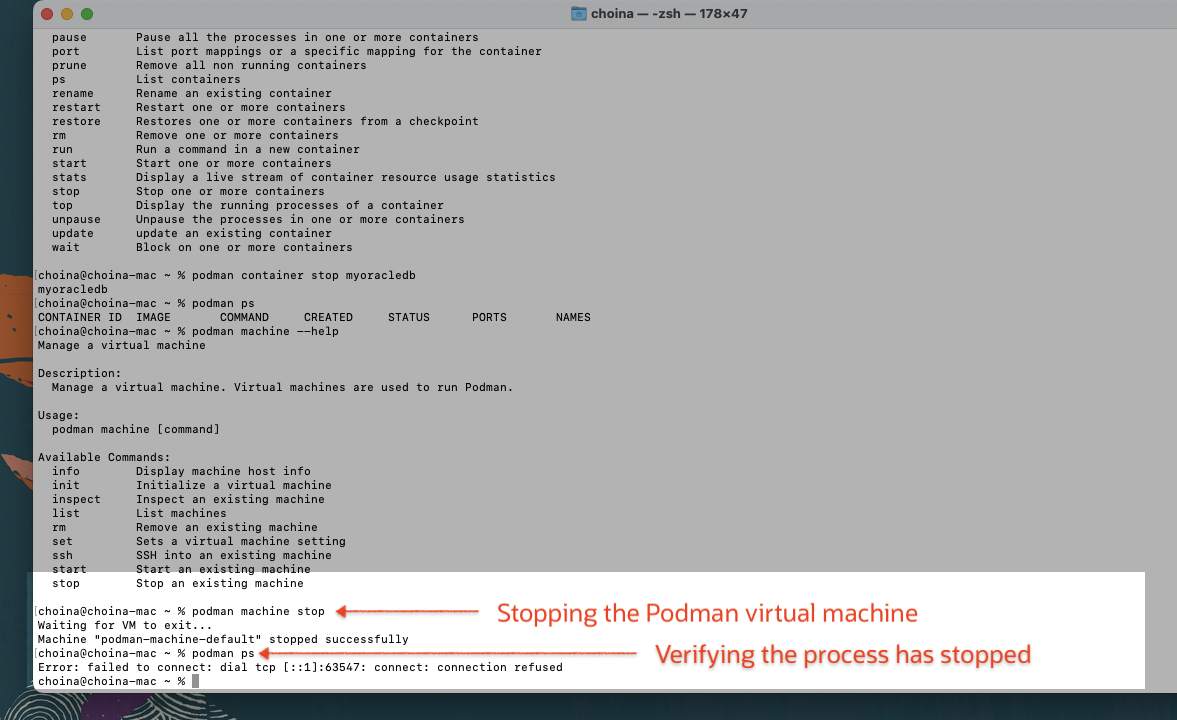
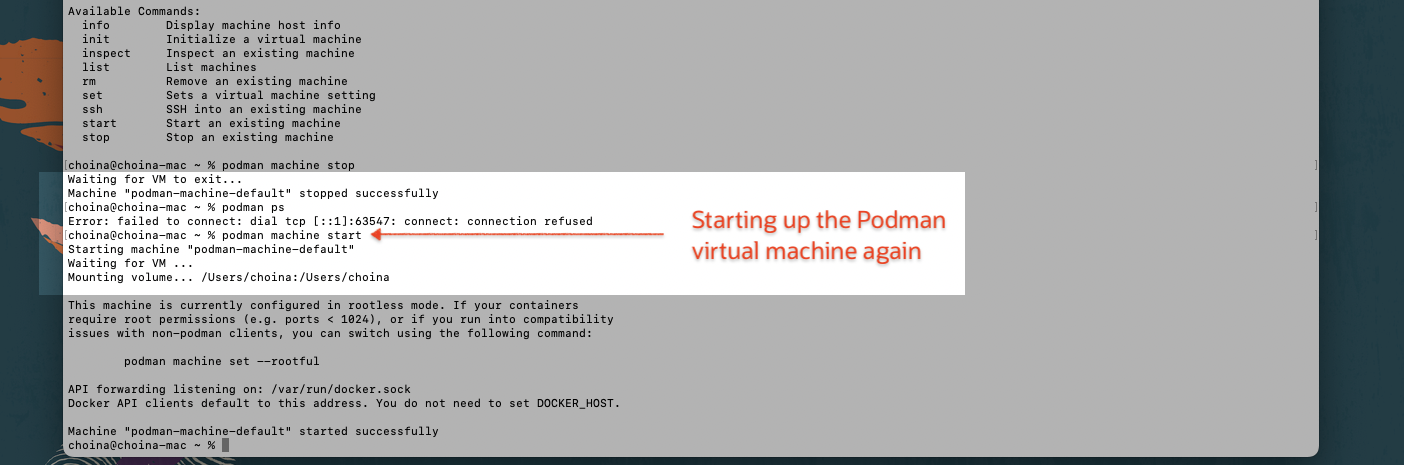
- Stopped and then restarted the Podman Linux virtual machine
- Restarted the
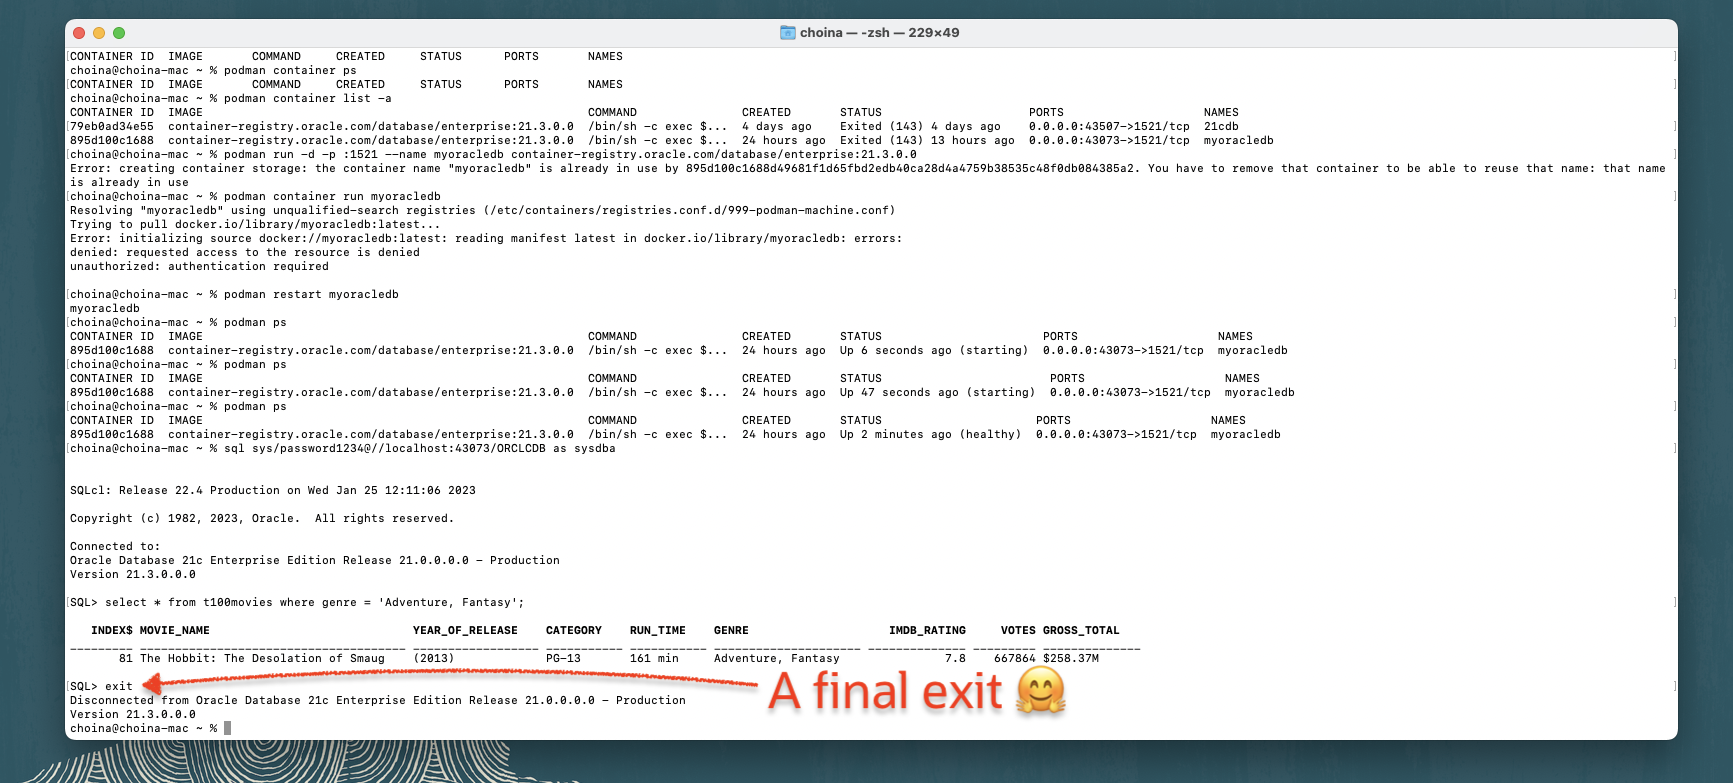
myoracledbcontainer - Executed the same SQL query as before
- Exited from the SQLcl application a final time
And if you take a look at all these images (they are numbered in order) you can see all the steps I took to during this little test. Pretty cool, eh!?


A couple of notes here:
- When I restarted the container, it only took about a minute for it to move from a “starting” to a “healthy” status. So I think the first time you start this container it takes a while. Subsequent start-ups, a minute or less.
- When you start back up the container, you don’t have to map anything, I believe all those settings are still intact. Either that or I just spent a whole bunch of time networking when I didn’t need to.
The end
And that does bring us to a close. If you’ve made it this far, you understand how you can at least get this container started and log on using SQLcl. Remember you can use Brew to install SQLcl and Podman. And of course, you’ll need to get the container I used (from our Container Registry; you can find it here in the Database category).
Remember, I didn’t do anything with checkpoints (or checkpointing containers) or with volumes. At the time of this article, I wasn’t 100% confident in my approach, so I wanted to exclude it. However, as I understand it, volumes (and their use) are the preferred approach to persisting data for later use (in containers). Just keep that in mind.
Finally, I’m not going to sugarcoat it. This was a grind – it was very tedious and frustrating, so hopefully, you can learn from my mistakes. I’m not claiming to be a developer or an expert in CI/CD. But I can totally see the appeal of having portable containers like this. The barrier to understanding stuff like this is incredibly high, so good luck to you. But hey, if you screw up, don’t worry about it. You can always uninstall and reinstall and try again.
Be sure to leave a comment if you see something amiss or if you have a better approach to something I’ve shown here. And as always…
Leave a Reply