Welcome Back
The title pretty much speaks for itself, and if you’ve been following along, you’d know that I’m working on a demo application that uses Flask (a web application microframework) connected to my Oracle Autonomous Database (ADB) via Oracle REST Data Services (ORDS) APIs.
One of Flask’s strengths is that it allows you to extend functionality and allows for a good bit of customization. But…
By default, Flask does not include a database abstraction layer, form validation or anything else where different libraries already exist that can handle that. Instead, Flask supports extensions to add such functionality to your application as if it was implemented in Flask itself.
Flask Docs
Why ADB and ORDS?
I’m primarily using this specific configuration (with ORDS and ADB) for obvious reasons. But secondarily, I haven’t come across anything that actually references the Oracle ADB or ORDS (in the context of Flask, WTForms, and python of course).
Most of the online tutorials I’ve seen and books I’ve read reference SQLlite or (in one case) MongoDB for the database. SQLite does seem like a good entry point, especially if you are putting together a proof of concept. But as things scale, I suspect you’ll reach diminishing performance returns with SQLite. In fact, the Flask documentation mentions exactly that:
Python comes with built-in support for SQLite in the
Flask Docssqlite3module. SQLite is convenient because it doesn’t require setting up a separate database server and is built-in to Python. However, if concurrent requests try to write to the database at the same time, they will slow down as each write happens sequentially. Small applications won’t notice this. Once you become big, you may want to switch to a different database.
That last sentence is significant. I know ORDS can be set up with High Availability in mind, so why not take advantage of that from the beginning? Also, with my ADB, the effort to create a database schema and tables is very minimal (fun even).
Regarding, MongoDB, obviously, I’m biased but I’m also disorganized. And I’m still a “technical toddler.” So having to download, install, and configure MongoDB Community Edition plus the MongoDB Compass GUI would end up being an unnecessary step for me (I actually ended up doing this for a previous tutorial).
Regardless, I already have my OCI tenancy and my Autonomous Database, and I continue to get more and more comfortable with our ecosystem.

Also: You should sign up for an
Always Free OCI account.
Moving on…I also want to use Database Actions, and the REST API features provided by ORDS. Not to mention, from everything I’ve seen in the Flask tutorials you have to first create database models before you can do anything really meaningful. I’m not entirely sure how to go about that (please check back in 2023).
ORDS is straightforward – just give me the URI for the API endpoint and I’ll take it from there. If I need something additional we can modify the API accordingly.
API GET Request response (via ORDS)
Speaking of which, here is what the JSON looks like from my ORDS-powered API GET request:
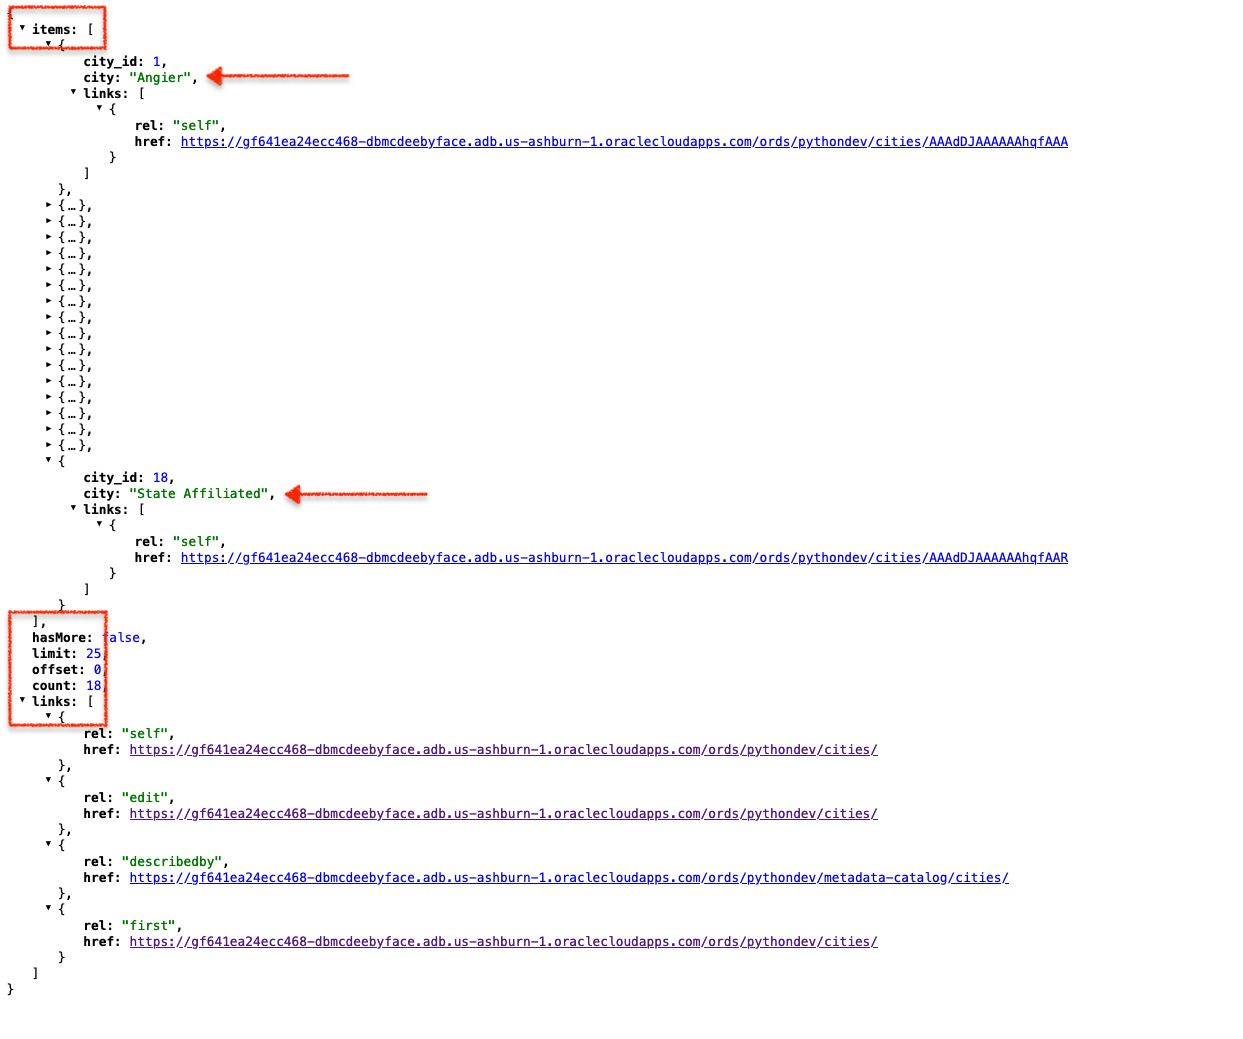
I won’t spend too much time explaining this image (you can read about it in detail, here), but I’m most interested in the city: (found under items). There are 18 cities, and I’ll need all of them for Flask. More specifically, I need them for WTForms.
About WTForms
I won’t give a crash course on WTForms, but bottom line it’s another way to extend the capabilities of Flask.
WTForms is a flexible forms validation and rendering library for Python web development. It can work with whatever web framework and template engine you choose. It supports data validation, CSRF protection, internationalization (I18N), and more.
WTForms Docs
In my scenario, WTForms allows me to easily make and handle (as in routing) forms in the Flask application. More specifically, there is a SelectFields() form that I need to use (this is just how I initially designed the app, you can review it here).
Choices
The forms have fields. Here are details on the form I’m most interested in:
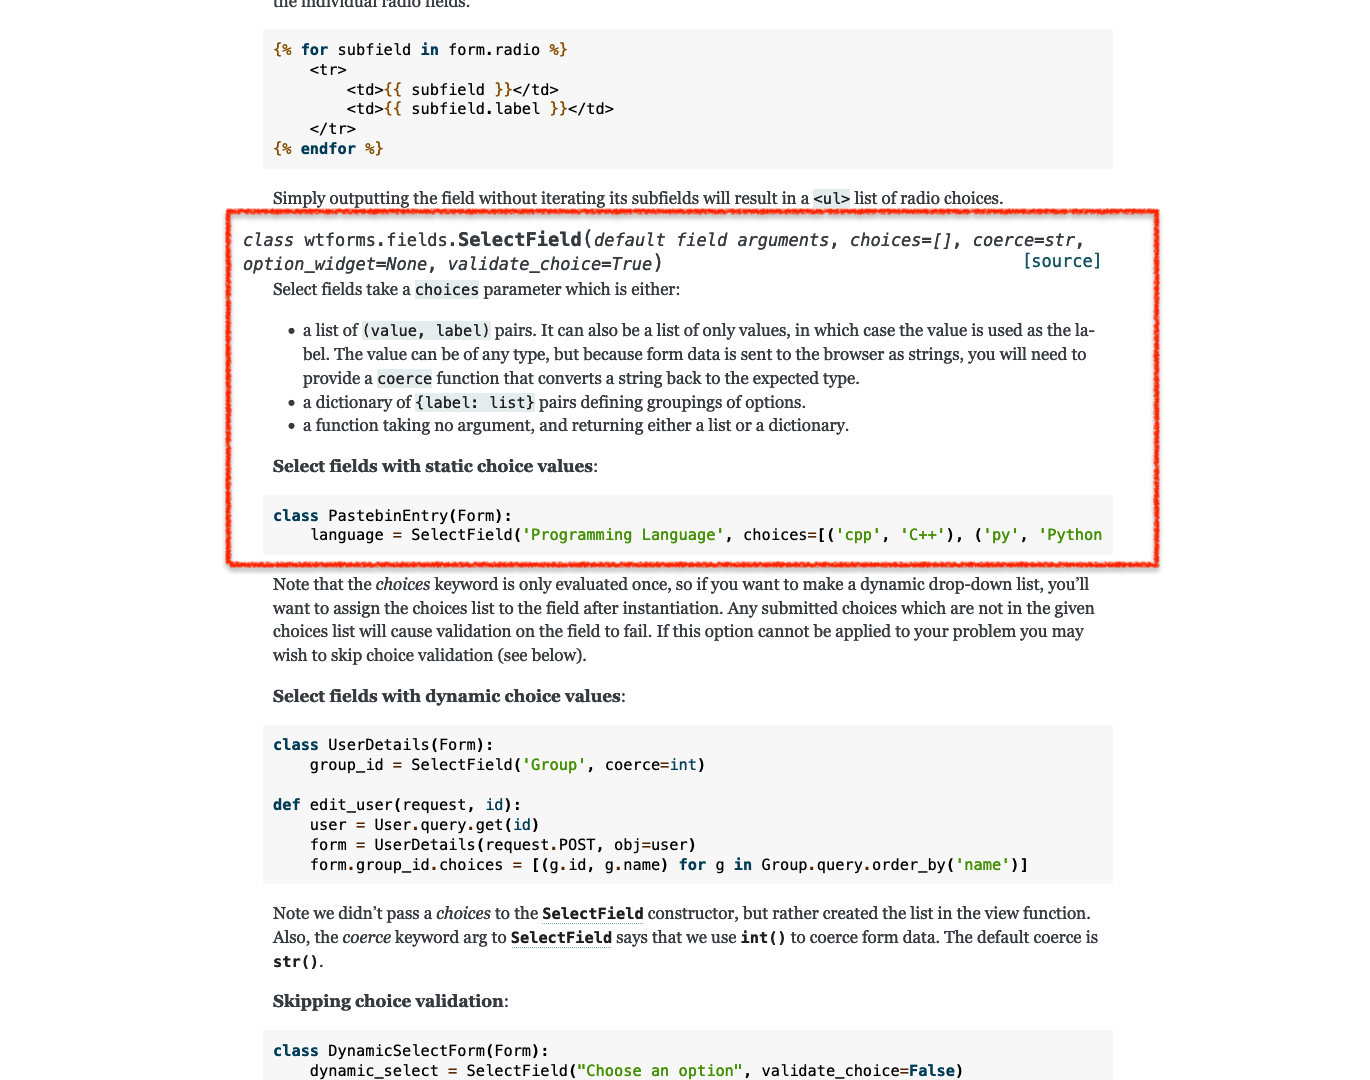
You’ll notice there are various parameters I can include, but all I care about are the choices[]. You can either hard (static) code in a list of choices, or (as I just successfully did as of this week), pass a list from an API GET request to the choices[] parameter.
If you’ve looked at the documentation, then you’ve seen that choices[] can be”passed” in one of three ways:
- a list of (value, label) pairs (it can also be a list of only values, in which case the value is used as the label)
- a dictionary of {label: list} pairs defining groupings of options, or
- a function taking no argument, and returning either a list or a dictionary
My approach used the first option. Actually, the values-only approach, in my case.
The breakdown
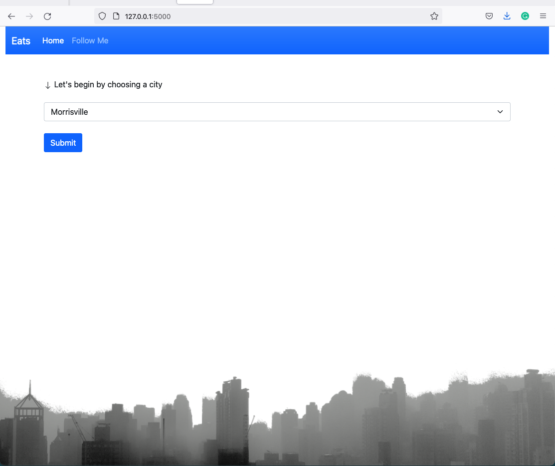
First, I’ll show the dropdown list; it will look like this in my application (FYI this actually works):
I know that video is fast, but you should be able to see the dropdown list (at around the :15-:17 mark) and how it renders.
This dropdown list is made possible from an initial GET request to my ORDS-enabled “Cities” table. And the code in its entirety (including the Flask bits), looks like this:
NOTE: I'm working off the assumption that you may have some familiarity with flask and WTForms. And also that your focus is the REST API - to - choices part of this problem.
By the numbers
Okay, a quick overview:
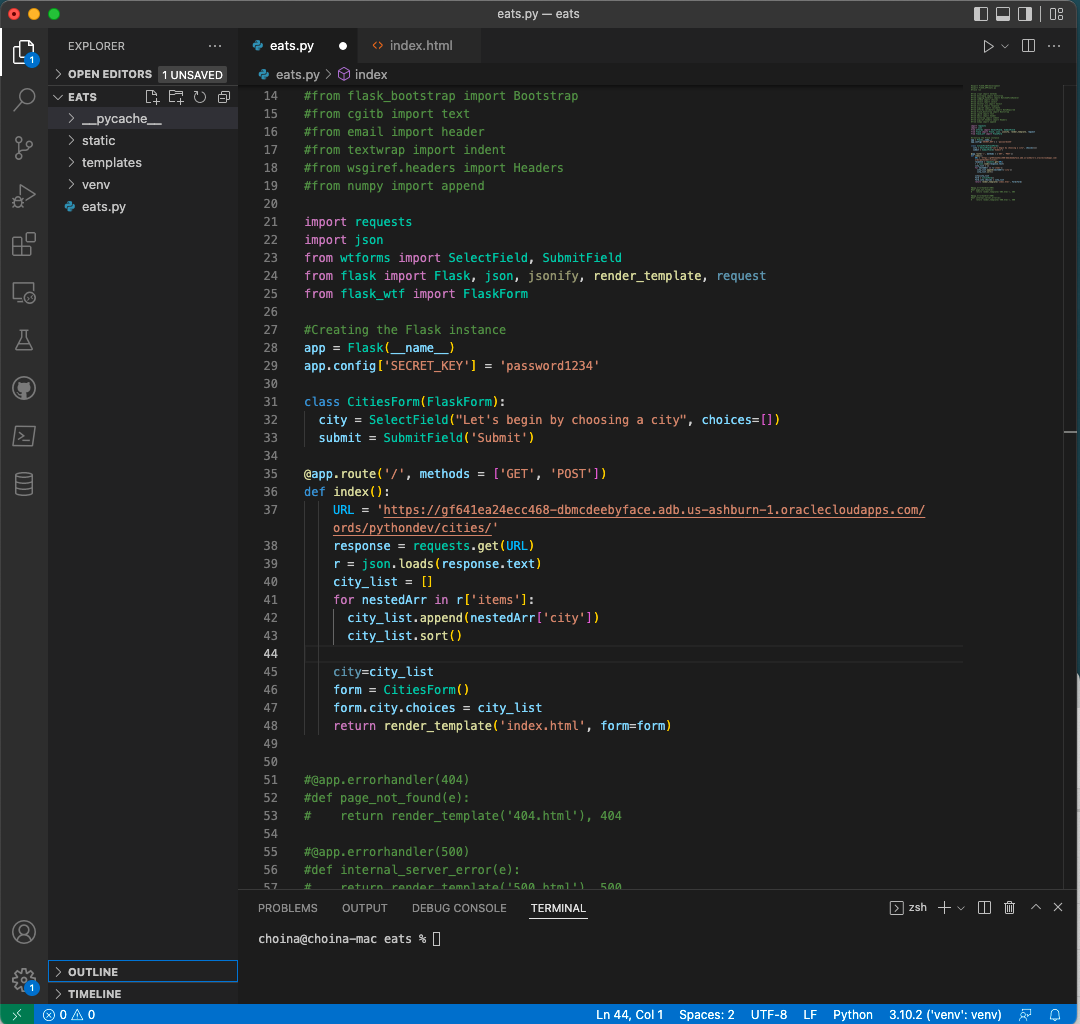
- Lines 27-29: This is pretty standard for Flask, no explanation is needed
- Lines 31-33: Are where I build out the form:
- You’ll see that
cityis the field (to select from) - The dropdown will have a heading that says, “Let’s begin by choosing a city” (you can see this in the video)
- And the choices will be a
list [] Submiton line 33 is just how you’d create the submit button
- You’ll see that
- Lines 37-39: Are also pretty standard for any GET request using the Requests library in python
NOTE: But here, you'll see that my URL is actually the URI provided by ORDS (remember, I REST-enabled my cities table - that is the "endpoint" we are seeing)
- Line 40: I make a list (it’s empty at this step, so sad)
- Lines 41-43: This is the pièce de résistance.
- Here we perform a loop through the
items:in the JSON response, and since this is a nested array, you have to specify what array you want and what exactly in that array you want to pull out (in this case the “city”)
- Line 43 was a suggestion by thatjeffsmith, to display the list in alphabetical order (I must confess, it does better)
- Here we perform a loop through the
- Lines 45-48: These are pretty standard for Flask as well. You need to set
city(in line 32) equal to thecity_listso WTForms knows where theSelectField(choices=[])comes from
The Code
With the brief explanation out of the way, here is the code. Please, help yourself:
#For the GET request portion, you'll at a minimum need requests and json. If you are working in Flask already, then you know the rest.
import requests
import json
from wtforms import SelectField, SubmitField
from flask import Flask, json, jsonify, render_template, request
from flask_wtf import FlaskForm

#Creating the Flask instance.
app = Flask(__name__)
app.config['SECRET_KEY'] = 'password1234'

#Creating the Form.
class CitiesForm(FlaskForm):
  city = SelectField("Let's begin by choosing a city", choices=[])
  submit = SubmitField('Submit')

#Routes, used for displaying the html on your web app.
@app.route('/', methods = ['GET', 'POST'])
def index():

#This is the section where you perform the GET request to retrieve the JSON from your ORDS endpoint.
    URL = '[your ORDS endpoint]'
    response = requests.get(URL)
    r = json.loads(response.text)

#Creating the list of cities; which will be populated shortly.
city_list = []

#Looping through the nested array (from the inital JSON / API response).
    for nestedArr in r['items']:
      city_list.append(nestedArr['city'])
      city_list.sort()

#Finishing touches so WTForms, and Flask know where to look. And also setting up how/where the html on your web application renders.

    city=city_list
    form = CitiesForm()
    form.city.choices = city_list
    return render_template('index.html', form=form)
Obviously, you’ll want to change up some of the names. But the ORDS pieces should remain pretty similar.
Next up
My next steps are to create a second and third dependent dropdown for the app. What I mean is that, based on a user’s city selection, that city would then be used as a query parameter for a subsequent GET request (to my ADB). And ORDS would respond with a list that includes restaurant information for the target city (everything else would be excluded).
If you’ve made it this far and you have any questions, please send me a note.
And if you think this is worth sharing, and that it might help others, please pass it around!
Cash me outside
As always, you can find me on:
Leave a Reply