Table of Contents
Intended Audience/Purpose
Does this describe you?
You have an Oracle Cloud Infrastructure Domain (OCI), or intend to set up a Domain in OCI, so that you may register an "Integrated Application" therein, and use the JSON Web Tokens (JWTs) provided by OCI Identity and Access Management (IAM) to request access to protected ORDS Resources (aka ORDS APIs).
If this describes you, then keep reading!
JWTs with Entra? If you are looking for how to configure ORDS to be used with Microsoft Entra JWTs, then you'll want this tutorial.
Creating a Domain
NOTE: Skip this section if you already have a Domain or know how to set one up!
Assuming you are at the central OCI Console, click the navigation icon at the top of your screen. Then, navigate to Identity & Security and click Create domain.
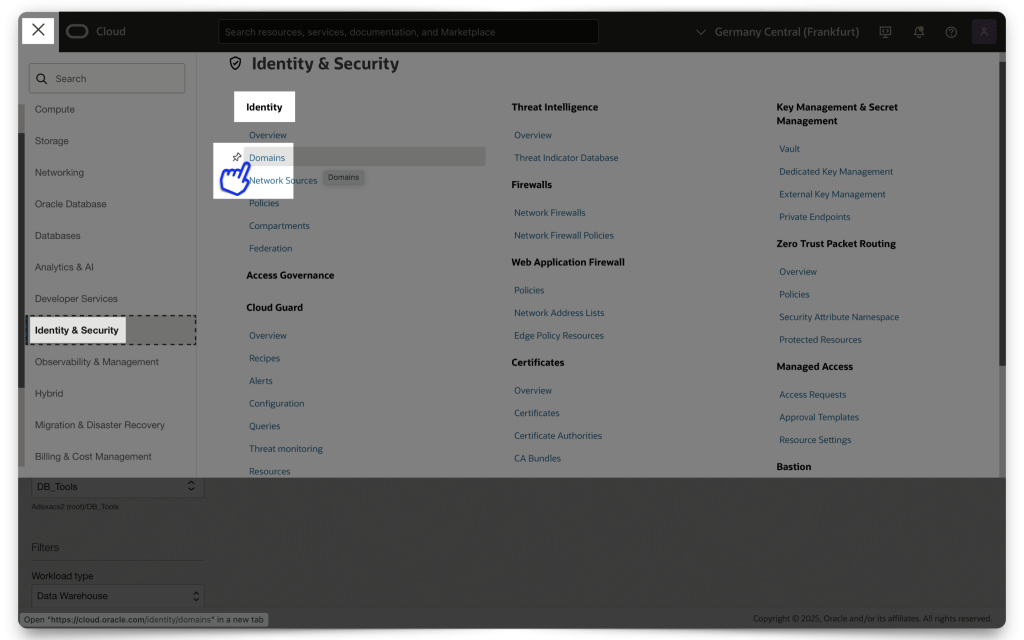
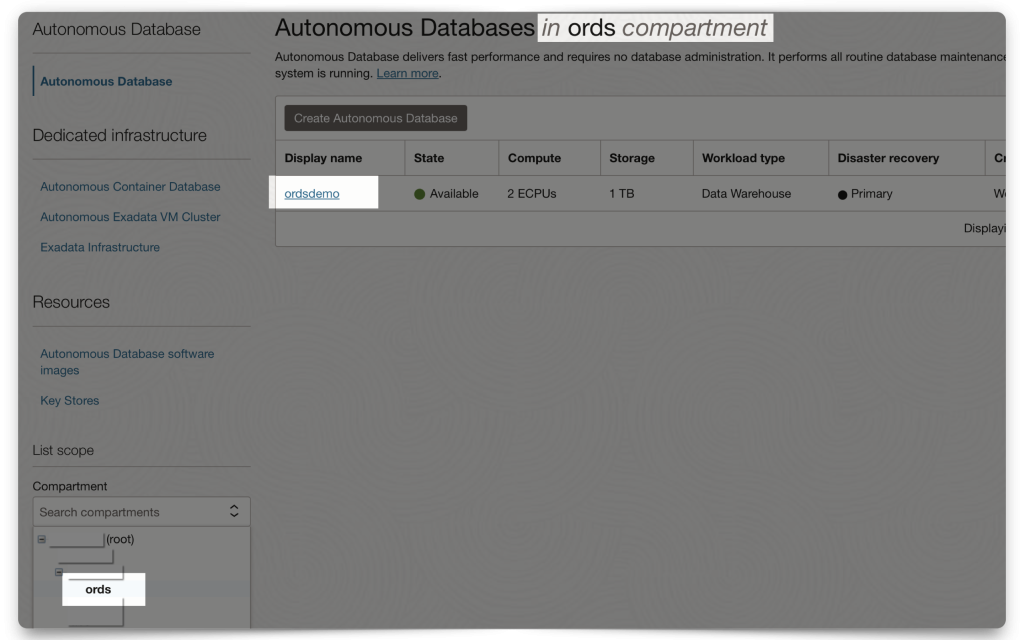
NOTE: Make sure you are in your correct Compartment (this will be up to you to decide)! Everything I show here is done within the same /ords Compartment.
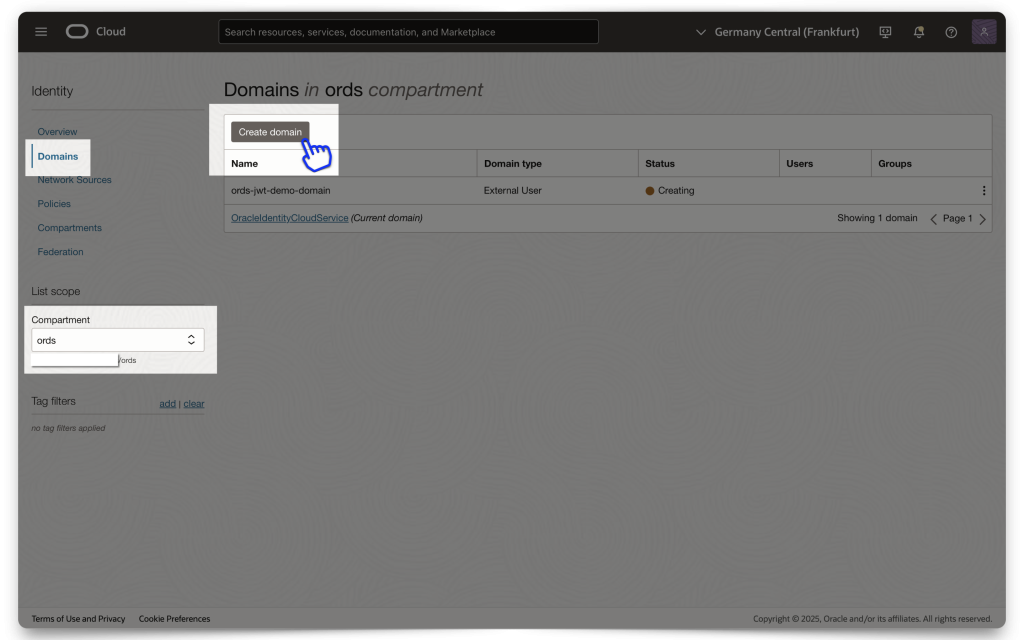
In this example, I’ve chosen to create an “External User” Domain type. I haven’t tested with any other Domain types, but I assume they all work similarly.
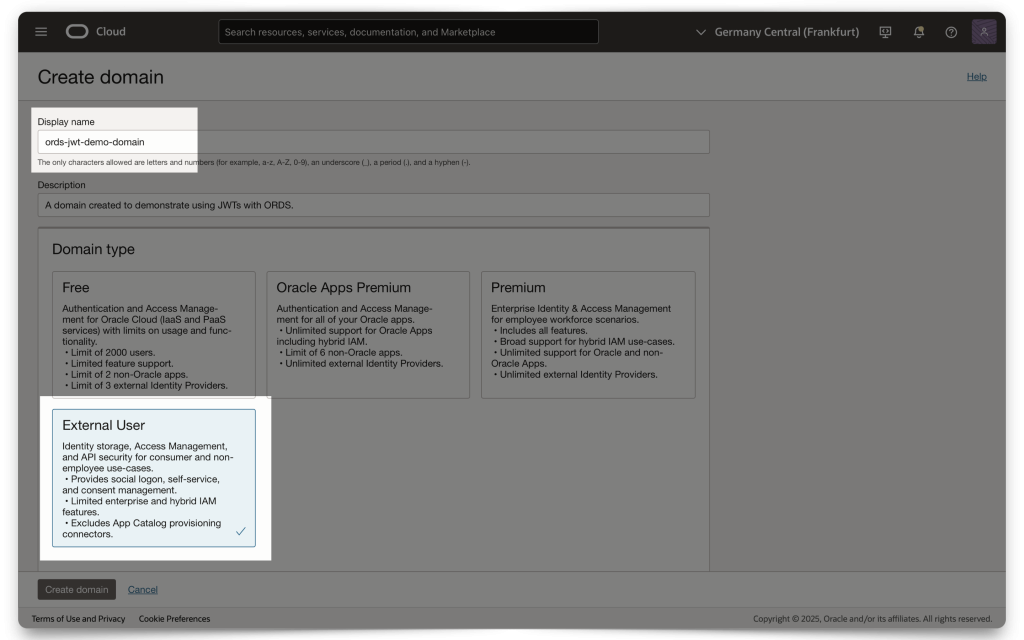
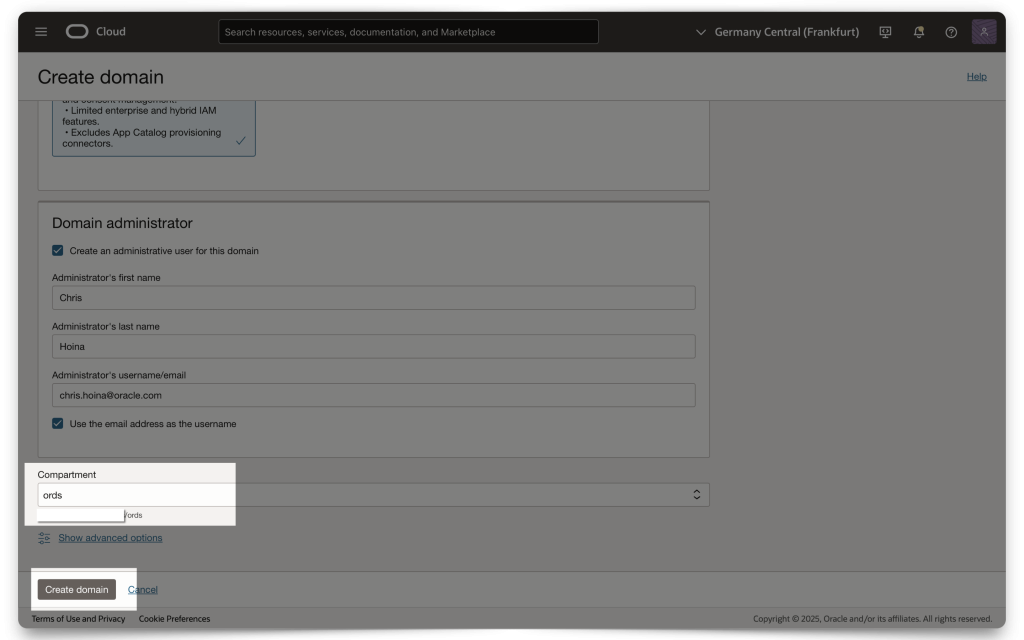
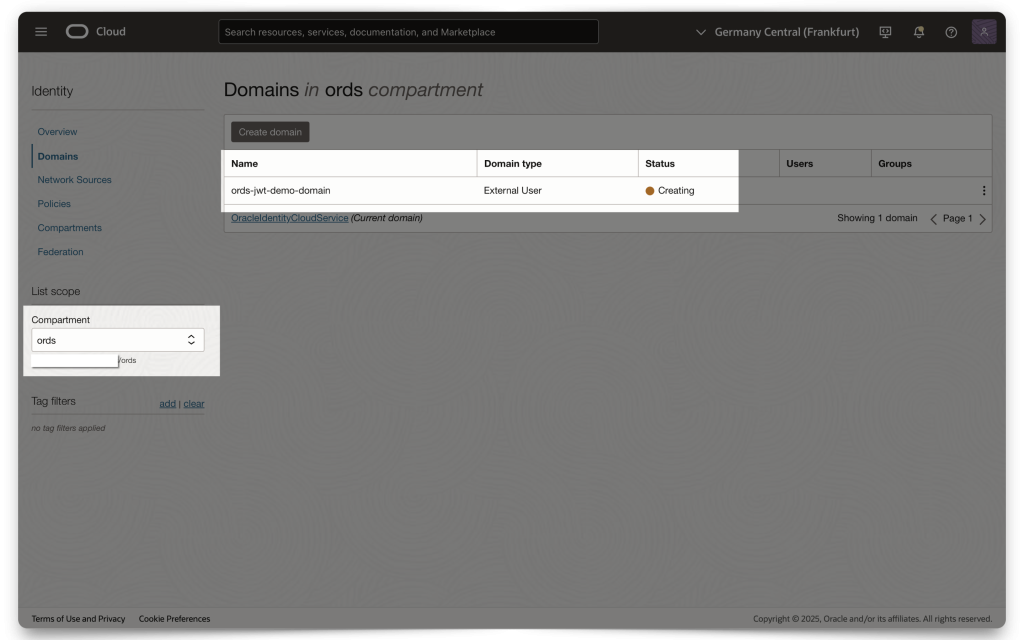
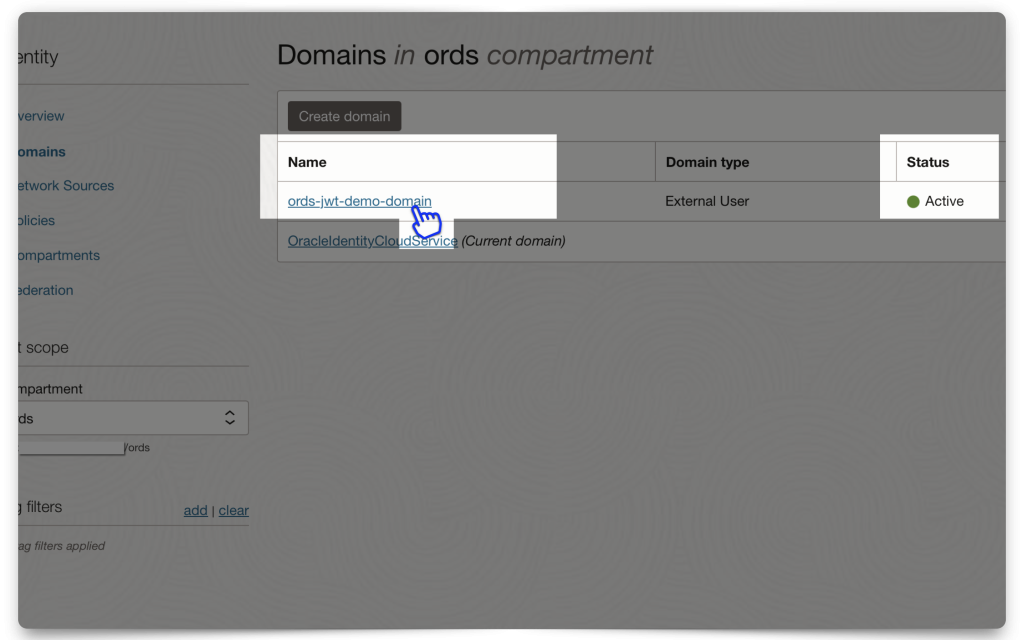
Once you’ve entered all the information (e.g., Domain administrator values and Compartment), click Create Domain. Then, click on the Domain you just created. Next, you’ll need to create and add an “Integrated application.”
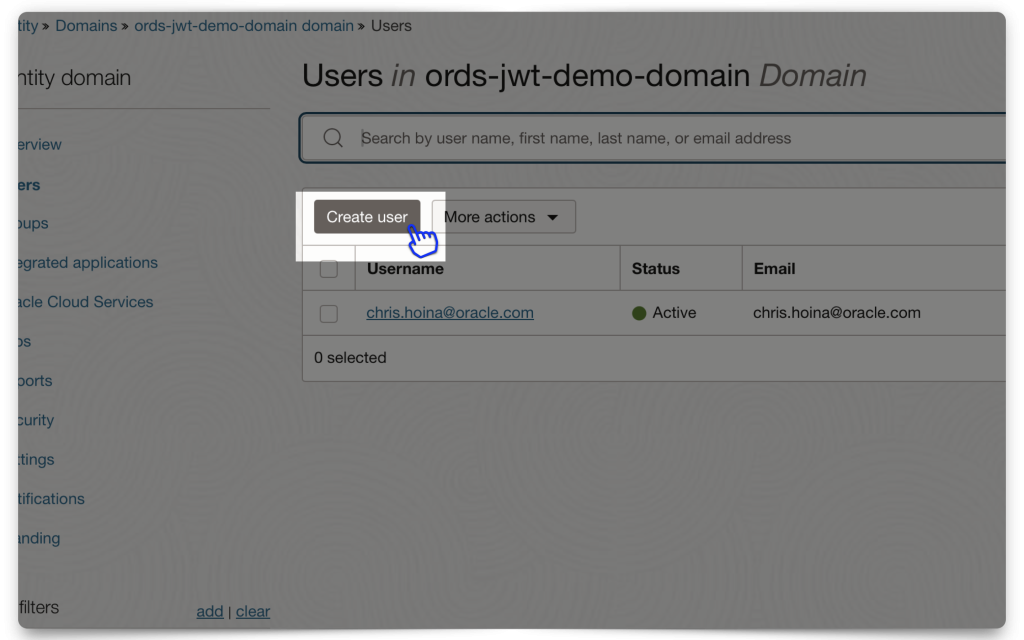
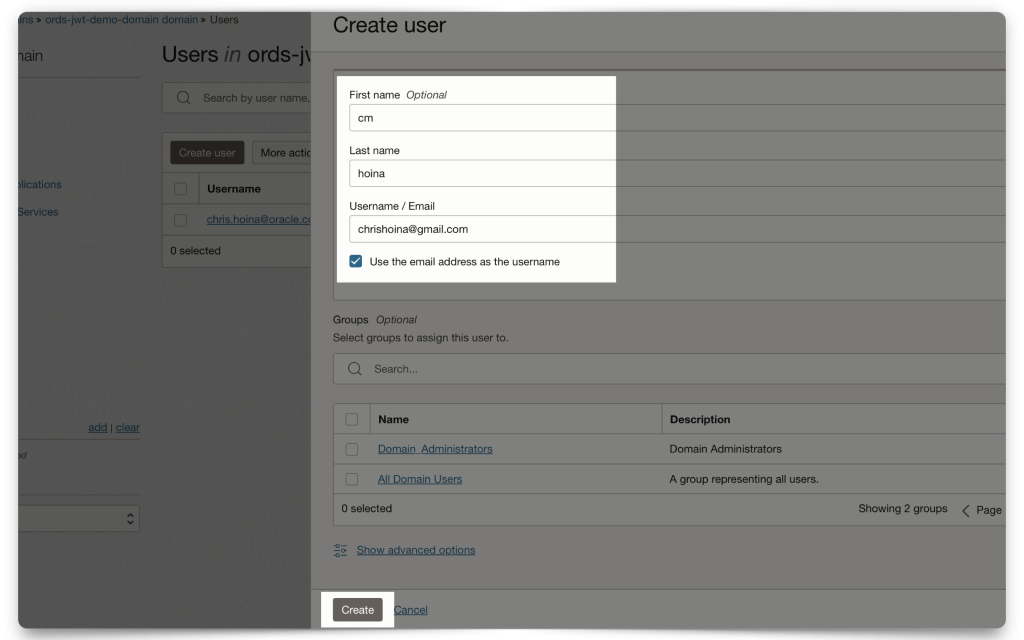
Mini-tutorial: Adding a user to your Domain
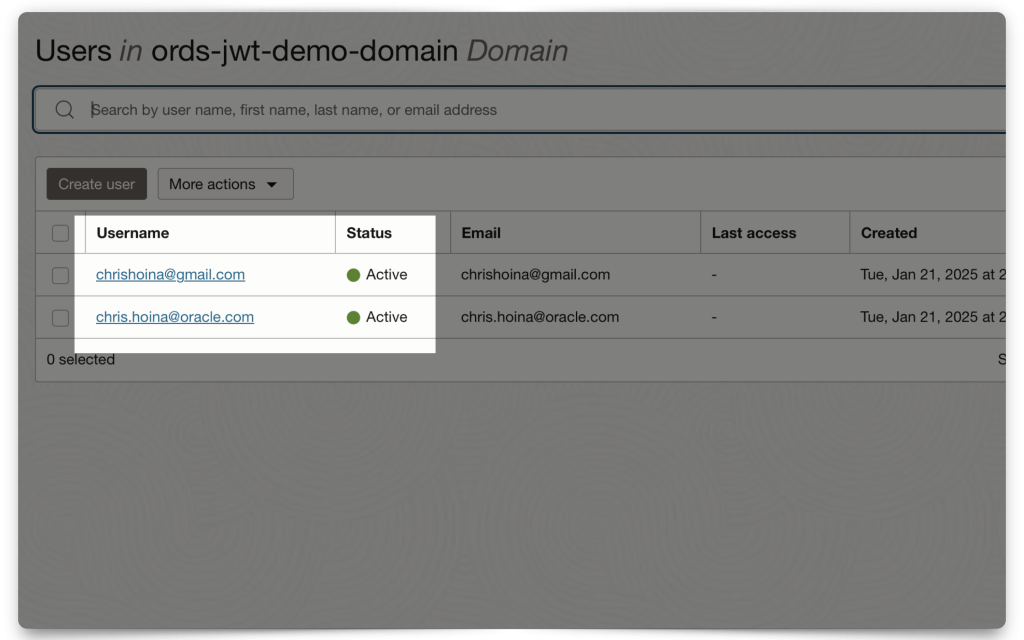
In this mini-tutorial, I demonstrate how to create a new user. Notice how I am using a personal email account, you can totally do this!
Once you’ve added this user, they recieve a password reset email for this Domain. They must create a new password before logging in.
NOTE: I'll be logging in as this user for the JWT demo.
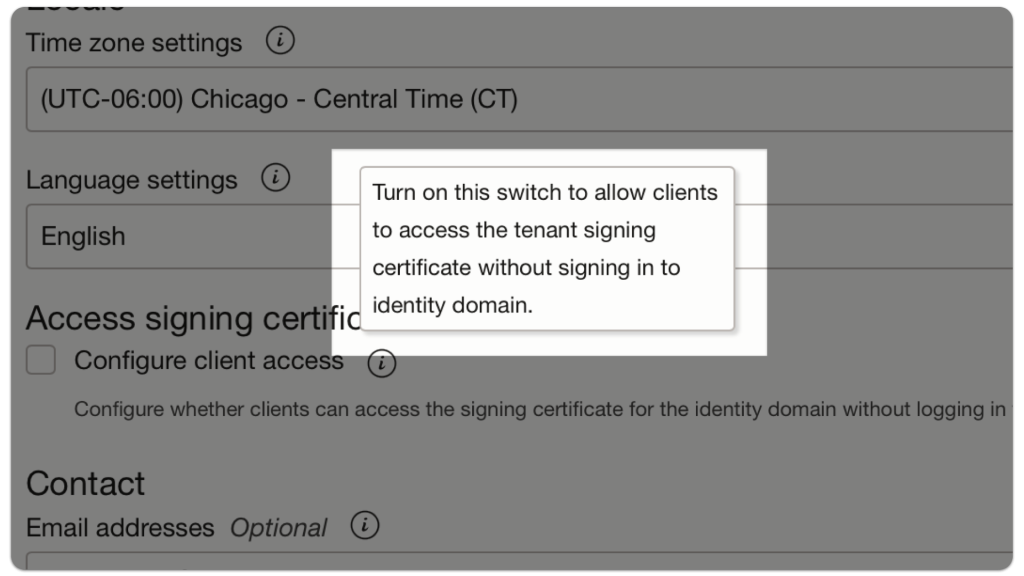
Configure client access
NOTE: This box must be checked so your application can automatically access a JWK URL (to be used for decoding a JWT) without having to sign in to the OCI tenancy.
First, navigate to your domain, then select Settings.
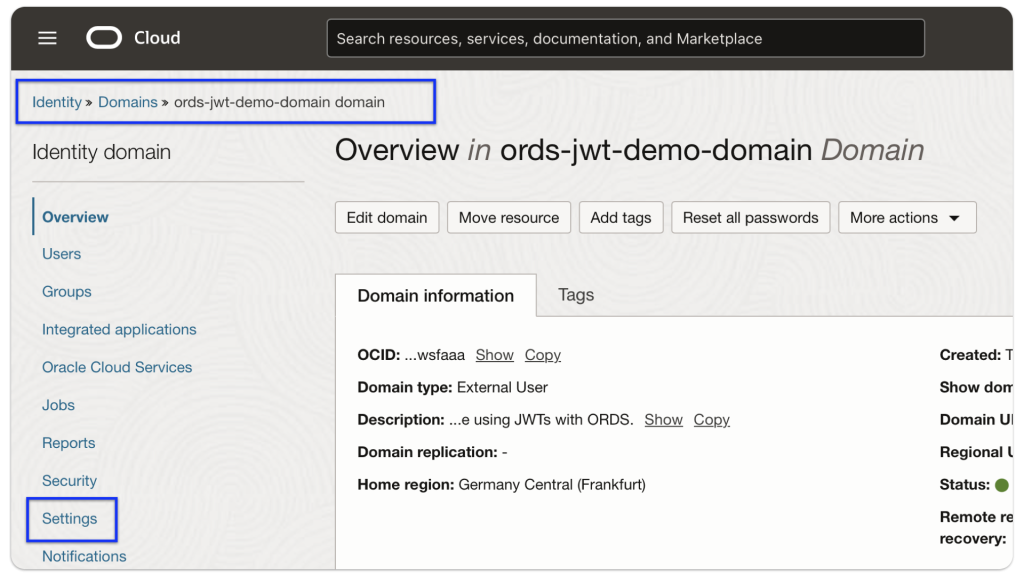
If this Configure client access box is unchecked, check it, then select Save Changes (the button at the bottom of the screen).
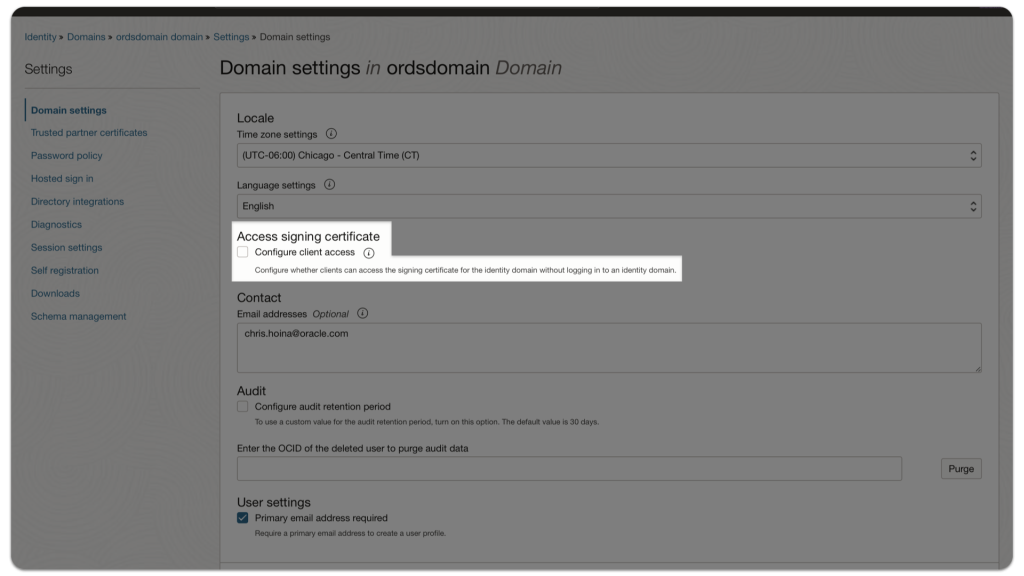
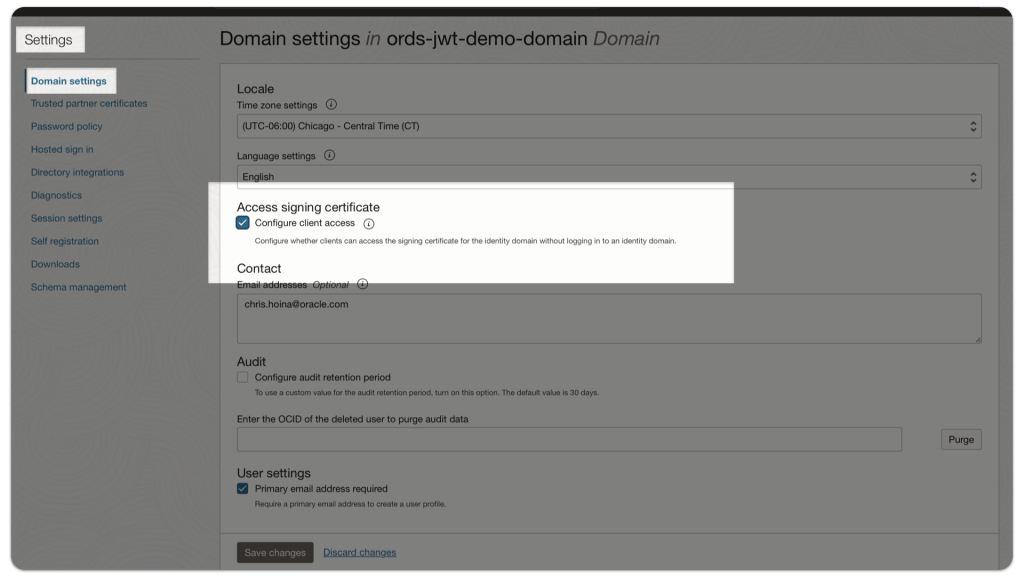
That’s it. You’re done!
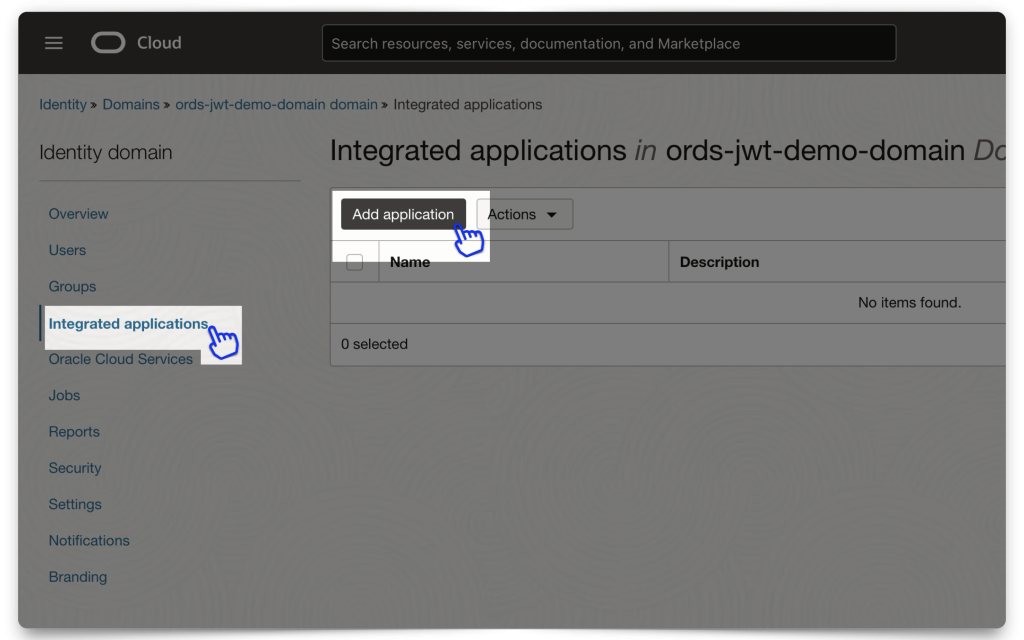
Adding an Integrated Application to the Domain
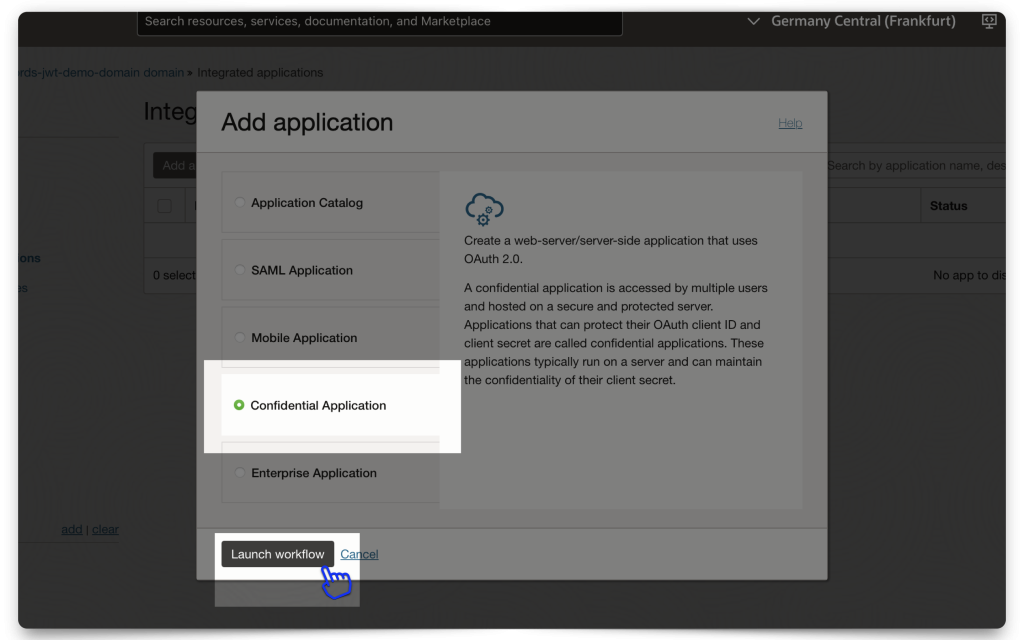
Adding the application
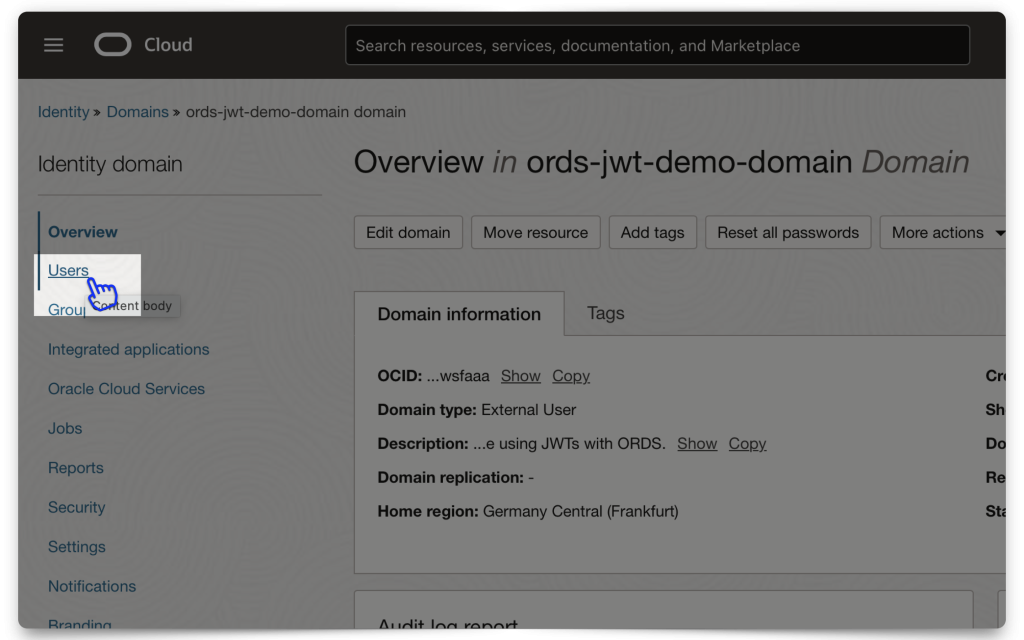
From within your Domain dashboard, click the Integrated Applications menu item. The “Add application” modal will appear. Read through the application types and choose the most appropriate one. For this demo, I selected “Confidential Application.”
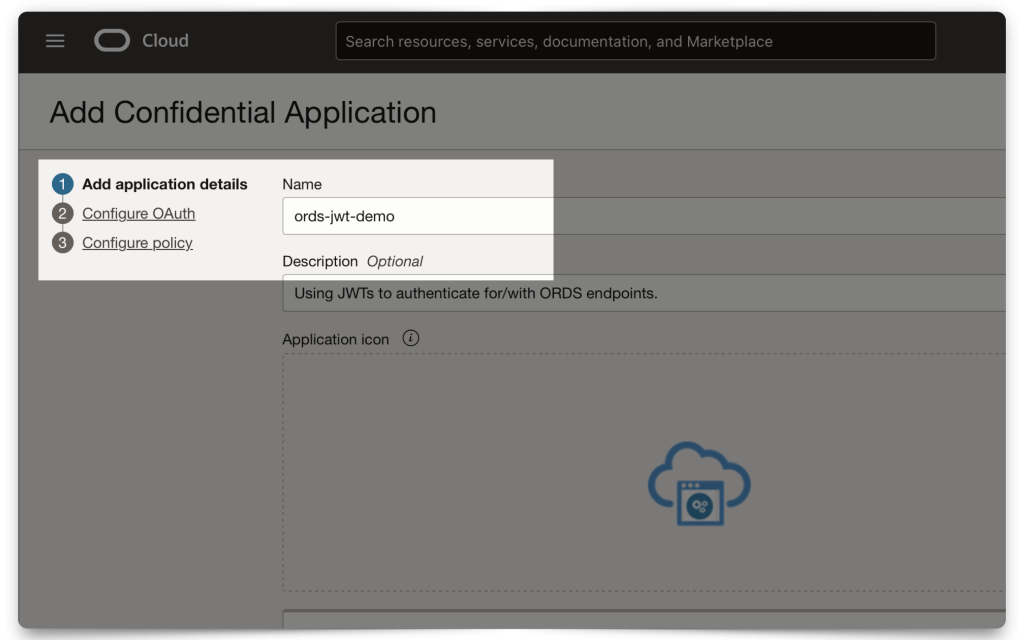
Continue filling in the modal fields. Make sure you choose a unique name!
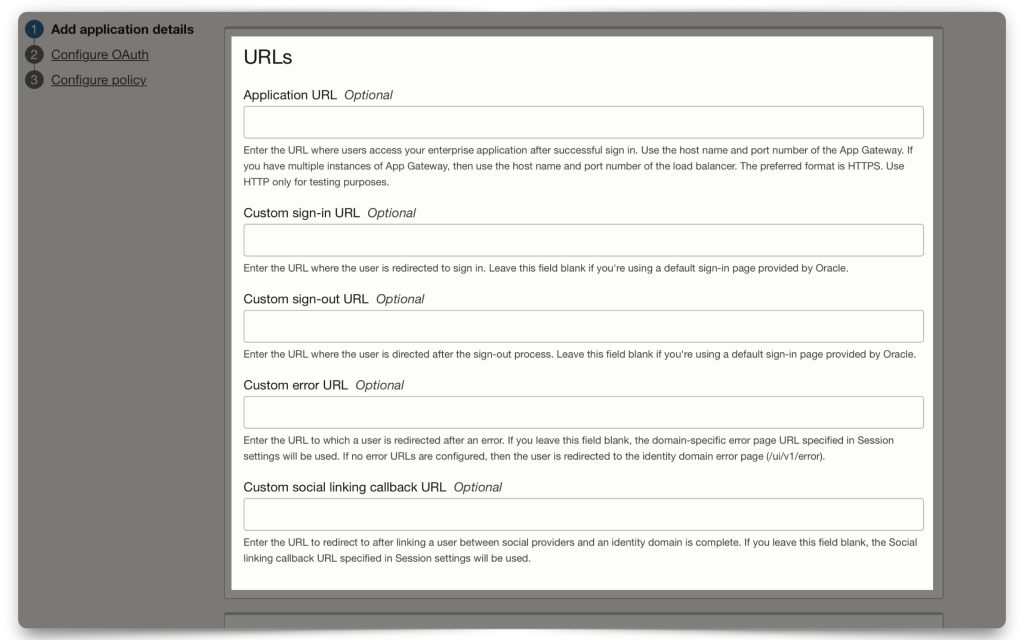
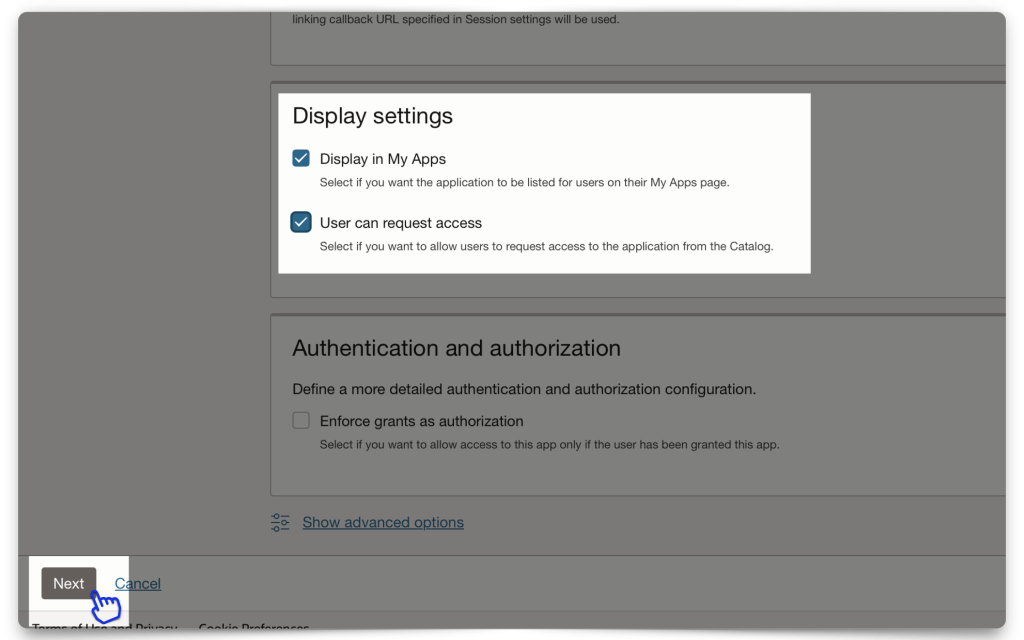
I’ve left the URLs section empty for this demo and kept the Display settings checked. The Display settings are options for users when logging into their Domain (i.e., they don’t impact this workflow, but they are nice to have set for later).
PRO-TIP: Even though the Description is optional, I recommend including at least a brief sentence. Trust me, your future self will thank you later! Oh, and this same advice applies to your ORDS Resource Modules too!
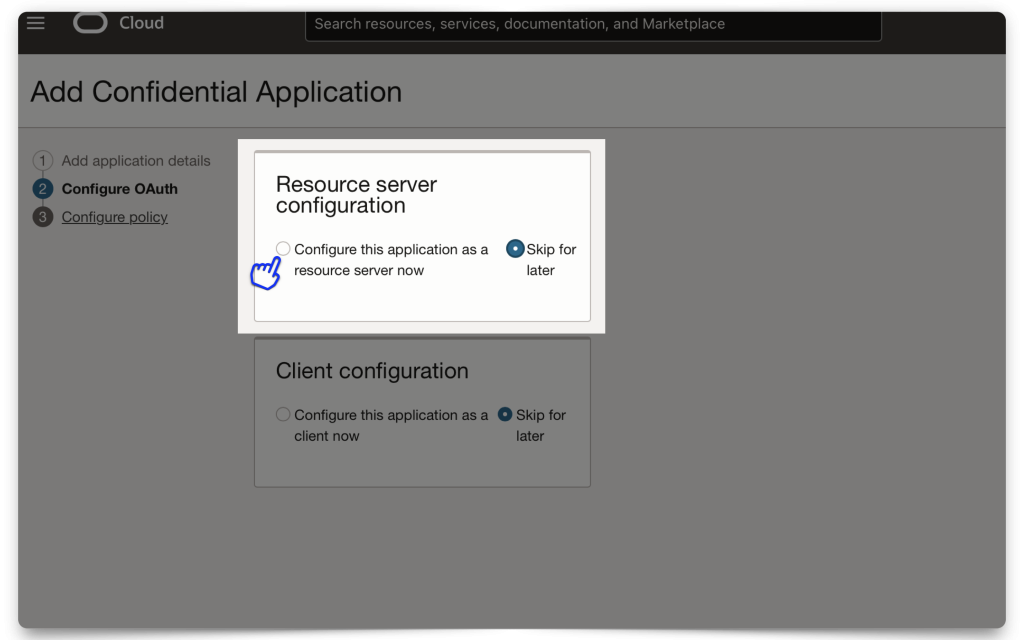
Click Next to continue to the Resource server configuration section.
Configuring OAuth2.0
In this section, you’ll configure your Resouce server and Client. First, we’ll create a Scope1.
Resource server configuration
When you configure your Scope, you must include a Primary audience field. Here, I’m just choosing the Domain’s name. The Primary audience needs to be structured exactly like this (with the trailing backslash)! Next, create a Scope (I’m using dot notation, since this will mirror the privilege I’ll create in ORDS, later).
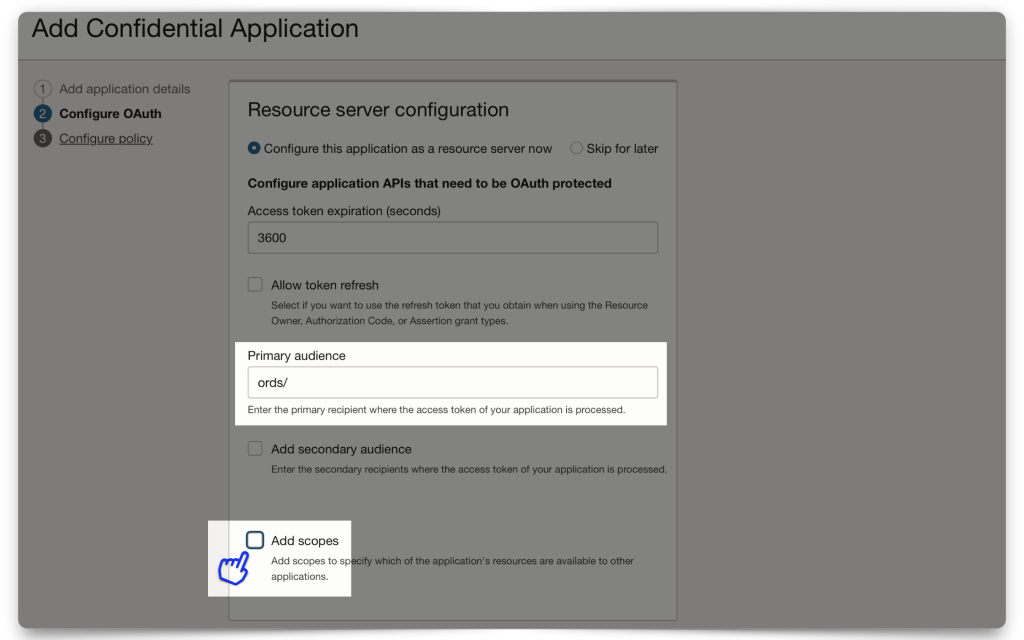
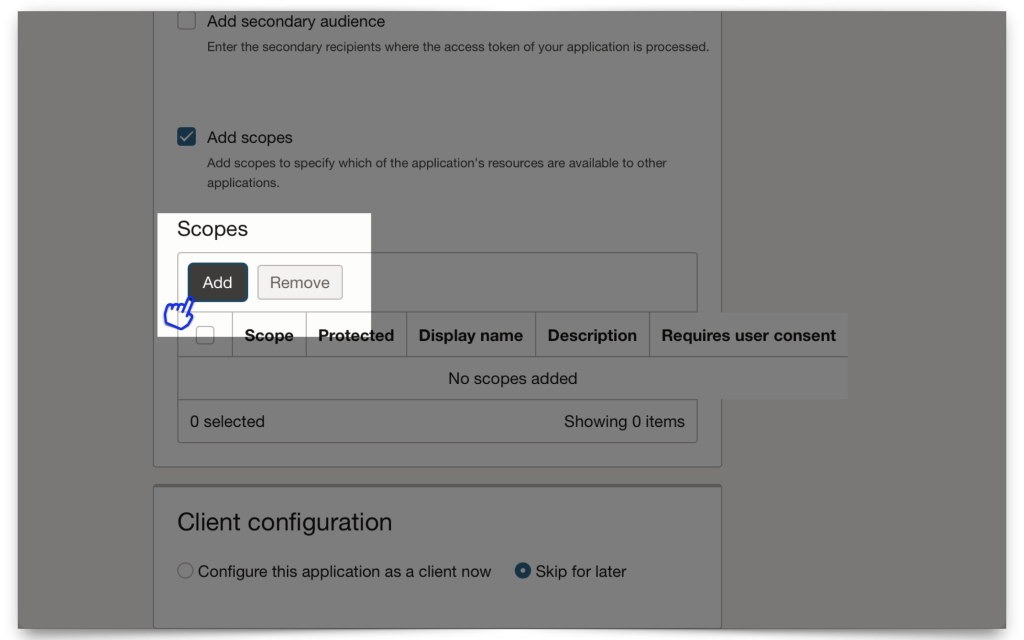
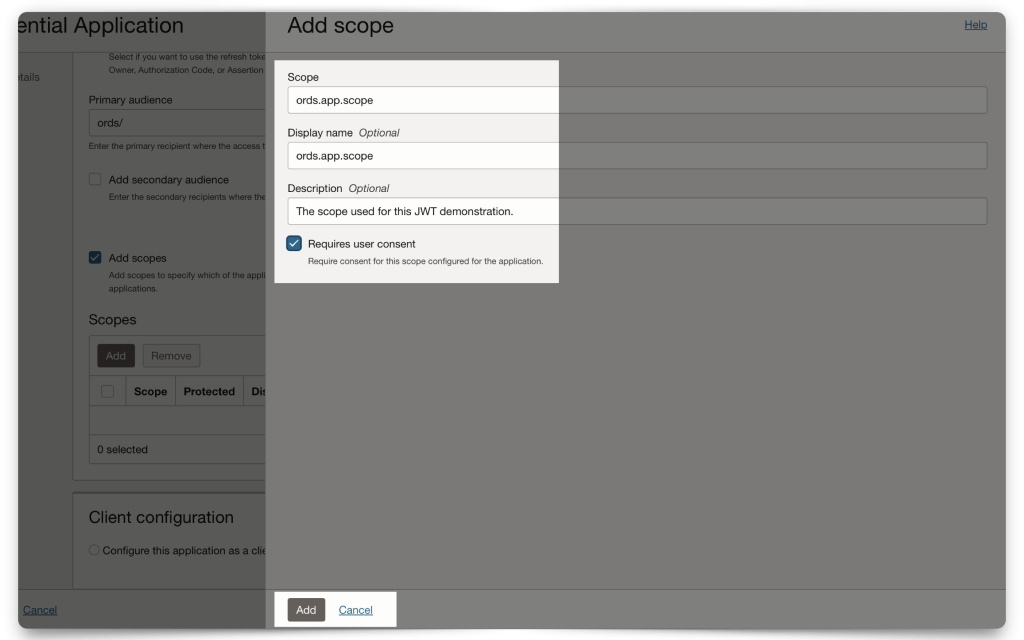
When finished, click Add.
Client Configuration
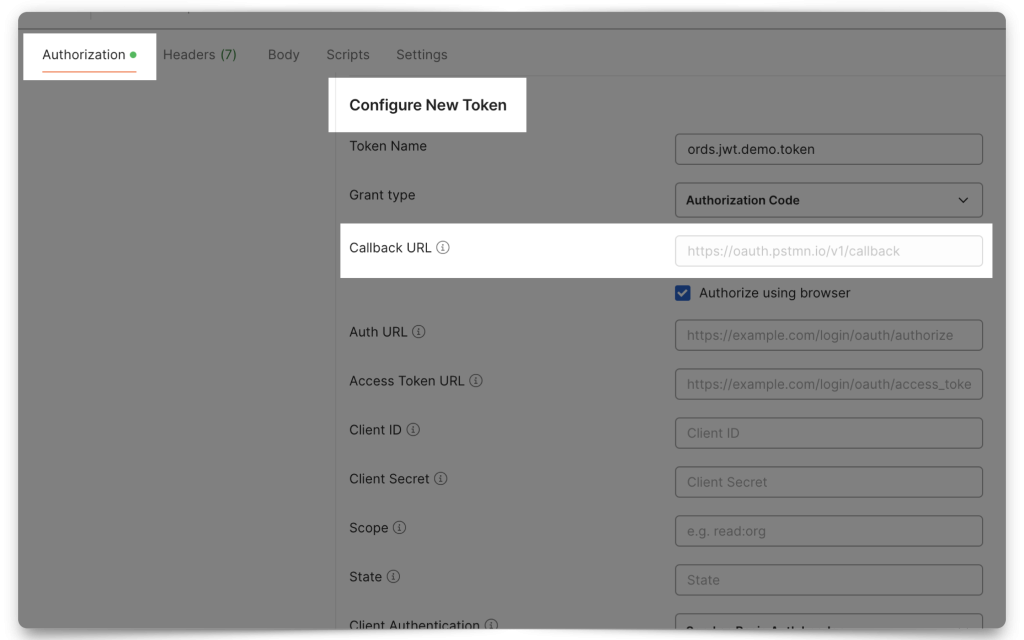
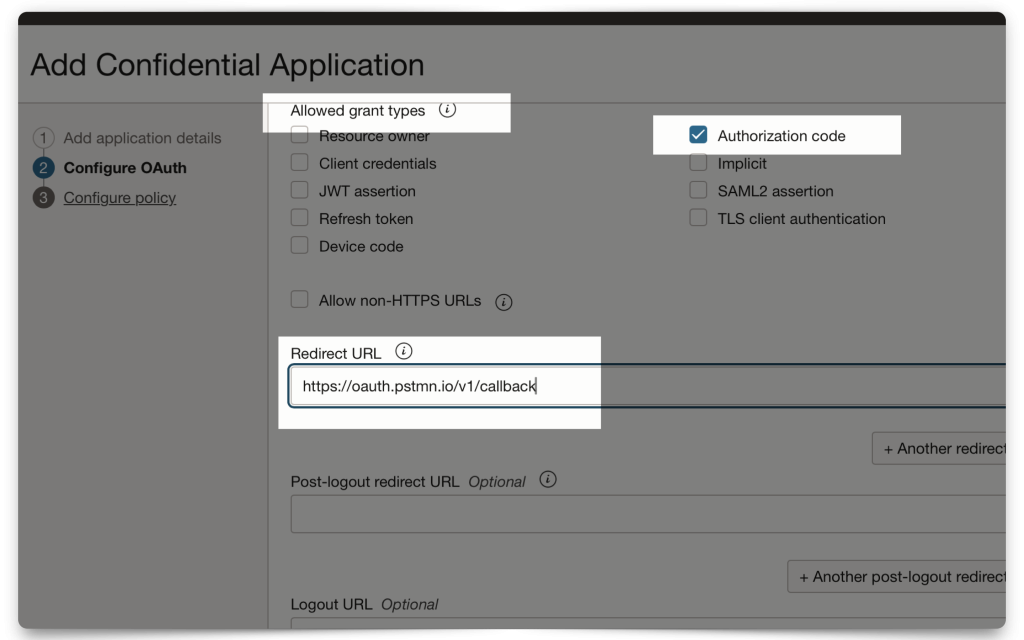
Next, you’ll include details about your client. In this demo, I use Postman as a client application stand-in. For this example I’m using the Authorization code grant type2, along with a Redirect URL.
FYI: Postman has a /callback URL that you can use as a Redirect URL.
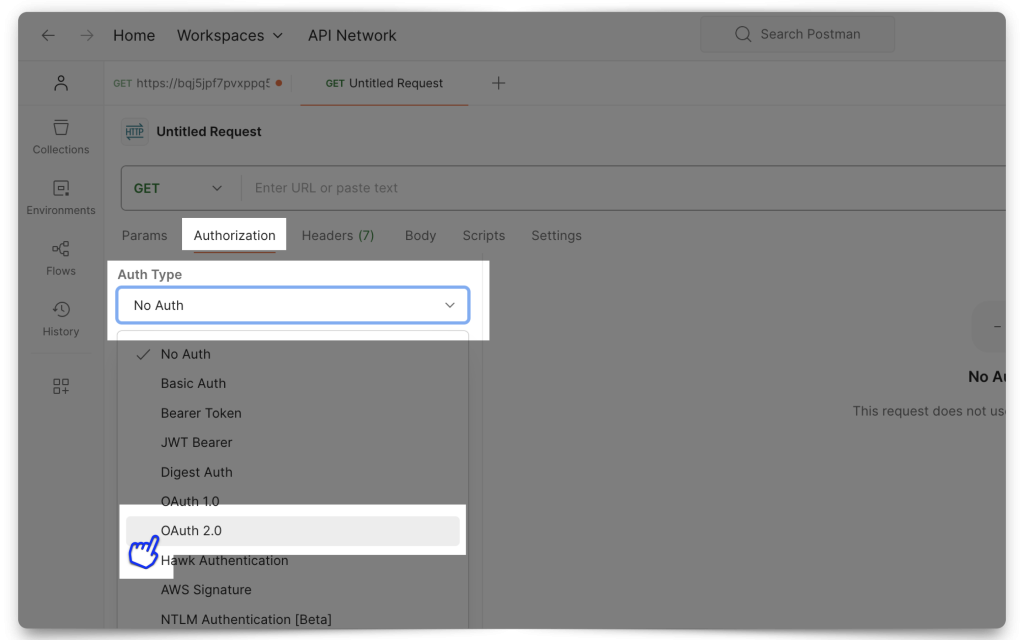
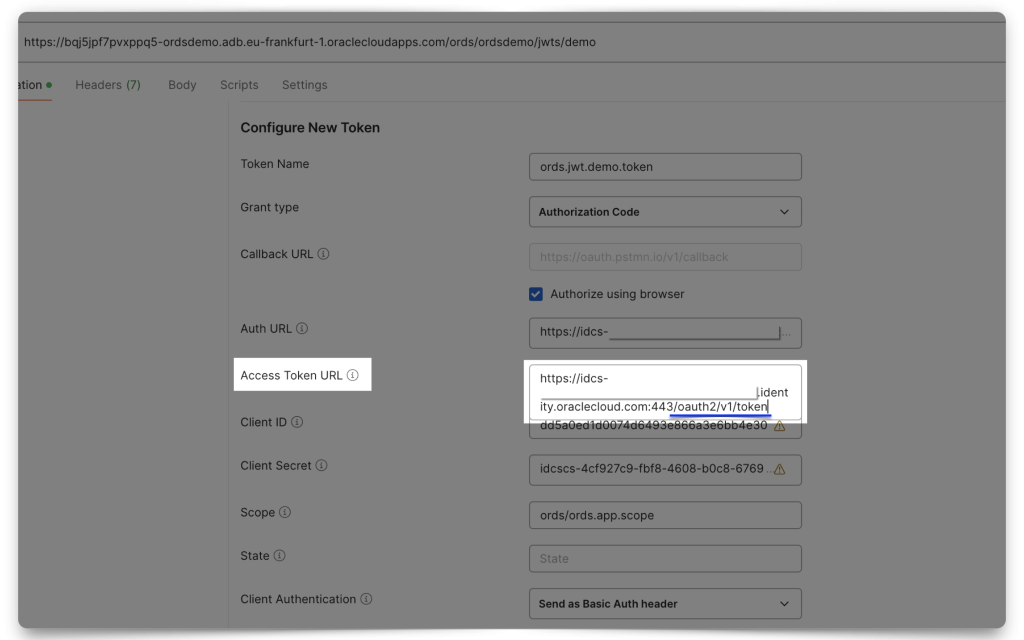
Mini-tutorial: How do I find Postman’s Callback URL?
From the Authorization tab, select OAuth 2.0. Then scroll down to the Configure New Token section. There you will find the Callback URL. Copy it. You’ll need it!
INFO: The "Redirect URL" is simply the location that OCI IAM should send you back to, once you have authenticated/retrieved a JWT. If this doesn't make sense, don't worry, you'll see that in practice in a later section.
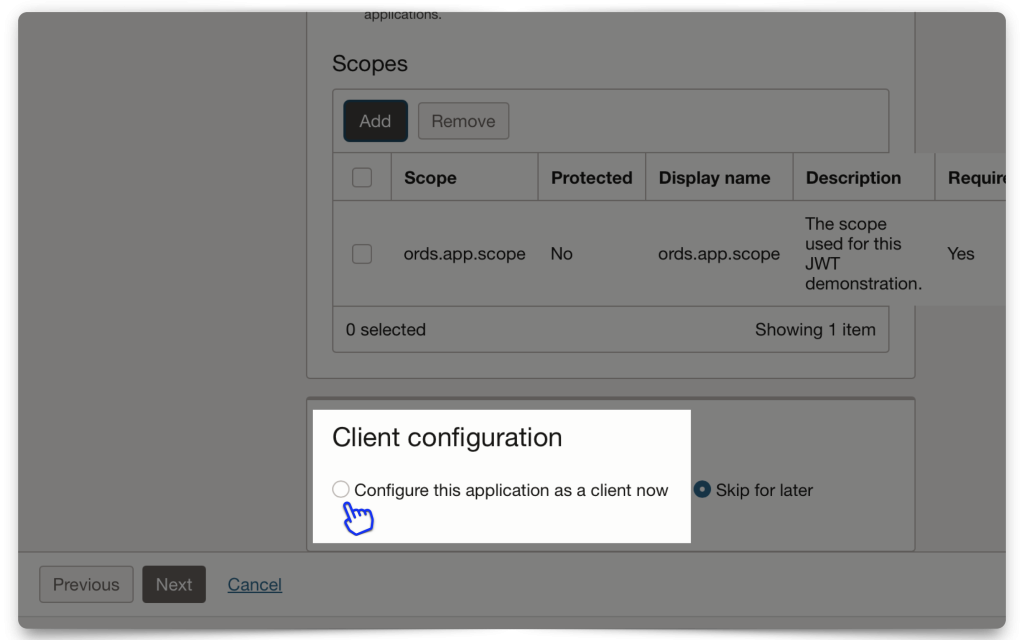
I’ve chosen “All” for the Token issuance policy. Next, click Finish.
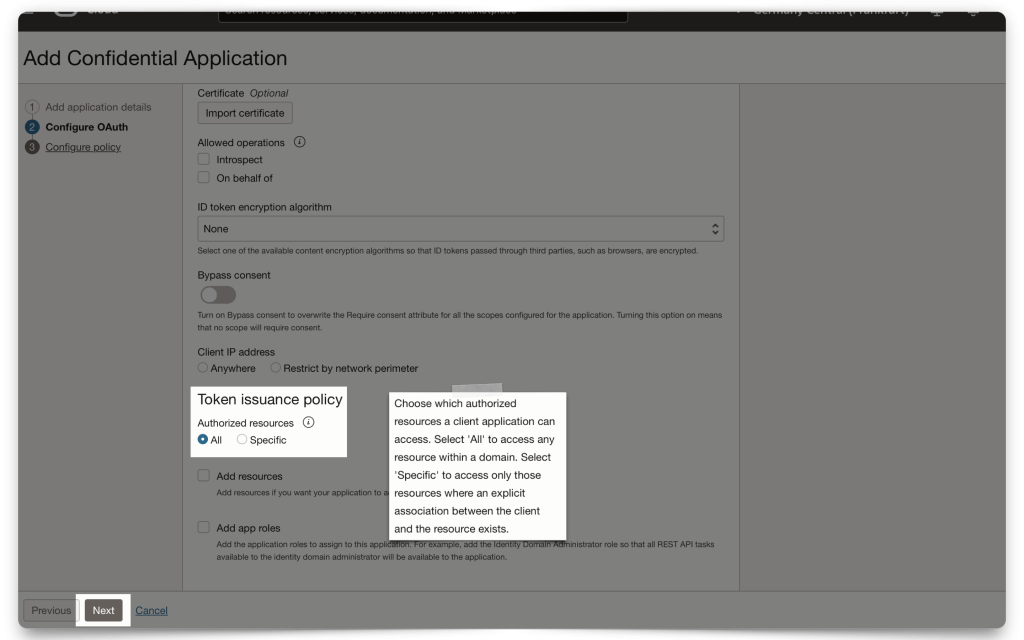
TIP: Click the (?) and you'll see a pop-up with information that can help you decide which option is best for you. For demonstration purposes, "All" is the most generous option.
Issuing a POST request to obtain a JWT
You can send off that initial POST request to obtain the JWT from IAM with your Domain set. You’ll then use the details contained in that JWT to configure ORDS.
Gathering the required values for the request
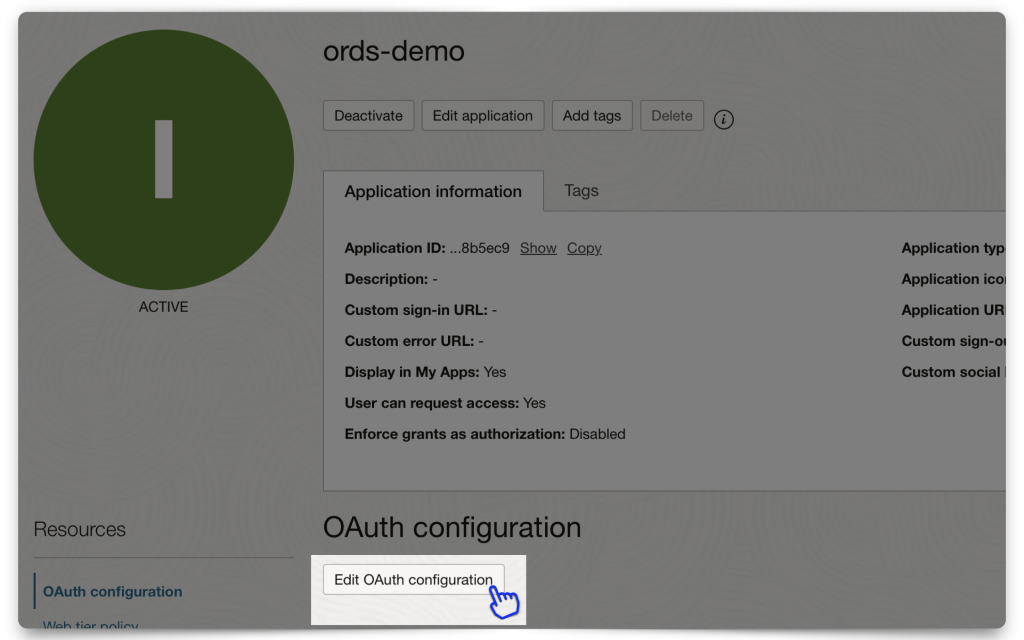
If your application hasn’t already been activated, do so now.

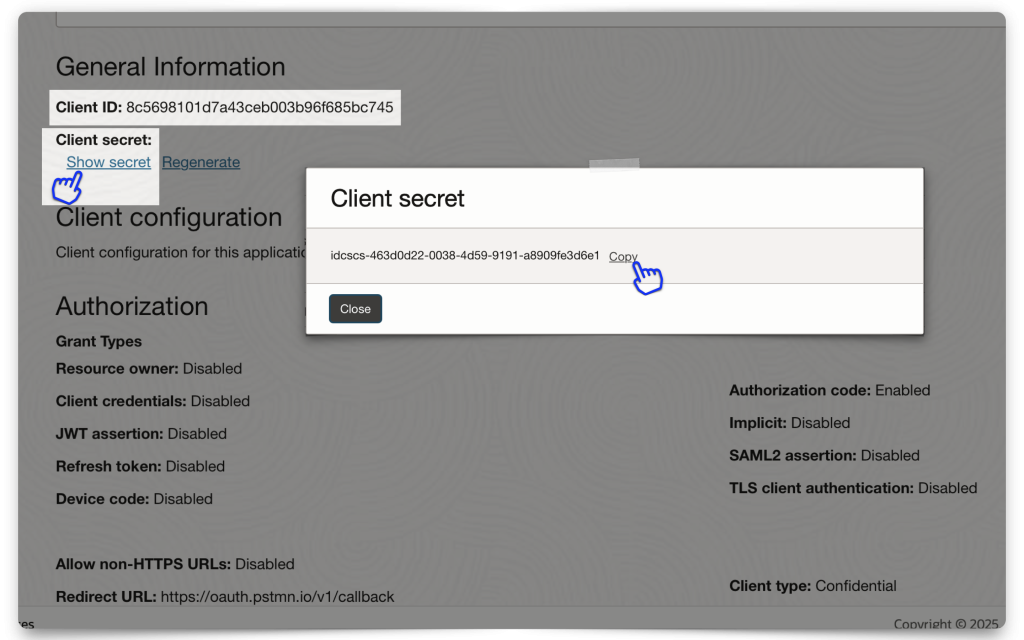
Next, click the Edit OAuth configuration button and retrieve your Client ID and Client secret. Save it to a clipboard or your environment files (if using this for an application).
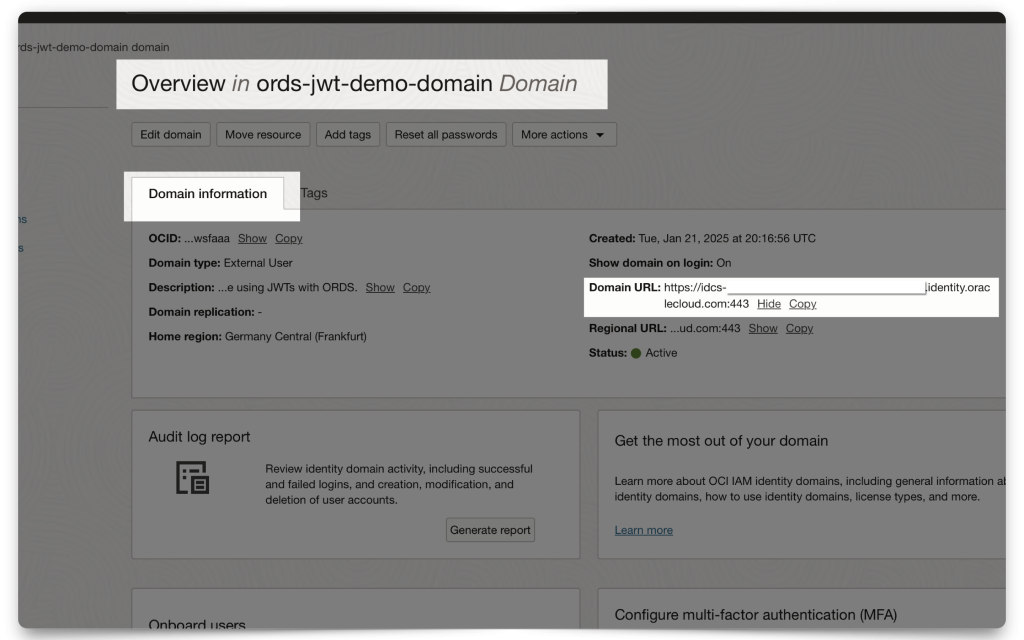
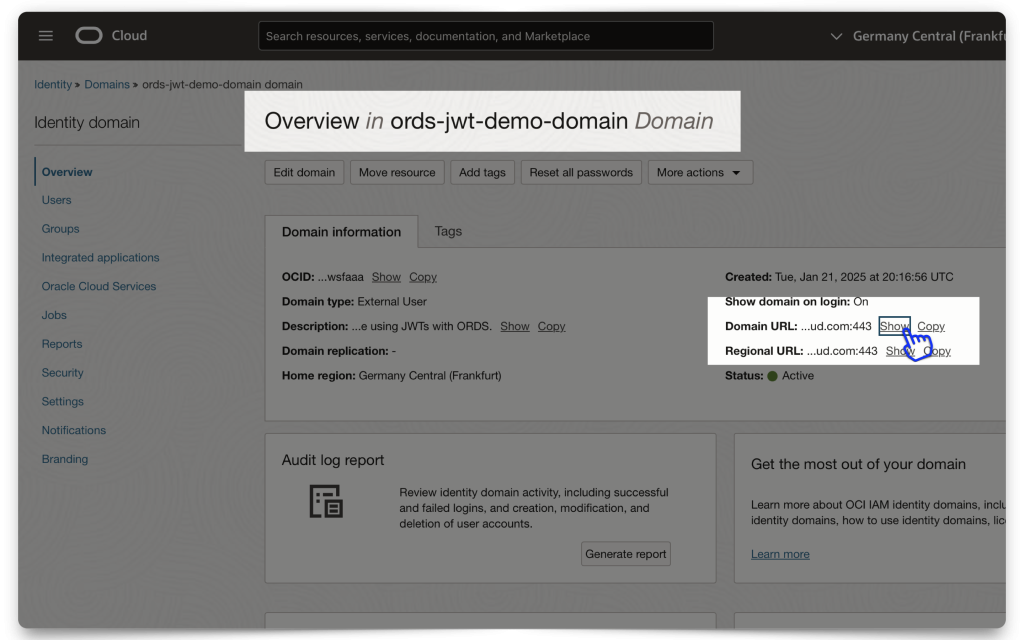
You will also need the Domain URL. Navigate to your Domain’s main dashboard (❗️make sure you are still in the correct Compartment). Then copy the Domain URL to your clipboard, or environment file (aka .env file).
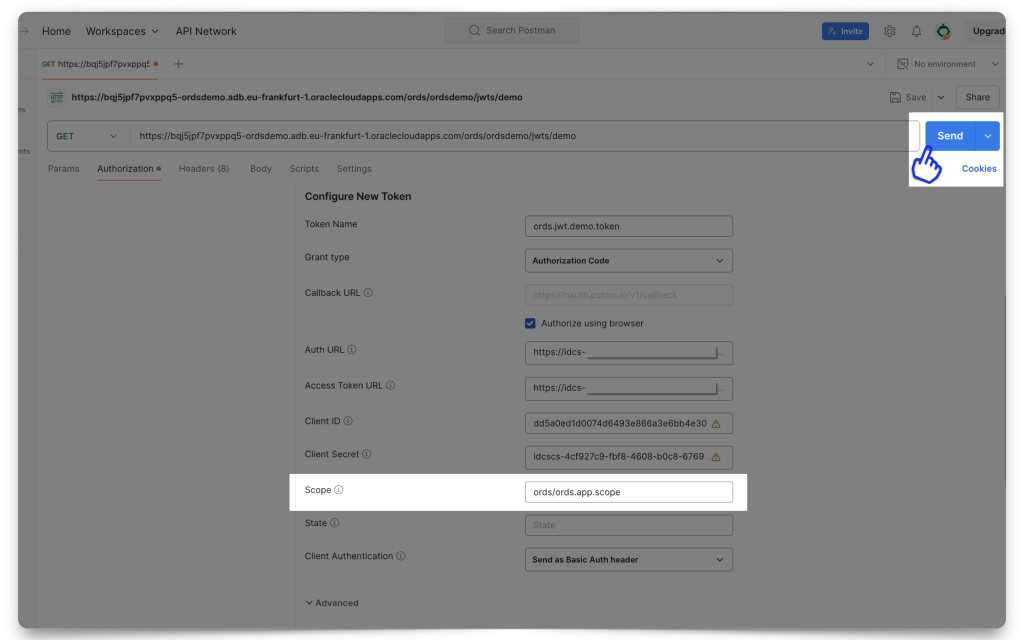
Setting up Postman
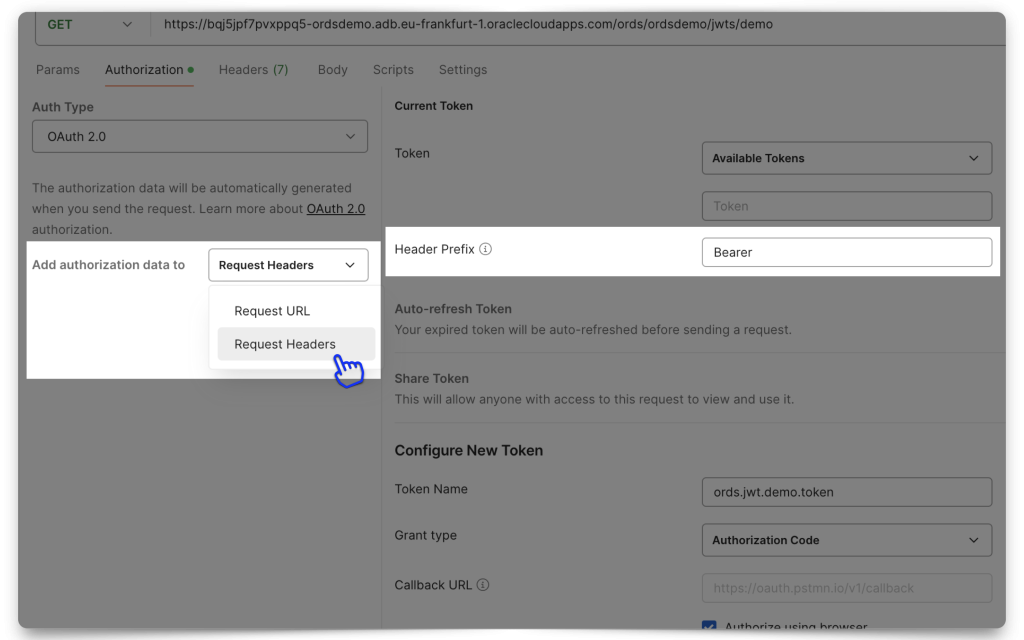
In Postman, make sure you have selected “Request Headers” in the Add authorization data to field. Also, add the word “Bearer” to the Header Prefix field.
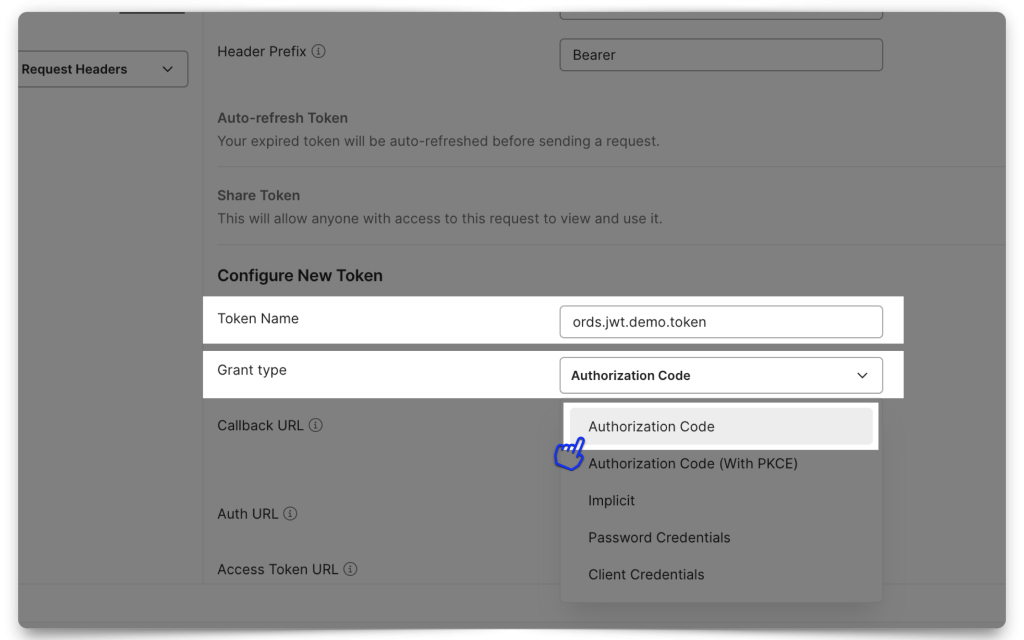
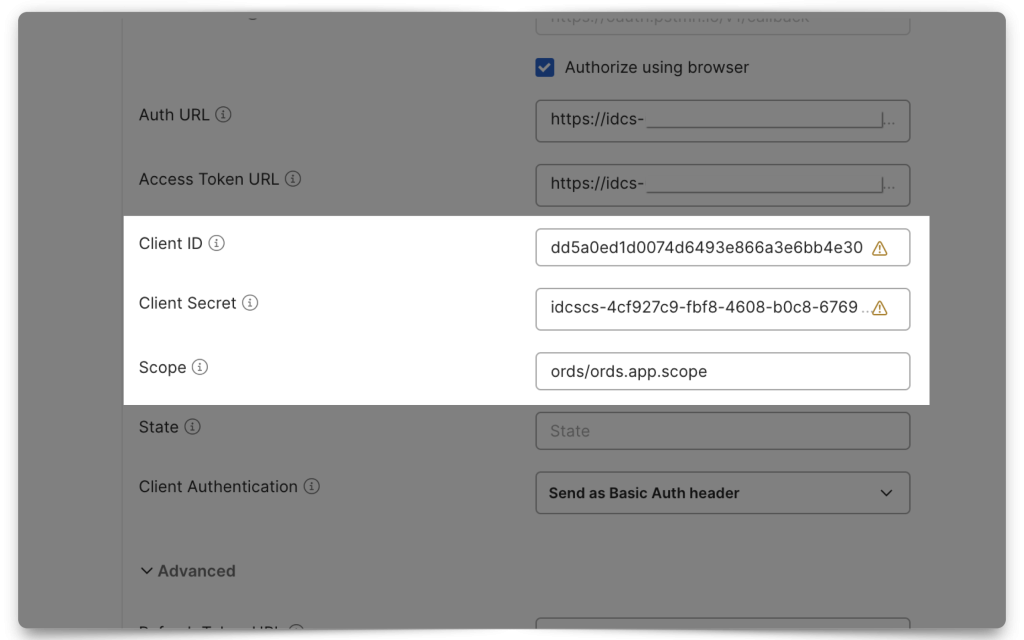
You’ll want to select Authorization Code as the Grant Type. For the Authorization URL and Access Token URL, you will use your Domain URL followed by:
- Auth URL
[Your Domain URL]/oauth2/v1/authorize
- Access Token URL
[Your Domain URL]/oauth2/v1/token
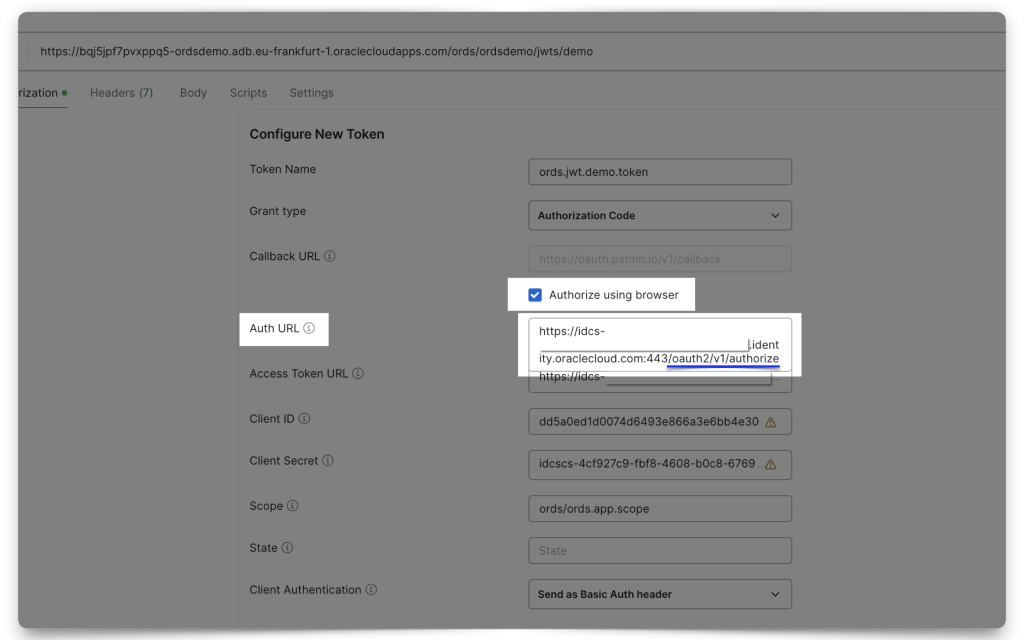
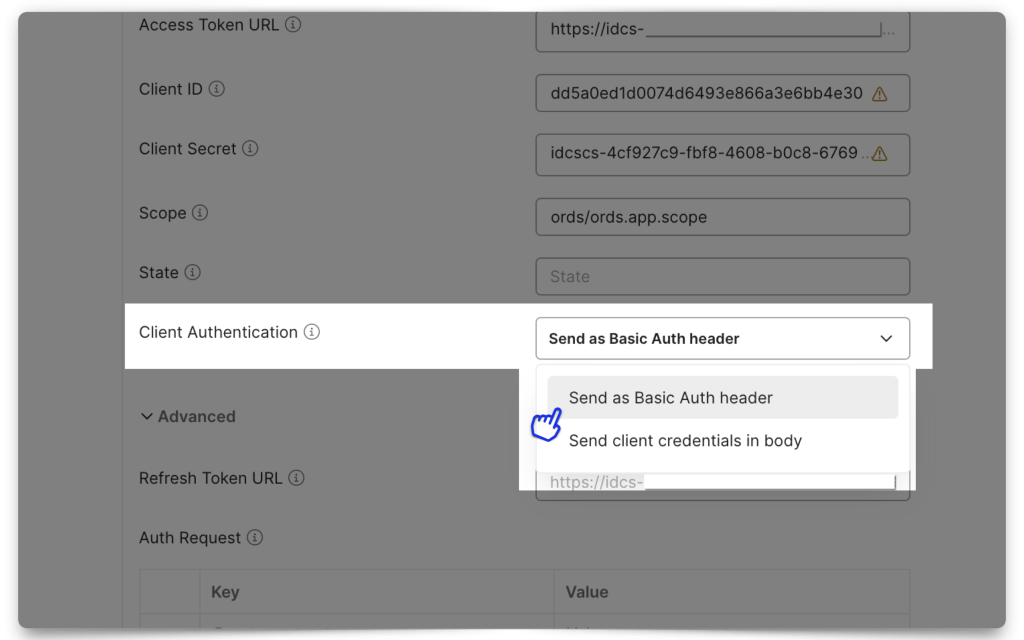
Next, add your Client ID, Client Secret, and Scope. Notice how the Scope in Postman uses the Primary audience and the Scope (if you don’t remember where these came from, review the Resource server configuration section). Select “Send as Basic Auth header” for the Client Authentication field.
Requesting the JWT
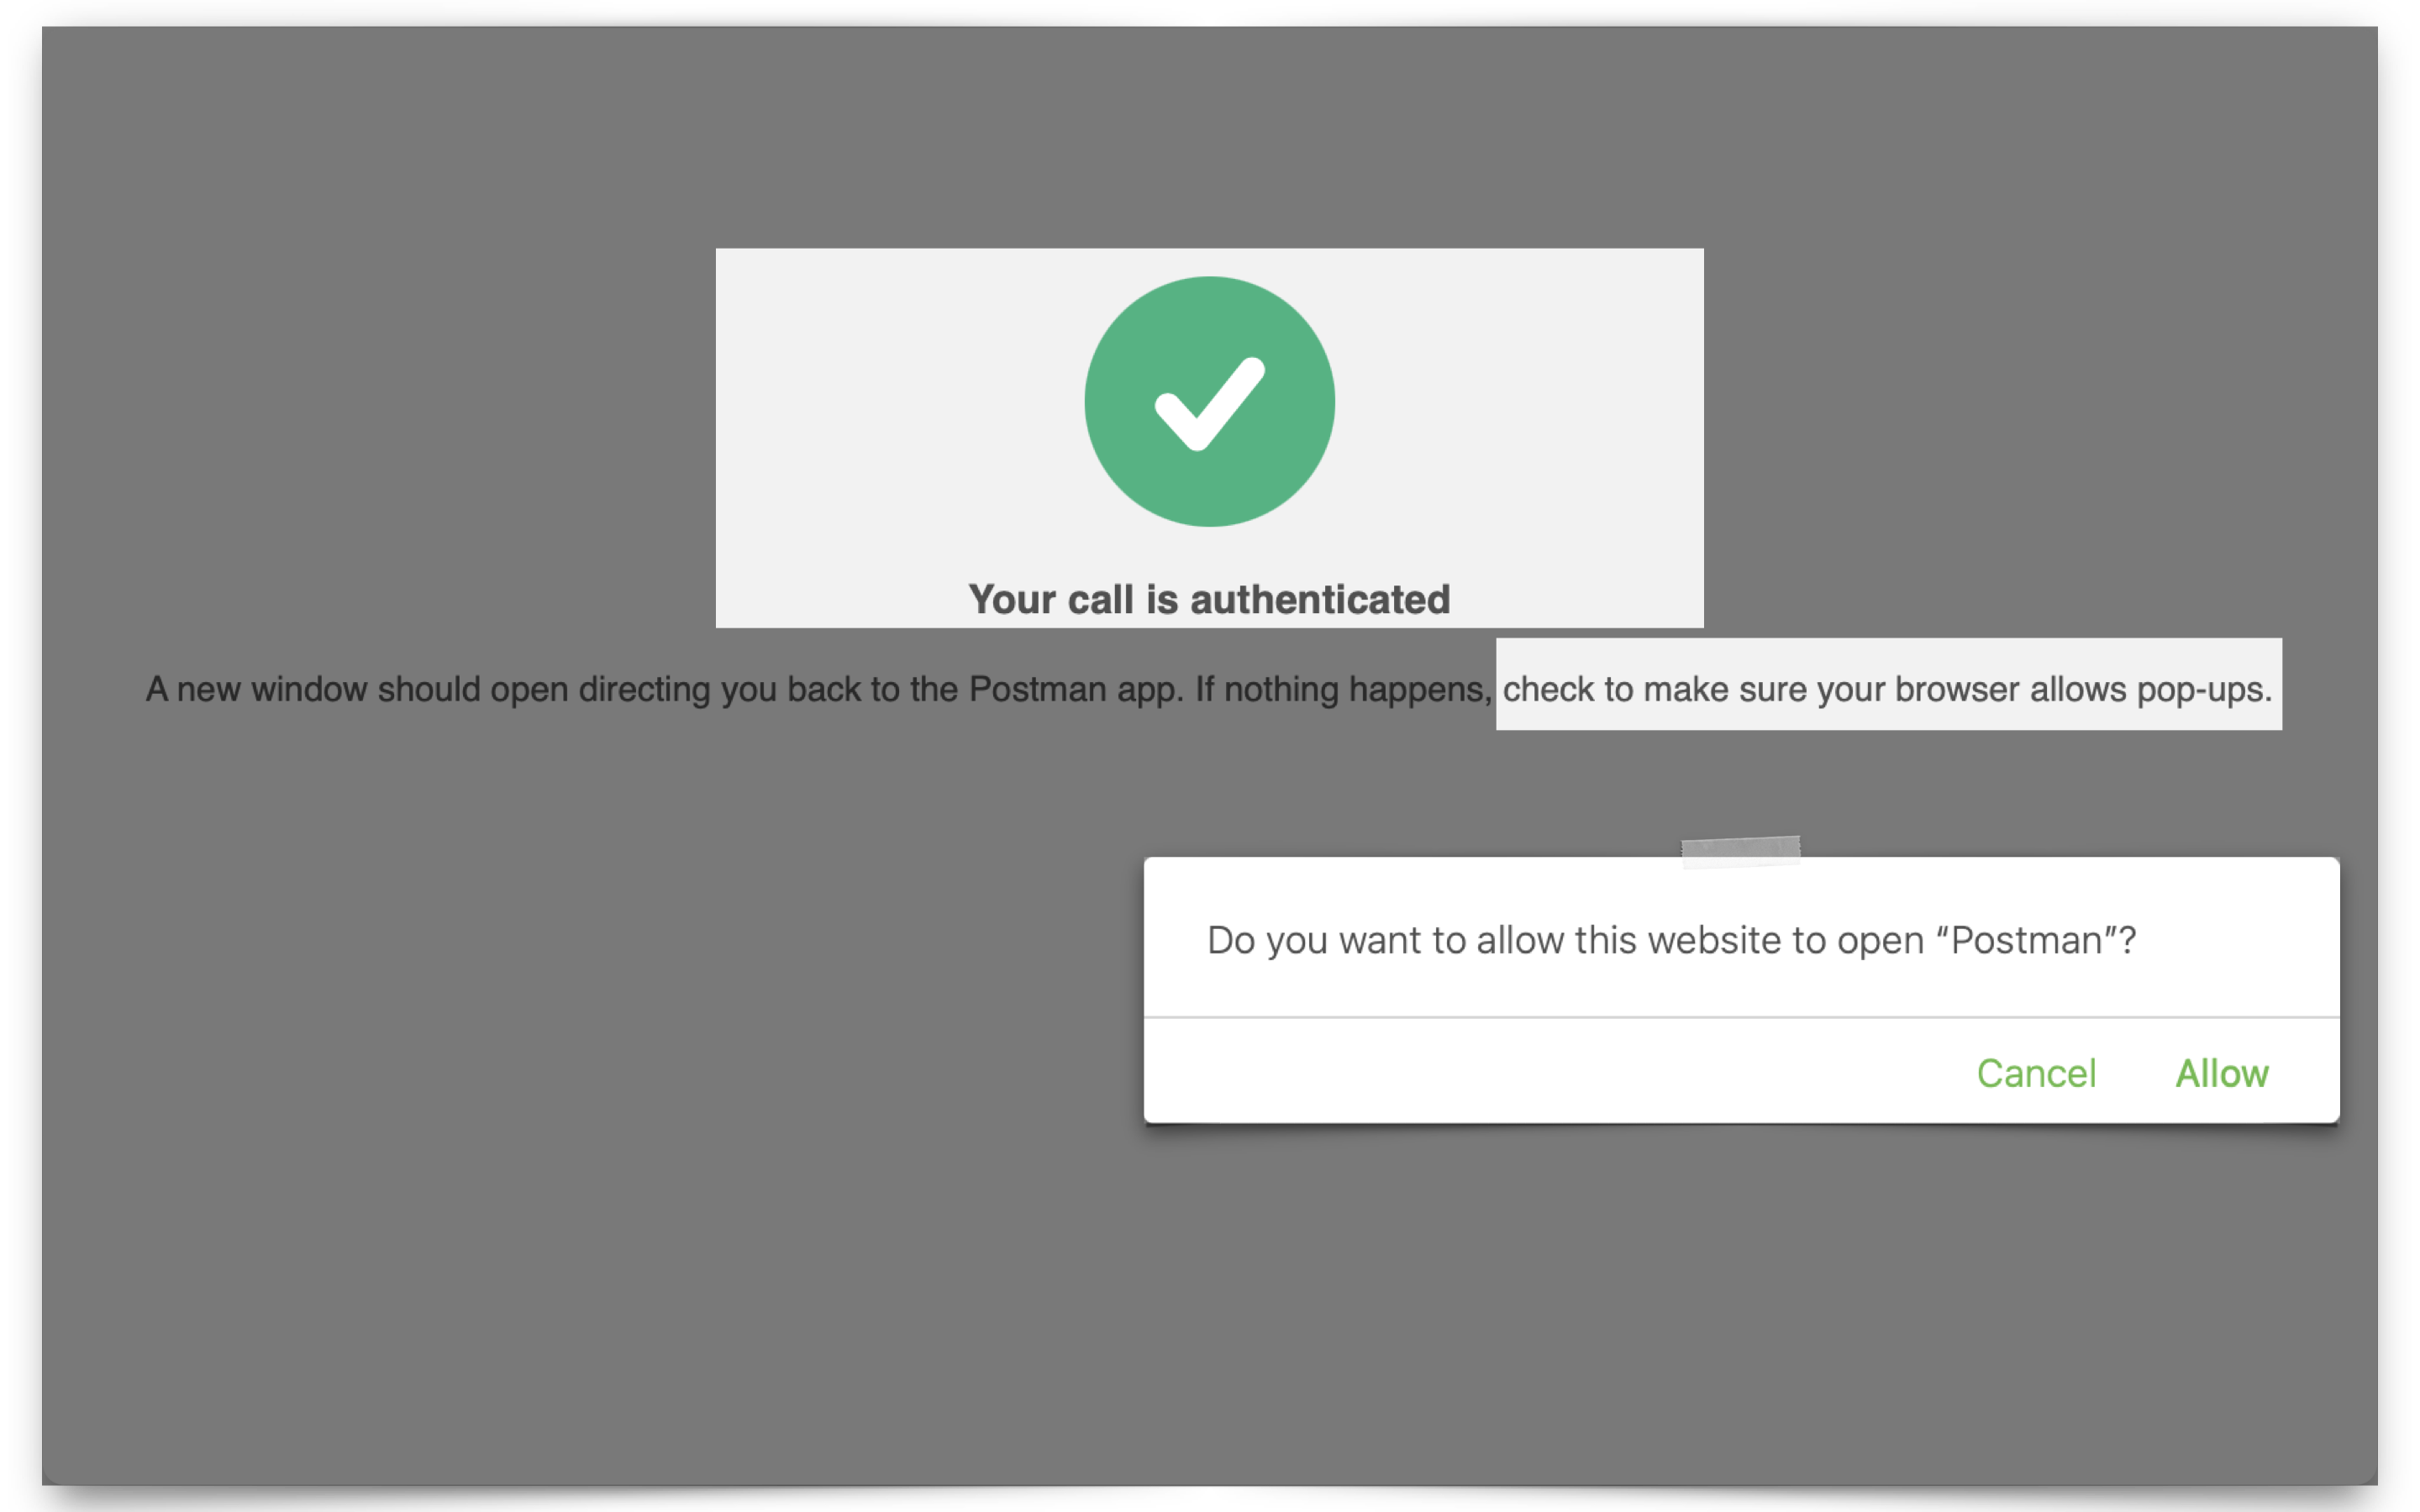
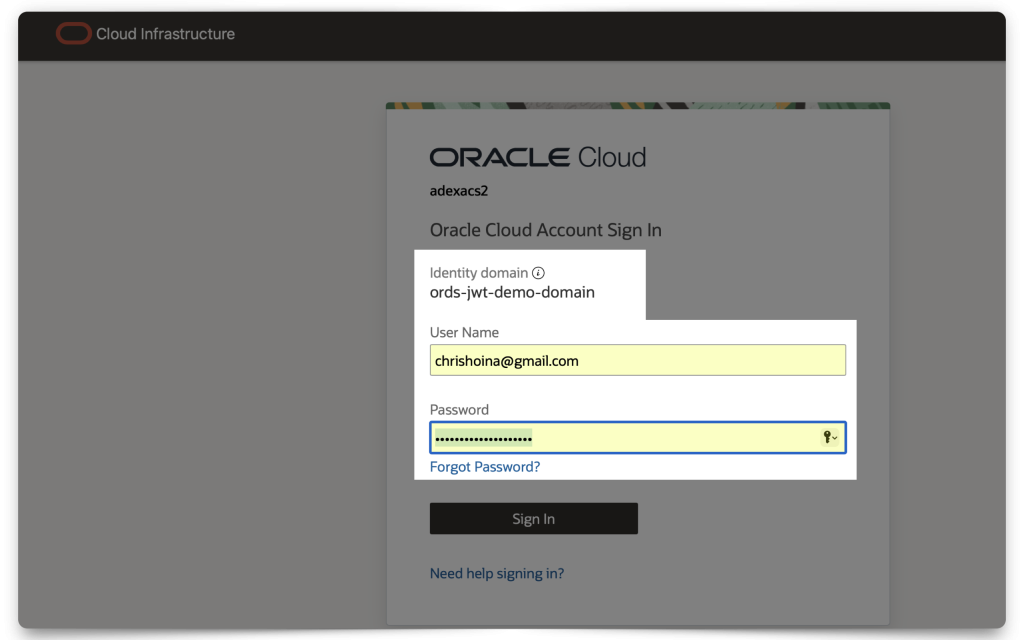
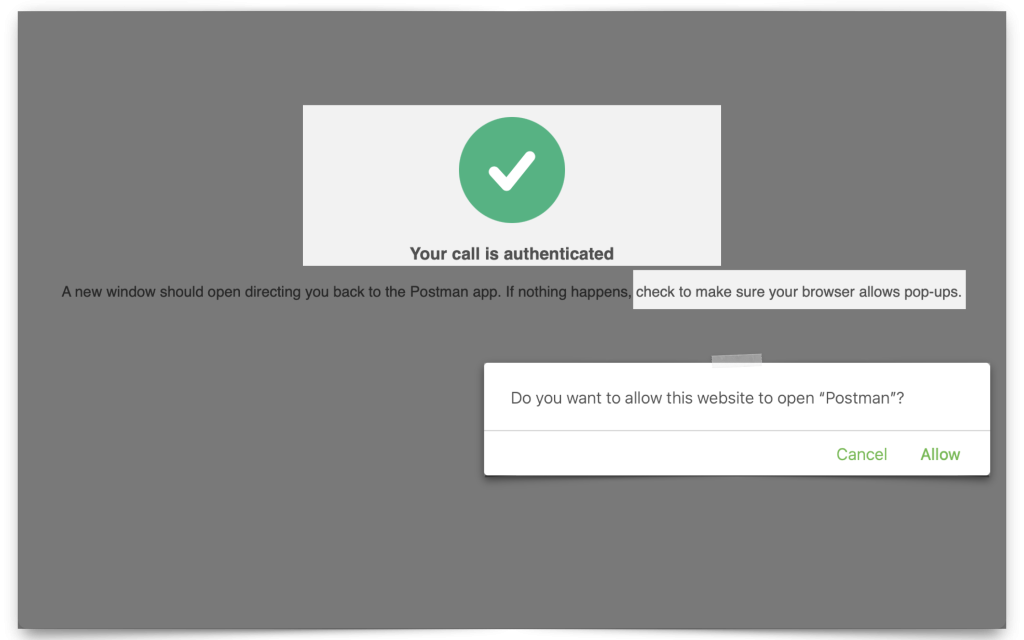
This next part is easy. From Postman, scroll down to the bottom of the Authorization window until you see the Get New Access Token button. Click it; a new browser window will appear. Enter the user credentials (I’m using the one I created specifically for this demo), and if any pop-up blocker notifications appear, make sure you “allow pop-ups.”
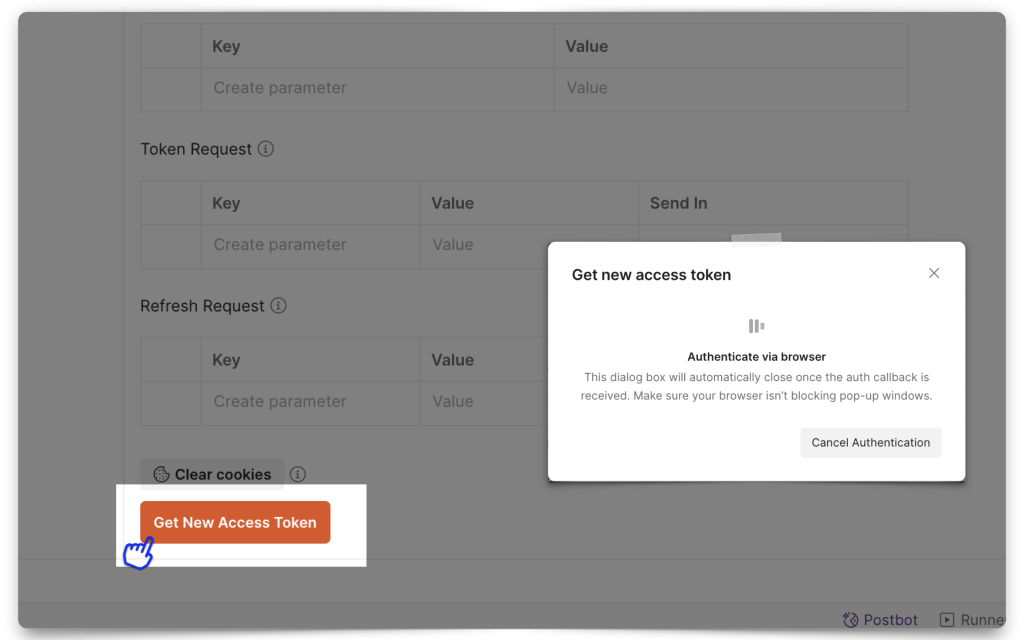
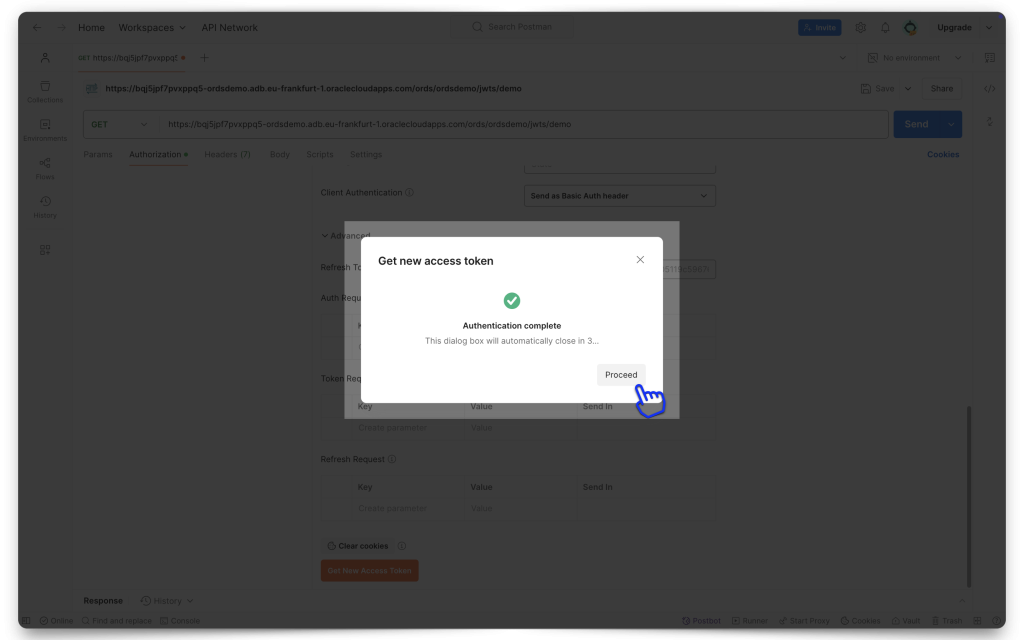
Once authenticated with IAM, you’ll be redirected back to Postman (remember, this is the Redirect URL you added in the Client Configuration section).
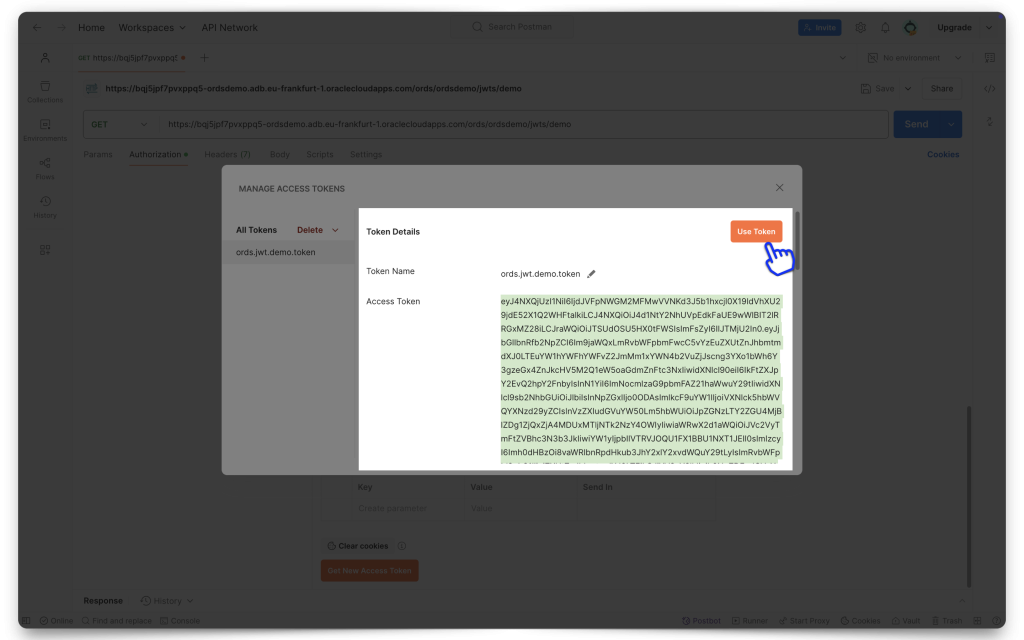
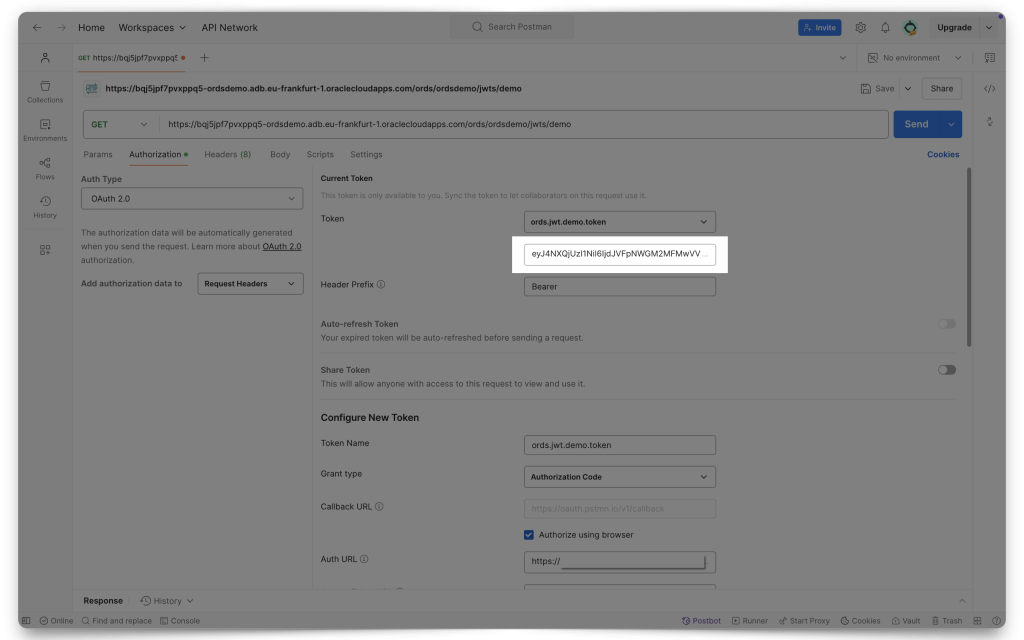
Copy the entire JWT, and then click Use Token. You’ll now see the token in the Current Token field in Postman.
HELP ME! Okay, if the Sign-in and/or Redirect didn't work for you, it might be that you are still signed into another OCI session, with a different user (a user that doesn't belong to this Domain). So, what I've had to do in the past is make sure I'm logged out of all OCI sessions, clear my cookies, close out my browser, and then restart with a new one. This has nothing to do with ORDS, but its what worked for me.
ORDS configuration
In these following sections, you will configure your ORDS JWT Profile and ORDS Privilege (associated with the Scope you’ve created). But first, you’ll need to decode your JWT.
Decoding the JWT
In the past, I’ve used two different tools for decoding these JWTs: JWT.io and JWT.ms. In this demonstration I’m using JWT.io.
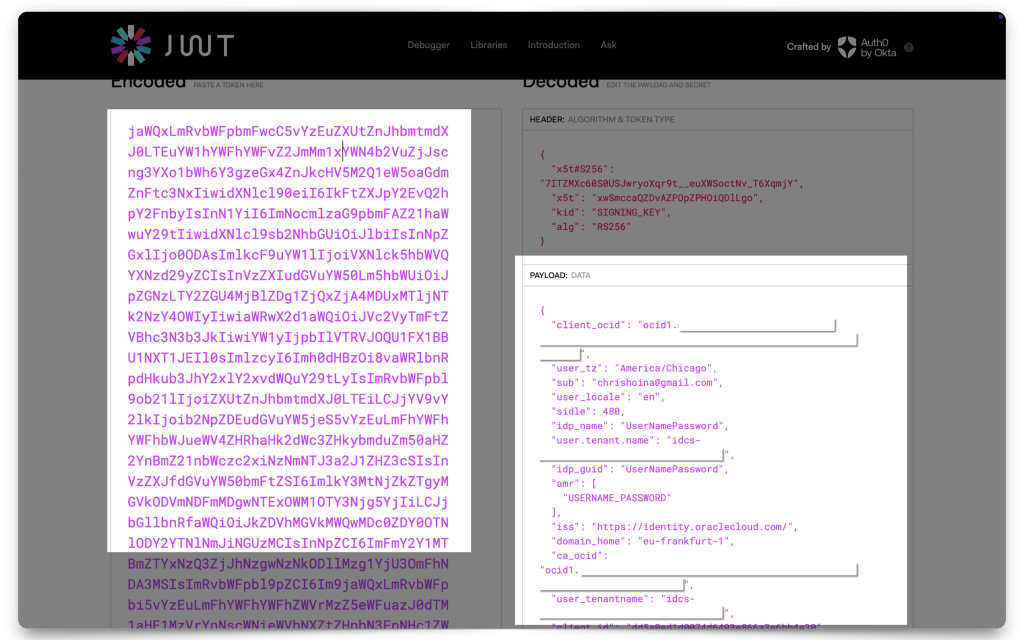
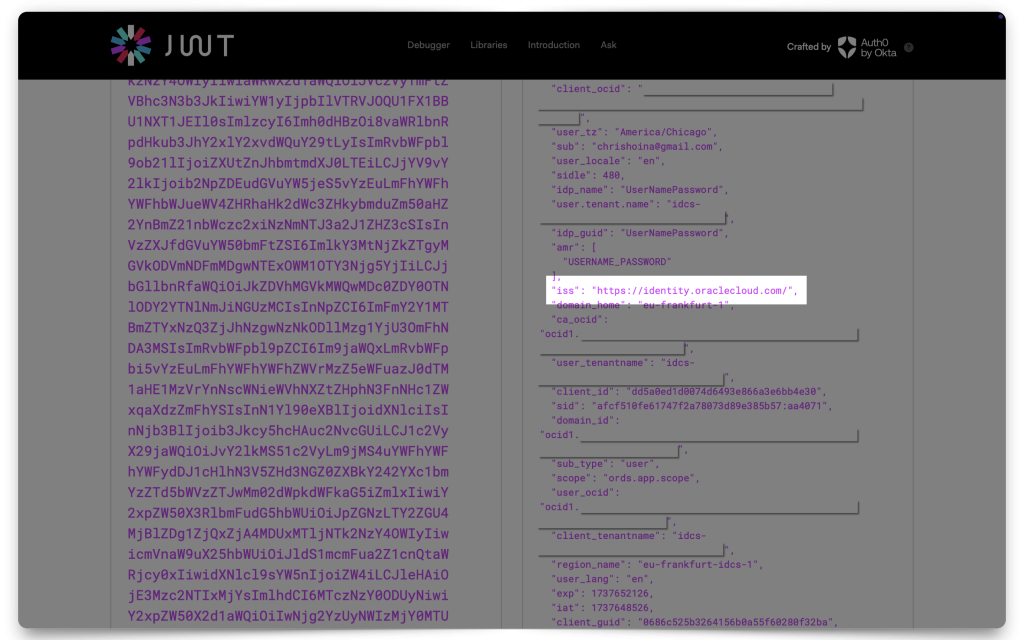
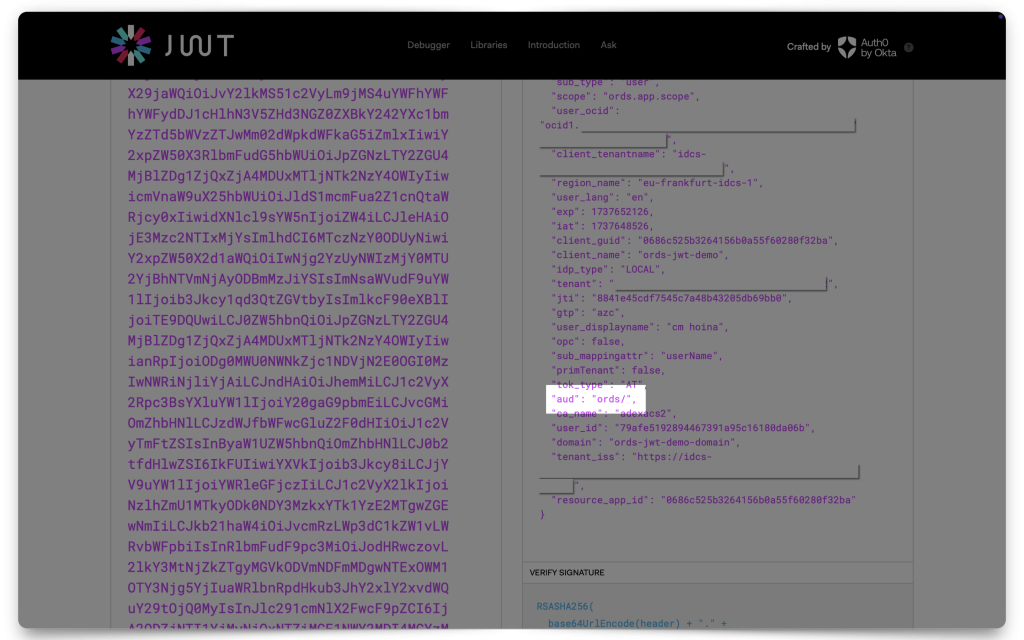
Paste your JWT into one of the decoders and copy the following values to your clipboard:
issscopeaud
The values you’ll need:

My ADB setup
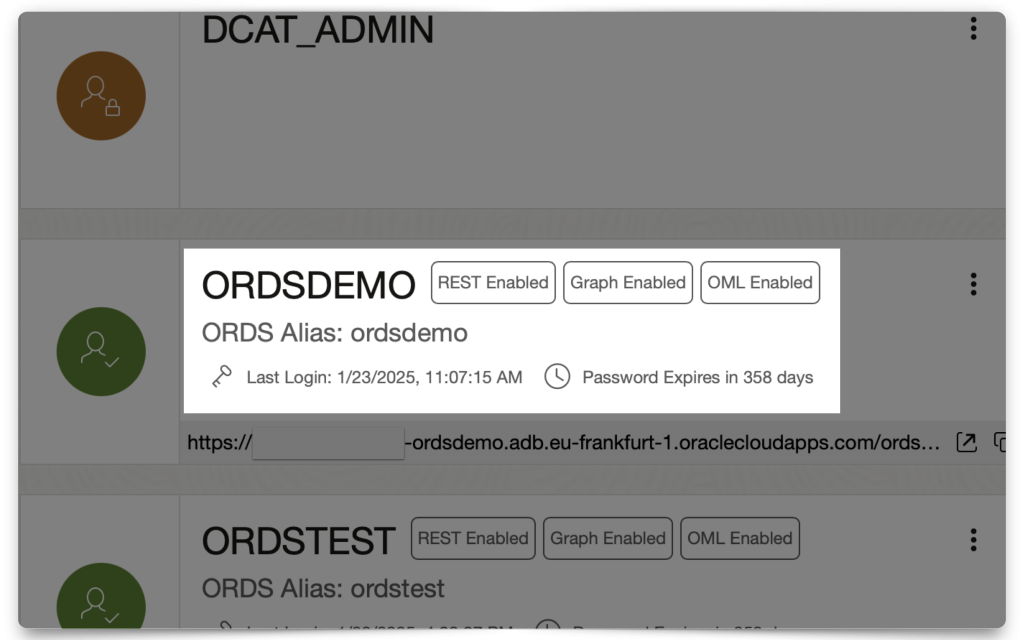
So as not to make too many assumptions, let me show you my ADB setup. I’ve created a 23ai ADB, in the same Compartment as my Domain. And I’ve created an “ORDSDEMO” user. So, everything I’m doing, in ORDS, from here on out is using that user.
You don’t need any other users up until this point. In fact, you could just use the ADMIN account to do all of this. But I’m choosing to use the ORDSDEMO user to demonstrate how to do this with a non-ADMIN, or non-DBA user. So, when we get to the ORDS PL/SQL procedures (found in the ORDS_METADATA schema), you’ll notice they are the non-ADMIN versions of the packages.
Creating the ORDS JWT profile
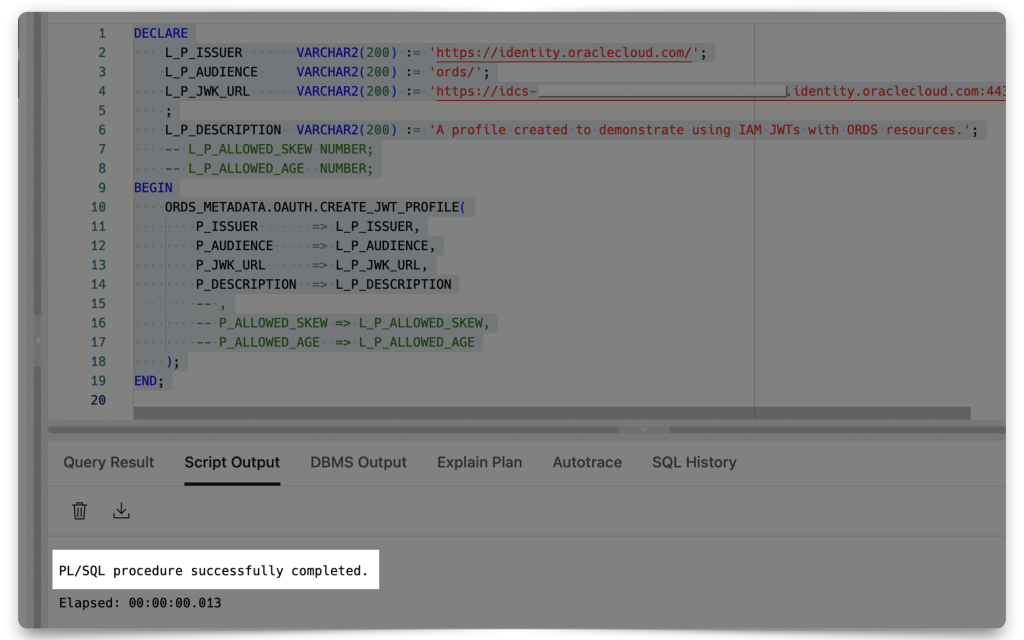
Step one: Create your JWT Profile. This process “registers” a JWT profile with ORDS, so when an incoming request comes in, ORDS can “cross-reference” information related to Issuers, Audiences, and Scopes.
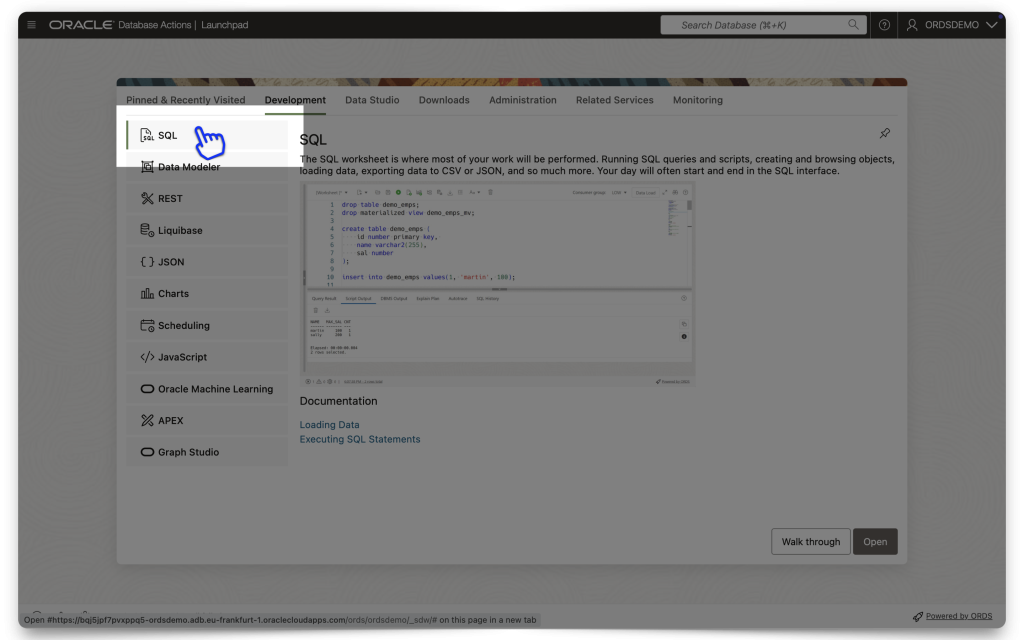
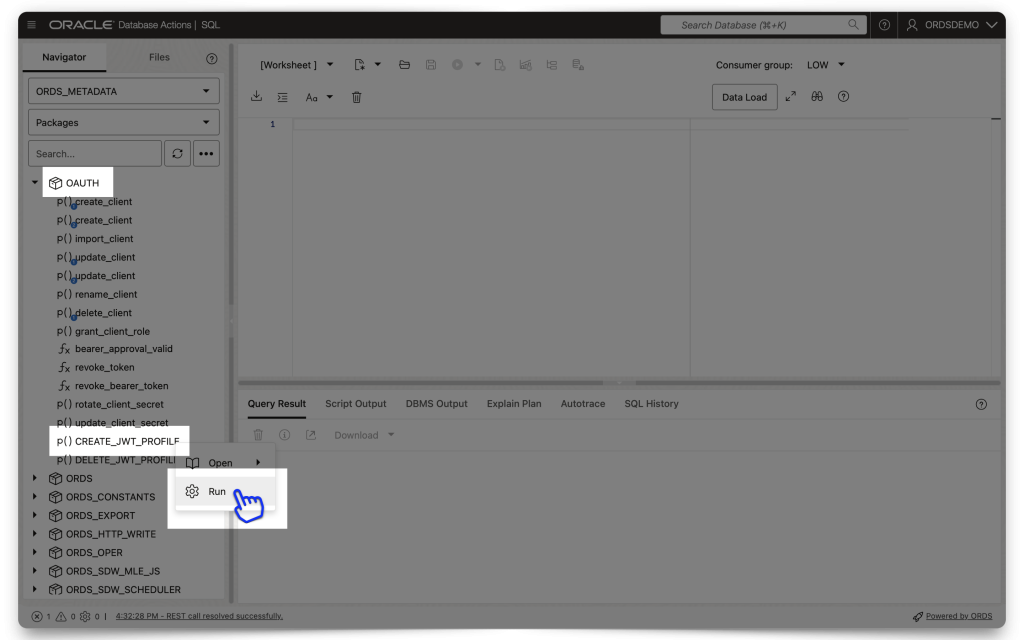
The easiest way to do all this is to first navigate to an SQL Worksheet and then select the schema from the Navigator tab. Then, under the database objects drop-down menu, choose Packages.

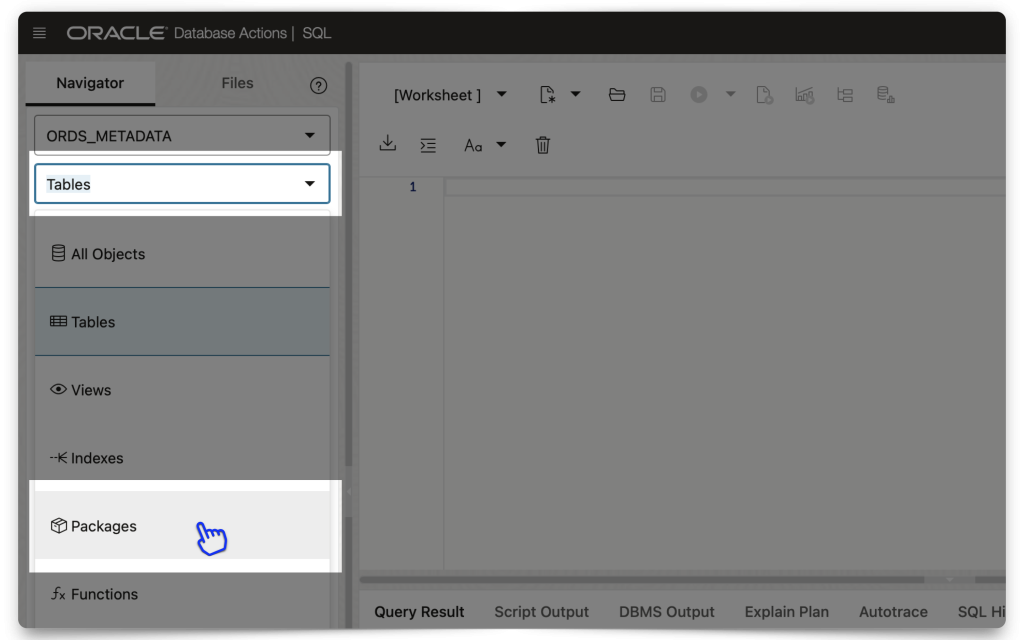
Click the OAUTH package to expand it, scroll to the bottom of that list, right click the CREATE_JWT_PROFILE PL/SQL procedure, and click Run. A slider will appear.
⚠️ REMINDER: The old OAUTH PL/SQL packages are deprecated and will be officially de-supported October 2025. We still have the old PL/SQL Security packages in our docs, but the new ones are included too. Link.
Enter your details exactly like you see below:
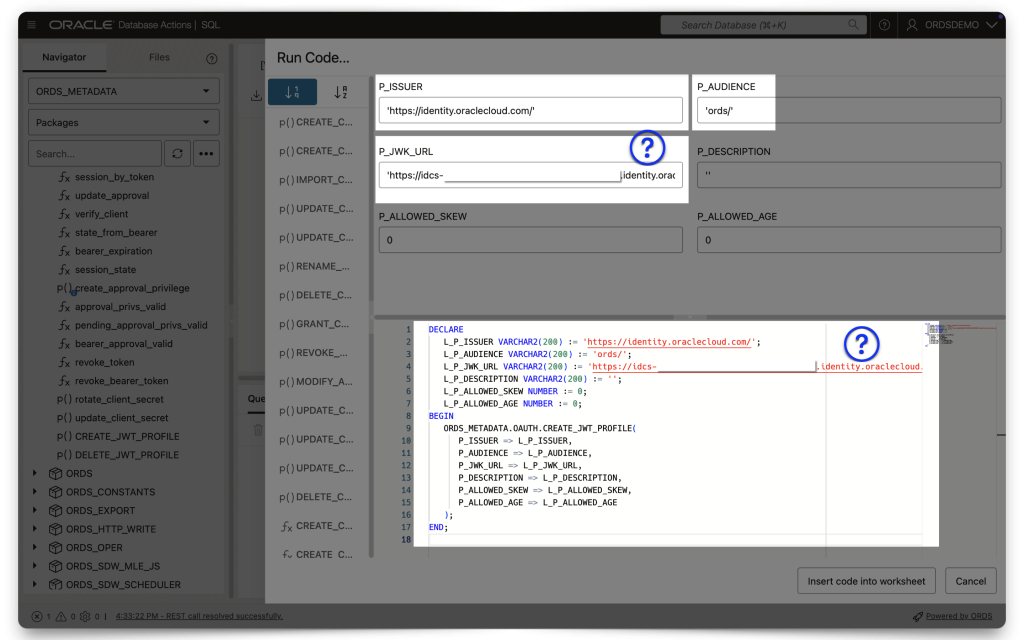
- P_ISSUER is https://identity.oraclecloud.com
- P_AUDIENCE should be whatever your Primary audience is, with the trailing slash included!
- P_JWK_URL
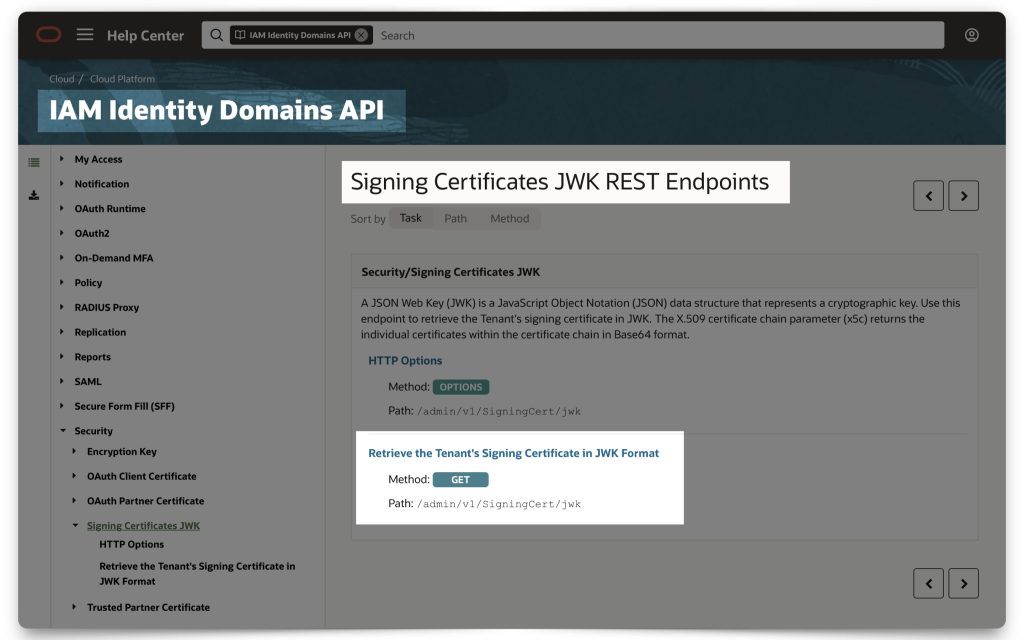
FYI: The P_JWK_URL is a combination of [Your Domain URL] + /admin/v1/SigningCert/jwk (this is the endpoint identified in the OCI IAM Domains API doc). And since this is a /v1 endpoint, I assume there may be more. So, double-check the docs in case of a different/updated version.
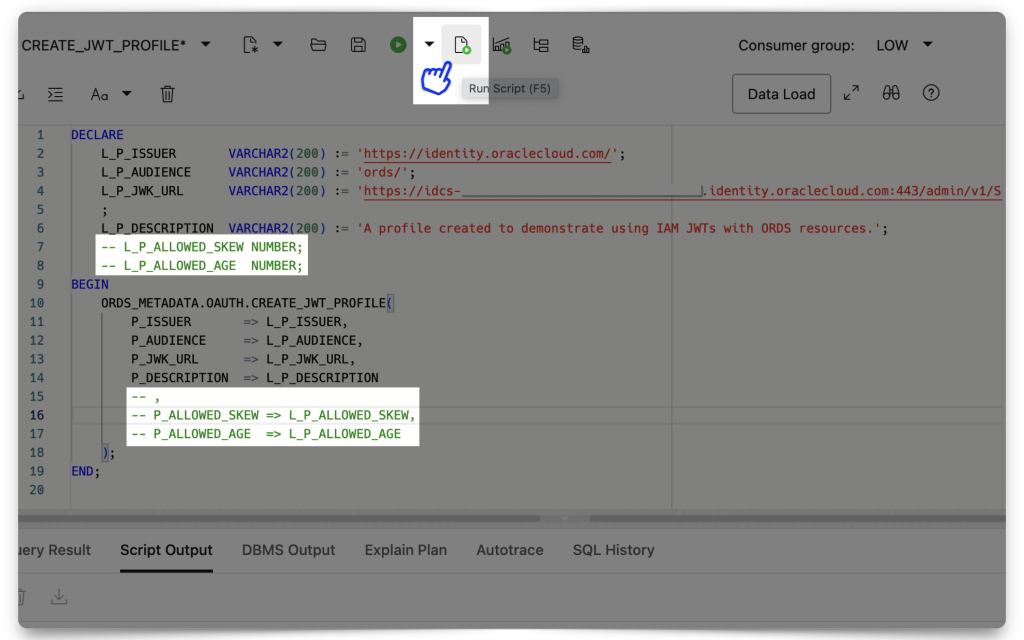
❗️STOP You need to either comment out, or completely remove theP_ALLOWED_SKEWandP_ALLOWED_AGEvalues (in both blocks), along with the trailing comma of theL_P_DESCRIPTIONvalue. For demonstration purposes those to values aren't required. And leaving them as "0" will make it impossible to obtain a JWT. They can be "NULL", but not "0," those are two totally different values!
Then, execute the PL/SQL procedure.
Next, you’ll create an ORDS Privilege (to associate with our protected ORDS Resources).
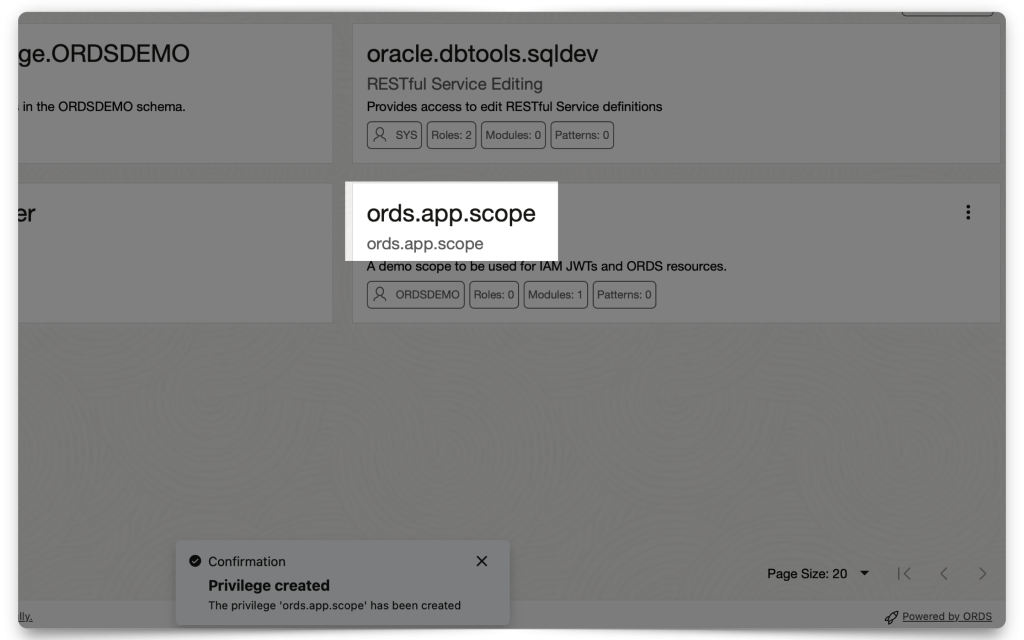
Creating an ORDS privilege
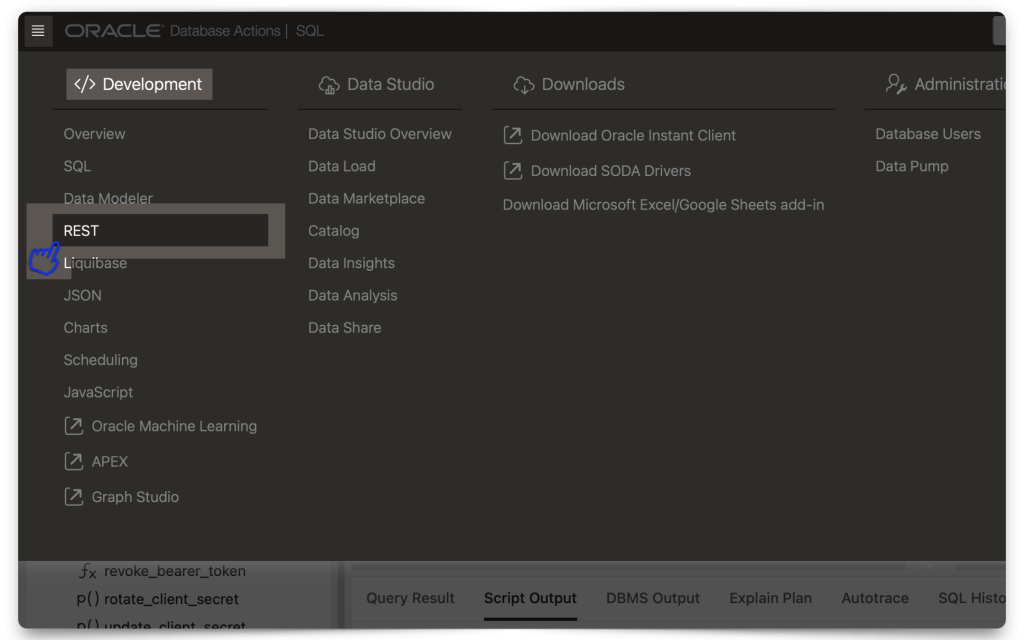
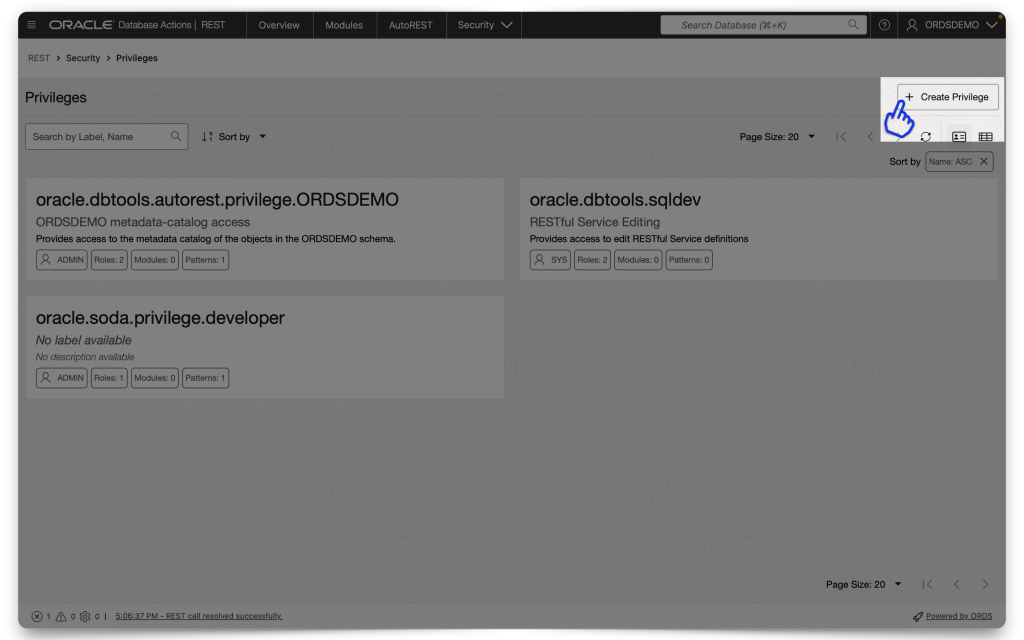
Aka, the “thing” we are protecting and making accessible with a valid JWT. Navigate to your REST Workshop. From the Security tab, select Privileges.
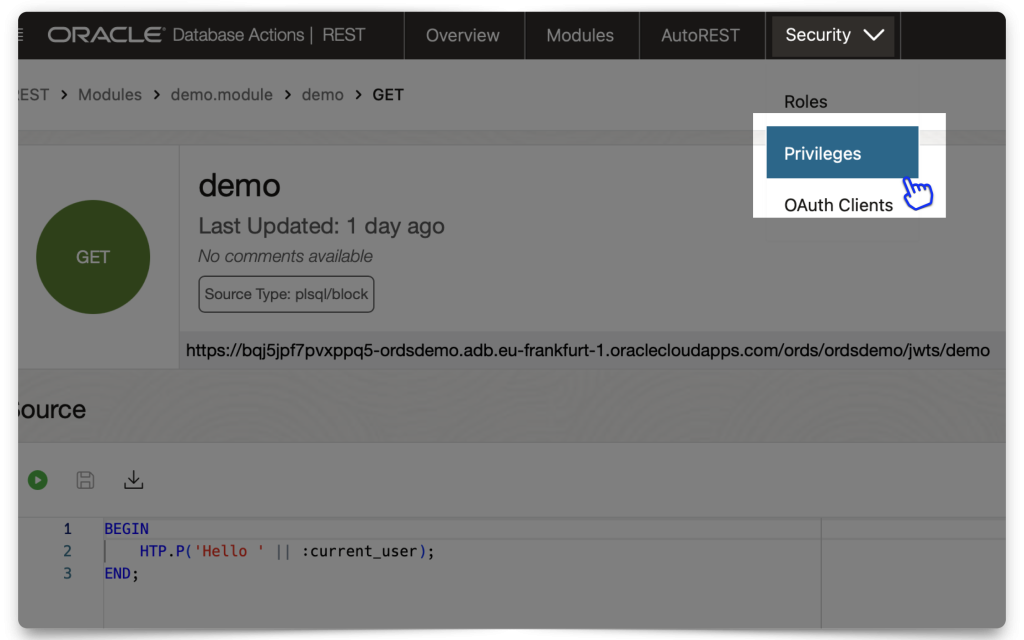
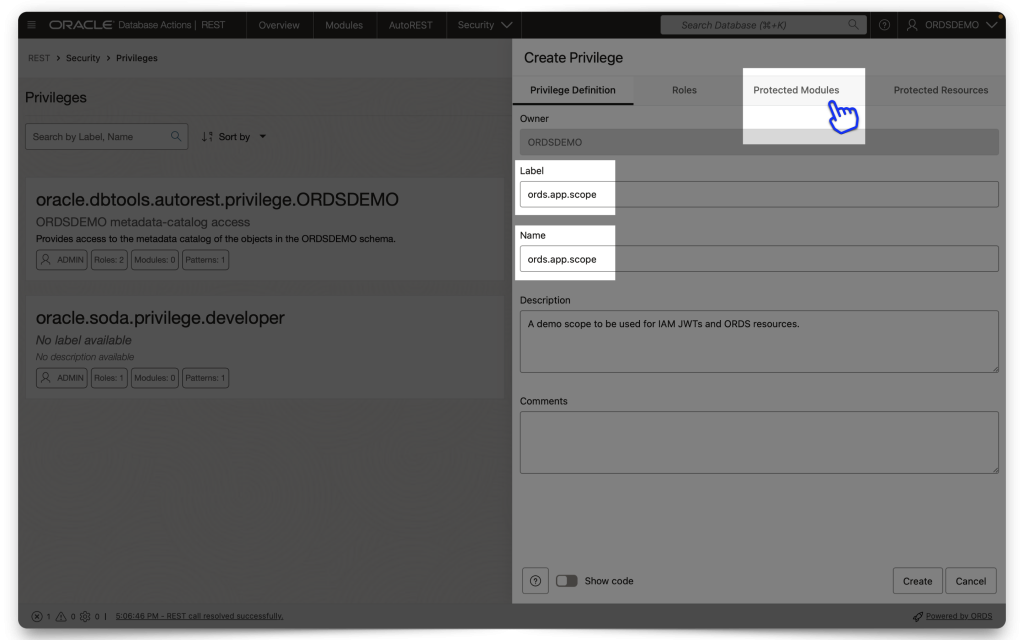
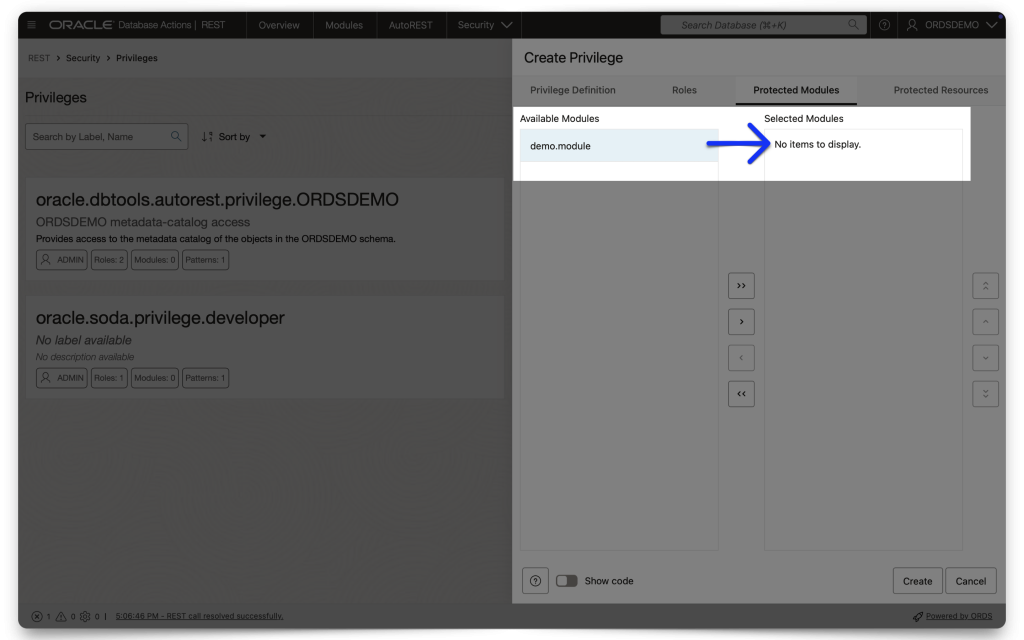
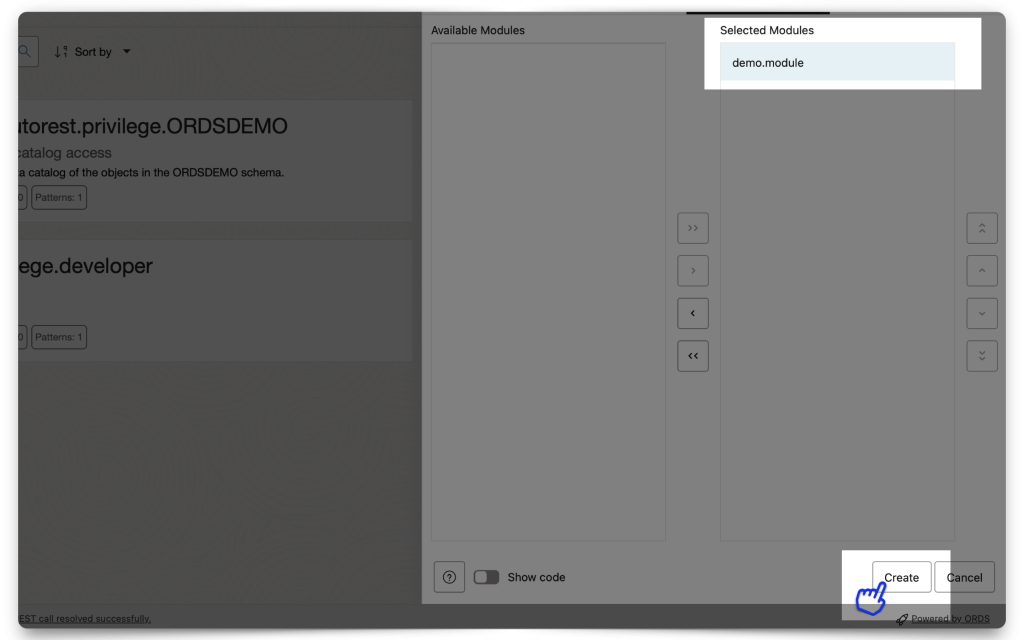
Create a new Privilege and name it exactly the same as the Scope you created in IAM. DO NOT INCLUDE the Primary audience in this scope name (In fact, you can’t; we won’t let you anyway 🤣)! In the Protected Modules tab, select the Module you want to protect. Either drag it from the Available Modules tab to the Selected Modules tab or use the arrows to move it over. Then click Create.
A peek at the ORDS API I’m using:
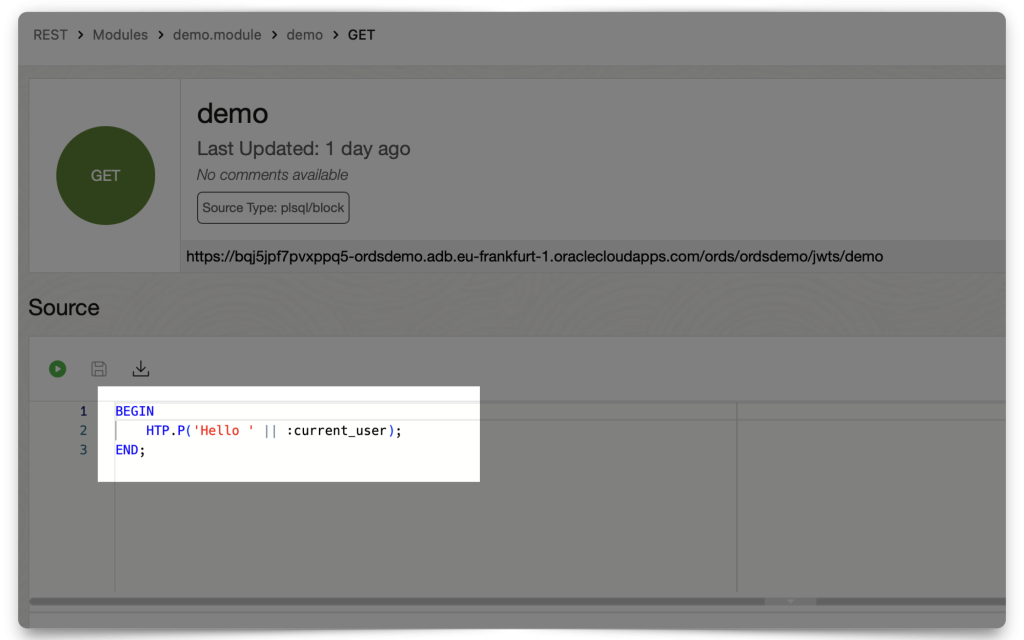
:current_user Implicit parameter.Accessing your protected Resource (aka ORDS API) with the JWT
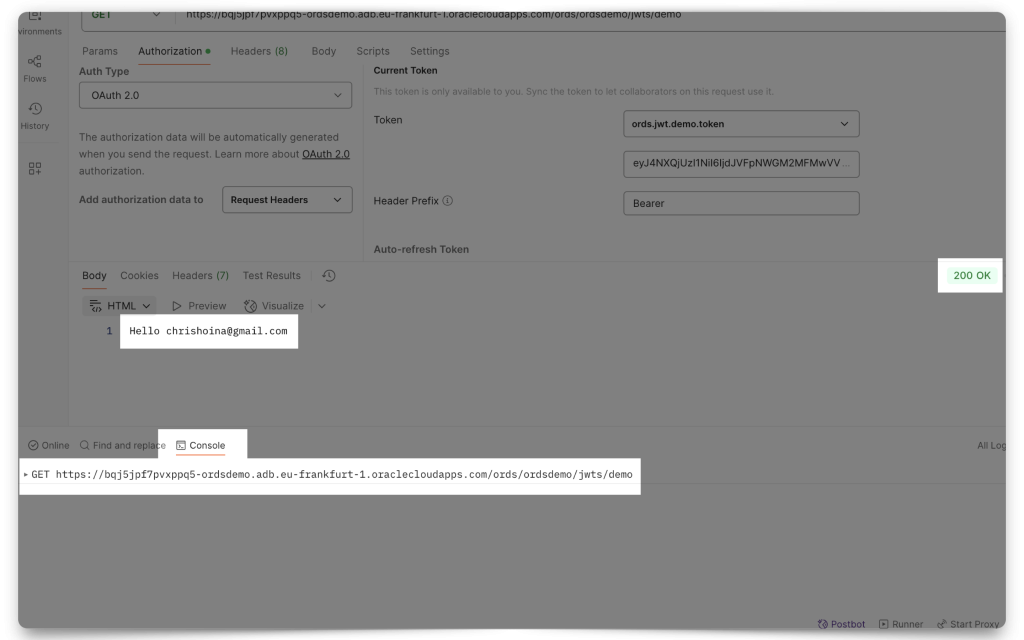
Now, you may access this protected resource. Unless you’ve taken an hour to set ORDS up, your token will still be valid (it’s valid for an hour). Otherwise, you’ll need to obtain a new, fresh JWT. Using the target ORDS API (mine is the “Hello :current_user” endpoint) in your Postman request field, click Send. You’ll see two things happen (if you are viewing your Postman Console):
- An initial
POSTrequest to the Token server, and - A subsequent
GETrequest to your target ORDS API
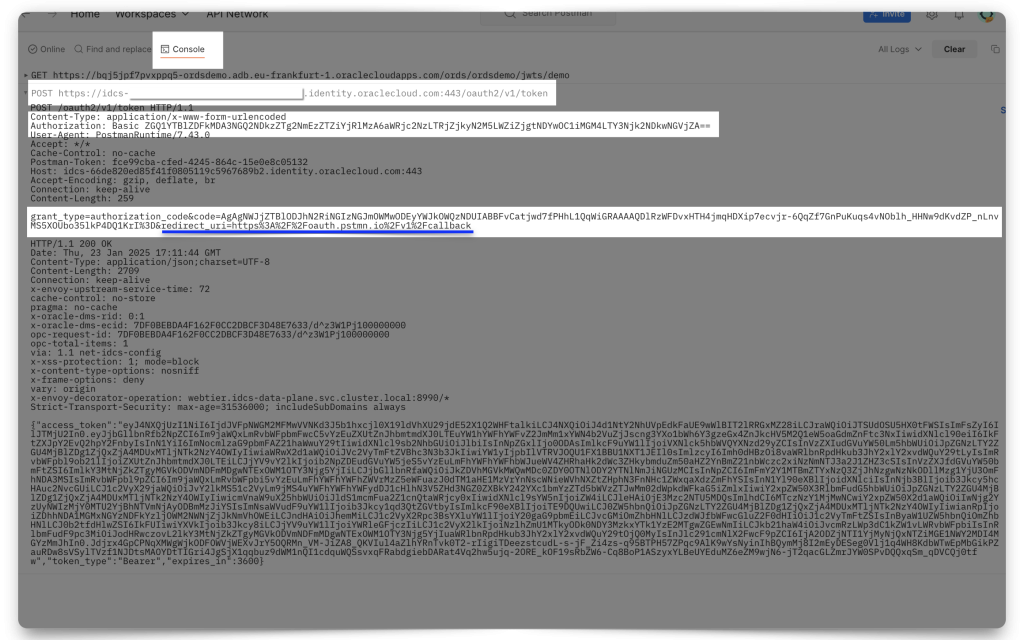
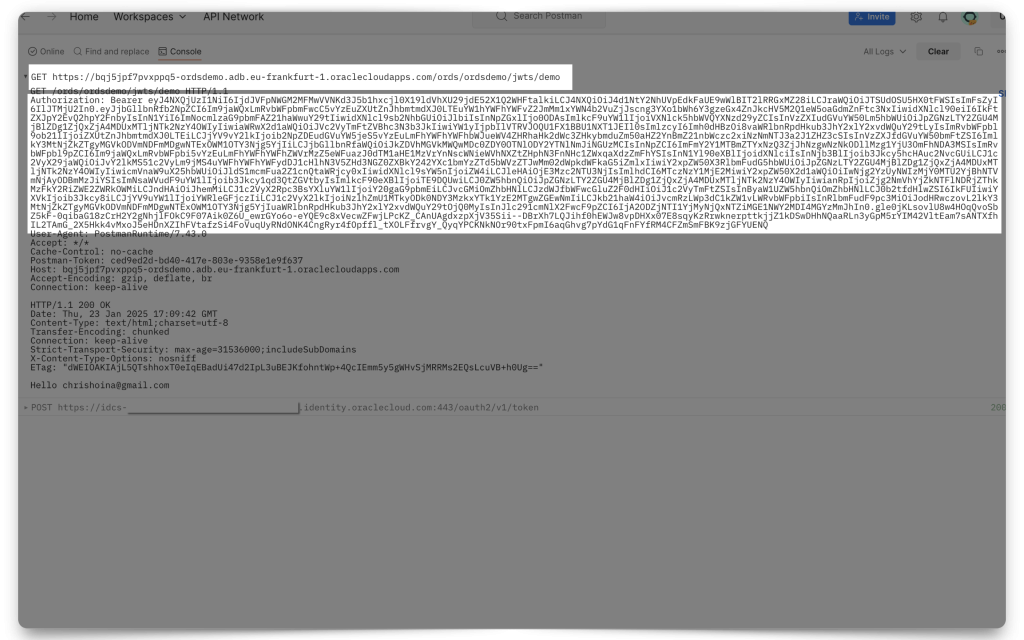
I should clarify…you might not see that initial POST request because you would have accomplished this before you opened the Postman Console. So, if you’d like to see these requests in real time, do this:
- Clear out your cookies
- Delete your existing token
- Clear out the Console
- Open the Console back up
- Request a new JWT
- Request your ORDS API (your protected Resource)
The End
And that’s it, finished! If you’ve made it this far, congratulations. That was a lot of work. Time for a coffee break!
Follow
And don’t forget to follow, like, subscribe, share, taunt, troll, or stalk me!
Leave a Reply