About this article
This article is a walkthrough and overview of setting up the example Java plugin that ships with ORDS. These plugins allow you to add functionalities and capabilities above what is possible with a standard ORDS configuration.
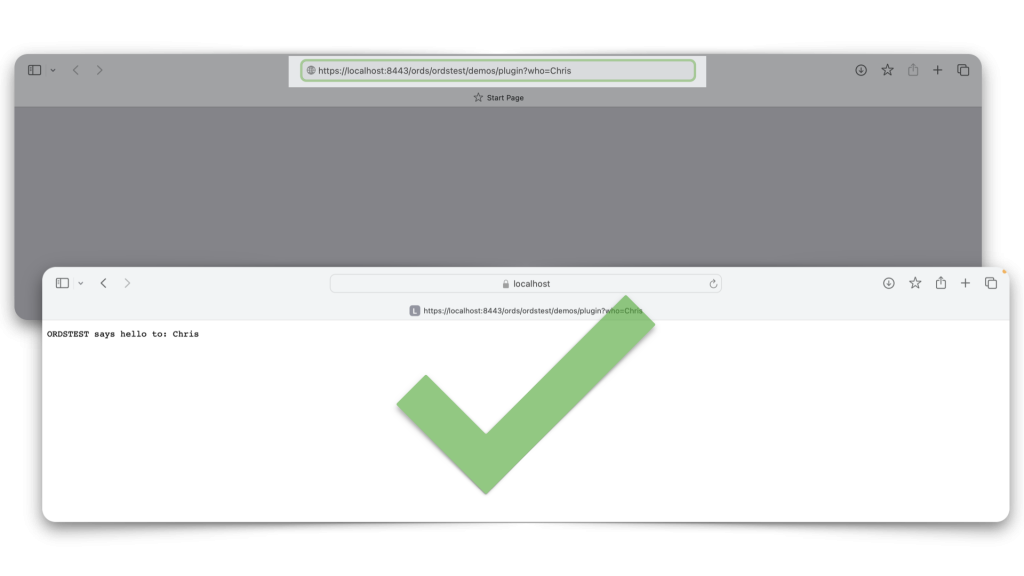
In this example, the plugin allows you to use a name as a query parameter in an HTTP request. What you receive in response is a greeting from the schema plus the name you used in that HTTP request. Like this:
I know what you are thinking…so what? And for about a day and a half, I felt the same. Eventually, it dawned on me that since this plugin relies on APIs from the Oracle REST Data Services Java API Reference, you can create a plugin for anything in that book. I’ll have to spend time in another article, stepping through the Java code. I’m realizing that you don’t need to know Java fluently to understand what is happening with this application. So, if you are a Java newbie (like me), this is a great way to get acquainted with the language.
Chapter 11 Extending ORDS Functionality with Plugins
Below, you’ll see the exact text from Chapter 11 Extending ORDS Functionality with Plugins of the ORDS Developer’s Guide. If you want to follow along, you won’t have to switch between the official docs and this blog post.
Further still, I’ve broken up the steps in Section 11.1 Plugin Demonstration Example into individual sections. I’ve added some commentary and images throughout. Some directions were challenging for me, and pictures are always helpful.
Oh! And there’s a special “How the hell do I set up Ant?!” section, too. Since it took me about 30 mins to figure out how to download, install, and configure the damn thing. It would be best if you didn’t have to suffer like I did 😘.
And yes...as soon as I hit publish on this post, I'm logging a ticket to enhance this section of the ORDS Developer's Guide 😊.
The unadulterated ORDS docs
HINT: Click the expand/collapse arrow to view the full text.
11 Extending ORDS Functionality with Plugins
This chapter explains and provides examples on using ORDS plugin framework.
ORDS has a plugin framework that allows you to add your own custom functionality into the ORDS web application. Plugins can be added to the ORDS runtime by placing the jar files in the lib/ext directory. The ORDS distribution contains the source for example plugins. The plugin examples can be built using Apache ant, a software tool used for automating the build processes.
11.1 Plugin Demonstration Example
This section shows how you can locate and build a plugin demonstration example.
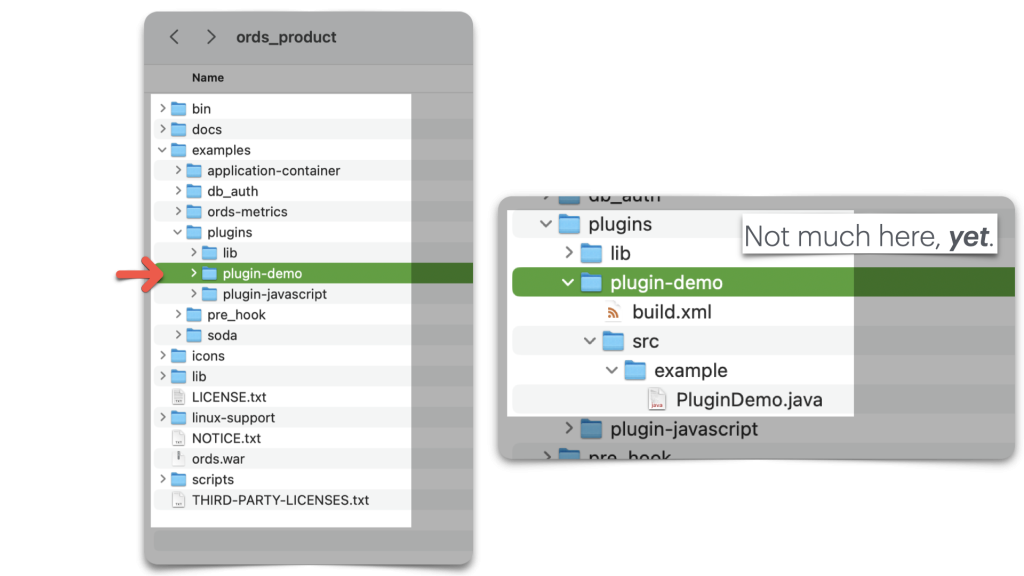
The plugin-demonstraion example is at examples/plugins/plugin-demo location and contains the source for a HttpServlet that gets a database connection injected at runtime. The servlet uses that JDBC database connection to run a query in the database and return a response at runtime.
Perform the following steps to build and use the demonstration example:
- Change the directory to
examples/plugins/plugin-demo - Run
antto build theexamples/plugins/plugin-demo/built/plugin-demo.jarfile - Copy the
plugin-demo.jarto the ORDS distributionlib/extdirectory and start an ORDS instance. - Invoke the servlet using the following URL pattern:
http://server/ords/schema/demos/plugin?who=somebody- For example:
http://localhost:8080/ords/hr/demos/plugin?who=scottwhere ORDS is configured with a default pool andHRis an alias for a REST Enabled Schema in that database.
- For example:
The details of developing and deploying Java based plugins is available in the Oracle REST Data Services Java API Reference book.
See Also:
Chapter 11.1 Steps, expanded
Locate the directory
Change the directory to
examples/plugins/plugin-demo.
This step assumes you have Ant installed and are ready to build the application. In other words:
- You’re in your Terminal, Shell, or Command Prompt.
- You have issued the
cdcommand, so you are in the /plugin-demodirectory, and - You’re about to run the
antcommand on the command line.
/plugin-demo directory. We’ll come back to this in a second.HOWEVER…If you don’t have Ant installed, this exercise won’t work. Let’s get Ant.
Get Ant
Introducing a special section dedicated to making Ant acquisition much easier!
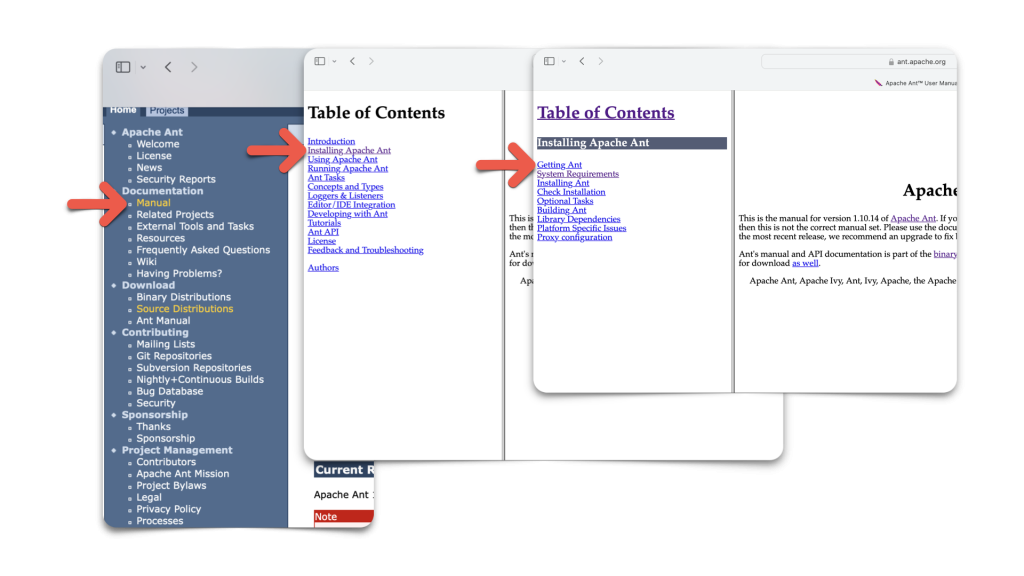
You’ll need to visit the Apache Ant main page. But don’t waste your time navigating to the Downloads page. It makes no sense.
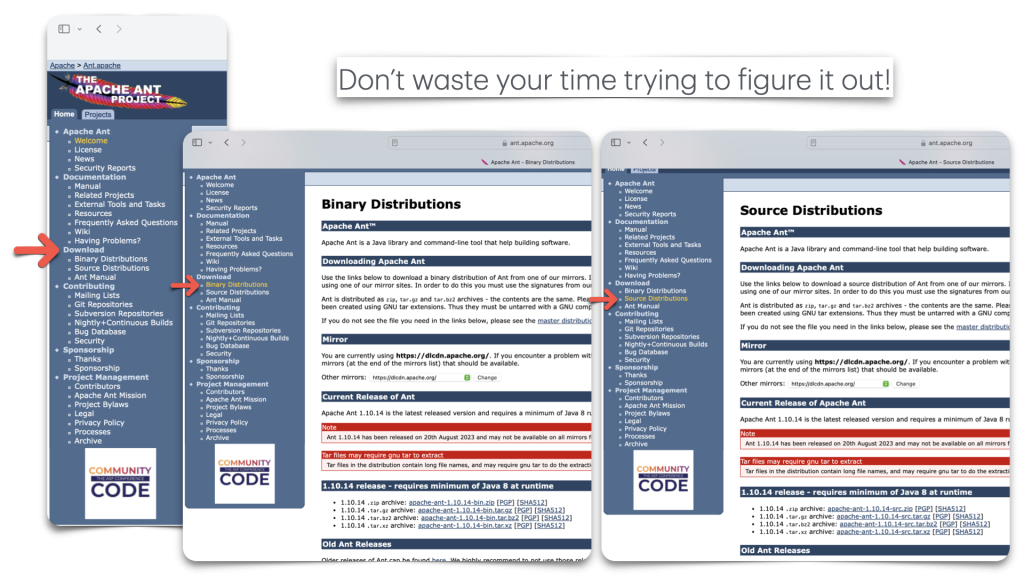
Just click Manual (located under the Documentation section). A new page will appear, and you’ll see a Table of Contents. Click “Installing Apache Ant.” Then, click “Getting Ant.”
Once you are at the “Getting Apache Ant” page, you’ll see five steps. For Step 1, I’ll assume you have Java installed.
Also, if own a computer, one that you bought and didn't build, there's like a 99% chance you have Java installed. It just might not be the latest version.
In Step 2, we need the Binary Distribution. Of the four links there, I chose the .zip file. It seemed the most normal (I haven’t seen .tar files since working on IBM Z 😵💫).
Step 3 states to unzip and then place the directory somewhere. I’ll show you what I did in a second.
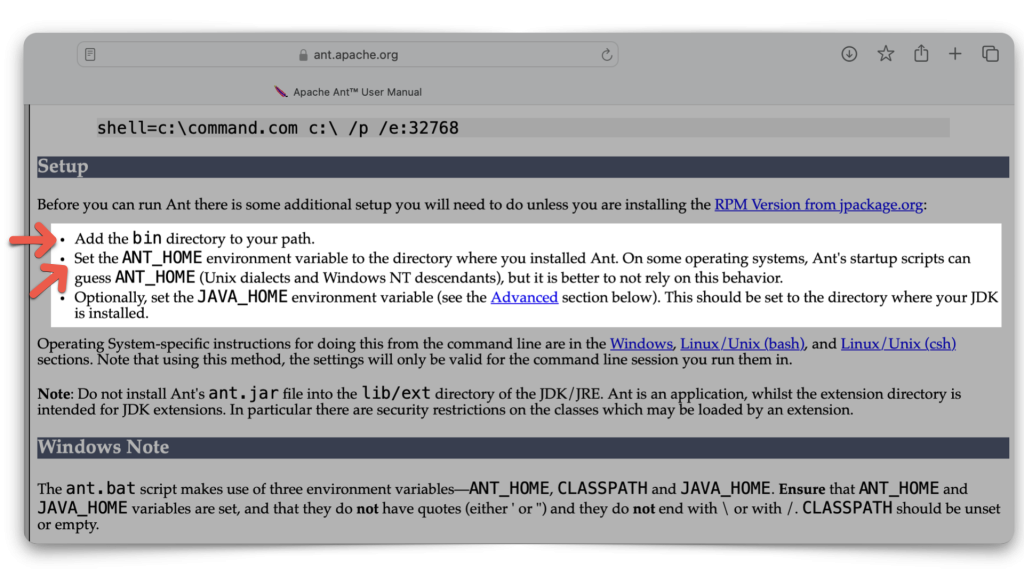
Step 4 instructs you to do some things and references the Setup page for details.
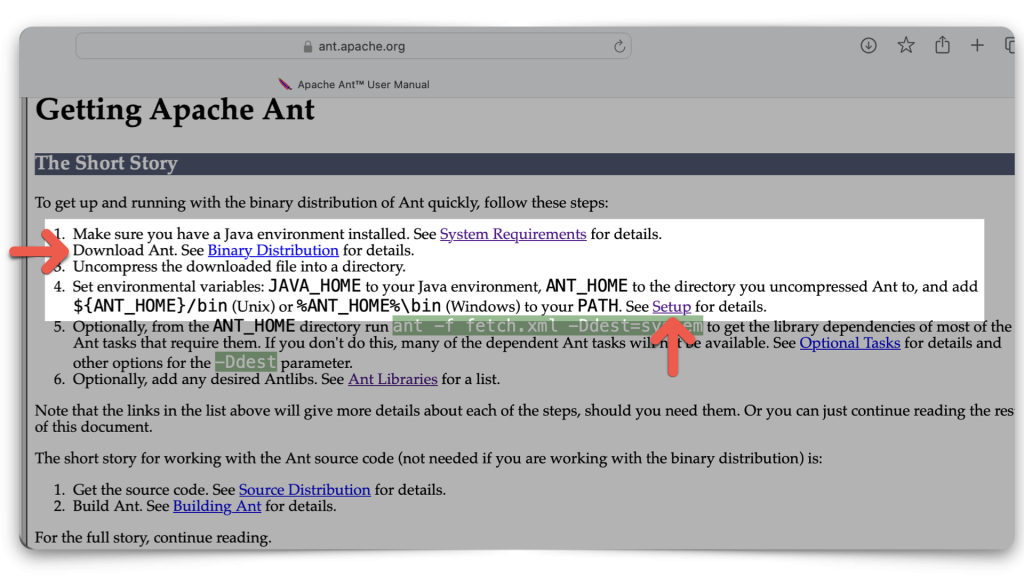
If you don’t understand any of the instructions in Step 4, please feel free to click the Setup link. You’ll be presented with even more steps that don’t make sense.
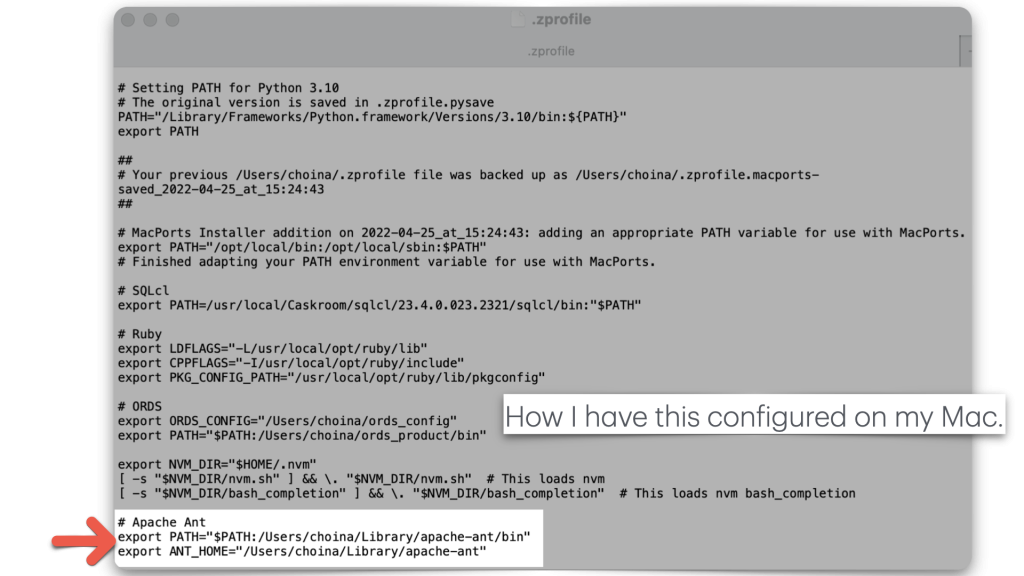
Let me show you how I have this all set up. If you are on a Mac, you can see how I have this bin directory and ANT_HOMEvariable set up. I open a new Terminal and issue the following command: open .zprofile
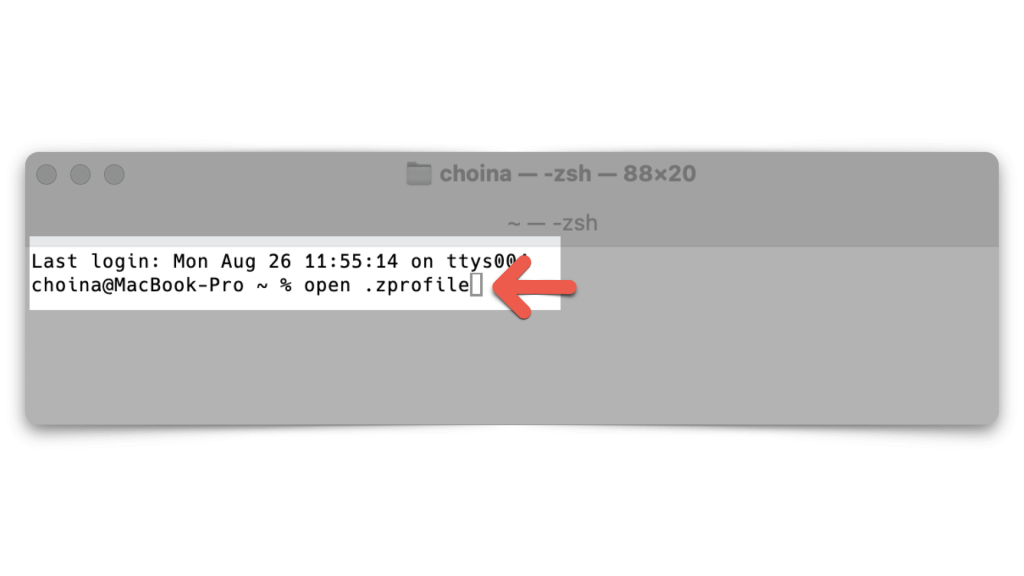
At the bottom of the file, you’ll see how I have Apache Ant set up for both bin and ANT_HOME. Set yours up like this: save the file, then restart your Terminal.
Wut did I just do? My idiot's take...After doing this, you can now execute theantcommand in any terminal. And you've also "pointed" to all the required dependencies (i.e.,ANT_HOME) for Ant to make the magic happen.
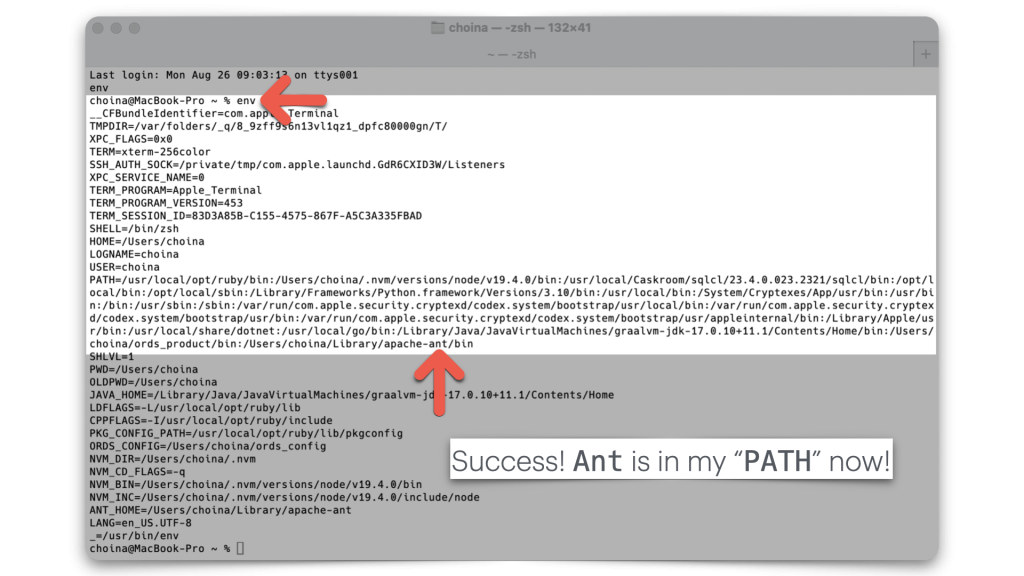
After restarting, you can issue the ENV or env command to review your environment settings. Here, you’ll see the Ant bin is in my PATH. You can now build with Ant 👍🏻.
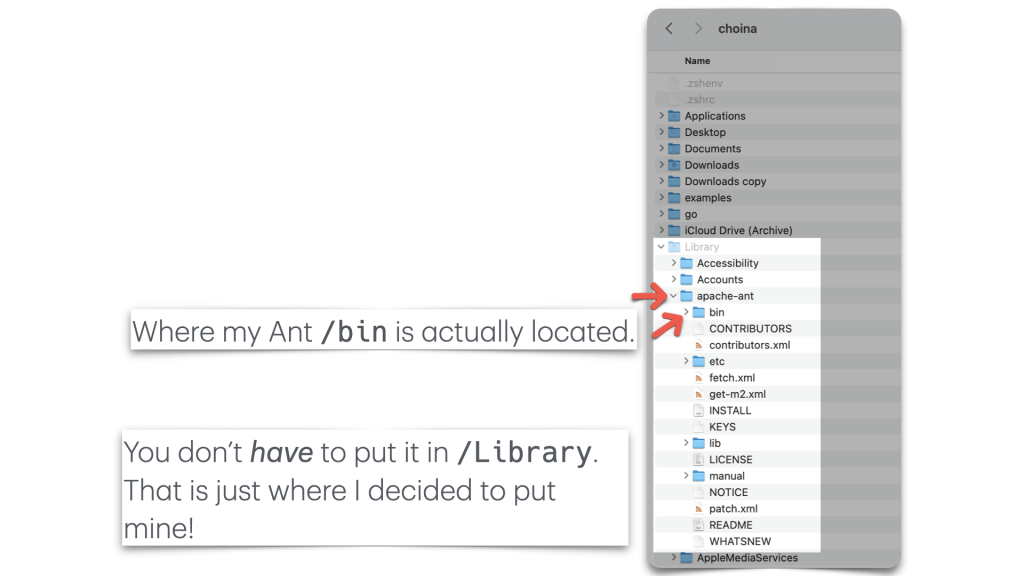
And to answer the question, “Where do I put the Ant files?” I placed them in my Library on my Mac.
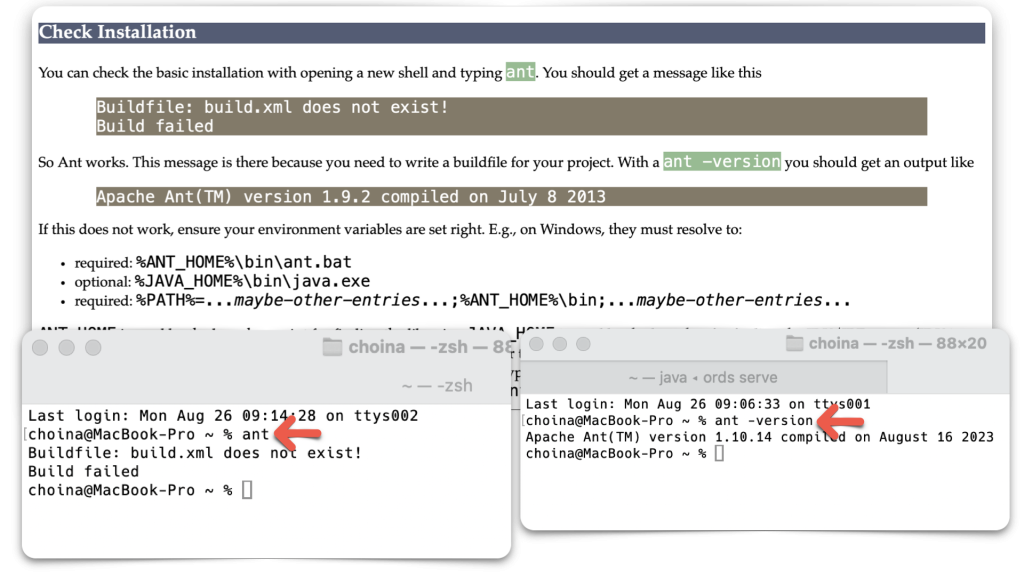
The Apache Ant docs mention two commands for testing to see if Ant is working as expected. The first command ant can be issued anywhere.
However, I assume if you issue this command in a directory where source files are waiting to be built, then you'll actually end up building a new Java app. I believe this is why they recommend issuing this command in a new shell. It assumes you don't have files there, waiting to be built.
Secondly, you can issue the ant -version command. If you have Ant installed, you’ll see the version information.
Okay! You now have Ant; let’s get back to the colony 🐜🐜🐜.
Build with Ant
Run
antto build theexamples/plugins/plugin-demo/built/plugin-demo.jarfile
README: The plugin-demo directory is located in your ORDS product folder. This step assumes you have ORDS installed and configured for Standalone, Weblogic, or an Apache Tomcat server.
Next, “cd” to the plugin-demo directory. I am lazy, so I right-click on the folder and choose to open a “New Terminal at Folder.”
The official instructions state that the source files for this Java plugin are contained in this folder. You do not need to modify these files for this to work. They are shipped with every ORDS version, so they will always be there, even when you upgrade (have you upgraded to the latest ORDS?).
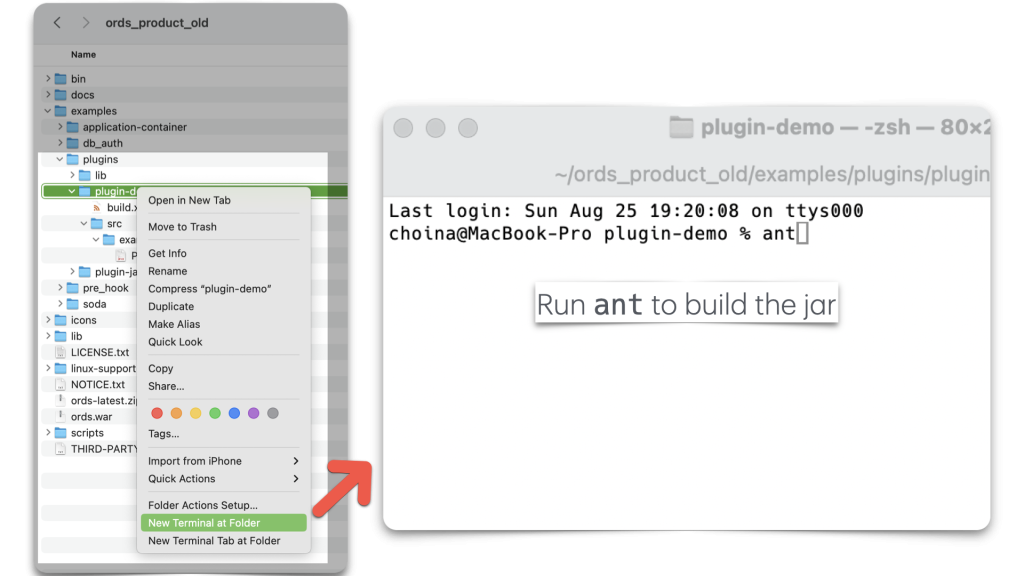
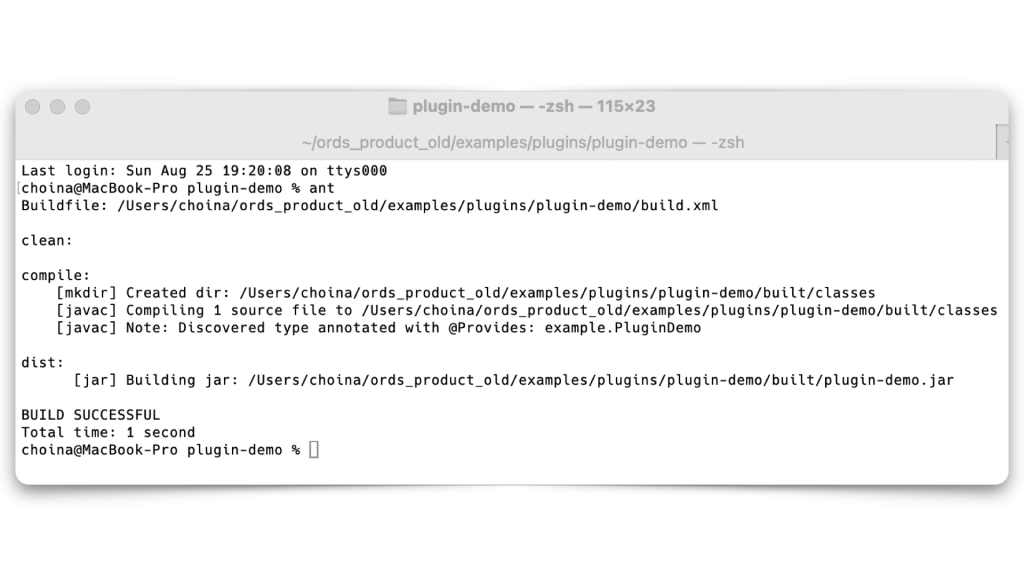
You are not losing your mind. The build literally takes about 5 seconds. You’ll see a printout like the image below. You only need to be concerned with the dist: row at this stage. That is your plugin, and it is ready to be deployed.
Jar configuration
Copy the
plugin-demo.jarto the ORDS distributionlib/extdirectory
Navigate back to the plugin-demo directory. While you’re there, you can expand the sub-directories. You will see the original src directory and the new built directory, with its sub-directories and files. Copy the plugin-demo.jarfile.

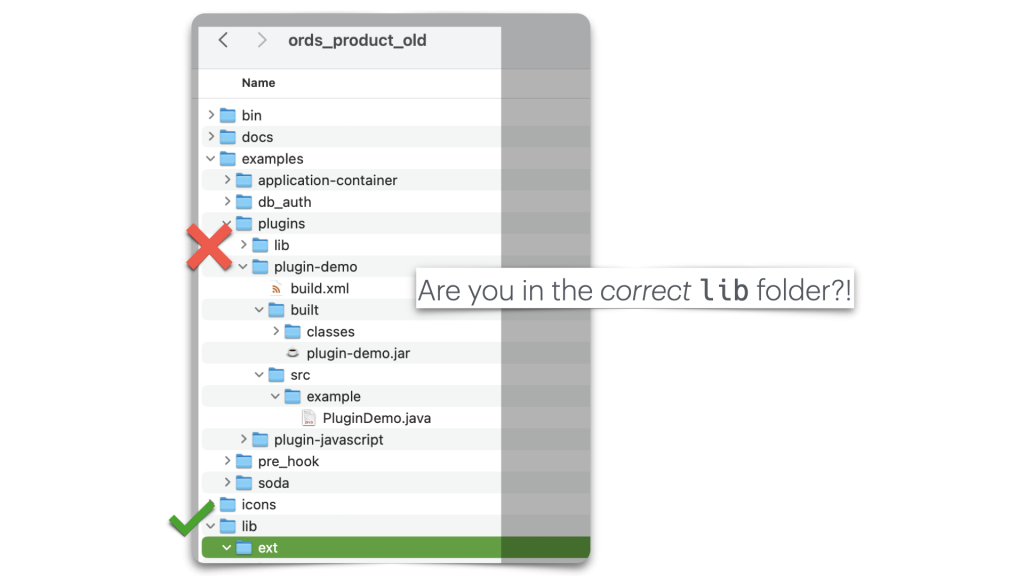
Return to your ORDS product folder and place the plugin-demo.jar file in the lib/ext directory. Just so we are clear, there is another lib directory nested in examples/plugins/lib. You DO NOT want to move the jar to that folder; you must go to the ords product folder/lib/ext directory.
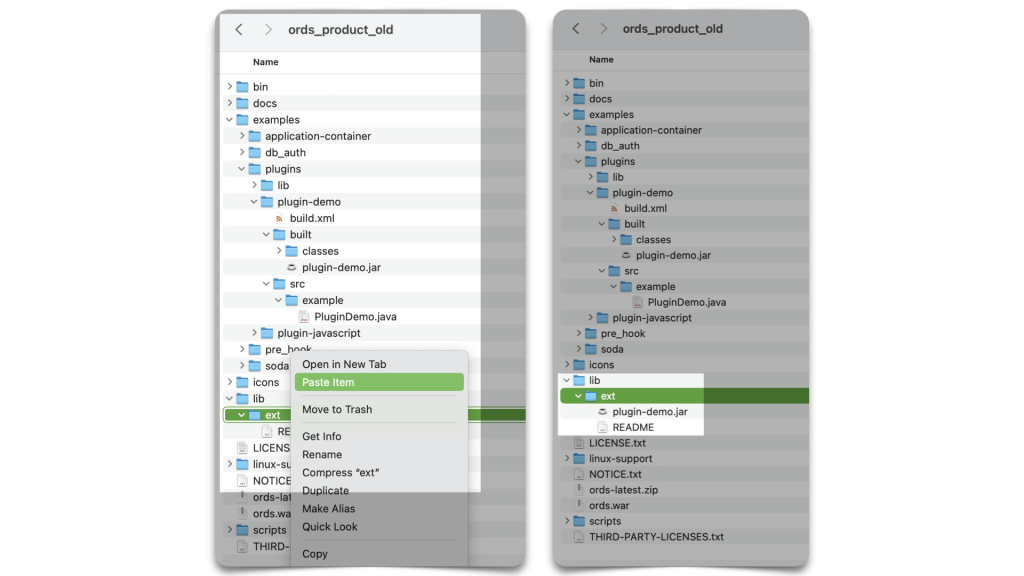
lib/ext the directory should now contain the plugin-demo.jar file. Double check!Starting ORDS
Start an ORDS instance with the
ords servecommand.
Okay, we are almost there. I have a couple of ORDS configurations here. One is for working in ORDS Standalone mode with a 23ai database via a Podman container (the Podman image can be found here), and another is a Customer-managed ORDS installation (identified by the moviestream23ai_medium database pool name) for working with my Autonomous database (in OCI).
ORDS customer-managed installation instructions can be found here.

Test the plugin
Invoke the servlet using the following URL pattern:
http://server/ords/schema/demos/plugin?who=somebody.For example:
http://localhost:8080/ords/hr/demos/plugin?who=scottwhere ORDS is configured with a default pool andHRis an alias for a REST Enabled Schema in that database.
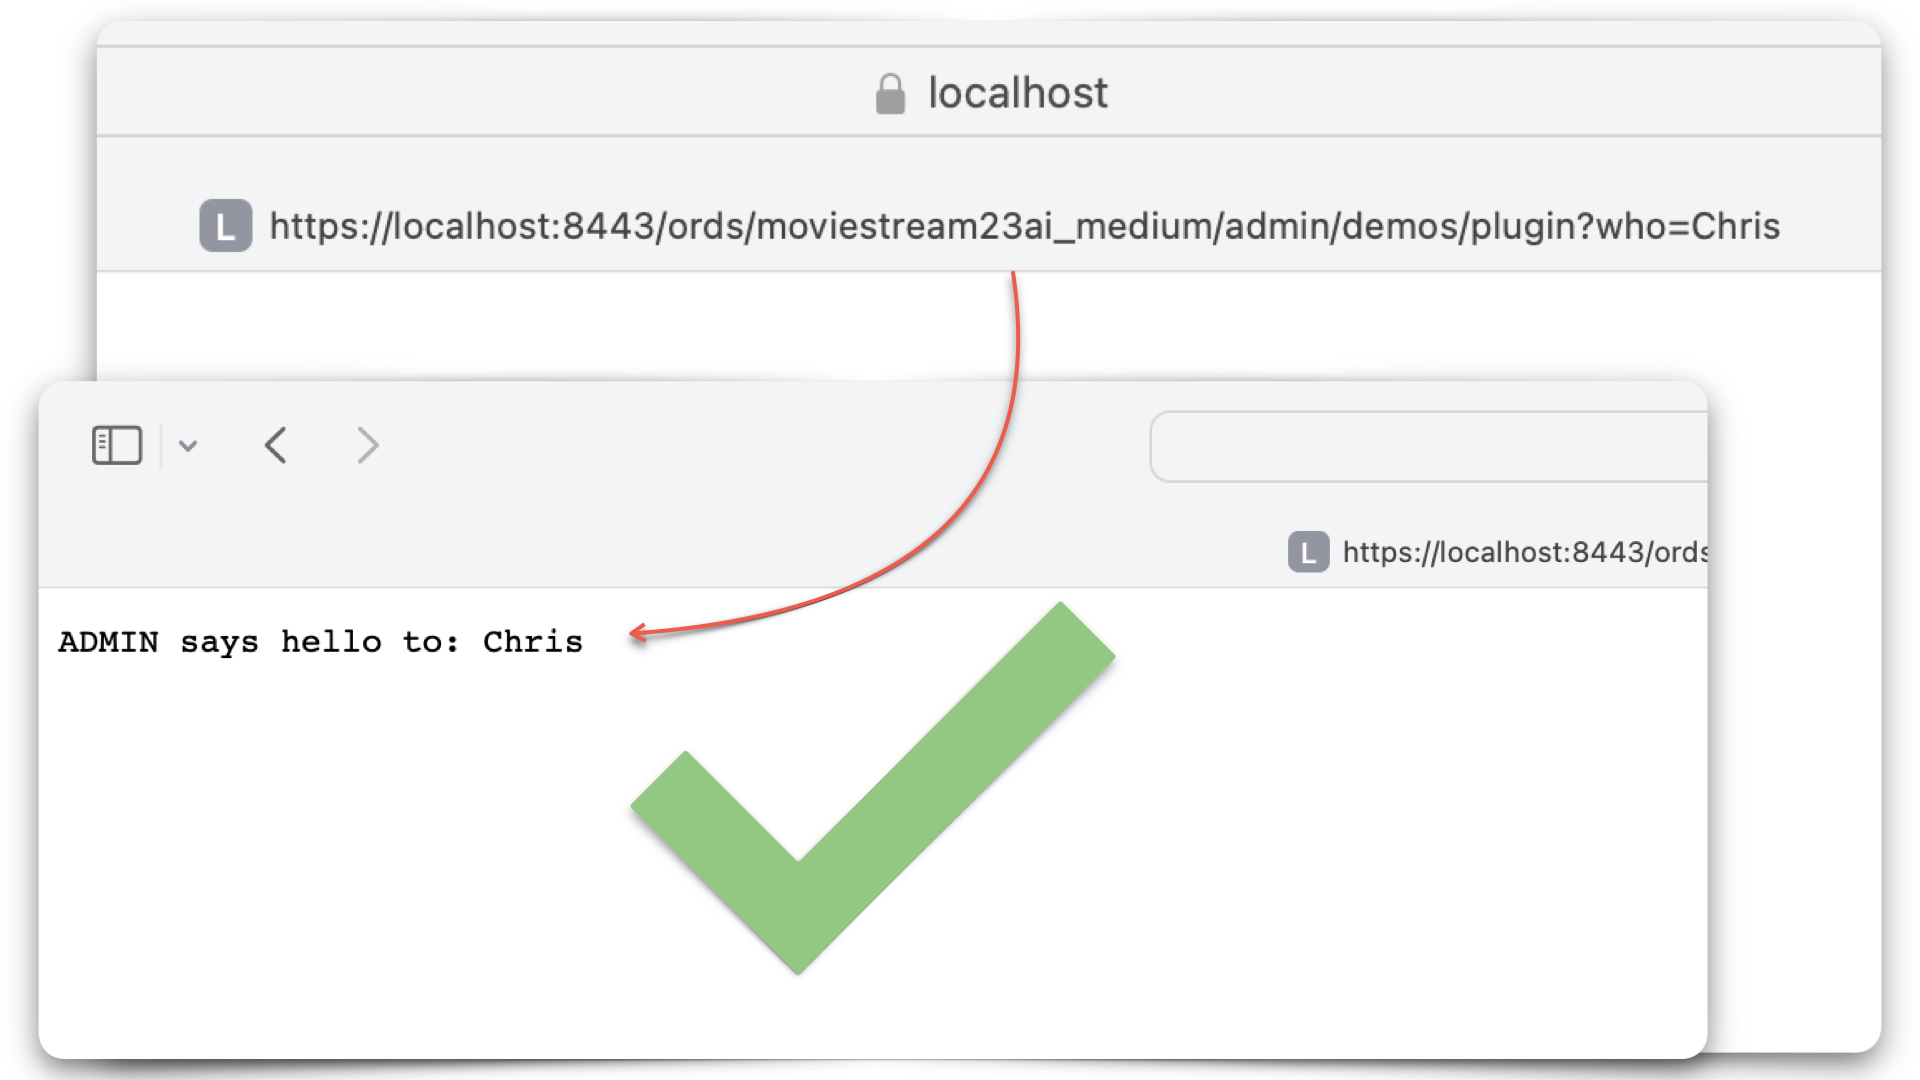
Now that ORDS is up and running, we can do some testing. In this first example, I challenged my creativity by using the name “Chris” for the test. Here, I’m issuing a request to the plugin. Of which it successfully returns the following message:
[ORDS REST-enabled schema] says hello to: [the name passed as a query parameter in the original request].
OR
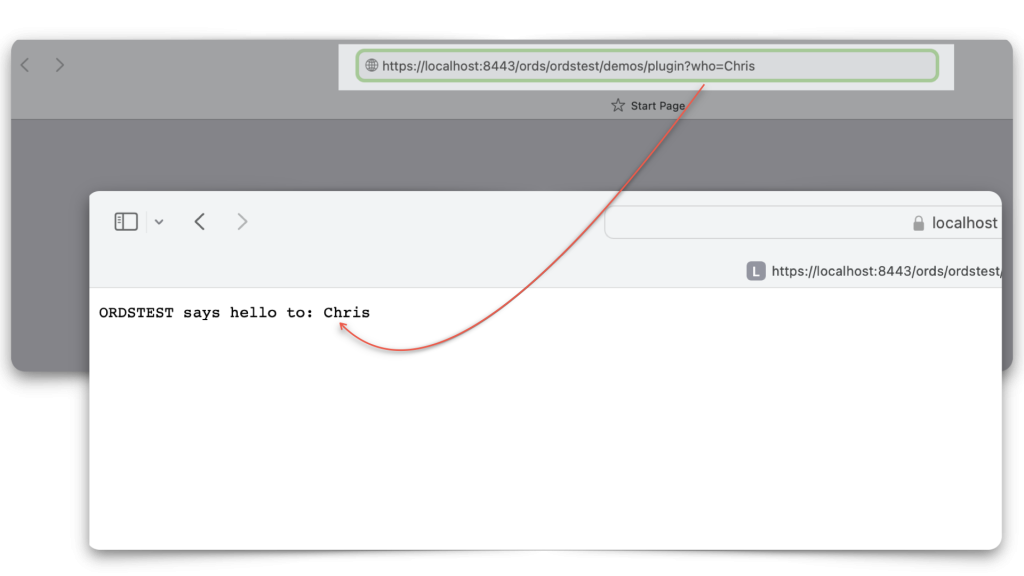
ORDSTEST says hello to: ChrisTesting with the Podman container:
And with the Customer-managed ORDS with Autonomous database installation:

Success! I am me!
Next steps
You’re probably asking yourself, “Now what?” Well, here is what I would do:
- Review the above steps again and on the docs for building this Java plugin.
- Look at our support for JavaScript plugins and the extra configuration step if you use GraalVM for your JVM.
- Start learning Java. The two resources I’ve been reading in my spare time:
- 2 Day + Java Developer’s Guide
- Introduction To Programming In Java — part of MIT’s OpenCourseWare
- Check out Peter’s ORDS plugin example too
- Make your own plugin and share it with me so I can try it out 😬
Oracle CloudWorld 2024 updates
And finally, yes, we are fast approaching this year’s CloudWorld conference. If you didn’t see my last post on our teams’ activities, review it (and hopefully register for at least some of our sessions). Details are here. And that’s all for now!
Follow
And don’t forget to follow, like, subscribe, share, taunt, troll, or stalk me!
Leave a Reply