Category: Languages

  • From one API to another: Using ORDS Auto-REST to update a table

    From one API to another: Using ORDS Auto-REST to update a table

    It turns out the National Highway Traffic Safety Administration (NHTSA; pronounced ‘nit-sə) has a Vehicle Identification Number (VIN) decoder (it’s freely available to the public). But even cooler are the set of APIs they have. The one I found most interesting, and useful (for my use case) was the /vehicles/DecodeVinValues/[your VIN]?format=[format]l&modelyear=[year] endpoint. Here is an example, using my vehicle:

    And as a cURL command (using my 1999 Chevy Silverado 🤠), with the subsequent server response:

    curl --request GET \
      --url 'https://vpic.nhtsa.dot.gov/api/vehicles/DecodeVinValues/1GCEK14V0XZ138493?format=json&modelyear=1999' \
    
    {
    	"Count": 1,
    	"Message": "Results returned successfully. NOTE: Any missing decoded values should be interpreted as NHTSA does not have data on the specific variable. Missing value should NOT be interpreted as an indication that a feature or technology is unavailable for a vehicle.",
    	"SearchCriteria": "VIN(s): 1GCEK14V0XZ138493",
    	"Results": [
    		{
    			"ABS": "",
    			"ActiveSafetySysNote": "",
    			"AdaptiveCruiseControl": "",
    			"AdaptiveDrivingBeam": "",
    			"AdaptiveHeadlights": "",
    			"AdditionalErrorText": "",
    			"AirBagLocCurtain": "",
    			"AirBagLocFront": "",
    			"AirBagLocKnee": "",
    			"AirBagLocSeatCushion": "",
    			"AirBagLocSide": "",
    			"AutoReverseSystem": "",
    			"AutomaticPedestrianAlertingSound": "",
    			"AxleConfiguration": "",
    			"Axles": "",
    			"BasePrice": "",
    			"BatteryA": "",
    			"BatteryA_to": "",
    			"BatteryCells": "",
    			"BatteryInfo": "",
    			"BatteryKWh": "",
    			"BatteryKWh_to": "",
    			"BatteryModules": "",
    			"BatteryPacks": "",
    			"BatteryType": "",
    			"BatteryV": "",
    			"BatteryV_to": "",
    			"BedLengthIN": "",
    			"BedType": "",
    			"BlindSpotIntervention": "",
    			"BlindSpotMon": "",
    			"BodyCabType": "",
    			"BodyClass": "Pickup",
    			"BrakeSystemDesc": "",
    			"BrakeSystemType": "Hydraulic",
    			"BusFloorConfigType": "Not Applicable",
    			"BusLength": "",
    			"BusType": "Not Applicable",
    			"CAN_AACN": "",
    			"CIB": "",
    			"CashForClunkers": "",
    			"ChargerLevel": "",
    			"ChargerPowerKW": "",
    			"CombinedBrakingSystem": "",
    			"CoolingType": "",
    			"CurbWeightLB": "",
    			"CustomMotorcycleType": "Not Applicable",
    			"DaytimeRunningLight": "",
    			"DestinationMarket": "",
    			"DisplacementCC": "4800.0",
    			"DisplacementCI": "292.91397165471",
    			"DisplacementL": "4.8",
    			"Doors": "2",
    			"DriveType": "4WD/4-Wheel Drive/4x4",
    			"DriverAssist": "",
    			"DynamicBrakeSupport": "",
    			"EDR": "",
    			"ESC": "",
    			"EVDriveUnit": "",
    			"ElectrificationLevel": "",
    			"EngineConfiguration": "V-Shaped",
    			"EngineCycles": "",
    			"EngineCylinders": "8",
    			"EngineHP": "",
    			"EngineHP_to": "",
    			"EngineKW": "",
    			"EngineManufacturer": "",
    			"EngineModel": "",
    			"EntertainmentSystem": "",
    			"ErrorCode": "0",
    			"ErrorText": "0 - VIN decoded clean. Check Digit (9th position) is correct",
    			"ForwardCollisionWarning": "",
    			"FuelInjectionType": "Multipoint Fuel Injection (MPFI)",
    			"FuelTankMaterial": "",
    			"FuelTankType": "",
    			"FuelTypePrimary": "",
    			"FuelTypeSecondary": "",
    			"GCWR": "",
    			"GCWR_to": "",
    			"GVWR": "Class 2E: 6,001 - 7,000 lb (2,722 - 3,175 kg)",
    			"GVWR_to": "",
    			"KeylessIgnition": "",
    			"LaneCenteringAssistance": "",
    			"LaneDepartureWarning": "",
    			"LaneKeepSystem": "",
    			"LowerBeamHeadlampLightSource": "",
    			"Make": "CHEVROLET",
    			"MakeID": "467",
    			"Manufacturer": "GENERAL MOTORS LLC",
    			"ManufacturerId": "984",
    			"Model": "Silverado",
    			"ModelID": "1850",
    			"ModelYear": "1999",
    			"MotorcycleChassisType": "Not Applicable",
    			"MotorcycleSuspensionType": "Not Applicable",
    			"NCSABodyType": "",
    			"NCSAMake": "",
    			"NCSAMapExcApprovedBy": "",
    			"NCSAMapExcApprovedOn": "",
    			"NCSAMappingException": "",
    			"NCSAModel": "",
    			"NCSANote": "",
    			"NonLandUse": "",
    			"Note": "",
    			"OtherBusInfo": "",
    			"OtherEngineInfo": "Iron",
    			"OtherMotorcycleInfo": "",
    			"OtherRestraintSystemInfo": "",
    			"OtherTrailerInfo": "",
    			"ParkAssist": "",
    			"PedestrianAutomaticEmergencyBraking": "",
    			"PlantCity": "ROANOKE",
    			"PlantCompanyName": "Fort Wayne Assembly",
    			"PlantCountry": "UNITED STATES (USA)",
    			"PlantState": "INDIANA",
    			"PossibleValues": "",
    			"Pretensioner": "",
    			"RearAutomaticEmergencyBraking": "",
    			"RearCrossTrafficAlert": "",
    			"RearVisibilitySystem": "",
    			"SAEAutomationLevel": "",
    			"SAEAutomationLevel_to": "",
    			"SeatBeltsAll": "",
    			"SeatRows": "",
    			"Seats": "",
    			"SemiautomaticHeadlampBeamSwitching": "",
    			"Series": "1500 (1/2 Ton)",
    			"Series2": "Conventional Cab",
    			"SteeringLocation": "",
    			"SuggestedVIN": "",
    			"TPMS": "",
    			"TopSpeedMPH": "",
    			"TrackWidth": "",
    			"TractionControl": "",
    			"TrailerBodyType": "Not Applicable",
    			"TrailerLength": "",
    			"TrailerType": "Not Applicable",
    			"TransmissionSpeeds": "",
    			"TransmissionStyle": "",
    			"Trim": "",
    			"Trim2": "",
    			"Turbo": "",
    			"VIN": "1GCEK14V0XZ138493",
    			"ValveTrainDesign": "",
    			"VehicleDescriptor": "1GCEK14V*XZ",
    			"VehicleType": "TRUCK",
    			"WheelBaseLong": "",
    			"WheelBaseShort": "",
    			"WheelBaseType": "",
    			"WheelSizeFront": "",
    			"WheelSizeRear": "",
    			"WheelieMitigation": "",
    			"Wheels": "",
    			"Windows": ""
    		}
    	]
    }

    On its own, this is pretty cool. But I wanted to do something more with this information. I wanted to store it, so I could use it later, for a Cloud World-related project.

    A GET and POST Python script

    So, with the help of one of the many popular LLMs I settled on a Python script that helps me take what you see above and get it “database ready.” Here is what that Python code looks like:

    import argparse
    import requests
    import json
    import re
    
    def sanitize_key(key: str) -> str:
        # Convert keys to lowercase, replace non-alphanumeric characters with underscores.
        key = key.strip()
        key = re.sub(r'[^a-zA-Z0-9]+', '_', key)
        return key.lower()
    
    def decode_vin(vin: str, model_year: int):
        url = f"https://vpic.nhtsa.dot.gov/api/vehicles/DecodeVinValues/{vin}?format=json&modelyear={model_year}"
        response = requests.get(url)
        response.raise_for_status()
    
        data = response.json()
    
        if "Results" not in data or not data["Results"]:
            raise ValueError("Invalid API response: No Results found.")
    
        raw_result = data["Results"][0]
    
        # Sanitize keys and skip empty values
        result = {
            sanitize_key(k): v
            for k, v in raw_result.items()
            if v not in (None, "", "Not Applicable")
        }
    
        return result
    
    def post_to_endpoint(payload: dict, endpoint: str):
        headers = {'Content-Type': 'application/json'}
        response = requests.post(endpoint, json=payload, headers=headers)
        response.raise_for_status()
        return response.json()
    
    def main():
        parser = argparse.ArgumentParser(description="A tool to decode VINs and send them to an Oracle REST endpoint")
        parser.add_argument("vin", type=str, help="Vehicle Identification Number")
        parser.add_argument("model_year", type=int, help="Model year of the vehicle")
        parser.add_argument("--pretty", action="store_true", help="Pretty-print output JSON")
        args = parser.parse_args()
    
        # Decode and sanitize
        result = decode_vin(args.vin, args.model_year)
    
        # Print to console
        if args.pretty:
            print(json.dumps(result, indent=2))
        else:
            print(result)
    
        # POST to local Oracle ORDS endpoint
        endpoint_url = "http://localhost:8080/ords/ordsdemo/vin_table/"
        try:
            post_response = post_to_endpoint(result, endpoint_url)
            print("\nPOST response from server:")
            print(json.dumps(post_response, indent=2))
        except requests.HTTPError as e:
            print(f"Error posting to endpoint: {e}")
    
    if __name__ == "__main__":
        main()

    👈🏼 Click here to learn what all different parts of this script do.

    I’ll explain briefly according to the code blocks:

    • Lines 6-10 take the results, or rather the “keys” (which will later become the columns in a database table), and standardize them. The keys end up being all lower case, no whitespaces.
    • Lines 12-31 are the bulk of the script. That part issues a GET request to the VIN decoder endpoint. If you can picture in your head, what I’m doing effectively is creating a table of keys and values. Those will then be sent over to my ORDS endpoint (a table I separately created and Auto-REST enabled with ORDS).
    • Lines 33-37 and 56-62 kind of work in tandem. That first block, lines 33-57, basically expects all the “stuff” you see in line 58. Line 58 sends the results (after we’ve processed it), using the ORDS endpoint, to the function in lines 33-57.
    • Lines 39-53 are my entry and exit points for this script. So on the command line I’d execute the following command (I’m using the same VIN and model year): python3 vindecode.py 1GCEK14V0XZ138493 1999

    Target 23ai Database

    So this whole exercise doesn’t work unless I have a target, in my database. And for this project I’m working on, a simple table that has been Auto-REST enabled is fine. I just need it to store these values. And I can use the VIN as a Primary Key (VINs are unique, and no two are alike).

    And if I’m thinking ahead, I’ll probably never update any single row. I just need to be able to insert a new row with a POST request, and then later issue a GET request by VIN. So an Auto-REST enabled table, with the VIN as a Primary Key will work just fine. As things scale, this might change, but with minimal technical debt incurred, this approach works for now.

    As an aside, when I’m working through projects like these, where I’m building out a new object, I usually have a general idea of what I want to achieve, but I will go through tons of iterations1. This time I ended up creating and dropping like four table versions before I ended on this one (four is on the low-end actually). The final DDL for this table:

    CREATE TABLE ORDSDEMO.VIN_TABLE 
        ( 
         VIN                         VARCHAR2 (17) , 
         MAKE                        VARCHAR2 (50) , 
         MAKEID                      NUMBER (5) , 
         MANUFACTURER                VARCHAR2 (100) , 
         MANUFACTURERID              NUMBER (10) , 
         MODEL                       VARCHAR2 (100) , 
         MODELID                     NUMBER (10) , 
         MODELYEAR                   NUMBER (4) , 
         SERIES                      VARCHAR2 (100) , 
         SERIES2                     VARCHAR2 (100) , 
         TRIM                        VARCHAR2 (100) , 
         TRIM2                       VARCHAR2 (100) , 
         VEHICLEDESCRIPTOR           VARCHAR2 (20) , 
         VEHICLETYPE                 VARCHAR2 (50) , 
         BODYCLASS                   VARCHAR2 (50) , 
         BODYCABTYPE                 VARCHAR2 (50) , 
         DRIVETYPE                   VARCHAR2 (50) , 
         BRAKESYSTEMTYPE             VARCHAR2 (50) , 
         BRAKESYSTEMDESC             VARCHAR2 (100) , 
         FUELINJECTIONTYPE           VARCHAR2 (100) , 
         FUELTYPEPRIMARY             VARCHAR2 (50) , 
         FUELTYPESECONDARY           VARCHAR2 (50) , 
         ENGINECONFIGURATION         VARCHAR2 (50) , 
         ENGINECYLINDERS             NUMBER (2) , 
         ENGINEHP                    NUMBER , 
         ENGINEKW                    NUMBER , 
         ENGINEMANUFACTURER          VARCHAR2 (100) , 
         ENGINEMODEL                 VARCHAR2 (100) , 
         DISPLACEMENTCC              NUMBER (6,1) , 
         DISPLACEMENTCI              NUMBER (8,5) , 
         DISPLACEMENTL               NUMBER (4,1) , 
         DOORS                       NUMBER (2) , 
         GVWR                        VARCHAR2 (100) , 
         PLANTCITY                   VARCHAR2 (50) , 
         PLANTSTATE                  VARCHAR2 (50) , 
         PLANTCOUNTRY                VARCHAR2 (50) , 
         PLANTCOMPANYNAME            VARCHAR2 (100) , 
         OTHERENGINEINFO             VARCHAR2 (255) , 
         ERRORTEXT                   VARCHAR2 (255) , 
         ERRORCODE                   NUMBER (2) , 
         AIRBAGSIDE                  VARCHAR2 (50) , 
         AIRBAGFRONT                 VARCHAR2 (50) , 
         AIRBAGCURTAIN               VARCHAR2 (50) , 
         TPMS                        VARCHAR2 (100) , 
         SEATBELTSALL                VARCHAR2 (50) , 
         ENTERTAINMENTSYSTEM         VARCHAR2 (100) , 
         CUSTOMMOTORCYCLETYPE        VARCHAR2 (100) , 
         TRAILERTYPE                 VARCHAR2 (100) , 
         TRAILERBODYTYPE             VARCHAR2 (100) , 
         TRANSMISSIONSTYLE           VARCHAR2 (100) , 
         TRANSMISSIONSPEEDS          VARCHAR2 (50) , 
         WINDOWS                     VARCHAR2 (50) , 
         WHEELS                      VARCHAR2 (50) , 
         WHEELBASESHORT              VARCHAR2 (50) , 
         WHEELBASELONG               VARCHAR2 (50) , 
         WHEELBASETYPE               VARCHAR2 (100) , 
         NOTE                        VARCHAR2 (255) , 
         ABS                         VARCHAR2 (10) , 
         ADAPTIVECRUISECONTROL       VARCHAR2 (50) , 
         ADAPTIVEHEADLIGHTS          VARCHAR2 (50) , 
         FORWARDCOLLISIONWARNING     VARCHAR2 (50) , 
         PEDESTRIANAUTOMATICEBRAKING VARCHAR2 (50) , 
         REARCROSSTRAFFICALERT       VARCHAR2 (50) , 
         REARAUTOMATICEBRAKING       VARCHAR2 (50) , 
         PARKASSIST                  VARCHAR2 (50) , 
         TRACTIONCONTROL             VARCHAR2 (50) , 
         ESC                         VARCHAR2 (50) , 
         DYNAMICBRAKESUPPORT         VARCHAR2 (50) , 
         LANEDEPARTUREWARNING        VARCHAR2 (50) , 
         LANEKEEPSYSTEM              VARCHAR2 (50) , 
         ACTIVESAFETYSYSNOTE         VARCHAR2 (255) , 
         ADDITIONALERRORTEXT         VARCHAR2 (255) 
        ) 
        TABLESPACE USERS 
        LOGGING 
    ;
    
    ALTER TABLE ORDSDEMO.VIN_TABLE 
        ADD PRIMARY KEY ( VIN ) 
        USING INDEX LOGGING ;

    Some background

    Oh, please know that I used an LLM for this DDL too. I could have reduced the number of columns since this particular vehicle has a lot of null or “n/a” fields. But other, future vehicles might actually have values for some of those columns. They can stay for now. You might not like the stylistic choice of condensing all my values, but I think this is inconsequential. You’d probably transform them again, in your application layer, when you pull them down from the database. Also, I’m familiar with these values. I could have abbreviated them even further, but for readability, I think this is good (for future me, and others too).

    ORDS Auto-REST

    The last thing I needed to do was Auto-REST enable my table. Which, if you’ve used the SQL Developer Web UI, you know how easy this is. Two clicks and you’re done. From there I have access to several HTTP methods; I only care about GET [all], GET{by id}, and POST.

    Oh, and if you look at the URI that is provided, it’s the same URI that you saw in line 56 of my Python script. So that sort of brings us full circle.

    If you recall, I used the VIN as a Primary Key. This image shows how that VIN can now be used in the URI (instead of an arbitrary Row ID).

    Review/Checkpoint

    So, at this point, I have two target endpoints:

    1. One where I retrieve a vehicle’s details by its VIN and model year (I don’t own this one – this is the one provided by NHTSA).
    2. Another (that I own) where I am updating and retrieving vehicle records.

    I’ve created a VIN_TABLE table, with the VIN as the Primary Key, and I’ve Auto-REST enabled it with ORDS. I’ve then taken the endpoint for issuing a POST request and added it to the Python script (saved as vindecode.py). Now I can issue the following command to add a record to my table:

    python3 vindecode.py 1GCEK14V0XZ138493 1999

    And just so you know I’m being honest, I’ll drop everything from my target table, and run through this workflow again.

    Back in VS Code, I’ll issue the command, and receive the response from my database (via ORDS).

    And finally, I’ll review the results (I already did this in VS Code, but I’ll do it in the browser and SQL Worksheet too):

    Review

    And that’s it! One of countless examples of how you might work through a pretty common pattern such as this (using LLMs too). The nice thing here is I don’t have to worry about any ORMs (never have, never will). You have to understand, my reality is such that ORMs do not exist. All I’ve ever known is ORDS; a bit of middleware that sends/receives HTTP/HTTPS requests on your behalf, without ever having to map a thing.

    And we’ve made it much easier to take ORDS for a test drive. We’ve been working behind the scenes to improve our Docker/Podman documentation; we just released the latest refresh to our docs here. Hopefully the docs are much more approachable for the container newbie.

    OH! And if you ever have any issues, open a ticket here. Our team now “owns” the ORDS content on that GitHub repository; so, we’ll be a lot more responsive too!

    That is all for now. If you haven’t downloaded the latest ORDS, check it out here. Bye 👋🏼.

    P.S. Yes, I realize this post’s image is of a GMT-400, and not a GMT-800. But it was a cool pic, and I really liked it. Credit to The Autopian.

    1. I’m including a link to the prompting I used for creating most of what you see here. I think in this new age of AI/LLMs it is important to understand prompting. Eventually, whether we like it or not, we’ll all need to become “prompt engineers.” And as you’ll see in that thread, you actually have to know what you are doing to be able to ask the right questions and to challenge an LLM’s assumptions.

      A lot of times, these things are just flat out wrong, and overly verbose too. As you’ll see, at one point the LLM added a mapping function in one of the iterations, which in my mind was completely unnecessary. Additionally, I wouldn’t have constructed this script as a pseudo-command line interface. BUT…I learned a new library (argparse), and I think I’ll explore that more in the future. ↩︎
  • A simple ORDS GET request using the Go language

    A simple ORDS GET request using the Go language

    Venkata this one’s for you 😀

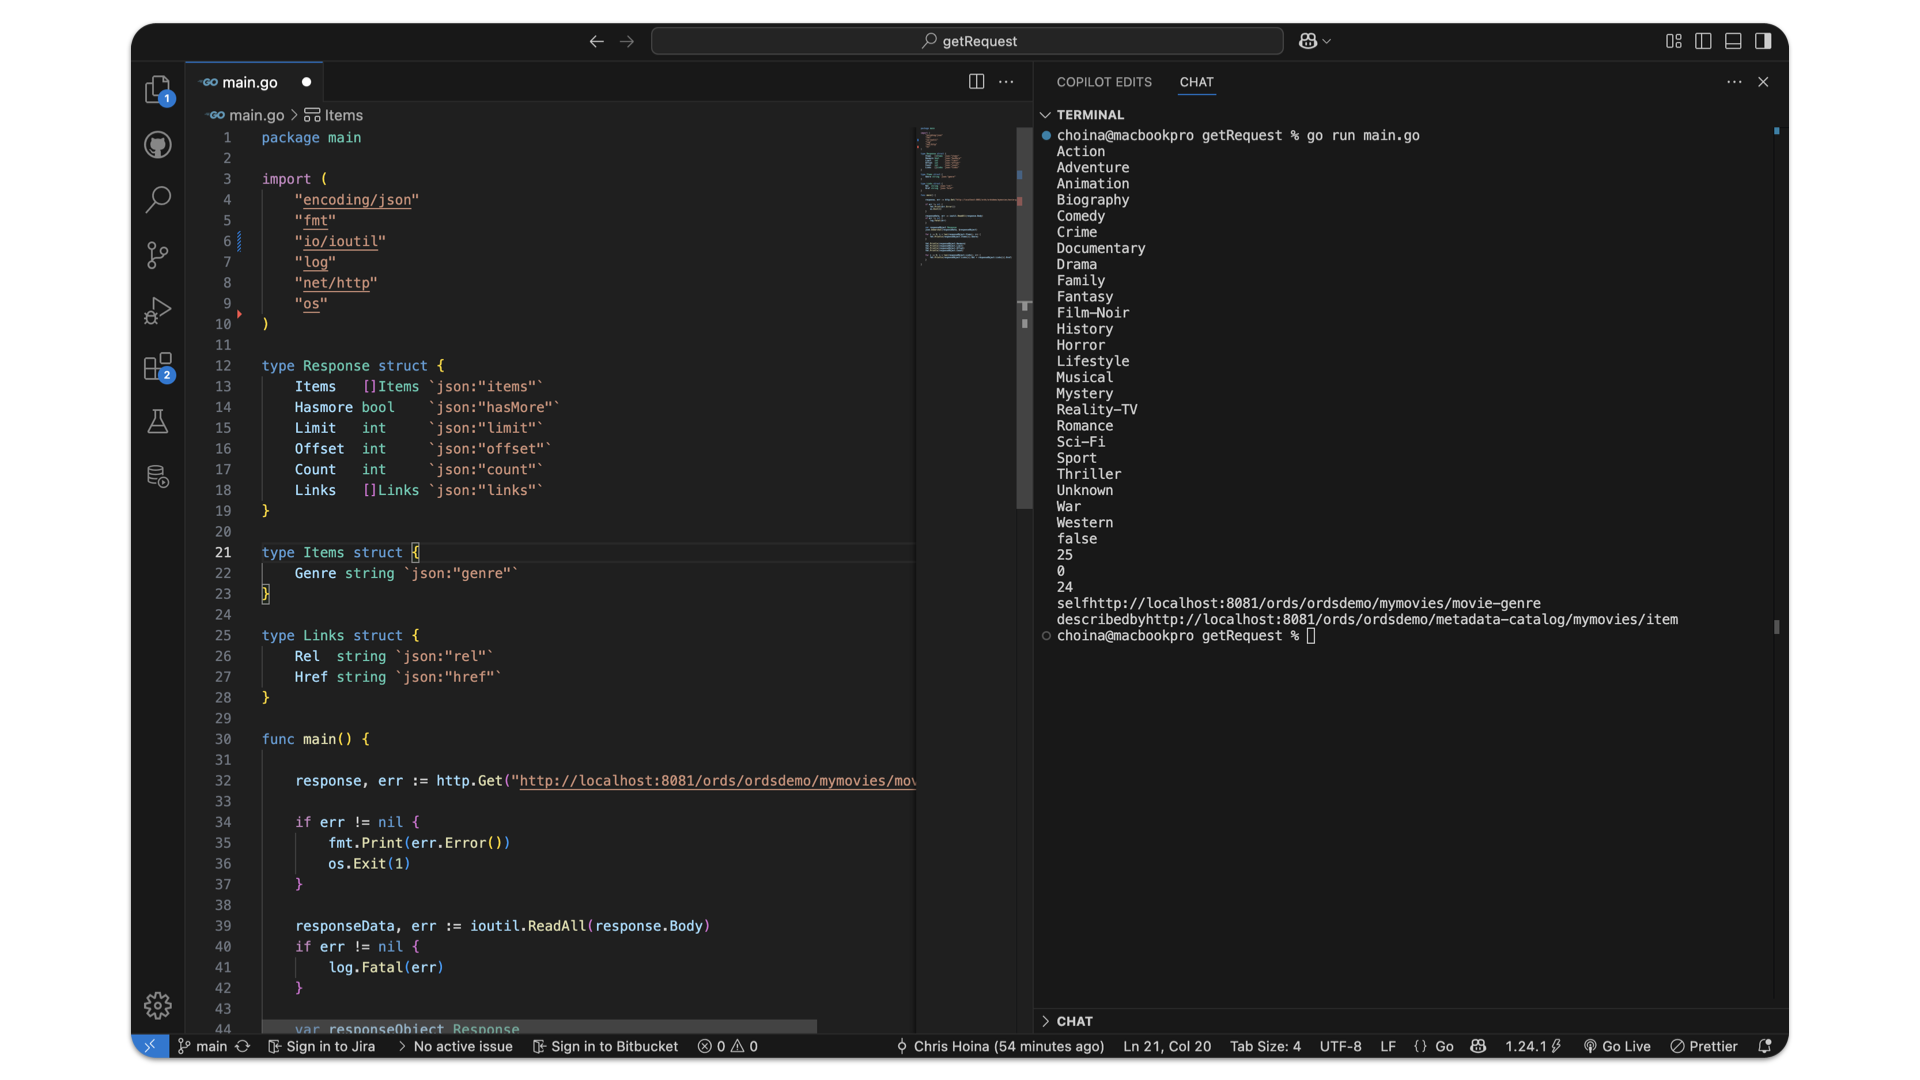
    It took me the rest of the afternoon, but here is a pretty simple GET request example, using a user-defined ORDS API. This API is derived from one of our LiveLabs, a Python + JavaScript application. But this particular scenario pretty well exemplifies what we discussed in our presentation yesterday—that the RESTful framework makes your backend code much more language-agnostic. With a few tweaks, I was able to “port” this over to Go.

    ORDS example API

    The ORDS API I’m working with looks like this on the back end (this is our REST Workshop; where you build ORDS APIs):

    More formally, it looks like this:

    SELECT DISTINCT
        GENRE
    FROM
        MOVIE,
        JSON_TABLE ( GENRES, '$[*]'
                COLUMNS (
                    GENRE PATH '$'
                )
            )
    ORDER BY
        1 ASC

    The MOVIE table I’m calling upon consists of various data types, but the target GENRE In this case, the column is a JSON object that actually contains an array. So, all I’m doing is returning the unique genres (i.e., removing duplicates) from a table of thousands of movies. What is nice about this approach is that all my SQL and PL/SQL stay in the database. All my application’s code needs now is an endpoint.

    If I don’t want to keep pinging that endpoint, I can always just use a JSON document as a proxy for the endpoint. And if I just point my browser to that URI (i.e. ORDS API), here is what the results look like (I had to take two screenshots to capture everything):

    When you are looking at these results, it’s best to focus on the “root” key:value pairs of the ORDS response. For a fairly standard ORDS GET request, the response body will consist of:

    • items
    • hasMore
    • limit
    • offset
    • count, and
    • links

    When I collapse my example, I am left with the following:

    {
        "items": [
        ],
        "hasMore": false,
        "limit": 25,
        "offset": 0,
        "count": 24,
        "links": [
        ]
    }
    Note: The items will be an array, as will the links.

    A caveat to this is when/if you choose to Auto-REST enable an object, the result will look mostly the same. However, ORDS adds a self-referential link to each result. But those links are an array, too.

    Regardless, it shouldn’t affect how you approach this in Go. The struct of those types are the same: Items []Items json:"items" and Links []Links json:"links", respectively. Compare this auto-REST-enabled result to the one above:

    Worth noting: The image below is using a different endpoint. Its basically doing a "select * from movies;" on the MOVIES table. Hence, why it looks a little different. But you should still be able to see what I am talking about. If you want to learn more about ORDS Auto-REST, then check this out. 
    If you squint, you can see how each result has its own “rel” link. That is how Auto-REST would look, this is expected.

    Go time

    Coming from Python and PL/SQL, along with some JavaScript, I found Go to be extremely enjoyable. I get the gist of how you define the types and structures of “things.” I haven’t even bothered to look at the documentation yet; I didn’t even need to. It was easy to follow along using the two tutorials I found (here and here). After a few minutes of debugging (which is quite intuitive in Go, actually), I had my code working.

    Actually, once I figured out the syntax and Go idiosyncracies, creating this simple example wasn’t much of an effort.

    Here is the Go code that I came up with:

    package main
    
    import (
    	"encoding/json"
    	"fmt"
    	"io/ioutil"
    	"log"
    	"net/http"
    	"os"
    )
    
    type Response struct {
    	Items   []Items `json:"items"`
    	Hasmore bool    `json:"hasMore"`
    	Limit   int     `json:"limit"`
    	Offset  int     `json:"offset"`
    	Count   int     `json:"count"`
    	Links   []Links `json:"links"`
    }
    
    type Items struct {
    	Genre string `json:"genre"`
    }
    
    type Links struct {
    	Rel  string `json:"rel"`
    	Href string `json:"href"`
    }
    
    func main() {
    
    	response, err := http.Get("http://localhost:8081/ords/ordsdemo/mymovies/movie-genre")
    
    	if err != nil {
    		fmt.Print(err.Error())
    		os.Exit(1)
    	}
    
    	responseData, err := ioutil.ReadAll(response.Body)
    	if err != nil {
    		log.Fatal(err)
    	}
    
    	var responseObject Response
    	json.Unmarshal(responseData, &responseObject)
    
    	for i := 0; i < len(responseObject.Items); i++ {
    		fmt.Println(responseObject.Items[i].Genre)
    	}
    
    	fmt.Println(responseObject.Hasmore)
    	fmt.Println(responseObject.Limit)
    	fmt.Println(responseObject.Offset)
    	fmt.Println(responseObject.Count)
    
    	for i := 0; i < len(responseObject.Links); i++ {
    		fmt.Println(responseObject.Links[i].Rel + responseObject.Links[i].Href)
    	}
    
    }

    If you know Go, then I’m not teaching you anything that you don’t already know. You probably know the libraries I’m using. However, I think it is worth pointing out a few ORDS-specific things.

    When it comes to the items and the links they are always going to be an array. So you’ll need to account for that when you are defining the structures (aka struct) for your user-defined types (let me know if this terminology is correct, it just seems so intuitive, so I’m going with it).

    Here are some other things to consider:

    • hasMore is a Boolean; or bool in Go. It’s also going to be either true or false.
      • True means there are more results (so you can page forward if you want).
      • False means there are no more results.
    • limit just means how many results you should expect. In my case, 25 results (that is our default, but you can adjust this when you build your APIs).
      • Another way to look at this is that my pagination is set to 25 results per page.
    • offset and limit are kind of interdependent. If you are on the first page then your offset will be = 0. But if you wanted to view your second “page” or set of results, then you’d set your offset = 25.
      • And because your limit = 25 then you’d see results 26-50.
    • The count is just the total results per page, or 25 in this case (hypothetically, if you were to make it to the end of your results set, it would probably not be exactly 25, something to keep in mind).

    Here is a complete JSON object of my first results (if you want to play around with it until you get ORDS up and running):

    {
        "items": [
            {
                "genre": "Action"
            },
            {
                "genre": "Adventure"
            },
            {
                "genre": "Animation"
            },
            {
                "genre": "Biography"
            },
            {
                "genre": "Comedy"
            },
            {
                "genre": "Crime"
            },
            {
                "genre": "Documentary"
            },
            {
                "genre": "Drama"
            },
            {
                "genre": "Family"
            },
            {
                "genre": "Fantasy"
            },
            {
                "genre": "Film-Noir"
            },
            {
                "genre": "History"
            },
            {
                "genre": "Horror"
            },
            {
                "genre": "Lifestyle"
            },
            {
                "genre": "Musical"
            },
            {
                "genre": "Mystery"
            },
            {
                "genre": "Reality-TV"
            },
            {
                "genre": "Romance"
            },
            {
                "genre": "Sci-Fi"
            },
            {
                "genre": "Sport"
            },
            {
                "genre": "Thriller"
            },
            {
                "genre": "Unknown"
            },
            {
                "genre": "War"
            },
            {
                "genre": "Western"
            }
        ],
        "hasMore": false,
        "limit": 25,
        "offset": 0,
        "count": 24,
        "links": [
            {
                "rel": "self",
                "href": "http://localhost:8081/ords/ordsdemo/mymovies/movie-genre"
            },
            {
                "rel": "describedby",
                "href": "http://localhost:8081/ords/ordsdemo/metadata-catalog/mymovies/item"
            },
            {
                "rel": "first",
                "href": "http://localhost:8081/ords/ordsdemo/mymovies/movie-genre"
            }
        ]
    }

    All the code you see here is also in my blog post code repo. There are other examples there, too!

    Also, huge thanks for asking about Go. It gave me an excuse to start learning it. I think I might be a Go fanboi now 🫣!

    And for all others reading:

    Follow

    And don’t forget to follow, like, subscribe, share, taunt, troll, or stalk me!

  • Random Access Memories: ORDS and JWTs

    Random Access Memories: ORDS and JWTs

    Why is this in the OAuth chapter?

    Apparently, JWTs fall under the purview of the OAuth Working Group, a section of the Internet Engineering Task Force (IETF). Here is a draft of the JWT specification I found. This makes sense; I’ve since relearned that OAuth = Open Authorization 🤦🏻.

    ORDS JWT OAUTH parameters

    You’ll notice two new procedures in that package: OAUTH.CREATE_JWT_PROFILE and OAUTH.DELETE_JWT_PROFILE. After getting acquainted with them, I wanted to highlight three parameters of the OAUTH.CREATE_JWT_PROFILE procedure: 

    • p_issuer
    • p_audience
    • p_jwk_url

    Your JWT issuer (e.g., Microsoft Entra or Oracle Identity Cloud Service) will provide you with these three values required for the OAUTH.CREATE_JWT_PROFILE procedure. 

    However, they might be referred to by slightly different names. I first noticed this as I set up Microsoft Entra to work with ORDS (below are images taken from a slide deck I’m working on). 

    Learn more about these parameters.

    So, the names are all slightly different. But if I can figure it out, you definitely can.

    Decoding JWTs

    Once you acquire your JWT, you’ll need a way to decode it so you can use it for testing or development, and you’ll need some of the information for the ORDS profile procedure! Several resources exist, but here is a [non-exhaustive] list I put together: 

    If you choose to use a web-based decoder, it’ll look like this (paste your Token):

    But you might prefer something other than putting your JWT into a browser for decoding. 

    Homegrown

    So, if you’re like me (and didn’t do your research beforehand), you might try to come up with something independently. Something you can run locally.

    I created a JavaScript function that expects a JWT and “splits” on the periods. From there, Base64 decodes the necessary stuff for you and returns it: 

    function decodeJwt(newjwt) {
        var headerJwt = newjwt.split(".")[0];
        var headerJwtdecoded = atob(headerJwt);
        
        var payloadJwt = newjwt.split(".")[1];
        var payloadJwtdecoded = atob(payloadJwt);
    
        var signatureJwt = newjwt.split(".")[2];
        // var signatureJwtdecoded = atob(signatureJwt);
    
        // var signatureJwtBase64 = signatureJwt.replace(/-/g, "+").replace(/_/g, "/");
        // var signatureJwtBase64decoded = atob(signatureJwtBase64);
    
        console.log(headerJwt, payloadJwt, signatureJwt);
    
        console.log(headerJwtdecoded, payloadJwtdecoded);
    
        return(headerJwt, payloadJwt);
      };
    
    
    decodeJwt("Your JWT goes here.");
    

    To illustrate how this function works, I took some “boilerplate” HTML from the Bootstrap docs page and spun up a LiveServer in VS Code. I’m also “inspecting” the results from the console.log();. I’m not really sure how far I’ll take this, especially now that I’ve learned about all the existing libraries. But feel free to remix this code!

    Thank you for your time 🙇🏻‍♂️

    And that’s all I have to share for today! 

    If you still need to download and upgrade to the latest ORDS, you can find the.zip file here. Be sure to explore GraalVM, too; you can “unlock” some newer ORDS features by using GraalVM as your primary Java Developer Kit (JDK)!

    Follow

    And don’t forget to follow, like, subscribe, share, taunt, troll, or stalk me!

  • Python script to retrieve objects from Oracle Cloud Bucket

    Python script to retrieve objects from Oracle Cloud Bucket

    For…reasons, I needed a way to retrieve all the .CSV files in a regional bucket in Oracle Cloud Object Storage, located at this address:

    https://objectstorage.us-phoenix-1.oraclecloud.com/n/dwcsprod/b/moviestream_data_load_workshop_20210709/o

    You can visit it; we use it for one of our LiveLabs (this one), so I’m sure it will stay live for a while 😘. Once there, you’ll see all the available files in that bucket:

    FYI: A bucket is one of the three core components of Oracle Cloud's Object Storage. The other two are Objects and Namespaces (more details at Object Storage FAQs).

    In this case, there were more than just .CSV files; the script I created will also download those. But, of course, your specific situation may vary. Onto the Python script!

    The code

    Allow me to first address a few considerations and limitations:

    1. There is probably a way to create a function that accepts a parameter to make this even more elegant and compact. I’m not “there” yet. So, if you have a better solution, please comment, and I’ll amend my code!
    2. I still haven’t learned error and exception handling in Python. So anytime you see me “code in” print(...) that is basically me attempting to check to see if what I think will happen actually happens.
    3. I’m not sure if my range() and len() practices are appropriate, but it works, so I’m going with it!
    4. Don’t ask me how I even found out about the webbrowser library. I must have found it on a forum, or StackOverflow (hate that I can’t attribute credit to my savior).

    The code for real

    import requests
    import json
    import webbrowser
    
    url = 'https://objectstorage.us-phoenix-1.oraclecloud.com/n/dwcsprod/b/moviestream_data_load_workshop_20210709/o/'
    
    r = requests.get(url)
    
    data = r.json()
    # print(data)
    
    newlist = []
    for name in data['objects']:
        newlist.append((name['name']))
    
    # print(newlist)
    length = len(newlist)
    newurl = []
    
    for i in range(length):
        newurl = url + newlist[i]
        webbrowser.open(newurl, new=0, autoraise=True)

    As you can see, with spacing, it’s less than 25 lines of code. I’m using a total of three libraries: requests, json, and webbrowser. The first two libraries you are probably familiar with, the third maybe not so much. Webbrowser() is great, when used correctly, the code will automatically open a new browser tab and execute whatever it is told to do (in this case, go to a URL and issue a GET request). Make sense?

    Not to worry, I’ll break this down into smaller blocks, to better understand what is happening.

    Lines 1-10

    import requests
    import json
    import webbrowser
    
    url = 'https://objectstorage.us-phoenix-1.oraclecloud.com/n/dwcsprod/b/moviestream_data_load_workshop_20210709/o/'
    
    r = requests.get(url)
    data = r.json()
    # print(data)

    I’ve imported the three relevant libraries (remember if you don’t have these libraries, you can use pip and perform a pip install to grab them). And I assign URL equal to the target bucket. And from here I perform my first GET request. I do this for two main reasons:

    1. to remind me of the structure of the JSON, and
    2. because I am about to loop through all the available files in this bucket (so I need to capture them somehow)

    Since I’ve essentially assigned the value of r.json() equal to data, I can now print(data) to visually inspect the….um….data. After executing lines 1-10, I can see the corresponding output in my terminal:

    Now that I know this is working (because of my manual check), I can proceed to the next step.

    Lines 12-16

    Executing this code…

    import requests
    import json
    import webbrowser
    
    url = 'https://objectstorage.us-phoenix-1.oraclecloud.com/n/dwcsprod/b/moviestream_data_load_workshop_20210709/o/'
    
    r = requests.get(url)
    
    data = r.json()
    print(data)
    
    newlist = []
    for name in data['objects']:
        newlist.append((name['name']))
    
    print(newlist)

    Will yield a new list:

    But how you ask? Good question, lots of trial and error. In short, I created an empty list, named newList. And later populated it with “stuff”. In normal people speak, lines 13-14 say the following,

    “There is an item, actually many items in the JSON payload we received from our GET request. For simplicity, lets call each of those items name, since ultimately what we want are file names. And we’ll use bracket notation to ‘drill’ down into more specific sections of the original JSON payload. And since we want just the file name (values), we want all the stuff that is in objects (if that doesn’t make sense review the lines 1-10 section again). We are then going to add to newList only the names (aka values) of the files. And these lines of code are what help us to populate the newList list.

    Maybe by this stage, you’ve caught on to what I’m trying to do. If not, I won’t spoil it for you 🙃.

    Lines 18-19

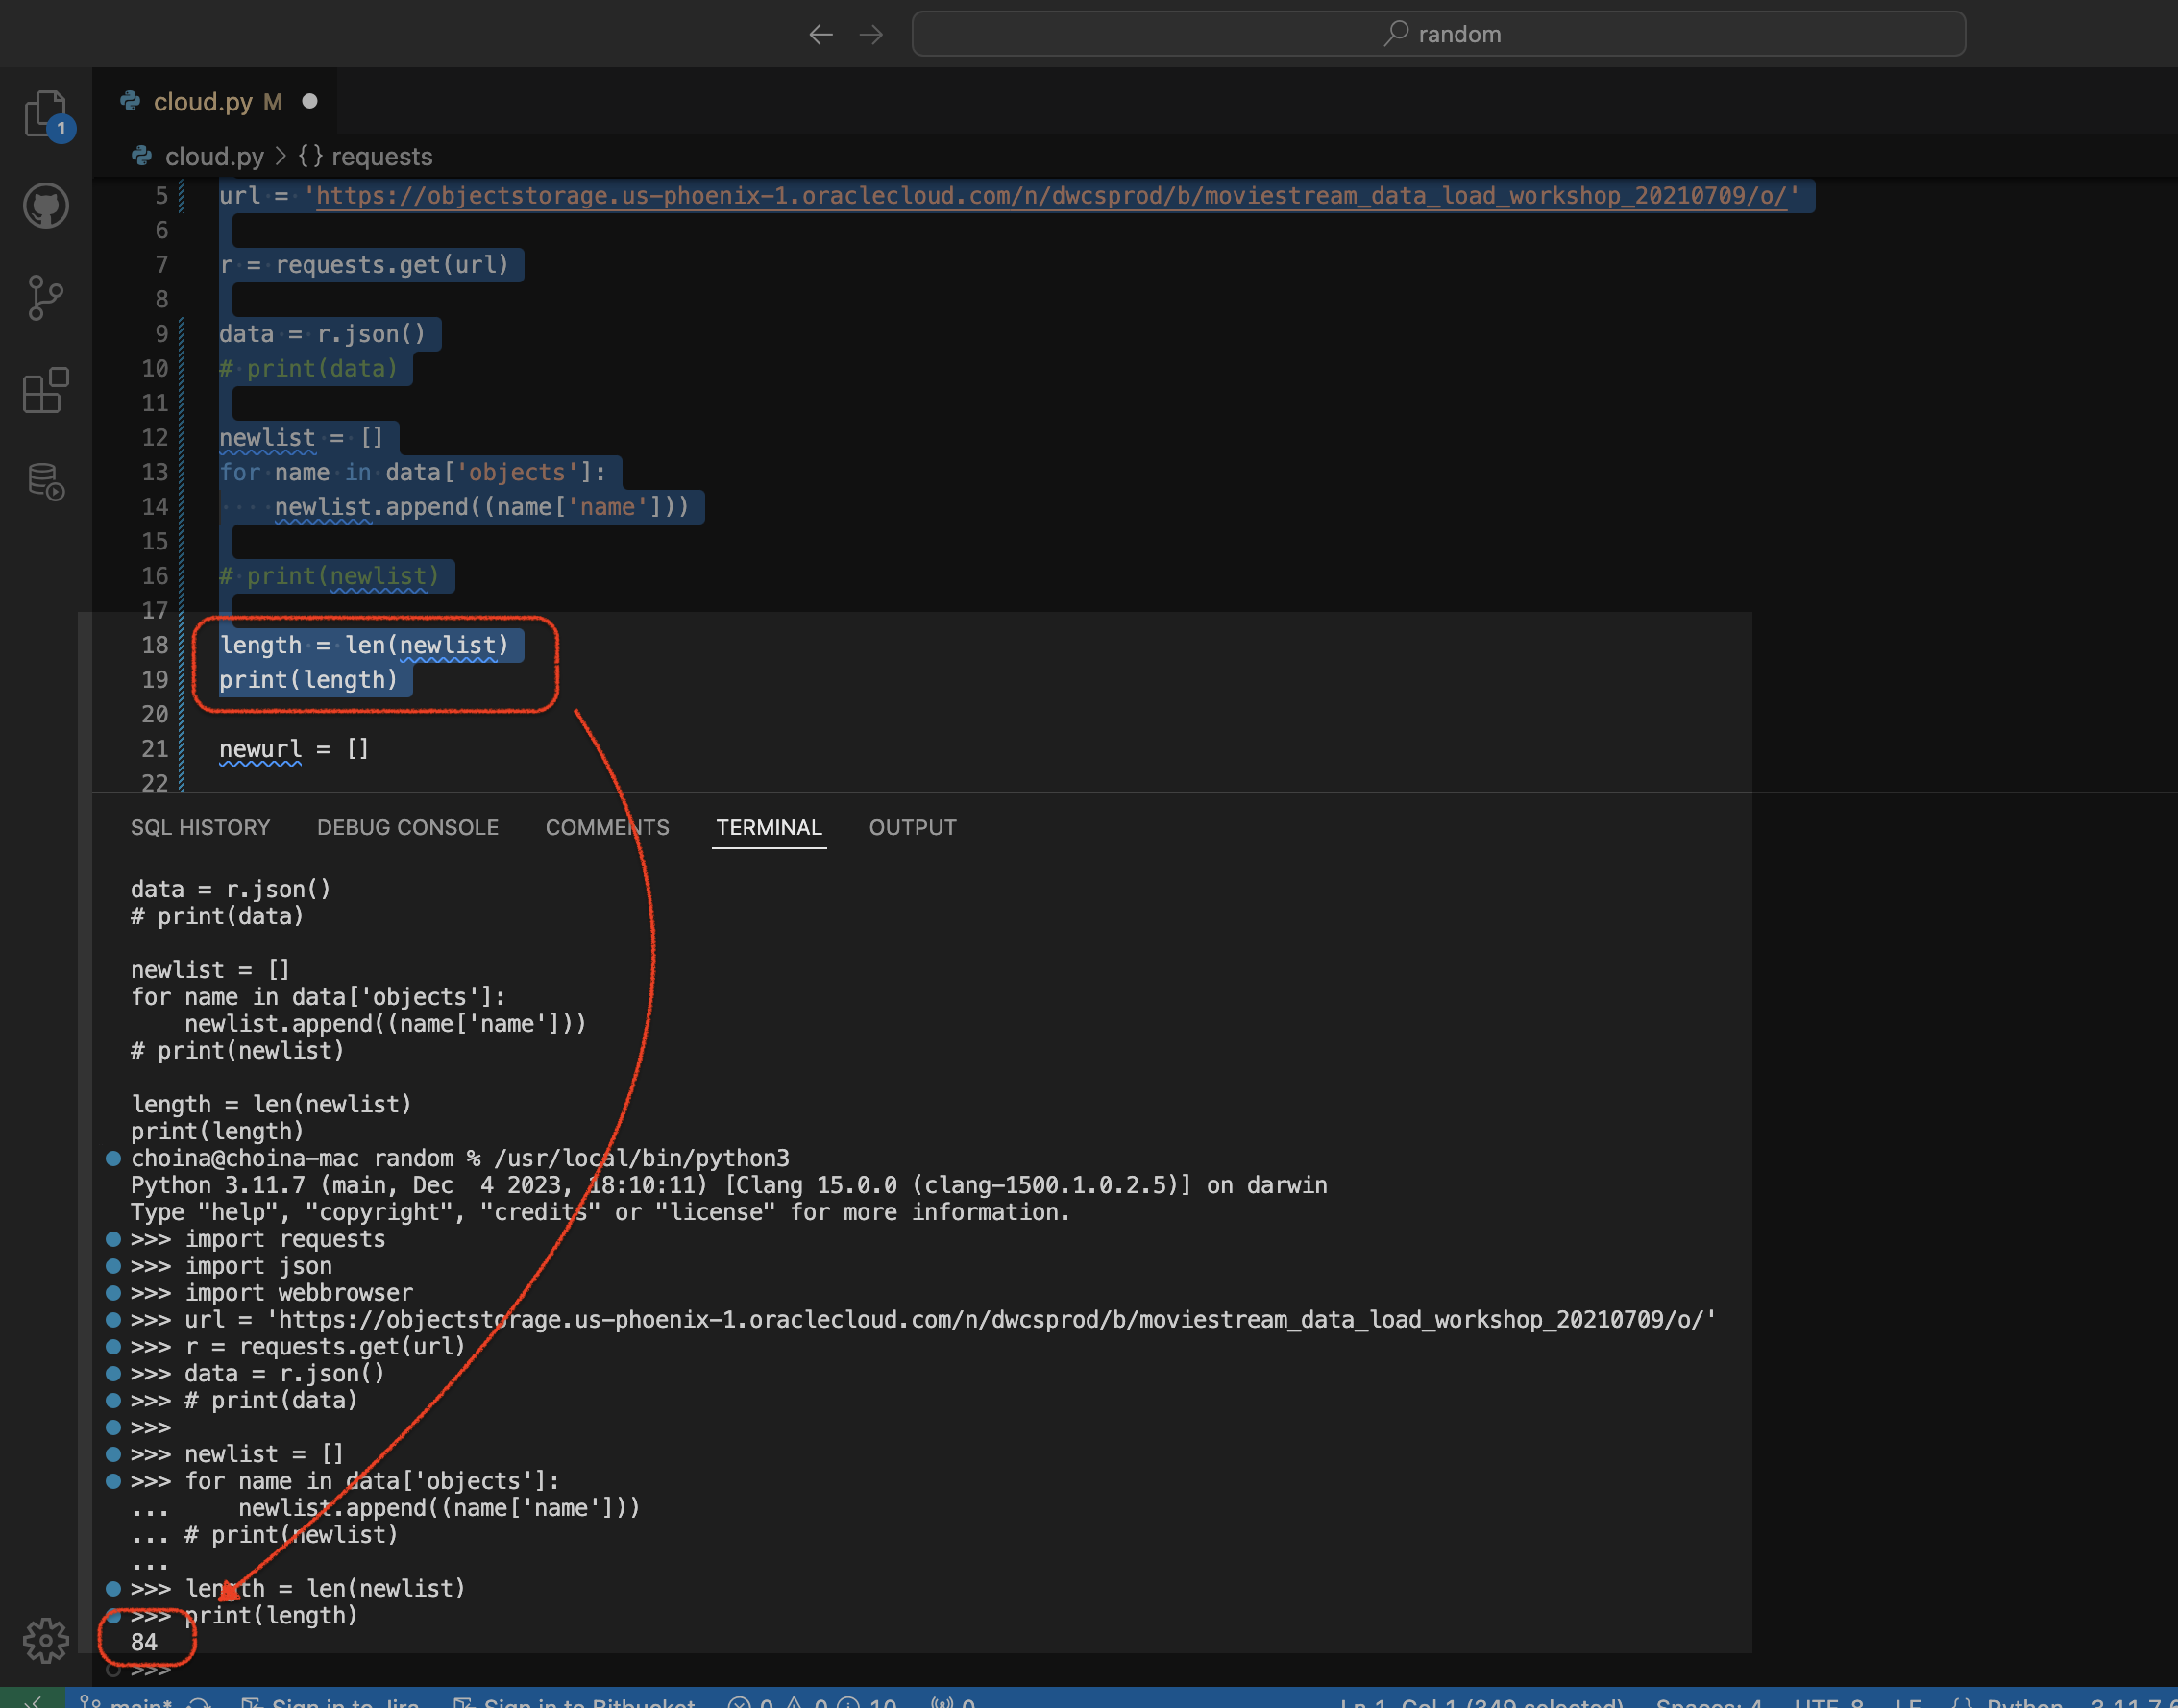
    And if you don’t quite “get it” yet, not to worry, it’ll click here in a second. Next, I need to see how many items are in this newlist I just created. Here is the code that is responsible for making that happen:

    import requests
    import json
    import webbrowser
    
    url = 'https://objectstorage.us-phoenix-1.oraclecloud.com/n/dwcsprod/b/moviestream_data_load_workshop_20210709/o/'
    
    r = requests.get(url)
    
    data = r.json()
    # print(data)
    
    newlist = []
    for name in data['objects']:
        newlist.append((name['name']))
    
    # print(newlist)
    
    length = len(newlist)
    print(length)

    Here is the result in my terminal:

    It looks like I have 85 elements, things, stuffs in my list. I’ll use that knowledge for the final steps in my script.

    Lines 21-26

    import requests
    import json
    import webbrowser
    
    url = 'https://objectstorage.us-phoenix-1.oraclecloud.com/n/dwcsprod/b/moviestream_data_load_workshop_20210709/o/'
    
    r = requests.get(url)
    
    data = r.json()
    # print(data)
    
    newlist = []
    for name in data['objects']:
        newlist.append((name['name']))
    
    # print(newlist)
    
    length = len(newlist)
    # print(length)
    
    newurl = []
    
    for i in range(length):
        newurl = url + newlist[i]
        webbrowser.open(newurl, new=0, autoraise=True)
        print(newurl)

    Line 21, you’ve seen this before (like 2 mins ago).

    However, lines 23-25 are new. If you recall my “considerations and limitations” section. I bet there is a better way to do this (or all of this actually), but this worked for me, so I’ll keep it. In short, we know we have 85 “iterables” (that’s the for i seen in line 23) and the range(length) portion simply says, “Begin at 0 and then keep going till you reach the entire length of…length()…which in this case is 85).”

    Next, I take the original URL (from line 5 in the code) and add each element of the newList to the end, making a newurl. From there, we open a web browser (new tabs actually) and visit that new amended URL aka newurl (I think more appropriately this is a URI, no?).

    And for the visual, a video of the entire process (no audio):

    And finally, for my own gratification, I’ll print out the newurl list just so I can marvel at my work. The new URLs:

    Now that I have these individual files, I can simply drag and drop them into my tables (in Database Actions obviously).

    As always, this and other code can be found in my blog repo. I hope this comes in handy someday! That’s all for now 😀!

    Follow

    And don’t forget to follow, like, subscribe, share, taunt, troll, or stalk me!

  • Build an ORDS API Resource Module, GET request with JavaScript fetch, display in HTML

    Recap

    This post is a continuation of a previous one, which can be found here. In this post, I’ll:

    If you are coming from the previous related post, then you’ll recall I used the following SQL query:

    My next step is to take this SQL and bring it to the REST Workshop, where I’ll turn it into an API.

    REST Workshop

    There are several ways you can navigate to the REST Workshop. Typically, I return to the Database Actions LaunchPad. From there, I select REST.

    The Handler code

    I've already created my Resource Module, Template, and Handler. I kept everything default, with no authentication enabled.

    The only thing I changed was the SQL query. I removed the final line, fetching the first 10 only. I want to be able to control the pagination of the API. If I were to keep that last line, this eventual endpoint would always only return the first 10 rows. And what if I want the next ten rows thereafter? Well, if I hard-code this, then I can’t really make that work. So, I chose to leave it open-ended.

    Technically, it is NOT open-ended because I retained the default pagination of 25. But, by removing that fetch first 10 rows condition, I can now fetch ALL rows that fit those parameters (in increments of 25).

    If I visit this new endpoint, it will appear like this:

    And if I collapse the items, you’ll see something that is EXTREMELY confusing. If I removed that fetch first 10 rows condition in the original SQL query, then why do we see a limit and offset of 10?

    The answer is because I actually set the Items Per Page equal to 10 (in the Resource Handler). This is the REST equivalent of a dirty joke. Consider yourself roasted…

    JavaScript

    With that endpoint live, I can take the API and drop it into some sample JavaScript and HTML code.

    JavaScript and HTML

    I learned a great deal about this JavaScript by reviewing this YouTube video. That is where I learned how to map through the items of my ORDS payload. And there was a refresher on JavaScript string interpolation (with template literals) too!

    PAUSE: Don't be too intimidated by string interpolation and template literals! Read the link I included, and take your time. If you are coming from Python, its similar to Jinja (when using Flask) and f-string literals 🙃.

    You can see that I’m using the map() constructor to iterate through all the data in my JSON payload. Remember, this was the payload in the items portion of my endpoint!

    I believe the item in list.map((item) is a reference to an individual item inline 4’s data.items. The reason why I think this is because if I change the items in lines 7-10 in my JavaScript to something random, like the name bobby, things start to break:

    However, if I change everything back to item, and start the live server in VS Code, I’ll be met with the following rendering:

    That’s it, though. Combining the ORDS API, the Fetch API, simple JavaScript, and HTML will allow you to create this straightforward web page.

    Reviewing Inspector, Console, Network

    I also have a few more screenshots, one each for the HTML Inspector, Console Log, and Client/Server Network. All of these show what is happening under the covers but in different contexts.

    Inspector

    In the Inspector, you can see how the JavaScript map() constructor plus the document.querySelector() in line 18 of the JavaScript code work in tandem with line 12 of the HTML script to display contents on the page:

    Console

    Here, you can see the items in the Console. This is because we added console.log(item)in line 19 of the JavaScript code.

    Network

    Finally, you can see the 200 GET request from our ORDS API. Then, on the far right of the screen, you can see the JSON payload coming from that same ORDS endpoint.

    Admittedly, the way the “Cast” is displayed is not correct. That is yet another array of cast members. And I’ve yet to learn how to structure that correctly. So, if you are reading this, and you know, let me know!

    Finally, all the code you’ve seen in this post can be found in my moviestreamjs github repository.

    That’s all for now!

    Follow

    And don’t forget to follow, like, subscribe, share, taunt, troll, or stalk me!

  • ORDS, JavaScript, the Fetch API, and HTML

    ORDS, JavaScript, the Fetch API, and HTML

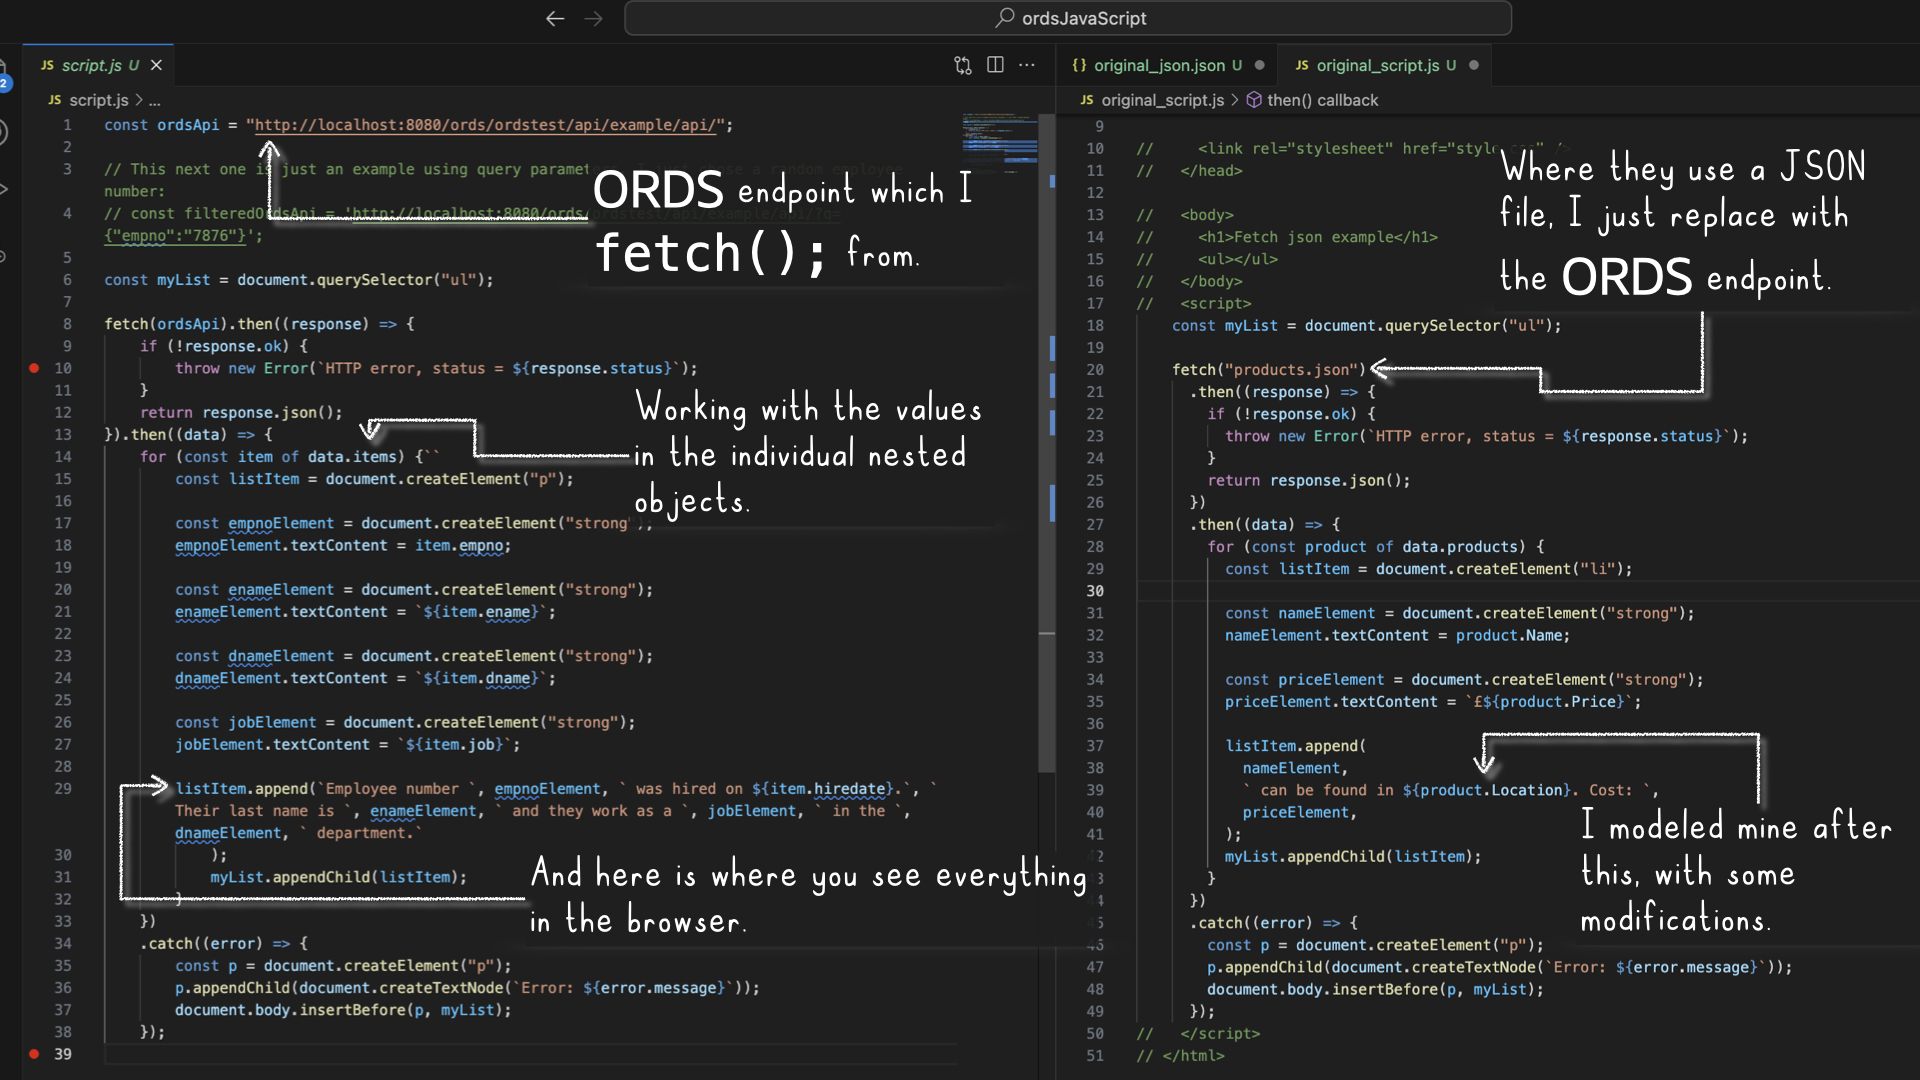
    I found JavaScript and HTML code here and here and “remixed” it to work with one of my sample ORDS APIs. Here is the result:

    the-html-in-browser, chris hoina, db tools, ords, oracle database, javascript, html, ords api, oracle rest api
    ORDS + JavaScript + Fetch API + HTML

    Impressive, no? Care to try it out? Read on friend!

    References

    I’ll front load with all the necessary stuff. That way, you can bounce if you don’t feel like reading. You’ll get the gist if you follow along with what I’ve provided.

    Much of what I learned came from the MDN Web Docs site. I would get acquainted with the following pieces of code (or at least have them handy) since they heavily influenced me (a.k.a. plagiarized).

    MDN Web Docs

    I either used or referenced these files in my version of the code. They are all available in the two links I mentioned above, but I’m adding them here for convenience (in case you need to leave or want to review while on this page).

    ORDS code

    Here are a few things to point out:

    1. In line 16 of my index.html code, I referenced the JavaScript code (script.js) separately. This approach achieves the same effect as embedding the JavaScript directly into the HTML file (as seen in the MDN’s version of the index.html file).
    2. The script.js contains the Fetch API and the JavaScript concept of “promises.” The following were super helpful for me. Maybe the will be for you too:
    3. The JSON file contains an example of what an ORDS GET request response looks like (if viewing in the browser). The structure is nearly identical if you compare it to the MDN JSON file.
      • This means you can take their HTML and JavaScript code and populate it with an ORDS endpoint and [subsequent] response data (i.e., the stuff you see in this localhost.json file).

    Live Server

    I’m also using the Live Server extension for VS Code. If you don’t have it, you’ll need it to run the code I’ve provided. You can download it from the VS Code Marketplace here.

    mentioning-live-server-for-this-exercise, chris hoina, db tools, ords, oracle database, javascript, html, ords api, oracle rest api
    You’ll want Live Server for this one!

    How I met your Mothra 👾

    Where to start? From the beginning, right? What you see below are two JSON files. On the left, from ORDS. On the right, from the MDN Web Docs sample code (direct link to that file).

    Comparing JSÒN

    comparing-ords-and-mdn-json-files, chris hoina, db tools, ords, oracle database, javascript, html, ords api, oracle rest api
    ORDS on the left, MDN on the right.

    They are nearly identical. They are both a JSON object {} comprised of key: value pairs, where the first key’s value is an array []. In both files, this array has more objects {}. And each of those objects has its own key: value pairs…marone 🤌🏼!

    I mention all this because this makes the existing code easy to work with. Which you’ll see shortly.

    Comparing JavaScript

    Next is the JavaScript code; I’ll compare both my version and the MDN Web Docs version.

    comparing-javascript-versions-with-ords-apis, chris hoina, db tools, ords, oracle database, javascript, html, ords api, oracle rest api
    ORDS on the left; can you spot the differences?

    You’ll notice that a lot of the code is quite similar. I kept it this way, so I wouldn’t unintentionally break anything. The main differences in my code are the:

    1. const ordsAPI on Line 1 (as opposed to referencing a JSON file).
    2. Naming conventions in lines 14-27.
    3. listItem.append(); on line 29 is heavily remixed (I did this so I could create individual lines for each entry).
    4. Templating in my code (i.e., wherever you see the little ``` marks; they allow you to embed text directly into the HTML) I use A LOT more of it!

    About the ORDS JSON Object

    If you were to navigate to your ORDS endpoint, it would look like the images below. I’m including them for a couple of reasons:

    1. You can see those key: value pairs in a different presentation.
    2. These images help connect what is coming through in that GET request and what you see in the JavaScript code.
    an-example-of-ords-response-in-browser, chris hoina, db tools, ords, oracle database, javascript, html, ords api, oracle rest api
    The items key with its value (an array).
    the-raw-ords-response-in-browser, chris hoina, db tools, ords, oracle database, javascript, html, ords api, oracle rest api
    Remember the other key: value pairs, too!

    Reviewing the HTML

    Assuming you’ve started up Live Server (along with setting up your environment to mimic my own), you’ll immediately see this beauty of a web page. This image alone doesn’t tell a complete story, though.

    the-html-in-browser, chris hoina, db tools, ords, oracle database, javascript, html, ords api, oracle rest api
    Review line 29 in the JavaScript code; it’ll help to “connect the dots.”

    However, when you open up the developer tools in your browser, you’ll see what is happening under the covers.

    1. Live Server starts up, sees the index.html file, and “serves” it up.
    2. In that HTML file is a reference to script.js; the JavaScript is run.
    3. The JavaScript composes a list and then appends all the data you see here (on screen):
    html-with-developer-tools-to-inspect-html-and-javascript, chris hoina, db tools, ords, oracle database, javascript, html, ords api, oracle rest api
    With developer tools open, you can see the HTML. This HTML should look similar to lines 12-27 of the JavaScript code.

    Summary

    After writing this up, I’m realizing this clearly needs to be a video. But if you get it, great! Otherwise, stay tuned!

    There isn’t anything ground-breaking here. I’m highlighting an example of manipulating existing ORDS JSON objects (with the Fetch API) because I hadn’t seen anything quite like what I am presenting here.

    Also, the web page that I’m showing is very, very basic. I’m neither a UX nor UI designer, so this is what you get, folks!

    The main point is that the ORDS APIs are effortless to work with if you have a fundamental understanding of manipulating JSON objects using JavaScript. They are no different than what you see out in the wild.

    Some follow-up

    I want to take this and add some React to it. And I’d also like to add authentication (Basic, OAuth 2.0, and Java Web Tokens). But baby steps.

    Okay, that’s all for now, folks, Sayonara!

    Follow

    And don’t forget to follow, like, subscribe, share, taunt, troll, or stalk me!

  • Python and the Oracle Autonomous Database: Three Ways to Connect

    Python and the Oracle Autonomous Database: Three Ways to Connect

    Watch the deep dive videos:

    Part I

    Overview and connecting with the python-oracledb library

    Part II

    Connecting with Oracle REST APIs unauthenticated

    Part III

    Custom Oracle REST APIs with OAuth2.0 Authorization

    Welcome back

    I finally had a break in my PM duties to share a small afternoon project [I started a few weeks ago]. I challenged myself to a brief Python coding exercise. I wanted to develop some code that allowed me to connect to my Autonomous Database using either our python-oracledb driver (library) or with Oracle REST Data Services (ORDS).

    I undertook this effort as I also wanted to make some comparisons and maybe draw some conclusions from these different approaches.

    NOTE: If you don't feel like reading this drivel, you can jump straight to the repository where this code lives. It's all nicely commented and has everything you need to get it to work. You can check that out here. 

    The test files

    Reviewing the code, I’ve created three Python test files. test1.py relies on the python-oracledb library to connect to an Oracle Autonomous database while test2.py and test3.py rely on ORDS (test3.py uses OAuth2.0, but more on that later).

    Configuration

    Configuration directory

    I set up this configuration directory (config_dir) to abstract sensitive information from the test files. My ewallet.pem and tnsnames.ora files live in this config_dir. These are both required for Mutual TLS (mTLS) connection to an Oracle Autonomous database (you can find additional details on mTLS in the docs here).

    config directory files first test case, chris hoina, senior product manager, oracle rest apis, database tools
    ewallet.pem and tnsnames.ora files

    Other files

    oauth testyurls and wallet creds files for tests, chris hoina, senior product manager, ords, oracle rest apis, database tools, sqlcl
    OAuth2.0, Test URLs, and Wallet Credential files

    Other files include oauth2creds.py, testurls.py, and walletcredentials.py. Depending on the test case, I’ll use some or all of these files (you’ll see that shortly).

    NOTE: If not obvious to you, I wouldn't put any sensitive information into a public git repository. 

    Connecting with python-oracledb

    One approach to connecting via your Oracle database is with the python-oracledb driver (library). An Oracle team created this library (people much more experienced and wiser than me), and it makes connecting with Python possible.

    FYI: I’m connecting to my Autonomous Database. If you want to try this, refer to the documentation for using this library and the Autonomous database. You can find that here.

    The Python code that I came up with to make this work:

    #Connecting to an Oracle Autonomous Database using the Python-OracleDB driver.
    
    import oracledb
    
    # A separate python file I created and later import here. It contains my credentials, so as not to show them in this script here. 
    
    from walletcredentials import uname, pwd, cdir, wltloc, wltpwd, dsn
    
    # Requires a config directory with ewallet.pem and tnsnames.ora files.
    
    with oracledb.connect(user=uname, password=pwd, dsn=dsn, config_dir=cdir, wallet_location=wltloc, wallet_password=wltpwd) as connection:
        with connection.cursor() as cursor:
    
    # SQL statements should not contain a trailing semicolon (“;”) or forward slash (“/”).
    
            sql = """select * from BUSCONFIND where location='ZAF'
            order by value ASC """
            for r in cursor.execute(sql):
                print(r)

    In Line 7, you can see how I import the wallet credentials from the walletcredentials.py file. Without that information, this code wouldn’t work. I also import the database username, password, and configuration directory (which includes the ewallet.pem and tnsnames.ora files).

    From there, the code is pretty straightforward. However, some library-specific syntax is required (the complete details are in the docs, found here), but aside from that, nothing is too complicated. You’ll see the SQL statement in Lines 16-17; the proper SQL format looks like this:

    SELECT  * FROM busconfind WHERE location='zaf'
    ORDER BY value ASC;

    And here is an example of this SQL output in a SQL Worksheet (in Database Actions):

    testing sql in database actions for python-oracledb driver, chris hoina, senior product manager, oracle rest apis, ords, python, autonomous database
    Reviewing the SQL in Database Actions
    FYI: This is a Business Confidence Index data-set, in case you were curious (retrieved here). 

    That SQL allows me to filter on a Location and then return those results in ascending order according to the Value column. When I do this using the python-oracledb driver, I should expect to see the same results.

    NOTE: You've probably noticed that the SQL in the python file differs from that seen in the SQL Worksheet. That is because you need to escape the single quotes surrounding ZAF, as well as remove the trailing semi-colon in the SQL statement. Its all in the python-oracledb documentation, you just have to be aware of this.

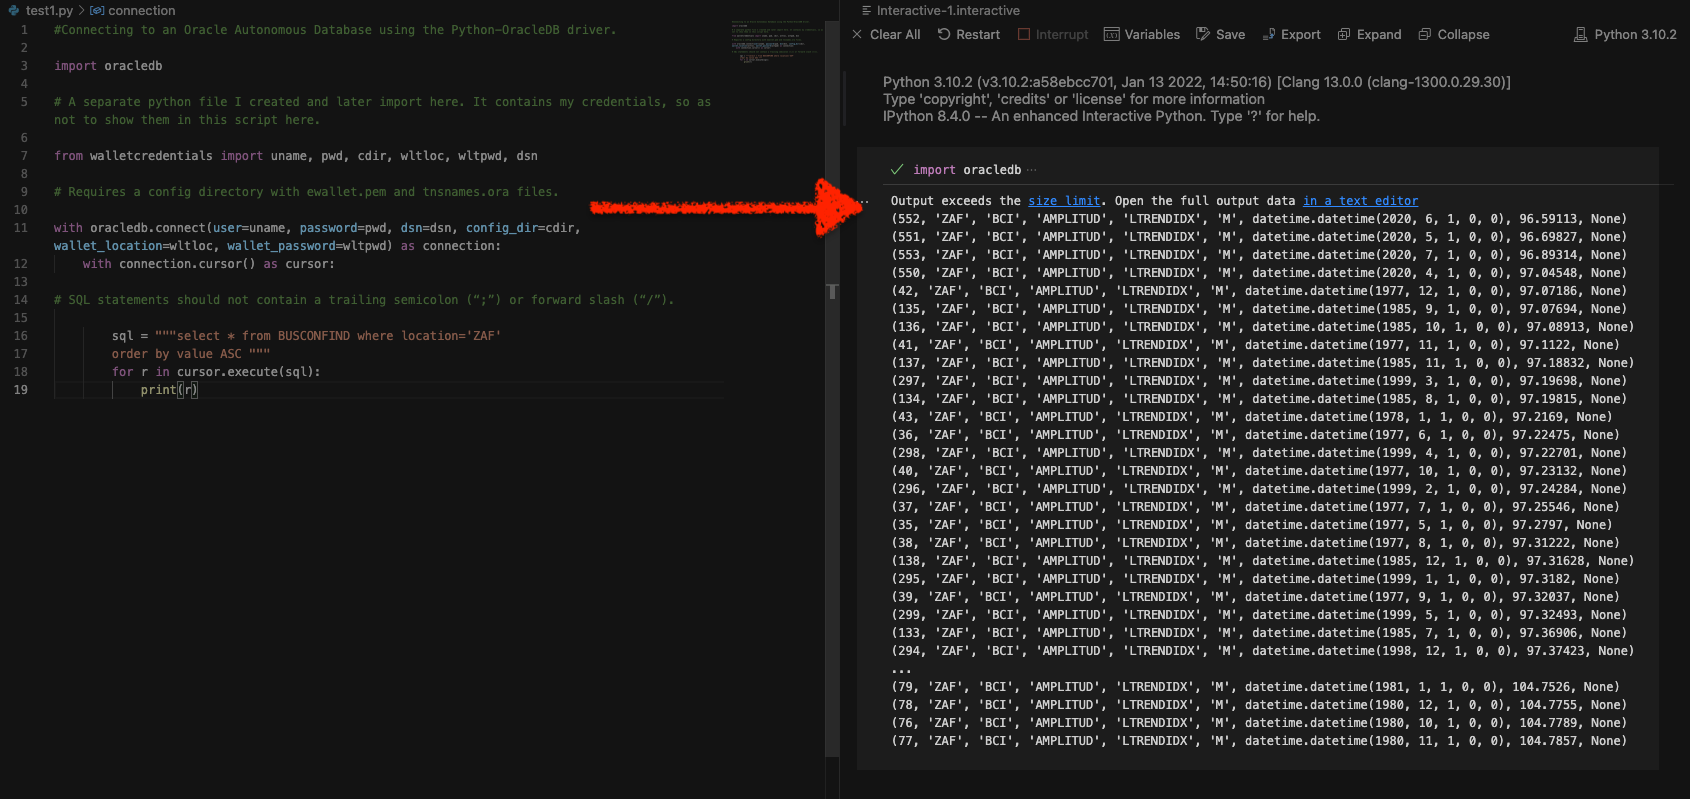
    Once I have all the necessary information in my walletcredentials.py file, I can import that into the test1.py file and execute the code. I chose to run this in an Interactive Window (I’m using VS Code), but you can also do this in your Terminal. In the images (from left to right), you’ll see the test1.py file, then a summary of the output from that SQL query (contained in the test1.py code), and finally, the detailed output (in a text editor).

    Wrap-up

    For those that have an existing Free Tier tenancy, this could be a good option for you. Of course, you have to do some light administration. But if you have gone through the steps to create an Autonomous database in your cloud tenancy, you probably know where to look for the tnsnames.ora and other database wallet files.

    I’m not a developer, but I think it would be nice to simplify the business logic found in this Python code. Maybe better to abstract it completely. For prototyping an application (perhaps one that isn’t micro services-oriented, this could work) or for data- and business analysts, this could do the trick for you. In fact, the data is returned to you in rows of tuples; so turning this into a CSV or reading it into a data analysis library (such as pandas) should be fairly easy!

    Connecting via ORDS: sans OAuth2.0

    Auto-REST and cURL

    I’m still using the “devuser” (although this may be unnecessary, as any unsecured REST-enabled table would do). I’m using the same table as before; the only change I’ve made is to auto-REST enable the BUSCONFIND table for the test2.py code.

    In the following images, I’m retrieving the cURL command for performing a GET request on this table.

    NOTE: In a recent ORDS update, we made available different shell variations (this will depend on your OS); I've selected Bash.

    From there, I take the URI (learn more on URIs) portion of the cURL command and place it into my browser. Since this table is auto-REST enabled, I’ll only receive 25 rows from this table.

    NOTE: The ORDS default pagination is limit = 25.

    The code

    And the code for this test2.py looks like this:

    # Auto-REST enabled with ORDS; in an Oracle Autonomous Database with query parameters.
    
    import requests
    import pprint
    
    # Importing the base URI from this python file.
    
    from testurls import test2_url
    
    # An unprotected endpoint that has been "switched on" with the ORDS Auto-REST enable feature. 
    # Query parameters can be added/passed to the Base URI for GET-ing more discrete information.
    
    url = (test2_url + '?q={"location":"ZAF","value":{"$gt":100},"$orderby":{"value":"asc"}}}')
    
    # For prototyping an application, in its earlier stages, this could really work. On your front end, you 
    # expect the user to make certain selections, and you'll still pass those as parameters. 
    # But here, you do this as a query string. In later stages, you may want to streamline your application
    # code by placing all this into a PL/SQL or SQL statement. Thereby separating application
    # logic and business logic. You'll see this approach in the test3.py file. 
    # This works, but you can see how it gets verbose, quick. Its a great jumping-off point.
    
    responsefromadb = requests.get(url)
    pprint.pprint(responsefromadb.json())

    Lines 8 and 13 are the two areas to focus on in this example. In Line 8 imported my URL from the testurls.py file (again, abstracting it, so it’s not in the main body of the code).

    test2 python file and testurls file for second test, chris hoina, senior product manager, oracle rest apis, ords, python, autonomous database
    The test2.py and testurls.py files

    And then, in Line 13, I appended a query string to the end of that URL. ORDS expects the query parameters to be a JSON object with the following syntax:

    [ORDS Endpoint]/?q={"JSON Key": "JSON Value"}

    The new, complete query string below requests the same information as was requested in the test1.py example:

    url = (test2_url + '?q={"location":"ZAF","value":{"$gt":100},"$orderby":{"value":"asc"}}}')

    This string begins with that same BASE URI for the ORDS endpoint (the auto-REST enabled BUSCONFIND table) and then applies the query string prefix “?q=” followed by the following parameters:

    1. Filter by the location "ZAF"
    2. Limit the search of these locations to values (in the Value column) greater than ($gt) 100
    3. Return these results in ascending order (asc) of the Value column
    NOTE: You can manipulate the offsets and limits in the python-oracledb driver too. More info found here. And filtering in queries with ORDS can be found here. 

    And if I run the test2.py code in the VS Code Interactive Window, I’ll see the following summary output.

    summary output from python test2, chris hoina, senior product manager, oracle rest apis, ords, python, autonomous database
    Summary output from the response in test2.py

    Here is a more detailed view in the VS Code text editor:

    detailed output from python test2, chris hoina, senior product manager, oracle rest apis, ords, python, autonomous database
    Detailed output with helpful links

    Wrap-up

    A slightly different approach, right? The data is all there, similar to what you saw in the test1.py example. There are a few things to note, though:

    • The consumer of this ORDS REST API doesn’t need access to the database (i.e. you don’t need to be an admin or have a schema); you can perform GET requests on this URI.
    • The response body is in JSON (ubiquitous across the web and web applications)
      • Also, language and framework agnostic (the JSON can be consumed/used widely, and not just with Python)
    • You are provided a URI for each item (i.e. entry, row, etc.)
    • No need for SQL; just filter with the JSON query parameters
    • No business logic in the application code
    • Needless to say, no ORMs or database modeling is required for this approach

    However…security is, ahem…nonexistent. That is a problem and flies in the face of what we recommend in our ORDS Best Practices.

    Connecting via ORDS: secured with OAuth2

    Note: This is an abbreviated explanation, I'll be posting an expanded write-up on this example post haste!

    Since this is what I’m considering “advanced” (it’s not difficult, there are just many pieces) I’m going to keep this section brief. Long story short, I’ll take those query parameters from above and place them into what is referred to as a Resource Handler.

    TIME-OUT: Auto-REST enabling a database object (the BUSCONFIND table in this case) is simple in Database Actions. Its a simple left-click > REST-enable. You saw that in the previous example. You are provided an endpoint and you can use the query parameters (i.e. the JSON {key: value} pairs) to access whatever you need from that object. 
    
    However, creating a custom ORDS REST endpoint is a little different. First you create a Resource Module, next a (or many) Resource Template/s, and then a (or many) Resource Handler/s. In that Resource Handler, you'll find the related business logic code for that particular HTTP operation (the menu includes: GET, POST, PUT, and DELETE). 

    The Resource Module

    The process of creating a custom ORDS API might be difficult to visualize, so I’ll include the steps I took along with a sample query (in that Resource Handler) to help illustrate.

    Chances are you may be the administrator of your Always Free tenancy, so you have full control over this. Other times, you might be provided the REST endpoint. In that case, you may not ever have to worry about these steps. Either way, you can see how we’re simulating (as well as both abstracting and keeping the business logic in the database) the query with this final example (test3.py).

    Security

    The OAuth 2.0 authorization framework enables a third-party application to obtain limited access to an HTTP service, either on behalf of a resource owner by orchestrating an approval interaction between the resource owner and the HTTP service, or by allowing the third-party application to obtain access on its own behalf.

    RFC 6749: The OAuth 2.0 Authorization Framework

    I’ll keep this section brief, but I’m protecting this resource through the aid of an ORDS OAuth2.0 client. I’ve created one here:

    creating an oauth2 client for test3 example, chris hoina, senior product manager, oracle rest apis, ords, python, autonomous database
    After creating a client you can use the provided URL for requesting a new Bearer Token

    And, as you’ll see shortly, I’ll rely on some Python libraries for requesting an Authorization Token to use with the related Client ID and Client Secret. If you want to nerd out on the OAuth2.0 framework, I challenge you to read this.

    test3.py example

    NOTE: Remember, I'm keeping this section intentionally brief. It deserves a slightly deeper dive, and class is almost over (so I'm running out of time). 

    The code for this example:

    # Custom ORDS Module in an Oracle Autonomous Database.
    
    import requests
    from requests_oauthlib import OAuth2Session
    from oauthlib.oauth2 import BackendApplicationClient
    import pprint
    import json
    
    # Importing the base URI from this python file.
    
    from testurls import test3_url
    
    # A separate python file I created and later import here. It contains my credentials, 
    # so as not to show them in this script here. 
    
    from oauth2creds import token_url, client_id, client_secret
    
    token_url = token_url
    client_id = client_id
    client_secret = client_secret
     
    client = BackendApplicationClient(client_id=client_id)
    oauth = OAuth2Session(client=client)
    
    token = oauth.fetch_token(token_url, client_id=client_id, client_secret=client_secret)
    
    bearer_token = token['access_token']
    
    # Location can be anything from the table. Now, only the single variable needs to be passed. Business logic has been abstracted somewhat; as it now resides within
    # ORDS. This could make your application more portable (to other languages and frameworks, since there are fewer idiosyncracies and dependencies):
    
    location = "ZAF"
    
    # print(location)
    
    # ------------------------------------------------------------------------------ # 
    # In Database Actions, we:
    #   1. Create an API Module
    #   2. Then create a Resource Template
    #   3. Finally, a GET Resource Handler that consists of the code from test1.py:
    
    #           select * from BUSCONFIND where location= :id
    #               order by value ASC
    # ------------------------------------------------------------------------------ # 
    url = (test3_url + location)
    # print(url)
    
    responsefromadb = requests.get(url, headers={'Authorization': 'Bearer ' + bearer_token}).json()
    
    # This step isn't necessary; it simply prints out the JSON response object in a more readable format.
    
    pprint.pprint(responsefromadb)

    Lines 11 and 16 deserve some attention here. The URL for Line 11 comes from the testurls.py file; seen in the previous example. And the contents from Line 16 come from the oauth2creds.py file. Here are the files, side-by-side:

    test3 python oauthcreds and test url files, chris hoina, senior product manager, oracle rest apis, ords, python, autonomous database
    The test3.py, testurls.py, and oauth2creds.py files

    As you can see in the testurls.py file, I’m relying on the test3_url for this example. And the OAuth2.0 information you see comes directly from the OAuth Client I created in Database Actions:

    creating an oauth2 client for test3 example, chris hoina, senior product manager, oracle rest apis, ords, python, autonomous database
    In this image, you can see the Client ID and Client Secret

    If I put that all together, I can execute the code in test3.py and “pretty print” the response in my Interactive Window. But first I need to adjust the Resource Handler’s URI (the one I copied and pasted from the “REST Workshop”). It retains the “:id” bind parameter. But the way I have this Python code set up, I need to remove it. It ends up going from this:

    test3_url = 'https://test3_url = 'https://abc123def456ghi789-darmok.adb.us-ashburn-1.oraclecloudapps.com/ords/devuser/myapi/locations/:id'

    To this:

    test3_url = 'https://abc123def456ghi789-darmok.adb.us-ashburn-1.oraclecloudapps.com/ords/devuser/myapi/locations/'

    Otherwise, if I don’t remove that bind parameter when the code executes, the target URL will end up looking like this:

    'https://abc123def456ghi789-darmok.adb.us-ashburn-1.oraclecloudapps.com/ords/devuser/myapi/locations/:idZAF'

    With that out of the way, I can run this code and review the output.

    From top-to-bottom, left-to-right you’ll see I first execute the code in the Interactive Window. From there I can review a summary of the response to my GET request. That pretty print library allows us to see the JSON array in a more readable format (one that has indentation and nesting); which you can see in the second image. The third image is a more detailed view of the first half of this response. And I include the final image to highlight the helpful URLs that are included in the response body.

    Since I know my limit = 25, and the 'hasMore': True (seen in the output in that third image) exists, I know there are more items. You can adjust the limit and offset in subsequent requests, but I’ll save that for another day.

    Wrap-up

    You can probably tell, but this is like an expansion of the previous example. But instead of relying on the auto-REST enabling, you are in full control of the Resource Module. And while you don’t need to use OAuth2.0 it’s good practice to use it for database authentication. You can see how the response comes through a little differently, compared to the previous example, but still very similar.

    In this example, I did all the work, but that might not be the case for you; much of it might be handled for you. The main thing I like about this example is that we rely on stable and popular Python libraries: requests, requests_oauthlib, and oautlib.

    The fact that this is delivered as a JSON object is helpful as well (for the same reasons mentioned in the second example). And finally, I enjoy the fact that you only need to pass a single parameter from your (assumed) presentation layer to your application layer; an example might be a selection from an HTML form or drop-down menu item.

    The end

    We’re at the end of this fun little exercise. As I mentioned before, I will expand on this third example. There are so many steps, and I think it would be helpful for people to see a more detailed walk-through.

    And be on the lookout (BOLO) for a video. There’s no way around this, but a video needs to accompany this post.

    And finally, you can find all the code I review in this post in my new “blogs” repository on GitHub. I encourage you to clone, fork, spoon, ladle, knife, etc…

    Oh and…

  • Using Python Pandas to turn ISO Country Codes into a string to use as values for a SQL Query

    Using Python Pandas to turn ISO Country Codes into a string to use as values for a SQL Query

    Summary, code, resources

    Problem

    While querying a table (based on this dataset) with SQL, you realize one of your columns uses 3-character ISO Country Codes. However, some of these 3-character codes aren’t countries but geographical regions or groups of countries, in addition to the actual country codes. How can you filter out rows so you are left with the countries only?

    Answer

    Use the Python Pandas library to scrape ISO country codes and convert the values to one single string. Then use that string as values for a subsequent SQL query (possibly something like this):

    SELECT * FROM [your_table]
    WHERE country_code IN ([values from the generated list-as-string separated by commas and encased by single / double quotes]);

    Code

    # Libraries used in this code
    from bs4 import BeautifulSoup
    import requests
    import csv 
    import pandas as pd 
    
    # I found these ISO country codes on the below URL. Pandas makes it easy to read HTML and manipulate it. Very cool!
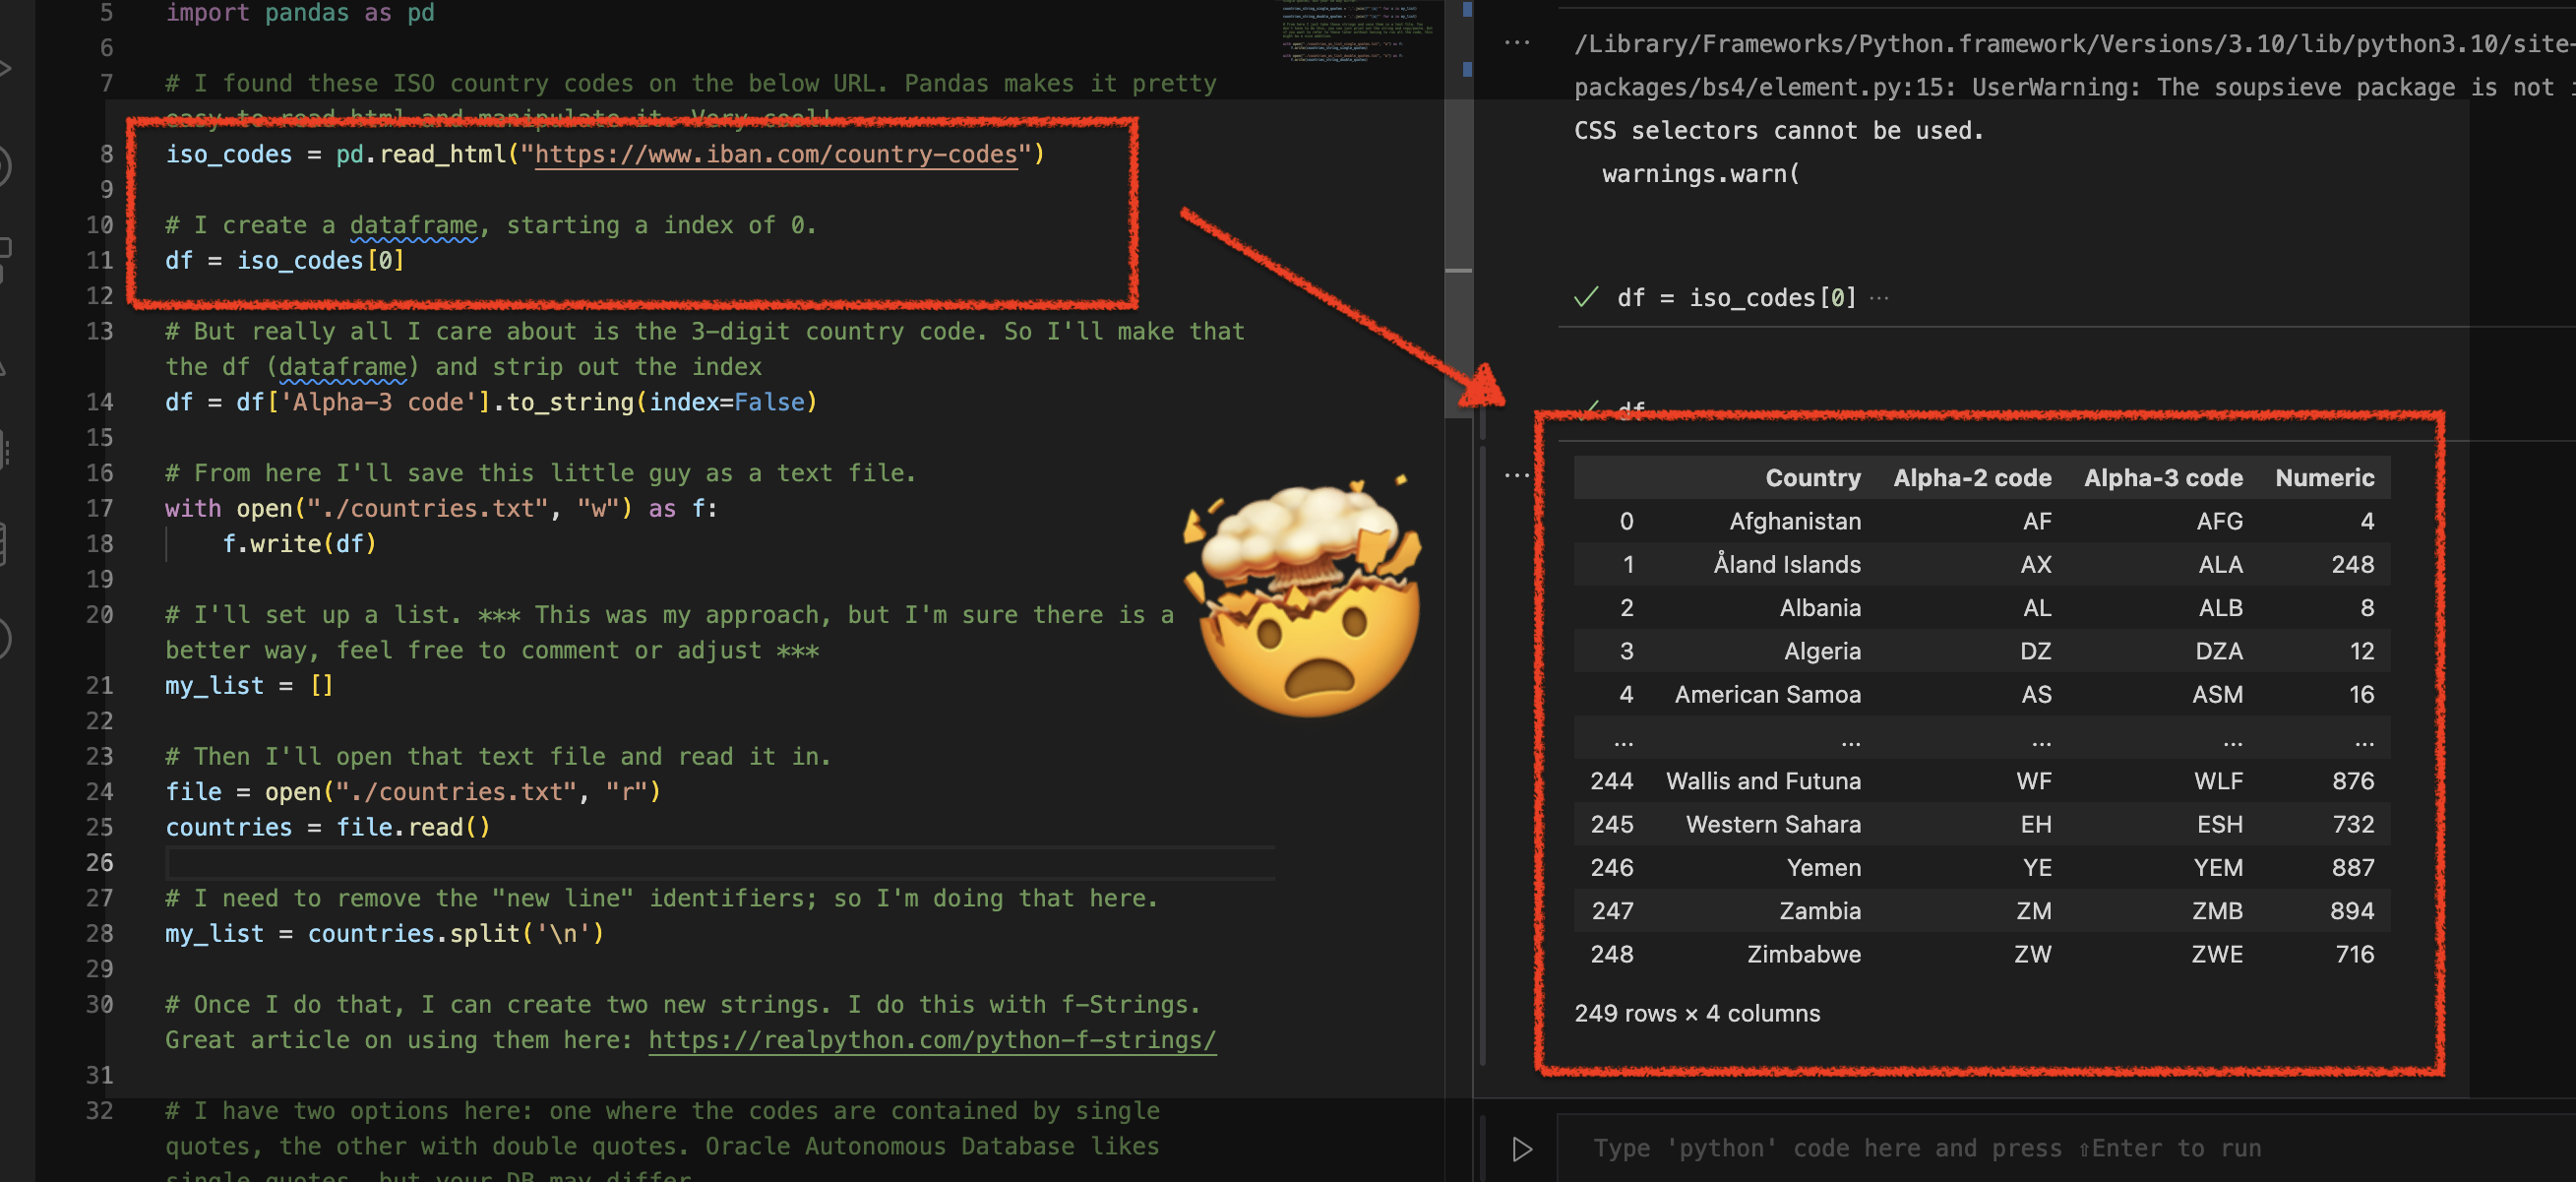
    iso_codes = pd.read_html("https://www.iban.com/country-codes")
    
    # I create a data frame, starting at an index of 0.
    df = iso_codes[0]
    
    # But really, all I care about is the 3-digit country code. So I'll make that the df (dataframe) and strip out the index
    df = df['Alpha-3 code'].to_string(index=False)
    
    # From here, I'll save this little guy as a text file.
    with open("./countries.txt", "w") as f:
        f.write(df)
    
    # I'll set up a list. *** This was my approach, but if you find a better way, feel free to comment or adjust. ***
    my_list = []
    
    # Then I'll open that text file and read it in.
    file = open("./countries.txt", "r")
    countries = file.read()
    
    # I need to remove the "new line" identifiers, so I'm doing that here. 
    my_list = countries.split('\n')
    
    # Once I do that, I can create two new strings. I do this with f-Strings. Great article on using them here: https://realpython.com/python-f-strings/ 
    
    # I have two options here: one where the codes are contained by single quotes, the other with double quotes. Oracle Autonomous Database likes single quotes, but your DB may differ.
    
    countries_string_single_quotes = ','.join(f"'{x}'" for x in my_list)
    
    countries_string_double_quotes = ','.join(f'"{x}"' for x in my_list)
    
    # From here, I take those strings and save them in a text file. You don't have to do this; you can print and copy/paste the string. But this might be an excellent addition if you want to refer to these later without running all the code. 
    
    with open("./countries_as_list_single_quotes.txt", "a") as f:
        f.write(countries_string_single_quotes)
    
    with open("./countries_as_list_double_quotes.txt", "a") as f:
        f.write(countries_string_double_quotes)

    GitHub repo details

    You can find the code from this post in my GitHub repository. The repository consists of the following:

    • The Python code I created for solving this problem
    • A countries.txt file, which is produced midway through the code (temporary placeholder for later processing)
    • ‘Single quotes’ .txt file – the 3-character ISO Country Codes are formatted as a string. The values are enclosed by single quotes; commas throughout
    • “Double quotes” .txt file – the 3-character ISO Country Codes are formatted as a string. The values are enclosed by double quotes; commas throughout

    Resources


    The in-depth walkthrough

    Backstory

    A few days ago, I stumbled upon this question in the r/datasets subreddit:

    I spent most of the morning figuring out how I would go about this, and after some trial and error, I devised a plan. I decided to take the list of ISO Country Codes (which I found here) and use them as values for filtering in a SQL statement (later on in Oracle SQL Developer Web).

    After some research, I figured out the proper SQL syntax for a successful query.

    SELECT * FROM [your_table]
    WHERE country_code IN ([values from the generated list-as-string separated by commas and encased by single / double quotes]);

    From there, I knew I needed to work backward on those ISO Country Codes. Meaning I needed to take something that looked like this:

    And turn it into something more workable. It turns out that grabbing this was pretty straightforward. I’m using Pandas primarily for this exercise, but first, I need to import some libraries:

    # Libraries used in this code
    from bs4 import BeautifulSoup
    import requests
    import csv 
    import pandas as pd 

    Next, I’ll use Pandas’ read_html function (this feels like cheating, but it’s incredible) to read in the table.

    # I found these ISO country codes on the below URL. Pandas makes it easy to read HTML and manipulate it. Very cool!
    iso_codes = pd.read_html("https://www.iban.com/country-codes")
    
    # I create a data frame, starting at an index of 0.
    df = iso_codes[0]

    This is wild, but this is what the printout looks like:

    pandas to_html printout of ISO codes table, chris hoina, senior product manager, oracle rest apis, oracle autonomous database, sql developer web, ORDS
    The Pandas read_html() the function is powerful.

    If you squint, you can see an “Alpha-2 code” and an “Alpha-3 code” column in the image. From here, I need to isolate the 3-code column. So I reshaped the data frame by making it a single column; dropping the index (this is optional, you could keep the index if you needed it; perhaps you wanted to create a separate table in your database).

    # But really, all I care about is the 3-digit country code. So I'll make that the df (dataframe) and strip out the index
    df = df['Alpha-3 code'].to_string(index=False)

    I’ll save this data frame as a .txt file.

    # From here, I'll save this little guy as a text file.
    with open("./countries.txt", "w") as f:
        f.write(df)

    This is only temporary (FYI: this is the only way I could figure out how to do this). It’ll look like this:

    country codes as a temporary text file, chris hoina, senior product manager, oracle rest apis, oracle autonomous database, sql developer web, ORDS
    The temporary .txt file of 3-character ISO Country Codes.

    Next, I take that temporary text file and read it in. I’m going to add it to a list, so I’ll first create the empty list (aptly named “my_list“). I also need to remove the newline characters from the list; otherwise, if I don’t, then when I create my string of values (that comes in the final step), the string will look like this:

    countries string with newline characters, chris hoina, senior product manager, oracle rest apis, oracle autonomous database, sql developer web, ORDS
    The “countries” string with “\n” characters.

    I remove the newline characters with this piece of code:

    # I need to remove the "new line" identifiers, so I'm doing that here. 
    my_list = countries.split('\n')

    The almost string of values will look like this:

    viewing ouput of my_list, chris hoina, senior product manager, oracle rest apis, oracle autonomous database, sql developer web, ORDS
    New line characters have now been removed.

    I use F-Strings to create the following two strings; countries_strings_single_quotes and countries_strings_double_quotes, respectively. Need to learn about F-Strings (or, more formally, Literal String Interpolation)? No problemo! Check out these three resources:

    The code for the F-Strings is below. I loop through my_list and separate the x (the things I’m iterating over) with commas (that’s the join).

    # Once I do that, I can create two new strings. I do this with f-Strings. Great article on using them here: https://realpython.com/python-f-strings/ 
    
    # I have two options here: one where the codes are contained by single quotes, the other with double
    # quotes. Oracle Autonomous Database likes single quotes, but your DB may differ.
    
    countries_string_single_quotes = ','.join(f"'{x}'" for x in my_list)
    
    countries_string_double_quotes = ','.join(f'"{x}"' for x in my_list)

    And now that I have these two objects (are they called objects??). I’ll save them each as a text file. One file has the 3-character codes surrounded by single quotes, the other with double quotes. The code:

    # From here, I take those strings and save them in a text file. You don't have to do this; you can print
    # and copy/paste the string. But this might be a nice addition if you want to refer to these later 
    # without running all the code. 
    
    with open("./countries_as_list_single_quotes.txt", "a") as f:
        f.write(countries_string_single_quotes)
    
    with open("./countries_as_list_double_quotes.txt", "a") as f:
        f.write(countries_string_double_quotes)

    The text files look like this now:

    side by side comparison of newly created text files, chris hoina, senior product manager, oracle rest apis, oracle autonomous database, sql developer web, ORDS
    The country codes are now presented in one long string. Pretty cool, eh?

    SQL time

    We have arrived! Let me show you what I can do now!

    I took the CSV data from the World Bank and loaded it into my Autonomous Database. Our returning intern Layla put together a video of how to do this; you can check it out here:

    Once my table was created, I did a SELECT [columns] FROM. Here you can see my “beginning state”.

    There are 266 entries; some are countries, and others are not. And if you recall, the original question asked how somebody could filter out the non-countries. Onto that next!

    This is the best part. I can take the string I made and use that in a SQL query such as this:

    SELECT * from ADMIN.REDDIT_TABLE
    WHERE COUNTRY_CODE IN('AFG','ALA','ALB','DZA','ASM','AND','AGO','AIA','ATA',
    'ATG','ARG','ARM','ABW','AUS','AUT','AZE','BHS','BHR','BGD','BRB','BLR','BEL',
    'BLZ','BEN','BMU','BTN','BOL','BES','BIH','BWA','BVT','BRA','IOT','BRN','BGR',
    'BFA','BDI','CPV','KHM','CMR','CAN','CYM','CAF','TCD','CHL','CHN','CXR','CCK',
    'COL','COM','COD','COG','COK','CRI','CIV','HRV','CUB','CUW','CYP','CZE','DNK',
    'DJI','DMA','DOM','ECU','EGY','SLV','GNQ','ERI','EST','SWZ','ETH','FLK','FRO',
    'FJI','FIN','FRA','GUF','PYF','ATF','GAB','GMB','GEO','DEU','GHA','GIB','GRC',
    'GRL','GRD','GLP','GUM','GTM','GGY','GIN','GNB','GUY','HTI','HMD','VAT','HND',
    'HKG','HUN','ISL','IND','IDN','IRN','IRQ','IRL','IMN','ISR','ITA','JAM','JPN',
    'JEY','JOR','KAZ','KEN','KIR','PRK','KOR','KWT','KGZ','LAO','LVA','LBN','LSO',
    'LBR','LBY','LIE','LTU','LUX','MAC','MKD','MDG','MWI','MYS','MDV','MLI','MLT',
    'MHL','MTQ','MRT','MUS','MYT','MEX','FSM','MDA','MCO','MNG','MNE','MSR','MAR',
    'MOZ','MMR','NAM','NRU','NPL','NLD','NCL','NZL','NIC','NER','NGA','NIU','NFK',
    'MNP','NOR','OMN','PAK','PLW','PSE','PAN','PNG','PRY','PER','PHL','PCN','POL',
    'PRT','PRI','QAT','REU','ROU','RUS','RWA','BLM','SHN','KNA','LCA','MAF','SPM',
    'VCT','WSM','SMR','STP','SAU','SEN','SRB','SYC','SLE','SGP','SXM','SVK','SVN',
    'SLB','SOM','ZAF','SGS','SSD','ESP','LKA','SDN','SUR','SJM','SWE','CHE','SYR',
    'TWN','TJK','TZA','THA','TLS','TGO','TKL','TON','TTO','TUN','TUR','TKM','TCA',
    'TUV','UGA','UKR','ARE','GBR','UMI','USA','URY','UZB','VUT','VEN','VNM','VGB',
    'VIR','WLF','ESH','YEM','ZMB','ZWE')
    ORDER BY COUNTRY_CODE ASC;

    Once I execute that SQL statement, I’m left with the countries from that list. I opened up the results in another window so you can see a sample.

    The end

    So yeah, that’s it! I don’t know if this was the best way to go about this, but it was fun. I’m curious (if you’ve made it this far), what do you think? How would you go about it? Let me know.

    And two more things: remember to share this and…

  • More fun with Medium story stats, JSON, Python, Pandas, and Oracle SQL Developer Web

    More fun with Medium story stats, JSON, Python, Pandas, and Oracle SQL Developer Web

    That’s right; I’m back again for yet another installment of this ongoing series dedicated to working with Medium.com story stats. I first introduced this topic in a previous post. Maybe you saw it. If not, you can find it here.

    Recap

    My end goal was to gather all story stats from my Medium account and place them into my Autonomous Database. I wanted to practice my SQL and see if I could derive insights from the data. Unfortunately, gathering said data is complicated.

    Pulling the data down was a breeze once I figured out where to look for these story statistics. I had to decipher what I was looking at in the Medium REST API (I suppose that was somewhat tricky). My search was mostly an exercise in patience (there was a lot of trial and error).

    I uploaded a quick video in the previous post. But I’ll embed it here so you can see the process for how I found the specific JSON payload.

    Obtaining the raw JSON

    Once I found that URL, I saved this JSON as a .json file. The images below show remnants of a JavaScript function captured with the rest of the JSON. I’m no JavaScript expert, so I can’t tell what this function does. But before I load this into my Autonomous Database (I’m using an OCI Free Tier account, you can check it out here if you are curious), it needs to go.


    README

    I am pointing out a few things that may seem convoluted and unnecessary here. Please take the time to read this section so you can better understand my madness. 
    
    FIRST: Yes, you can manually remove the [presumably] JavaScript saved along with the primary JSON payload (see above paragraphs). I'm showing how to do this in Python as a practical exercise. But I'm also leaving open the opportunity for future automation (as it pertains to cleaning data). 
    
    SECOND: When it comes to the Pandas data frame steps, of course, you could do all this in Excel, Numbers, or Sheets! Again, the idea here is to show you how I can clean and process this in Python. Sometimes doing things like this in Excel, Numbers, and Sheets is impossible (thinking about enterprise security here). 
    
    THIRD: Admittedly, the date-time conversion is hilarious and convoluted. Of course, I could do this in a spreadsheet application. That's not the point. I was showing the function practically and setting myself up for potential future automation. 
    
    FOURTH: I'll be the first to admit that the JSON > TXT > JSON > CSV file conversion is comical. So if you have any suggestions, leave a comment here or on my GitHub repository (I'll link below), and I'll attribute you!

    The code

    Explaining the code in context, with embedded comments, will be most illuminating.

    I’ve named everything in the code as literally as possible. In production, this feels like it might be impractical; however, there is no question about what the hell the code is doing! Being more literal is ideal for debugging and code maintenance.

    Here is the entire code block (so CTRL+C/CTRL+V to your heart’s content 😘). I’ll still break this down into discrete sections and review them.

    import csv
    import json
    import pandas as pd 
    import datetime
    from pathlib import Path
    
    # You'll first need to sign in to your account, then you can access this URL without issues: 
    # https://medium.com/@chrishoina/stats/total/1548525600000/1668776608433
    # NOTES:
    # Replace the "@chrishoina" with your username 
    # The two numbers you see are Unix Epochs; you can modify those as # needed; in my case, I
    # wanted to see the following:
    # * 1548525600000 - At the time of this post, this seems to be 
    # whenever your first post was published or when 
    # you first created a Medium account. In this case, for me, this 
    # was Sat, Jan/26/2019, 6:00:00PM - GMT
    # * 1665670606216 - You shouldn't need to change this since it will # just default to the current date.
    
    # For the conversion, I an Epoch Converter tool I found online: https://www.epochconverter.com/
    
    # Step 1 - Convert this to a,(.txt) file
    p = Path("/Users/choina/Documents/socialstats/1668776608433.json")
    p.rename(p.with_suffix('.txt'))
    
    # Step 2 - "read" in that text file, and remove those pesky
    # characters/artifacts from position 0 through position 15. 
    # I'm only retaining the JSON payload from position 16 onward.
    
    with open("/Users/choina/Documents/socialstats/1668776608433.txt", "r") as f:
    stats_in_text_file_format = f.read()
    
    # This [16:] essentially means grabbing everything in this range. Since
    # there is nothing after the colon; it will just default to the end (which is
    # what I want in this case).
    
    cleansed_stats_from_txt_file = stats_in_text_file_format[16:]
    
    print(cleansed_stats_from_txt_file)
    
    # This took me a day to figure out, but this text file needs to be encoded
    # properly, so I can save it as a JSON file (which is about to happen). I
    # always need to remember this, but I know that the json.dumps = dump
    # string, which json.dump = dump object. There is a difference, I'm not
    # the expert, but the docs were helpful. 
    
    json.dumps(cleansed_stats_from_txt_file)
    
    # Step 3 - Here, I create a new file, then indicate we will "w"rite to it. I take the 
    # progress from Step 2 and apply it here. 
    
    with open('medium_stats_ready_for_pandas.json', 'w') as f:
    f.write(cleansed_stats_from_txt_file)
    
    # Step 4 - Onto Pandas! We've already imported the pandas library as "pd."
    # We first create a data frame and name the columns. I kept the names
    # very similar to avoid confusion. I feared that timestampMs might be a
    # reserved word in Oracle DB or too close, so I renamed it. 
    
    df = pd.DataFrame(columns=['USERID', 'FLAGGEDSPAM', 'STATSDATE', 'UPVOTES', 'READS', 'VIEWS', 'CLAPS', 'SUBSCRIBERS']) 
    
    with open("/Users/choina/Documents/socialstats/medium_stats_ready_for_pandas.json", "r") as f: 
    data = json.load(f)
    data = data['payload']['value']
    
    print(data)
    
    for i in range(0, len(data)):
    df.loc[i] = [data[i]['userId'], data[i]['flaggedSpam'], data[i]['timestampMs'], data[i]['upvotes'], data[i]['reads'], data[i]['views'], data[i]['claps'], data[i]['updateNotificationSubscribers']]
    
    df['STATSDATE'] = pd.to_datetime(df['STATSDATE'], unit="ms")
    
    print(df.columns)
    
    # Step 5 - use the Pandas' df.to_csv function and save the data frame as
    # a CSV file
    
    with open("medium_stats_ready_for_database_update.csv", "w") as f:
    df.to_csv(f, index=False, header=True)

    I used several Python libraries I use for this script:

    Step 1

    p =  Path("/Users/choina/Documents/socialstats/1668776608433.json")
    p.rename(p.with_suffix('.txt')

    Pathlib allows you to assign the file’s path to “p”. From there, I changed the .json file extension to a .txt extension.

    Note: Again, I'm sure there is a better way to do this, so if you're reading, leave a comment here or on my GitHub repository so I can attribute it to you 🙃. 

    The before and after of what this step looks like this:

    With that out of the way, I needed to remove that JavaScript “prefix” in the file. I do this in Step 2 (I got so fancy that I probably reached diminishing returns). My approach works, and I can repurpose this for other applications too!

    Step 2:

    # Step 2 - "read" in that text file, and remove those pesky
    # characters/artifacts from position 0 through position 15. Or in other
    # words, you'll retain everything from position 16 onward because that's
    # where the actual JSON payload is.
    
    with open("/Users/choina/Documents/socialstats/1668776608433.txt", "r") as f:
    stats_in_text_file_format = f.read()
    
    # This [16:] essentially means grabbing everything in this range. Since
    # there is nothing after the colon; it will just default to the end (which is
    # what I want in this case).
    cleansed_stats_from_txt_file = stats_in_text_file_format[16:]
    
    print(cleansed_stats_from_txt_file)
    
    # This took me a day to figure out, but this text file needs to be
    # appropriately encoded to save as a JSON file (which is about to
    # happen). I always forget the difference between "dump" and "dumps";
    # json.dumps = dump string, whereas json.dump = dump object. There is
    # a difference, I'm not the expert, but the docs were helpful (you should
    # read them). 
    
    json.dumps(cleansed_stats_from_txt_file)
    
    json with characters that need to be removed in vs code context chris hoina senior product manager oracle rest apis database tools autonomous database
    I needed to remove these remnants from the Medium JSON response

    While this initially came through as a JSON payload, those first 0-15 characters had to go.

    FULL DISCLAIMER: I couldn't figure out how to get rid of this while it was still a JSON file hence why I converted this to a text file (this was the only way I could figure it out).

    I captured position 16 to infinity (or the end of the file, whichever occurs first), then I re-encoded the file as JSON (I interpreted this as “something the target machine can read and understand as JSON“).

    OPEN SEASON: CompSci folks, please roast me in the comments if I'm wrong. 

    Step 3

    # Step 3 - I create a new file, then I'll "w"rite to it. I took the result from Step 2 and applied it here. 
    
    with open('medium_stats_ready_for_pandas.json', 'w') as f: 
    f.write(cleansed_stats_from_txt_file)

    I’m still at the data-wrangling portion of this journey, but I’m getting close to the end. I’ll create a new JSON file, take the parts of the (freshly encoded) text file I need, and then save them as that new JSON file.

    Step 4

    # Step 4 - Onto Pandas! We've already imported the pandas library as "pd"
    
    # I first create a data frame and name the columns. I kept the names 
    # similar to avoid confusion. I feared that timestampMs might be a
    # reserved word in Oracle DB or too close, so I renamed it. 
    
    df = pd.DataFrame(columns=['USERID', 'FLAGGEDSPAM', 'STATSDATE', 'UPVOTES', 'READS', 'VIEWS', 'CLAPS', 'SUBSCRIBERS']) 
    
    with open("/Users/choina/Documents/socialstats/medium_stats_ready_for_pandas.json", "r") as f: 
    data = json.load(f)
    data = data['payload']['value']
    
    print(data)
    
    for i in range(0, len(data)):
    df.loc[i] = [data[i]['userId'], data[i]['flaggedSpam'], data[i]['timestampMs'], data[i]['upvotes'], 
    data[i]['reads'], data[i]['views'], data[i]['claps'], data[i]['updateNotificationSubscribers']]
    
    df['STATSDATE'] = pd.to_datetime(df['STATSDATE'], unit="ms")
    
    print(df.columns)

    I won’t teach Pandas (and honestly, you do NOT want me to be the one to teach you Pandas), but I’ll do my best to explain my process. I first created the structure of my data frame (“df” in this case). And then, I named all the column headers (these can be anything, but I kept them very close to the ones found in the original JSON payload).

    I then opened the newly-saved JSON file and extracted what I needed.

    NOTE: I got stuck here for about a day and a half, so let me explain this part. 

    The data['payload']['value'] refers to the key and value in this particular {key: value} pair. This approach allowed me to grab all the values of “value“. This image explains what I started with (on the left) and what I ended up with (on the right).

    retrieving all the values in the payload-value key-value pair, chris hoina, ords, oracle rest apis, database tools, sql developer web
    The before and after JSON payload

    You’ll notice a {"success": true} key: value pair. With this method, I removed that pair and shed others at the end of the JSON payload.

    three additional key value pairs i remove from the json, chris hoina, senior product manager, ords, oracle rest apis, database tools, sql developer web, oracle autonomous database
    Removing a great deal of trash

    I can’t take credit for organically coming up with this next part; Kidson on YouTube is my savior. I’d watch this video to understand what is happening in this piece of code entirely:

    for i in range(0, len(data)):
        df.loc[i] = [data[i]['userId'], data[i]['flaggedSpam'], data[i]['timestampMs'], data[i]['upvotes'],                                   
        data[i]['reads'], data[i]['views'], data[i]['claps'], data[i]['updateNotificationSubscribers']]

    In short, you take the values from the columns in the JSON file (above) and then put them into the column locations named in this piece of code:

    df = pd.DataFrame(columns=['USERID', 'FLAGGEDSPAM', 'STATSDATE', 'UPVOTES', 'READS', 'VIEWS', 'CLAPS', 'SUBSCRIBERS'])  

    For instance, the "userId" values in the JSON file will all go into the 'USERID' column in the Pandas data frame. And the same thing will happen for the other values and associated (Pandas data frame) columns.

    Finally, I changed the date (which, if you recall, is still in this Epoch format) with the Datetime library to a more friendly, readable date. Using this code:

    df['STATSDATE'] = pd.to_datetime(df['STATSDATE'], unit="ms")

    Step 5

    with open("medium_stats_ready_for_database_update.csv", "w") as f:
        df.to_csv(f, index=False, header=True)

    I’m at the home stretch now. I take everything I’ve done in Pandas and save it as a CSV file. I wanted to keep the headers but ditch any indexing. The clean CSV file will look like this:

    completed csv ready for oracle autonomous database chris hoina senior product manager oracle rest apis database tools autonomous database
    Cleaned, tidy CSV ready for Data Load via SQL Developer Web

    Step 6

    Lastly, I logged into SQL Developer Web and clicked the new Data Load button (introduced in Oracle REST Data Services version 22.3) to upload the CSV file into a new table. The Autonomous Database automatically infers column names and data types. I slightly modified the "statsdate" column (honestly, I could have left it alone, but it was easy enough to change).

    Before and After

    And that’s it! Once uploaded, I can compare what I did previously to what I have achieved most recently. And both ways are correct. For instance, depending on your requirements, you can retain the JSON payload as a CLOB (as seen in the first image) or a more traditional table format (as seen in the second image).

    Wrap up

    If you’ve made it this far, congrats! You should now have two ways to store Medium stats data in a table (that lives in the Oracle Autonomous Database) either as:

    • a CLOB
    • an OG table

    And if you’d like to review the code, you can find it here.

    And until next time 🫠, happy querying.

  • Fun with Python GET requests, Medium stats, and the Oracle Autonomous Database

    Fun with Python GET requests, Medium stats, and the Oracle Autonomous Database

    I feel so silly for posting this because you’ll quickly realize that I will have to leave things unfinished for now. But I was so excited that I got something to work, that I had to share!

    If you’ve been following along, you know you can always find me here. But I do try my best to cross-post on other channels as well:

    But given that everything I do supports the development community, audience statistics are always crucial to me. Because of this, I’ll periodically review my stats on this site and the others to get a feel for the most popular topics.

    Python continues to be huge. Really anything Python and REST API related. My Python and Filtering in Queries and Python POST Requests posts seemed to generate A LOT of interest.

    I even did a RegEx post a while back that was pretty popular too. Thankfully it wasn’t that popular, as it pained me to work through Regular Expressions. 

    I can quickly review site statistics on this blog, but other places, like Medium, are more challenging to decipher. Of course, you can download your Audience stats, but sadly not your Story stats 😐.

    Audience-Stats-in-Medium-Chris-Hoina-ORDS-Oracle-REST-Database-Actions-Oracle-Autonomous-Database
    Audience stats download, but no Story stats download.

    Undeterred, I wanted to see if it was somehow possible to acquire my Story stats. And it is possible, in a way

    Show and tell

    If after you log into your Medium account, navigate to your stats page, open up the developer tools in your browser and navigate to your “Console.” From there, reload the page and simply observe all the traffic.

    You’ll see a bunch of requests:

    • GET
    • POST
    • OPTION (honestly, I’ve no idea what this is, but I also haven’t looked into it yet)

    My thought was that the stats content was produced through (or by) one of these API requests. So yes, I (one at a time) expanded every request and reviewed the Response Body of each request. I did that until I found something useful. And after a few minutes, there it was:

    The-magic-GET-request-in-Medium-Chris-Hoina-Senior-Product-Manager-ORDS-Oracle-REST-APIs-Oracle-Autonomous-Database
    The magic GET request.

    I confirmed I had struck gold by taking this URL, placing it in a new browser window, and hitting Enter. And after selecting “Raw Data,” I saw this:

     raw-json-story-stats-from-medium-chris-hoina-senior-product-manager-ords-oracle-rest-apis-autonomous-database
    Double-checking the raw JSON.

    Indeed, we see my Story stats. But the final two paths in the URL made no sense to me.

    alan-turing-mode-chris-hoina-senior-product-manager-ords-oracle-rest-apis-autonomous-database

    The paths looked similar; I had no choice but to activate Turing Mode™.

    prefixes-of-these-numbers-look-the-same-chris-hoina-senior-product-manager-ords-oracle-rest-apis-autonomous-database

    I could see these numbers were similar, so I lined them up in my text editor and saw that they shared the same 166 prefixes. I don’t know much about machine-readable code, but since what was appearing on my screen was the last 30 days, I thought this might be some sort of date. But I’d never seen anything like this, so I wasn’t 100% sure.

    Unix Time Stamps

    After about 20 mins of searching and almost giving up, I found something in our Oracle docs (a MySQL reference guide of all places) that referenced Unix Time Stamps. Eureka!

    Unix-time-stamps-in-oracle-mysql-guide-chris-hoina-oracle-rest-apis-ords-autonomous-database
    About Unix time stamps in the Oracle MySQL docs.

    Success, I’d found it. So I searched for a “Unix time stamp calculator” and plugged in the numbers. My hunch was correct; it was indeed the last thirty days!

    verifying-the-unix-time-stamps-in-the-medium-get-request-ords-oracle-REST-APIs-autonomous-database-chris-hoina-senior-product-manager
    Verifying the Unix Time Stamp.

    So now I’m wondering if I change that leading date in the GET request will it allow me to grab all my story statistics from January 2022 till now? Oh, hell yeah, it will!

     testing-get-request-with-updated-unix-time-stamp-chris-hoina-senior-product-manager-oracle-rest-apis-autonomous-database
    All my Story stats from Jan 2022 to the present.

    End of the line

    Right, so here is where I have to leave it open-ended. I had a finite amount of time to work on this today, but what I’d like to do is see if I can authenticate with Basic Authentication into my Medium account. And at least get a 200 Response Code. Oh wait, I already did that!?

     testing-basic-authentication-with-medium-and-python-requests-chris-hoina-senior-product-manager-ords-oracle-rest-apis-autonomous-database
    Getting that sweet, sweet 200 Response Code.

    And now the Python code!

    import requests
    import json 
    from requests.auth import HTTPBasicAuth
    
    url = "https://medium.com/m/signin"
    # I found this to work even if I typically sign on through 
    # the Google Single-sign-on. I just used the same email/password 
    # I do when I login directly to google (Gmail). 
    user = "[Your login/email]"
    password = "[Your password]"
    
    r = requests.get(url, auth=HTTPBasicAuth(user, password))
    
    print(r)
    
    
    # I found this URL in the console but then removed everything after
    # the query string (the "?"), and used that for the requests URL
    
    # "/m/signin?operation=login&amp;redirect=https%3A%2F%2Fmedium.com%2F&amp;source=--------------------------lo_home_nav-----------"

    You’re probably wondering how I found the correct URL for the Medium login page. Easy, I trolled the Console until I found the correct URL. This one was a little tricky, but I got it to work after some adjusting. I initially found this:

    "/m/signin?operation=login&amp;redirect=https%3A%2F%2Fmedium.com%2F&amp;source=--------------------------lo_home_nav-----------"

    And since I thought everything after that “?” was an optional query string, I just removed it and added the relevant parts to Medium’s base URL to get this:

    https://medium.com/m/signin

    Next steps

    From here, I’d like to take that JSON object and either:

    • use the Python Pandas library to clean up before loading into my Autonomous Database via ORDS, or
    • extract the existing JSON (CLOB) with SQL (as was detailed in this Oracle Community forum post)

    If I want to keep it as is, I know I can load the JSON with a cURL command and an ORDS Batch Load API with ease. I dropped this into my Autonomous Database (Data Load) to see what it would look like:

    CLOB-in-my-Autonomous-Database-Chris-Hoina-Senior-Product-Manager-ORDS-Oracle-REST-APIs-Database-Actions
    My CLOB.

    We do something very similar in the Oracle LiveLabs workshop (I just wrote about it here). You can access the workshop here!

    I’ll have a follow-up to this. But for now, this is the direction I am headed. If you are reading this, and want to see more content like this, let me know! Leave a comment, retweet, like, whatever. So that I know I’m not developing carpal tunnel for no reason 🤣.