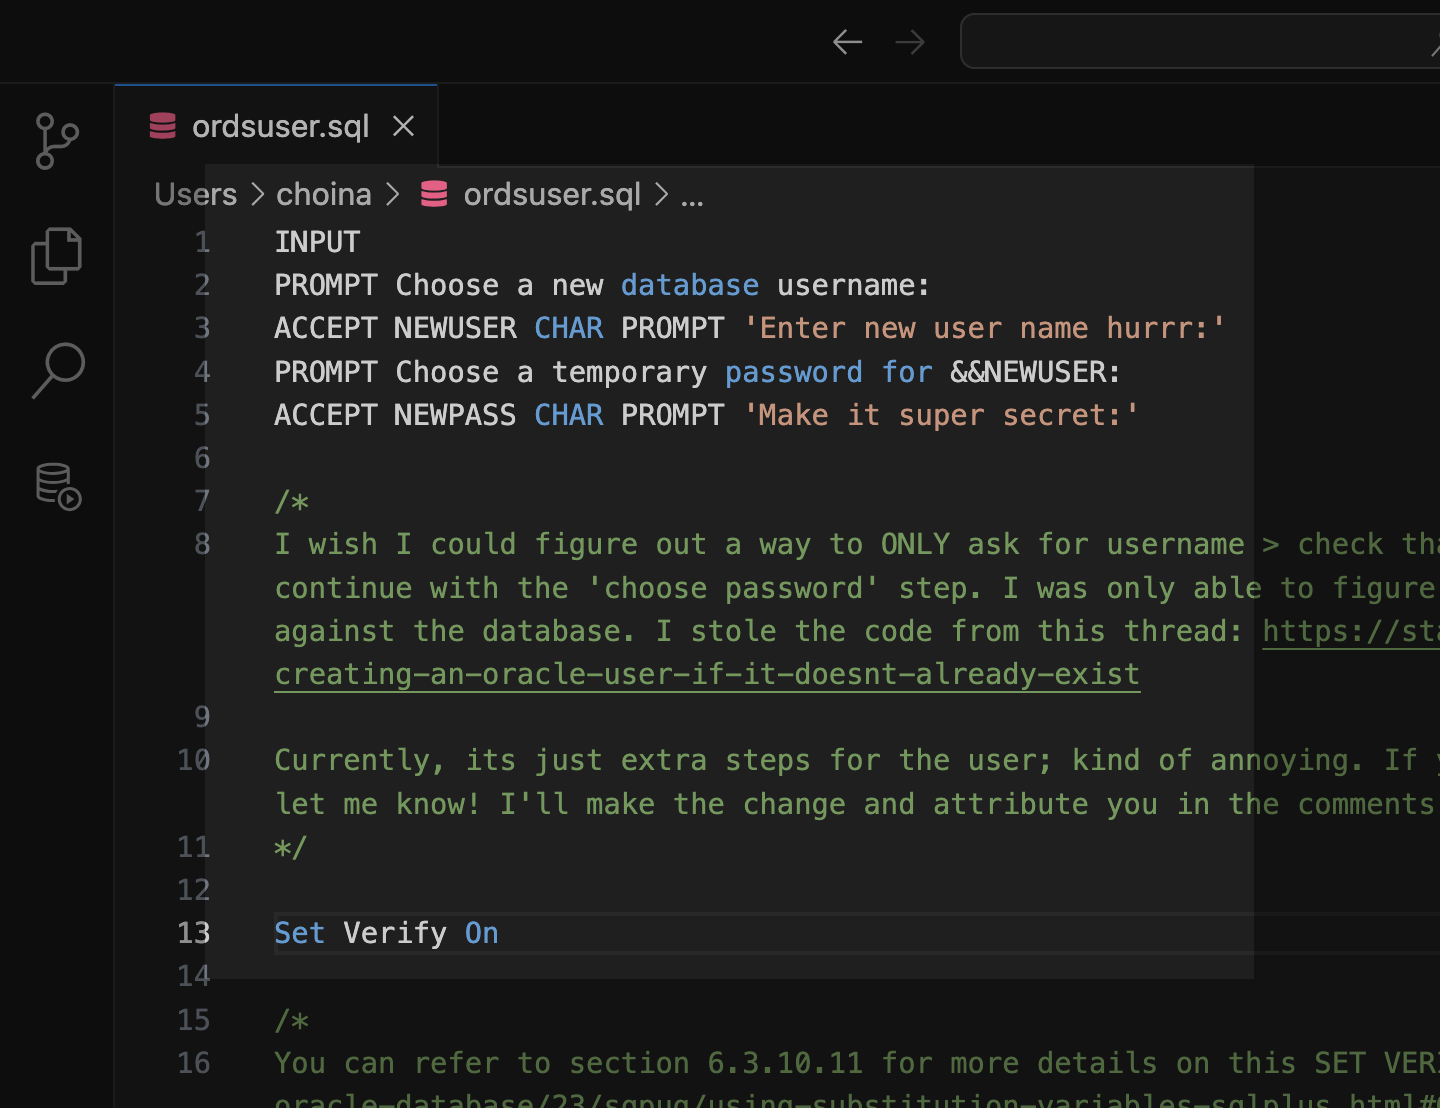
Once you’ve installed ORDS, you need to REST-enable your schema before taking advantage of ORDS (I used to forget this step, but now it’s like second nature).
RESOURCES: I've discussed ORDS installation here and here. I'd check both pages if you're unfamiliar with it or want a refresher.
ORDS.ENABLE_SCHEMA / ADMIN_ORDS.ENABLE_SCHEMA
While logged into your database with SQLcl, you can issue the following commands to not only create a new user but grant them the required Roles (and the underlying Privileges) and REST-enable their schema (aka “ORDS-ifying” a schema):
/* Remember to remove the brackets when you run this code */
Create User [username] Identified By [password];
Grant Connect to [username];
Grant Resource to [username];
Grant Unlimited Tablespace to [newuser];
/* This PL/SQL procedure assumes you are logged in as the SYS.
If you are logged in as that new user, AND HAVE BEEN GRANTED
THE DBA ROLE, then you can execute the ORDS.ENABLE_SCHEMA
procedure */
Begin
ORDS_ADMIN.ENABLE_SCHEMA(p_schema = > '[username]');
End;
/
Create User [username] Identified By [password];
Grant Connect to [username];
Grant Resource to [username];
Grant Unlimited Tablespace to [newuser];
Begin
ORDS_ADMIN.ENABLE_SCHEMA(p_schema = > '[username]');
Commit;
End;
/
Automate because lazy
But even that is too much work for me, so I took a stab at automating this via an SQL script. As you can see, the above commands are simple and repeatable (a perfect candidate for automation). And since I’m constantly adding and dropping users for various reasons, copying and pasting code from an old blog or writing everything by hand gets annoying. Additional reasons for automating:
laziness
a desire to improve SQL and PL/SQL skills
an interest in scripting
I get easily distracted
The script
After about a day and a half, I have a working prototype script to call upon when I’m on the SQLcl command line. Here is what I came up with:
NOTE: If you just came here to remix the code, I have this in the scripts folder in my GitHub blog repo as well. Please feel free to sample it and/or roast it/me 🔥. But if you keep scrolling, I'll go into more detail section-by-section.
18-OCT-2023 UPDATE: I've slightly changed this code to include the Commit; command in the PL/SQL portion of the script. You'll see that reflected in line 44. Thanks René 🙌🏻!
INPUT
PROMPT Choose a new database username:
ACCEPT NEWUSER CHAR PROMPT 'Enter new user name hurrr:'
PROMPT Choose a temporary password for &&NEWUSER:
ACCEPT NEWPASS CHAR PROMPT 'Make it super secret:'
/*
I wish I could figure out a way to ONLY ask for username > check
that against existing database users > AND THEN allow a user to
continue with the 'choose password' step. I was only able to figure
out how to ask for the username and password AND THEN checks
against the database. I stole the code from this thread:
https://stackoverflow.com/questions/30710990/creating-an-oracle-user-if-it-doesnt-already-exist
Currently, its just extra steps for the user; kind of annoying. If you're
reading this and can figure out a way to get this working, let me know!
I'll make the change and attribute you in the comments :)
*/
Set Verify On
/*
You can refer to section 6.3.10.11 for more details on this
SET VERIFY OFF command
https://docs.oracle.com/en/database/oracle/oracle-database/23/sqpug/using-substitution-variables-sqlplus.html#GUID-3ACD41F3-A5A2-48D5-8E81-C29F9C14C865
*/
/*
The difference between using single and double ampersands:
https://docs.oracle.com/en/database/oracle/oracle-database/23/sqpug/using-substitution-variables-sqlplus.html#GUID-C6BE6E41-821F-413E-B4B1-56AAE4A46298
*/
Declare
check_if_user_exists Integer;
plsql_block VARCHAR2(500);
NEWUSER VARCHAR2(20) := '&&NEWUSER';
Begin
Select count(*) Into check_if_user_exists From dba_users Where username=NEWUSER;
If (check_if_user_exists = 0) Then
Execute Immediate 'Create User &&NEWUSER Identified By &&NEWPASS';
Execute Immediate 'Grant Connect To &&NEWUSER';
Execute Immediate 'Grant Resource To &&NEWUSER';
Execute Immediate 'Grant Unlimited Tablespace To &&NEWUSER';
plsql_block := 'Begin ORDS_ADMIN.ENABLE_SCHEMA(p_schema => :1); Commit; End;';
Execute Immediate plsql_block using NEWUSER;
End If;
End;
/
/*
The p_schema parameter is mandatory, that's why I'm including it.
If you omit the other parameters, the procedure will use the default
parameter values.
Learn more about this procedure here:
https://docs.oracle.com/en/database/oracle/oracle-rest-data-services/23.2/orddg/oracle-rest-data-services-administration-pl-sql-package-reference.html#GUID-459B8B6F-16EC-4FEC-9969-E8231668AD85
I was able to get this entire thing to work through trial-and-error,
while also using this for reference:
https://docs.oracle.com/cd/B13789_01/appdev.101/b10807/13_elems017.htm
*/
PROMPT
PROMPT
PROMPT Congrats 🎉 the user: &&NEWUSER, with the password: &&NEWPASS is now a bona fide database user 🙌🏻!
PROMPT Not only that, &&NEWUSER can log into Database Actions and REST-Enable their database objects too 😍!
PROMPT
PROMPT
PROMPT Click RETURN to return to the SQLcl prompt. And NEVER forget:
PAUSE "You're good enough, you're smart enough, and doggone it, people like you!"
PROPS: I owe much credit to this StackOverflow post and Jon Heller's and Mark Bobak's comments.
Breaking it down
Starting up podman
I’ll first start up podman and cd in the correct directory. “Correct” insomuch that this is where my ordsuserl.sql script lives.
ordsuser.sql, the script I’ll be working with.
Once my container status displays healthy, I’ll execute the ords serve command. This will launch ORDS in standalone mode (using the embedded Jetty server). I’ll use ORDS in a few minutes, so I should prepare it now.
Checking the container health.Issuing the ords serve command.ORDS is ready.
Prompting the user
I’ll then log into my podman container using the following string:
sql sys/password1234@//localhost:41465/ORCLPDB1 as sysdba
But why not the podman exec command?
NOTE: I'm logging in as SYS (I've since been informed you shouldn't really be doing this as SYS; in fact, it looks like you shouldn't be doing this as SYSTEM. Tom has some good comments in this post here.
Why am I not using the podman exec command here?
If you’ve seen my latest post on podman ports and networking, this command contradicts that entire article. There are actually two ways (maybe more, if I’m unaware) you can connect to your Oracle database in a podman container. The first way is to simultaneously hop on over to the container and sign in from inside that container. Your connection string would look like this:
podman exec -it 21entdb sql sys/password1234@//localhost:1521/ORCLPDB1 as sysdba
The second option is to sign in remotely like I’m doing in this current example:
This is analogous to when you SSH into a machine remotely. I should have mentioned it in this recent YUM/Oracle Linux post. Still, when you create a Compute Instance, you can later SSH into that Instance and perform actions like you usually would in the Terminal or the Command Prompt. But instead of being on your own machine, you’re on a remote machine. Ports are very confusing (for me, at least), so please read that podman ports post.
When you use the exec command, consider yourself on another computer on the Linux operating system. Once there, you must log in using the 1521 port because that is where the database’s TNS Listener (deep dive on Oracle database connection) is. However, when you are outside that container (i.e., that machine’s Linux OS), you need to use your local port (in this case, 41465) because it essentially acts as a proxy or a pass-through to the container’s 1521 port. Savvy 🏴☠️?
DISCLAIMER: This my best-effort attempt at explaining this confusing concept. It is subject to change. But I really want people to take advantage of our tools in the Oracle Container Registry, so I hope this helps!
Hath connected to the database
Once I’m in, I can call upon my script to quickly create a new user and REST-enable their schema (recall, I “cd” into the correct directory in an earlier step). The syntax:
@ordsuser.sql
MORE SQLcl: You can read the different SQL, SQLcl, and PL/SQL commands here.
After pressing Return/Enter, a prompt will appear; this is what it looks like on the “front end”:
Notice the prompts in those first four lines.
HINT: I would also spend some time here, learning about the PROMPT, ACCEPT, and INPUT commands. Yes, this comes from the SQL*Plus documentation, but this works as you'd expect in SQLcl.
Meanwhile, here is the corresponding section in the script:
The first section of the SQL script.
Once I enter the password and press Enter/Return on my keyboard, the rest of the script is automatically executed using the provided username and passwordas substitution variables for the rest of the script! There is an in-depth explanation in the docs here, but you should grab the code and tinker with it to see how everything interacts and works together.
NOTE: The Set Verify On command displays the changes made from the original PL/SQL procedure and the updated PL/SQL procedure (with the updated username and password). It isn't necessary, but I wanted to provide some feedback to a user.
PL/SQL procedure
Assuming the user (i.e., the one you selected) doesn’t exist, the PL/SQL procedure should execute without issues. In the following image, you can see what is happening in real time:
A new user is created with the assigned username and password
That user is granted the Connect and Resource roles
The schema is then REST-enabled using the ORDS_ADMIN.ENABLE_SCHEMA PL/SQL procedure
Why NEWUSER in the Declare block?
Yeah, good question. At a minimum, you need to include the p_schema in the ORDS_ADMIN.ENABLE_SCHEMA procedure. Read up on that here. But, I wanted the username to remain in lowercase since that will later be used for my schema’s URIs (e.g., http://localhost:8080/ords/ordstest/emp/).
So I quickly taught myself/attempted a crash course on define variables and bind arguments; most of what I learned came from this EXECUTE IMMEDIATE documentation. And that’s why you see this in lines 25 and 34 of the code:
NEWUSER VARCHAR2(20) := '&&NEWUSER';
/* as well as */
ORDS_ADMIN.ENABLE_SCHEMA(p.schema => :1);
You can see the interaction between lines 25 and 34.
And on the front end, courtesy of the Set Verify On command, you’ll see that updated block of code:
The username and password fields are updated.
Feedback
I’ll then provide myself (or the user) with helpful feedback (along with words of encouragement). Once satisfied, I can click the Return/Enter key to exit the script and sign in to Database Actions as that new user.
The end of the script, after pressing Return/Enter.Exiting from SQLcl.
The corresponding section in the script looks like this:
I’m cheating by adding PROMPT to give line breaks.
Sign-in to Database Actions
Now, I can navigate to the Database Actions sign-in page at localhost:8080/ords/sql-developer. If I wanted to, I could also navigate to the newly introduced landing page at http://localhost:8080/ords/_/landing (obviously, depending on your deployment, this address will differ).
The landing page you’ve probably seen before.Signing in with the ordtest user I created with the script.This is our recently introduced landing page with more options.
SQL Worksheet then the proof
I’ll head to a SQL Worksheet, select All Objects in the Navigator tab, and a clean schema ready to take on the world!
Navigating to a SQL Worksheet.Selecting All Objects in the Navigator Tab.
Summary
And this marks the end of today’s lesson. So what did we learn?
You can execute SQL scripts directly from the SQLcl command line.
My script is cool, but I wish I could verify if a user exists sooner (I end up forcing the user to go through that password step).
The script has no exception handling (I’m giving myself a pass on this since I’m just now getting into PL/SQL).
Spend some time with the documentation on one screen and your script on another. After some time, you can actually understand how everything interacts.
One final thought. My process required a lot of trial and error, but seeing how everything flows and works is entertaining.
Please sample/remix my code; it’s located in my GitHub blog repo. Make it better, and let me know what you come up with! And be sure to check out ORDS and SQLcl 😍!
Follow
And don’t forget to follow, like, subscribe, share, taunt, troll, or stalk me!
The other day, I wrote about how I had to start from scratch on my podman containers 😢. I’m now at the step where I need to reinstall ORDS in these two new database containers (21c and 23c). And since I’m doing this install yet again, I figured I would point out some things I’ve learned while doing this with podman containers. This post isn’t meant to be all-inclusive; I’m simply highlighting the areas that gave me the most trouble.
Lettuce begin
My assumptions are that you’ve downloaded the ORDS zip file or from a Yum repository (how-to article here). You’ve also set the ORDS configuration folder path and the ORDS product folder path (both are necessary steps for ORDS pre-installation). You can read up on that step here.
The ORDS Interactive Installer
Here, I’m installing ORDS with the Interactive Installer.
Do this with the ords install command
The fine print
NOTE: For a vanilla installation, most of the default prompts are correct. But for working with a podman container, I do not believe all the default settings will work (at least, this has been my experience).
The ORDS Interactive Installer will prompt you with the default settings, where appropriate. You’ll notice the Choose [value]: convention. These settings are okay to use in many steps, but if you mindlessly follow them in specific steps, you might end up with the incorrect ORDS installation for your particular use case.
Select the type of installation
For instance, in the “Enter a number to select the type of installation” step, I’m prompted with the [1] option. For me, that is incorrect; I need to choose [2].
Option [2] I choose you!
Database pool to update or create
Things can get tricky here, too. In this step, I WILL choose option [1], but in the next step, I WILL NOT selectthe default settings (read on about host names, ports, and service names).
This default string is simply an example; with podman you may not be using 1521 as the port.
Selecting the database connection type
And here’s why I won’t use the default settings. It’s because I have mapped the ports to/from my podman containers like this:
My 21entdb container is set up such that my computer sends and receives podman container traffic on port 41465. Meanwhile, my podman container is set up so that it will send and receive data on port 1521 (which is the default port for Oracle’s TNS Listener).
Another way of looking at this is to imagine port 41465 is sort of spoofing port 1521. Ehh..maybe it’s better to think of it like a pass-through, a proxy, a go-between if you will…but more on this in a second.
Demystifying the connection string
Here, I’ll test both ports, the Container (ORCLCDB) and Pluggable (ORCLPDB1) databases, with various connection strings.
QUESTION: How do I even know my options are ORCLCDB or ORCLPDB1? Well, I learned about them in the container registry documentation.
Using port 1521
First, let’s see what happens when I try to log into my database with SQLcl, using 1521 as the port:
Attempting in the Container databaseAttempting in the Pluggable database
Nothing! Initially, for me, this made no sense! And that’s because, in my mind 1521is the port that you would expect to connect with! This whole network business was confounding! That was until I realized that you have to use your computer’s port to connect to the podman container (which is listening on port 1521).
Using the port podman assigned to you
Ah-ha! Now, if you make that slight change to the ports, you can connect to your Container (ORCLCDB) and Pluggable (ORCLPDB1) databases.
We’re sys-dba’ing now, babyyyy 🍾!
Does this help? Do you have a better understanding of why your port might not be 1521?
Host, port, and service names
You can probably keep the localhost default selection. When it comes to the listen port selection, I must choose 41465 and not1521. And for the database service name, you could choose ORCLCDB (i.e. Oracle Container Database), but we recommend installing ORDS into a Pluggable Database (read up on this in our ORDS Best Practices). Here you see me do just that; ORCLPDB1 is the ORDS default, but I wanted to highlight why this is the default.
Provide database user
In this step, I’m supplying the username and password of a user with the necessary privileges to log into the database to complete the ORDS installation. In this case, unsurprisingly, it is the SYS user (the default). We also have an ORDS Installer Privileges script you can execute if you’d rather grant another user privileges to install, upgrade, repair, and uninstall ORDS. You can find more details on that script here.
A great example showing how the JDBC driver is using the host, port, and service name values you provided.
Enabling features
This isn’t the final ORDS install step; this is just the last step I wanted to point out. The default here is also [1]. And I think you should keep it like that, here’s why. When you select [1], you’ll also give users access to Database Actions – the Graphical User Interface (which shares much in common with the SQL Developer desktop client). Once you start using Database Actions, it’s hard to stop.
Don’t ask any questions; select option [1].
NOTE: You'll also be enabling the REST-enabled SQL service (as well as the Database API). I recently wrote about the ORDS REST-Enabled SQL Service; it's very cool, and you should check out that article here.
The end
Aaanndd, that’s my time. They’re flashing the lights, so I have to get off the stage 🙁. Hopefully, this note will be helpful when you create some containers from images on the Oracle Container Registry. And if you think you might like to tinker with ORDS, bookmark this post so you can refer to it later!
Follow
And don’t forget to follow, like, subscribe, share, taunt, troll, or stalk me!
The title says it all. I’ve run through this about ten times now. But I’ll show you how to start a Podman container (with a volume attached) and install ORDS on your local machine. And then, once installed, we’ll create and REST-enable a user so that the user can take full advantage of Oracle REST APIs. (aka ORDS). I’ll finally show you how to log into a SQL Worksheet as that new user. Ready? Let’s go!
Oracle Container Registry
First, visit the registry. Navigate to the Database product category, then select Enterprise. Even better, just navigate to the 21cor23ai images directly (thanks Killian 😉! Ensure you’ve also signed into the site (otherwise, you won’t be able to pull this image).
For Podman, I’ll review the preferred way to start this container (with a volume; for persisting your data across sessions).
Volumes
Start your Podman machine with the podman machine startcommand. Then create a volume with the podman volume create command (that way, you can save data locally and use that volume each time you start your container). Now that we have the volume, we can create a new container and attach that volume simultaneously (more Podman volume info here).
There are a few ways you can attach volumes when starting a container, but I like the one I found in this video:
Ironically, this is an Oracle video. But it is one of the most straightforward ones I found. To start the container, here is the command I used:
podman run -d --name entdb213 -p 1521:1521 --mount=type=volume,source=entdb213vol,destination=/opt/oracle/oradata container-registry.oracle.com/database/enterprise:21.3.0.0
About port mapping
You’ll notice that I used the following port mapping -p 1521:1521. You can remove that leading 1521. If you do, Podman will bind any exposed port to a random port on your host (a MacBook, in my case) within an ephemeral port range. Ephemeral?? (I guess that means all/any available ports, assuming none of these).
At this point, I have created a volume and started a container (with an Oracle Enterprise database inside).
PRO TIP: If this is your first time starting a container with a database of this size, it will take several minutes. So go do some chores while you're waiting 🤪
Altering the db password
I’ll change the database Administrator password to something I can easily remember (“oracle“) using this command:
# Original command
# docker exec <oracle-db> ./setPassword.sh <your_password>
# My modified command
podman exec entdb213 ./setPassword.sh oracle
Changing the password to something I can easily remember.
Note: There are several shell scripts included in this container; one of which is the change password script. There are more details on the Oracle Container Registry > Oracle Database Enterprise Edition page (redirects prevent me from linking directly to that page).
Downloading ORDS
Next, I’ll head to the Oracle REST Data Services download page. And download the latest ORDS build (I’ll be setting this up shortly, I’m just gathering and configuring everything now).
Once that ZIP file is in my downloads folder, I’ll unzip it. At this point, this folder will still be named ords latest. You can certainly keep it like that, but I’ve renamed it to ords_product_folder. This is similar to how we refer to it in our installation/configuration documentation (changing it might make it easier to follow along).
ORDS Configuration
There are two configuration steps I need to perform before I can begin the ORDS installation. You’ll need to set an Environment Variable to the binaries (these are in the bin folder, you should see that in the above image) found in the ords_product_folder. Secondly, you’ll need to create an ORDS Configuration folder.
WAIT: If you're still reading this, how is my approach? After some research, placing these two folders in the "Library" seemed to make the most sense. I'm not sure what the analog on a Windows machine would be though. Drop a comment below if you know!
At this point, I’m nearly finished with this initial configuration. I next opened my .zprofile file (this is the file where I’m keeping most of my environment variables) and added the following paths:
Pourquoi? I can't seem to find a definitive answer as to where these paths should be saved, but this thread on Stack Exchange does a great job explaining all these files (and when/where they are used).
ORDS Installation
You’ll want to exit out of all your Terminal sessions so that the next session can pick up those changes to the .zprofile file. Podman will still keep doing its thing in the background, and hopefully, by this time, the database container will display as “healthy.”
🛑 STOP: This may be obvious to you, but it wasn't to me, the database needs to be ready (healthy), online, and active (whatever you want to call it) for ORDS to install. You can always issue the podman ps command to check the status of the container.
Remember this; you’ll need it shortly.
ORDS install, the first attempt
In a new Terminal, I’ll issue the ords installcommand. If you’ve set up your bin and config environmental variables like me, then you shouldn’t have any issues. Moving through the first few steps is easy.
The ORDS interactive installer will default to recommended settings. Most of the time, these will be correct. Since this is my first time installing ORDS, I’ll choose Option 2 in that first step. I can use “localhost” as the database hostname and 1521 as the port.
When you get to the database service name, that’s where you might get hung up. The ORDS installer assumes default configuration settings. But here, if you select “orcl” as the database service name, it will install ORDS in the entire database. This is not technically incorrect, but our ORDS Best Practices recommends you install ORDS in a Pluggable Database (PDB). So I’ll issue the podman logscommand (in my case: podman logs entdb213) to find the name of the PDB; ORCLPDB1 (that’s the default for this container, it’s well-documented in the container registry docs, I’m just an idiot).
This is a neat trick, but it’s also documented in the Container Registry docs.
The ORDS interactive installer is very forgiving. I’ve noticed I can exit out of the installation process pretty much anywhere. Given that fact, I’ll restart my Terminal and start the ORDS install over (now that I have the correct database service name).
ORDS install, for real this time
In these images, you can better see the ords installcommand (it was slightly grayed out in the previous image). And you’ll also see all the steps completed. You can probably keep everything default as I did. You might want to since our documentation refers to that 8080 port (as seen in the images) in most of our tutorials and examples. I find it easier to follow along with the docs when everything matches.
🗒️ NOTE: Make sure you choose to run ORDS in standalone mode. That way you can continue to follow along in later steps.
Here you can see the paths to the bin and config folders.Conditions are perfect.
The rest of the installation is largely unremarkable. You will notice a few things, though:
The paths we’ve pointed to for the config and bin folders
The “settings” names(no action required by you, it’s just cool to see)
once the installation finishes, the text “Oracle REST Data Services initialized” will appear
That final image confirms that ORDS is now running in standalone mode. You can visit the following:
localhost:8080/ords/sql-developer
Logging into the SQL Worksheet, the first attempt
And try to log in with the SYS credentials.
One does not simply log into Database Actions…you must REST-enable a user first.
SPOILER ALERT: You can't 😕! Muahahahahaha!
That was a dirty trick. While ORDS is installed in ORCLPDB1, we must first create and REST-enable a user. I will make up for this dirty trick by sharing one of my favorite cheat codes for learning SQL and PL/SQL.
🗒️ NOTE: You cannot REST-enable the SYSTEM or SYS user.
If lucky enough, you have an Oracle Cloud Free Tier account with at least one Autonomous database provisioned.
CORPORATE SHILL ALERT: You can sign up for one here 😘.
Code cheating with the Autonomous database
Login to Database Actions as the Administrator. Navigate to User Management. In that dashboard, select the + Create User button.
In the Administration section.Click the Create User button.
When the slider appears, enter the information for the ORDSTEST user (like you see in the image here).
Once you’ve entered everything in, hit that “Show code” switch.
You’ll need to enable “Web Access” for this user. When you do this (click the switch), two things will happen:
The CONNECT and RESOURCE roles will be automatically selected for you
The Authorization required toggle will be enabled – shut this off for now
Once you’ve done that, you can select the “Show code” switch at the bottom of the slider. This will reveal the actual code that is being executed should you click the “Create User” button (which you will most certainly NOT!).
Copy and paste this into a text editor.
I copied this code and placed it into a text editor. I made one small change to the QUOTA line (at the bottom of the script).
Stole this from the ORDS Quick Start Guide.I am making a slight change to that last line.
Then I headed back to my Terminal and opened a new tab. I’ll execute this code in the database (remember, it’s in that Podman container running idle in the background this entire time) using SQLcl.
Forgot your connection string?
IF YOU FORGET the connection string format for logging in, have no fear! That Jeff Smith recently showed me the history command. I also have a couple of shorts on how I used the command:
Using the history + the number of your choice.Here is a connection string that is close enough!Entering the slightly modified string into SQLcl.
Using SQLcl to REST-enable a user
Now that I have the proper format for the connection string, I’ll adjust it so the password is correct. Then I’ll execute the code in SQLcl to create a new database user and REST-enable that user’s schema.
I changed that final line; this is what it looks like in SQLcl.
Cheat code with PL/SQL in SQLcl
I’ve just learned you can REST-enable yourself by logging into SQLcl (i.e., connecting to the database in the Podman container) and issuing the following command:
EXECUTE ORDS.ENABLE_SCHEMA;
This command assumes that you have already been granted the CONNECT and RESOURCE roles but have yet to REST-enable your schema (what allows ORDS to act as the intermediary between the database and the rest of the web).
The command will employ the procedure’s default parameters, which are:
ORDS.ENABLE_SCHEMA( p_enabled IN boolean DEFAULT TRUE, p_schema IN ords_schemas.parsing_schema%type DEFAULT NULL, p_url_mapping_type IN ords_url_mappings.type%type DEFAULT 'BASE_PATH', p_url_mapping_pattern IN ords_url_mappings.pattern%type DEFAULT NULL, p_auto_rest_auth IN boolean DEFAULT NULL);
Here is what a sample output would look like, if I were signed in as the HR user:
An example output is if I were signed in as the HR user.
🛑 FYI: This above image is just a sample, and not related to the rest of the images in this article. Be sure to pay attention to the connection string (sql hr/oracle@localhost:1521/freepdb1). This is if the HR user is logging into SQLcl and REST-enabling their own schema. That's why you see references to HR throughout. I don't want anybody to get confused!
Logging into the SQL Worksheet, for real this time
With all this code executed, I can NOW go back to the SQL Worksheet (remember, we’re on localhost:8080/ords/sql-developer) and log in as the newly created ORDSTEST user.
I am logging in as the ORDSTEST user.A true “will-they, won’t they” moment.Congrats, you have arrived!
And once you’re in, you’ll notice the SQL Worksheet is no different than what you might expect in the Oracle Autonomous database. So if you made it this far, go forth and CREATE, DELETE, INSERT, SELECT, and Query away, friends!
Shutting it all down
Once you are done playing and tinkering, you can log out of the SQL Worksheet, stop the ORDS process with CTL + C (on Mac, at least), stop the Podman container, and shut down the Podman virtual machine.
Use Control + C to stop the ORDS process.I am stopping the entdb213 container.Exiting from the Podman virtual machine.
And since we set this all up with a volume (so….so long ago, I know; we called it entdb213vol), you can start the container later on, and all your work will still be there (i.e., It shall persist!).
The end
Congrats, we made it! What do you think? Did I miss anything? If so, comment, and I’ll respond and update this post as needed. And if you think this could be useful for others, do share!
Podman is a daemonless container engine for developing, managing, and running OCI Containers on your Linux System. Containers can either be run as root or in rootless mode. Simply put: alias docker=podman.
I’ve spent the past couple of weeks setting up Podman to work on my MacBook.
My current setup
I really wanted to take advantage of our Oracle Container Registry. While, we have several containers, the one I’m most interested in is the [Ace] freely available Oracle Enterprise Database version 21.3.0.0.
FYI: It can be found in the Database containers category.
I wanted to learn more about containers while also connecting locally (i.e., from my MacBook) via SQLcl to said container. In that scenario, as far as my computer thinks, the container is a production database running elsewhere in the world. Oh, and I’m using Podman instead of Docker to do all this.
be able to connect to it with various Oracle database tools
I began this exercise with SQLcl since it was used in one of my recent posts. But as a follow-on to this article, I’d like to install ORDS on my local computer and then connect again but with ORDS joining the party. But that’s for another time.
But before connecting to this container, you’ll need a lot of prerequisites. As far as “ingredients” go, you’ll need the following:
Homebrew installed and updated. (If you need to do this, review my recent article for instructions.)
Podman installed and updated
Apple X-Code Command Line Tools updated (this is tricky, so check my notes below)
SQLcl (you can review the installation steps here)
A sample CSV file (The subject doesn’t matter; I grabbed one from Kaggle – “IMDb’s Top 100 Movies“)
The setup before the setup
Since this was such a huge PITA, I’m going to walk through all the steps I took to make Podman work on my MacBook. I’ve done this about ten times so far to make sure I’m clearly explaining every step I took.
I first opened up a new Terminal session using Spotlight (Left Command + Spacebar). Once in Spotlight, I searched for “terminal” and then hit enter. A new Terminal window will appear.
Opening SpotlightSearching for the Terminal applicationA new Terminal window
From there, I reviewed Homebrew using the brew list command. If you’re following along, you’ll see a list similar to mine, depending on what you have installed.
The next part is easy. I installed Podman with the following command: brew install podman. Homebrew will run through an auto-update, and eventually, Podman will begin installing.
Upon the first installation, and depending on the macOS you are on, you may see a couple of errors appear. I can tell you they will cause issues within Podman later on down the line. So (and without having to take you back down the rabbit hole with me), you’ll need to uninstall Podman with the brew uninstall podman command.
The errors can be seen in this image:
Errors with Podman installing
There are a few ways one can remedy this. First, you should uninstall Podman, close your Terminal window, and open up a new Terminal window. I found (via this GitHub issue) that this is a known bug. Some have suggested running the brew doctor command to review a list of possible problems (this will reveal any potential problems Homebrew has discovered). This seems like a good practice, regardless, and I wasn’t aware of this feature until now!
And while writing this article, I did just that and found two errors I’ll need to fix. I’m still trying to figure out what either means, but the one about the executable is troubling.
But back to the Podman issue. To resolve the xcrun errors, I stumbled upon a solution buried deep in the recesses of the internet. Long story short, I needed to manually install Apple’s X-Code Command Line tools. But if you try and the installation fails, you have to take an extra step.
BTW, it did NOT take 78 hours to download and install
The x-tra step
If the xcode-select --install command fails, you have to remove the Command Tools from your machine altogether. I did this with the following command:
sudo rm -rf /Library/Developer/CommandTools
If you want to bore yourself with this issue, here are some resources I found:
I’ve seen sudo in the past; I wonder if I ever bothered to look up its meaning. Taken directly from the docs:
Sudo (su “do”) allows a system administrator to give certain users (or groups of users) the ability to run some (or all) commands as the superuser or another user, while logging all commands and arguments. Sudo operates on a per-command basis, it is not a replacement for the shell.
Back to our regularly scheduled program…you’ll probably need to enter your system’s password (the thing you use to log on to your computer when it first starts up and/or wakes). And after that, restart your Terminal (I don’t believe I did this, but it’s probably a good idea to restart the Terminal).
Once that new Terminal window fired up, I used the following command to install the latest X-Code Command Line tools:
sudo xcode-select --install
Reminder, it will not take 78 hours to install this. I just followed the prompts (license terms, the usual stuff, etc.).
NOTE: I suspect we have to do this because for some reason, X-Code Command Line tools are not updated upon every macOS version update. So, who knows when the last time these tools have been updated. This is just a hunch, but in reality, I've no idea what I'm talking about.
Are we ready yet? Well, almost. Again, if you’re following along, navigate to our Oracle Container Registry site to retrieve the database container for this “recipe.” The path I took was Landing page > Database > Enterprise.
The main landing pageYou want “enterprise”Pay attention to the sign-in
YOU NEED TO SIGN IN for this to work!!! Oh, suuuuure… it’ll seem like it’s working when you’re in Podman, and you’ve tried ten times…but then it just keeps failing, and failing, and failing! So be sure to sign in (or create an account if you haven’t already).
Once signed in and chosen your preferred language, you’ll see this:
I’m ready to head back to the Terminal
PAUSE: reviewing the limitations of this exercise
Alright, so there are a few limitations I should address, and in no particular order:
Checkpointing containers in Podman
Volumes in Podman
Creating the database versus signing on to the database
Checkpointing currently doesn’t work in Podman (at least for Macs on macOS Ventura). This is documented as well. Here’s a GitHub issue I found. I don’t seem to be the only one with the issue. I spent about a day on this trying to get it to work. I couldn’t figure it out; maybe if you’re reading this, you know the secret. Please share if you know!
Secondly, I couldn’t figure out how to mount a volume to a container. I know this is fundamental to containers, but I encountered error after error for days. And for the purposes of this exercise, it isn’t a big deal. Now, if I were on an actual development team, that would be a different story. But I’m too dumb for development, that is why I’m a product manager 🤣!
Finally, working with containers requires a paradigm shift. Shortly you’ll see that I’m setting up a container and “starting” the database therein. Later, I’ll separately log on to that database, using SQLcl,after the database is up and running. They are two different steps.
Looking at this screen you would think, “I’m just going to jump right in and execute the first command I see on this page.” Wrong!
Initial docker run command
Actually, you do NOT want to do that. You must scroll down to the “Connecting from outside of the container” section. Because I’m going to be connecting to this container from the outside.
Referring to the Custom Configurations section
I know this documentation mentions SQL*Plus, but this all applies to SQLcl also. And if you refer to my previous SQLcl post, you can review the logon syntax for logging on. The critical point is that I need to start the container with the -p (or Port) option included. Are you still with me? Let’s take a trip to the “Custom Configurations” section.
docker run -d --name <container_name> \
-p <host_port>:1521 -p <host_port>:5500 \
-e ORACLE_SID=<your_SID> \
-e ORACLE_PDB=<your_PDBname> \
-e ORACLE_PWD=<your_database_password> \
-e INIT_SGA_SIZE=<your_database_SGA_memory_MB> \
-e INIT_PGA_SIZE=<your_database_PGA_memory_MB> \
-e ORACLE_EDITION=<your_database_edition> \
-e ORACLE_CHARACTERSET=<your_character_set> \
-e ENABLE_ARCHIVELOG=true \
-v [<host_mount_point>:]/opt/oracle/oradata \
container-registry.oracle.com/database/enterprise:21.3.0.0
Parameters:
--name
The name of the container (default: auto generated
-p
The port mapping of the host port to the container port.
Two ports are exposed: 1521 (Oracle Listener), 5500 (OEM Express)
-e ORACLE_SID
The Oracle Database SID that should be used (default:ORCLCDB)
-e ORACLE_PDB
The Oracle Database PDB name that should be used (default: ORCLPDB1)
-e ORACLE_PWD
The Oracle Database SYS, SYSTEM and
PDBADMIN password (default: auto generated)
-e INIT_SGA_SIZE
The total memory in MB that should be used for all
SGA components (optional)
-e INIT_PGA_SIZE
The target aggregate PGA memory in MB that should be used
for all server processes attached to the instance (optional)
-e ORACLE_EDITION
The Oracle Database Edition (enterprise/standard, default: enterprise)
-e ORACLE_CHARACTERSET
The character set to use when creating the database (default: AL32UTF8)
-e ENABLE_ARCHIVELOG
To enable archive log mode when creating the database (default: false).
Supported 19.3 onwards.
-v /opt/oracle/oradata
The data volume to use for the database. Has to be writable by the
Unix "oracle" (uid: 54321) user inside the container If omitted the
database will not be persisted over container recreation.
-v /opt/oracle/scripts/startup | /docker-entrypoint-initdb.d/startup
Optional: A volume with custom scripts to be run after database startup.
For further details see the "Running scripts after setup and on
startup" section below.
-v /opt/oracle/scripts/setup | /docker-entrypoint-initdb.d/setup
Optional: A volume with custom scripts to be run after database setup.
For further details see the "Running scripts after setup and on startup"
section below
I believe the colons you see throughout the original code block (with certain exceptions) are there for the definitions (you wouldn’t actually include these in your commands). If you are coming from database development, I suspect some may think, “ahh, bind parameter.” I do not think that is the case here.
You might be asking, in this code block, what the hell am I supposed to be looking at? Well, the container has a “listener”, listening on port 1521. So if I want to connect to the container, I’ll need to “map” to it. I’m not sure if that is what it is called exactly (not a networking guy, don’t claim to be). But the next question is, what is my <host port> (How it is referred to in the code block above)?
Everything matters, and nothing matters
Executing a ping command in my Terminal, to see what my computer’s address is great, but it tells me nothing about the port.
Use ping localhost to see your IP address
So I took to the internet to try to figure out the appropriate port…Honestly, I’ve tried searching but I can’t find anything definitive. In the Podman documentation, I see a lot of reference to port 8080; as in localhost:8080.
Care to review it? Here are some search results using “8080” as the search parameter.
Buried in the docs, there is a brief mention of the port and it can be found in the –publish or -p parameter. The way I understand ports on your local machine is that if you omit the local host information, you shouldn’t have any problems. It will just default to…something. So..it doesn’t matter, nothing matters. It’s all an illusion.
I also reviewed the cURL documentation. I found something in the --connect-to option:
Can you leave it empty?
Aaaand, more port nonsense (if you are having trouble sleeping at night, try reading this):
Okay, with all this out of the way, I can finally start to make some progress (almost there, promise).
Remember, you have to start the Podman Linux virtual machine before you do anything (this is in the instruction steps, so review that first (steps for macOS). This is where the container “lives.” Once the virtual machine is up and running.
Podman virtual machine is ready
I then grabbed the Oracle container. But, since I’m using Podman I needed to modify the run command, like this:
podman run -d -p :1521 --name myoracledb container-registry.oracle.com/database/enterprise:21.3.0.0
REMINDER: Make sure you are logged into the Oracle Container Registry site before you attempt all this!
Assuming you’re still following along, you’ll see something like this in your Terminal:
New container ID
I used the podman ps command to check the status of the container. You should see something like this:
“Starting” and “Healthy” statuses
For several minutes, you’ll continue to see the container status as “starting”. You can do like me and just periodically enter the podman ps command, or you can go do something meaningful with your time. Check back in 10 mins or so. The choice is yours. Either way, you’ll eventually see the status change from “starting” to “healthy”.
The container is healthy and ready
“Healthy” means I now have an Oracle Enterprise database (version 21.3.0.0) running in my Linux virtual machine as a container. I still need to log in with SQLcl, though.
Hold up, I can’t just log into SQLcl. I still have some more setup to do. I need to reset the randomly generated password to one of my choosing. Our instructions tell you to first issue the docker logs + [your database name] command to view your database logs. And from there you should be able to locate it. I couldn’t maybe you can. Let me know if you were able to.
Using the logs command
Since I’m doing this in Podman, that command is slightly modified:
podman logs myoracledb
The printout of that command will appear like this (yours will be very similar). Although I wasn’t able to locate the password, there are still some important pieces of information that you’ll want to review and note.
podman logs [your database name] printout
In this print out you’ll see things like the local host and port information, and the “Global Database Name” and “System Identifier (SID)” can be seen as well. You’ll see where the log files are located (your temporary password can be retrieved from here) and the database version you are running. Finally, you’ll see the message “DATABASE IS READY TO USE!”
Use the included shell script for changing your password
We are this close to logging onto the database. Even though I couldn’t find the temporary password, it doesn’t matter. You have to change your password anyways. If you refer back to the instructions on the Oracle Container Registry page, there is a section entitled “Changing the Default Password for SYS User” and it reads as such (emphasis added):
On the first startup of the container, a random password will be generated for the database if not provided. The user [must] change the password after the database is created and the corresponding container is healthy.
Using the docker exec command, change the password for those accounts by invoking the setPassword.sh script that is found in the container. Note that the container must be running. For example:
Easy enough, and since my container is “healthy” at this point, I can execute this script. But since I’m using Podman, the command will look like this:
And the output of that command will look like this:
Automated password change with the provided Shell script
I guess it worked. As you can see, my new password is password1234 (pleeeeease, do NOT share that with anybody). And at this point, I’m ridiculously close to logging onto this completely containerized Oracle enterprise database. All I need to do now is log on using the same steps as before (in my previous post).
Referring back to the Oracle Container Registry docs, I see the following:
The different login options
NOTE: Remember I'm logging into this container from the outside.
The connect options are cut-off in that image, so let me copy/paste them here. Also, assume where it states “sqlplus” I’ll be connecting with SQLcl. The options are as follows:
Turns out you can just use the port command to discover the container’s port (I’m guessing this is the route the container uses to communicate with my MacBook – it’s all quite muddled at this point).
Here is the command I executed:
podman port myoracledb
And here is what was returned:
Exposing the ports for this network
If you are starting your journey from the MacBook, its address would be 0.0.0.0 with a port of 43073. Data/info flows in and out of that port. And 1521 is a reference to the [bleep blurp 🤖] TCP port at which the Transparent Network Substrate (TNS) Listener is located.
Actually, if you look at the previous output (from the podman logs myoracledb command) you’ll see how all the addresses and ports connect (including the TNS Listener).
TNS Listener information
It's in the logs, how could you not know this!?
Honestly, this is all ludicrous. You shouldn’t know all this, nobody should! It’s too much to retain, but that’s okay, I’m glad you’re still here…toughing it out with me. Once you get past this first big hurdle, I imagine working with containers is very fun.
Here is where I actually logged on (or is it logged into?) to this database with SQLcl. Here’s the command I used:
sql sys/password1234@//localhost:43073/ORCLCDB as sysdba
Which, if you recall is modeled on the original command found in the Oracle Container Registry docs; it looks like this (it’s also a few paragraphs back):
$ sqlplus sys/<your_password>@//localhost:<exposed_port>/<your_SID> as sysdba
NOTE: Exposed port is that where the TNS Listener is located, and the SID is the “System Identifier” – I showed that in the database logs earlier.
And again, I don’t think it matters if you include the localhost port. Here is what the output looked like in my Terminal:
Alright, so finally, I’m in! Next, I tested a SQLcl function to see if it worked as expected. I chose the LOAD function. And just as a refresher on the LOAD function I referred to the SQLcl help for in-context assistance. That help looks like this:
SQLcl Help and LOAD information
Specifically, I am going to test out the “CREATE TABLE” and “LOAD TABLE” function. So I scrolled down to the examples for reference.
Example showing how to create and load a table at the same time
At this point, the commands are pretty straightforward. I decided to use the LOAD NEW command, as seen above.
The beginning of the LOAD...NEW commandAlmost forgot the “NEW“Ready to execute
PRO TIP: You can simply drag the file and drop it into Terminal to get the complete file path.
DON’T forget to include the “NEW” at the end of the command. I forgot it the first time and my load failed. If doesn’t break anything, just a silly mistake.
I hit enter, and if you look at that image with the “Ready to execute” caption, everything worked as expected, here it is a zoomed-in (please excuse the gray shading):
Alright, so I have a brand new table. And if you recall, this was a data set that included the IMDb top 100 highest-rated movies of all time.
IMDb dataset by way of Kaggle
Well in the next few images, I wanted to test some SQL on the new table. I first searched by genre, with the following SQL:
SELECT DISTINCT genre FROM t100movies;
Selecting by the movie genre
Which returns all the distinct matches. Easy enough right? Then (because I like Adventure and Fantasy) I selected only those films that match those criteria, with this SQL statement:
SELECT * FROM t100movies WHERE genre = 'Adventure, Fantasy';
Single quotes and don’t forget your semi-colon 🫡
And once I correctly entered the SQL query, I found a single movie in the top 100 that meets those criteria. I’m actually surprised this one made the top 100 list.
Okay, but there’s just one more thing. The data persists inside the container even after I’ve stopped it. This isn’t necessarily the focus of this article, but I just wanted to demonstrate that even after shutting everything down, the table still exists.
This is true even after completely stopping my Podman container and shutting down the Podman Linux virtual machine.
The process was as follows:
Exited out of the SQLcl application
Stopped the myoracledb container process
Checked to make sure the process was actually stopped
Stopped and then restarted the Podman Linux virtual machine
Restarted the myoracledb container
Executed the same SQL query as before
Exited from the SQLcl application a final time
And if you take a look at all these images (they are numbered in order) you can see all the steps I took to during this little test. Pretty cool, eh!?
1. Exiting out of SQLcl2. Stopping the Podman container3. Stopping the Podman virtual machine4. Restarting the Podman virtual machine5. Restarting the myoracledb container6. Using the same SQL from before7. A final exit from SQLcl
A couple of notes here:
When I restarted the container, it only took about a minute for it to move from a “starting” to a “healthy” status. So I think the first time you start this container it takes a while. Subsequent start-ups, a minute or less.
When you start back up the container, you don’t have to map anything, I believe all those settings are still intact. Either that or I just spent a whole bunch of time networking when I didn’t need to.
And that does bring us to a close. If you’ve made it this far, you understand how you can at least get this container started and log on using SQLcl. Remember you can use Brew to install SQLcl and Podman. And of course, you’ll need to get the container I used (from our Container Registry; you can find it here in the Database category).
Remember, I didn’t do anything with checkpoints (or checkpointing containers) or with volumes. At the time of this article, I wasn’t 100% confident in my approach, so I wanted to exclude it. However, as I understand it, volumes (and their use) are the preferred approach to persisting data for later use (in containers). Just keep that in mind.
Finally, I’m not going to sugarcoat it. This was a grind – it was very tedious and frustrating, so hopefully, you can learn from my mistakes. I’m not claiming to be a developer or an expert in CI/CD. But I can totally see the appeal of having portable containers like this. The barrier to understanding stuff like this is incredibly high, so good luck to you. But hey, if you screw up, don’t worry about it. You can always uninstall and reinstall and try again.
Be sure to leave a comment if you see something amiss or if you have a better approach to something I’ve shown here. And as always…
Did you know you can use Homebrew to install Oracle’s SQLcl on Mac? I just realized this about a week ago (always the bridesmaid, never the bride…amirite??).
Homebrew
First you’ll need to install Homebrew (I’m sure there are other ways to install SQLcl, but installing through Homebrew was a breeze).
You can install Homebrew on your Mac by first opening up a new terminal window and typing/entering:
That Shell script should walk you through the setup.
DISCLAIMER: I didn't go that route, but if you follow the directions on the Homebrew site I assume it should work.
If you want a more hands-on approach, visit this site for a complete walk through of setting up your new Mac for application development. You may not need to do everything on that site, but read up on the Homebrew & Cask sections.
Installing SQLcl
I’ve since learned that you are really installing the SQLcl app via Cask (which is included in Homebrew). Cask allows the installation of “large binary files” (see the site from the paragraph above for more details). A list of the current Cask applications available.
We’re giving Pi a run for its money with that semantic versioning…
Once you are all updated with Homebrew, you can then open up a new terminal and enter the following:
brew install sqlcl
As it installs, you’ll see a lot of activity in the terminal window. Once complete, you’ll see something that looks like this (I’ve already installed/reinstalled it tons of times, so there may be some slight difference):
Don’t forget to review the Caveats section!
Caveats
The main things to review are in the “Caveats” section. First, you’ll need Java 11+ or higher for this to work (i.e., connect to an Oracle database). I didn’t realize this, but we give you a command to update to the latest Java version. I wish I had known that, as I spent way too much time figuring out the best way to update.
Upgrading Java through Homebrew
Second, you’ll need to add a new line to your “PATH environment variable”.
New line to be added to your PATH Environment Variable
I understand this, as specific applications will only work if you’ve predefined the locations of their dependencies. You can indicate where your operating system looks for these dependencies by updating the PATH Environment Variable (a separate file; more on this in a second). We have another excellent resource here (it explains PATH and CLASSPATH well).
Locating PATH on Mac
On a Mac, there are a couple of ways you can find PATH.
PRO TIP: PATH export definitions are located in a .zprofile file.
The easiest way (for me) to find this file is by typing/entering in a terminal window:
open .zprofile
LEARN ZSH: Want to learn all there is about zsh , .zshenv, .zprofile, .zshrc or .zlogin? Bookmark this manual for future use.
From there, your .zprofile file will appear in a new window. Mine looks like this:
A look at my .zprofile file.
If you recall from the “Caveats” section, you may need to add a line to your PATH. I’ve already done that; I added a comment for reference (optional, but make sure the comment is preceded with a “#”).
.zprofile file with the new line added.
Remember to save (with CMD + S)! After which, you can close out the window.
Also, it’s a good idea to close any active terminals and open a new one (this way your terminal picks up any changes you’ve made).
You can also perform a check to see what is installed via Homebrew with the following command:
brew list
You’ll see something akin to this (depending on what you have installed):
Use brew list to see current Homebrew installs.
Dive into SQLcl
Okay, now we are ready to explore SQLcl!
DISCLAIMER: I'm not connecting to my database yet (I will be in my next post as I'm just working out the kinks on my Podman setup…containers, baby!).
I’ll keep this next section simple. Begin with a new terminal and type/enter:
sql -h
or
sql -help
You’ll see the following printout:
Help printout.
If you look closely, you’ll see information for Usage 1 and Usage 2.
README: When in doubt, refer to the help!
Usage 1
Usage 1 – great for reviewing in-context help documentation as well as version information.
Usage 1 focus.
Regarding help, I’ve tried the following (they all work):
sql -h
sql -help
sql -Help
sql -H
sql -HELP
HINT: Type/enter exit into the command line to exit the SQLcl help screen.
Using the exit command.
Usage 2
Usage 2 focus.
In Usage 2, you’ll find information for two login options:
Login with a “Connect Identifier”
No logon
The Connect Identifier can be either:
“Net Service Name”
“Easy Connect”
Wut r theez?
I found some information relating to the “Net Service Name” method of connection; you can refer to that here. Be forewarned – there seems to be some configuration required to use the Net Service Name method (I’ve not tested this yet).
Conversely, the Easy Connect Method looks well…easier. I found a good resource here. This was the method I used when experimenting with containers and Podman (blog coming soon!).
Now, if you are like me and want to explore SQLcl (without connecting to an Oracle database), you can log in using the /NOLOG option. Make sure you exit out of the SQLcl help screen first.
Once you’re out, type/enter the following command:
sql /NOLOG
NOTE: Make sure you have a space between the "l" in sql and the "/" of /NOLOG.
Once you hit enter, you should see a screen like this:
Logging in with the /NOLOG option.
Unimpressive, right? Well, allow me to whet your appetite some. From here, you have two more options. Those are:
h
help
Entering h will reveal a history of the most recent shell commands you’ve executed.
Shell command history.
Type/enter help and you’ll; reveal a list of the available SQLcl commands and options. It looks like this:
So. Many. Options.
Pretty cool, eh?
You can take this one step further by typing/entering a topic of interest. Here are a couple random topics I explored (ALIAS and MODELER):
Reviewing the Alias topicReviewing the Modeler topic
Final thoughts
While I have yet to take full advantage of what SQLcl offers, I see the potential time savings for application developers who want to stay in a text editor while coding (without switching to another GUI application).
I’ll include the SQLcl documentation so you have it for reference. But be forewarned we’re updating this document; some instructions may be changed.
And check back in a week or two once I get Podman fully working with one of our Database Containers. I’ll test SQLcl, ORDS, and an Oracle Enterprise database 21.3.x (if you’re curious about our available containers, you can find them here).
Want to learn even more about SQLcl? Check out these helpful resources: