I’m kidding, there’s more. But if you don’t feel like reading anymore, bookmark this post and return when you’re ready.
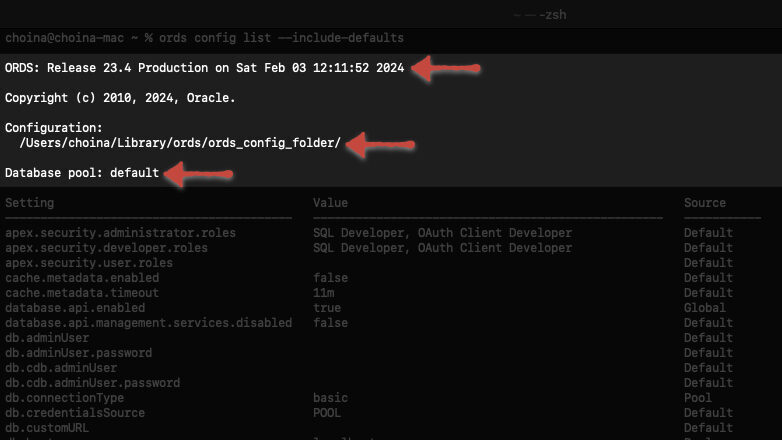
Assuming you have ORDS installed, you too can execute the ords config list --include-defaults command to reveal almost all the configuration settings for your ORDS installation.
Here is what my configuration looks like:
Executing the ords config list --include-defaults command.
Configuration settings: what am I seeing?
This command is a quick way to see all the settings from your .XML configuration files (i.e., the settings.xml and pool.xml files), including other settings automatically configured for you when you first ran the ords interactive installer.
In short: All your default settings and any that you may have added or changed are on one screen.
Read on to explore further…
Version, config folder location, and pool information
I've broken the configuration settings into sections. Anywhere you see red arrows, are just areas of intrigue (personally); however THIS LIST IS NOT EXHAUSTIVE.
I use this first section as an easy, convenient way to determine the ORDS version I’m running. Additionally, you can verify the location of your configuration folder (in case you forget). You can also verify the database pool (default is the default name for the pool unless you modify the name) you are using.
ORDS version, configuration folder location, and database pool information.
If you want to learn more about the ORDS pools, visit this link and this link.
💡I only have single install, that is why I see default as the default database pool.
Pool and global settings
Not much here that you probably already don’t know. However, in the future I will look at the features associated with the database.api.management.services.disabled = false property (also, I think the way this is written is a referred to as a “logical negation”, and it hurts my brain to read).
General ORDS settings.
Read more about this service here. But in short (and once you’ve created the requisite user), you can explore various services such as:
DBCA Jobs, available methods: DELETE, GET and POST
DBCA Templates GET
Oracle Home Environment GET
PDB Lifecycle DELETE, GET, POST
Open Service Broker DELETE, GET, and PUT
Debug and Error
My settings are false (these are the default settings). But if I were to, for instance, set debug.printDebugToScreen = true, I would then be able to see any error messages in the browser.
ORDS debug and error settings.
I can change the responseFormat to always display as JSON, HTML, or AUTO (i.e., Automatically determine the most appropriate format).
ℹ️ Note: Must explore this further and report back after I've sufficiently tinkered.
Did you know you can create custom HTTP error pages in ORDS? These two error.properties appear to be associated in some way. So if you were two create custom error pages, you’d probably need to consider the format as well. Nonetheless, could you imagine the fun you could have coming up with something totally unique to your application?
I'm definitely adding this to my "Productive Procrastination" list 🤣!
GraphQL and SQL Developer Web
ORDS supports GraphQL now; did you know?! I just set up my local installation (it wasn’t too bad once I figured out how to properly set my Java to GraalVM 😑), so I can start learning GraphQL queries.
GraphQL and ORDS settings.
Did you know ORDS ships with the GraphiQL IDE now? Learn how to set it up here.
Cookies and ICAP
I honestly wouldn’t have known ORDS could offload virus scanning to ICAP (Internet Content Adaptation Protocol) servers unless I looked at what was actually in the configuration settings. I’m not sure if I’ll configure this anytime soon, but maybe you will.
Want to bore yourself? Read more about ICAP in this RFC 3507 memo.
Java Database Connectivity (JDBC)
I am NOT going to spend much time here. I still need toggle these parameters and experiment more. However, I will point out that the default setting for maximum JDBC connections is 20 (jdbc.MaxLimit setting).
Java Database Connectivity and ORDS settings.
jdbc.MaxLimit=20 is probably too low for a production environment. I’ve left it as-is because it’s just me, and I’m doing everything locally in my Podman container.
Suppose you need to familiarize yourself with JDBC or Universal Connection Pools (UCPs)? In that case, we should both read the introduction sections of the following guides:
I have spent little time with MongoDB, but from what I understand, the Oracle Database API for MongoDB translates the MongoDB wire protocol into SQL statements executed by the Oracle.
ORDS and the MongoDB API settings.
What I’m inferring from our docs is that once you’ve migrated your data from a MongoDB into a supported Oracle database, you (or your application) can keep talking “MongoDB speak,” and at least in this case, ORDS will be able to interpret this Mongospeak and query the database on your behalf 🤯!
If this describes you or your use-case, you’re in luck; I found some excellent resources!
You’ll notice, no red arrows here. I have yet to spend much time with this section. However, I want to draw your attention to the security.jwks.[etc...] and security.jwt.[etc...] properties.
ORDS security settings.
In ORDS 23.3, we introduced JSON Web Tokens (JWTs) support, so these properties very much concern that new functionality.
In short, we've allowed you to incorporate JWT authentication provided through third parties into your APIs.
The nice thing about ORDS is that you can use the embedded Jetty server as a local web server for testing. This section shows most of the essential settings for running Jetty in “Standalone mode.”
ORDS standalone Jetty Server settings.
I use the term “testing” because our docs state, “the default configuration of Jetty is optimized for the most common ORDS use cases.”I interpret this as, “This is designed to expose you to Jetty (and make it easy to get you up and running), but you’ll probably need to adjust this according to your own requirements.”
The only things I want to point out here are the standalone.doc.root and standalone.static.context.path properties. These settings will look familiar if you’ve ever performed an APEX installation (available here, for free, BTW).
However, if you want to deploy custom HTML, CSS, and image files, you can configure this for ORDS. We have an overview in our docs here.
I think I've just stumbled upon another fun Friday afternoon project 😍!
Okay, that’s it for now. Thank you for choosing to waste your time with me.
What’s the point of this post?
There was no point to this post. I’m constantly wasting time researching technology and techniques I don’t need to know. However, in this case, I’ve hopefully:
left you with at least one helpful ORDS command-line command (ords config list --include-defaults), and
provided you with some helpful explanations and resources on what is contained in your ORDS installation (again, this list is NOTexhaustive)
And if you found this post helpful, please share it!
Follow
And don’t forget to follow, like, subscribe, share, taunt, troll, or stalk me!
I found JavaScript and HTML code here and here and “remixed” it to work with one of my sample ORDS APIs. Here is the result:
ORDS + JavaScript + Fetch API + HTML
Impressive, no? Care to try it out? Read on friend!
References
I’ll front load with all the necessary stuff. That way, you can bounce if you don’t feel like reading. You’ll get the gist if you follow along with what I’ve provided.
Much of what I learned came from the MDN Web Docs site. I would get acquainted with the following pieces of code (or at least have them handy) since they heavily influenced me (a.k.a. plagiarized).
MDN Web Docs
I either used or referenced these files in my version of the code. They are all available in the two links I mentioned above, but I’m adding them here for convenience (in case you need to leave or want to review while on this page).
👈🏼 click these to reveal the contents
No! Not this one, dummy. This one is just an example…duh 🤕!
response: json() method
const myList = document.querySelector("ul");
const myRequest = new Request("products.json");
fetch(myRequest)
.then((response) => response.json())
.then((data) => {
for (const product of data.products) {
const listItem = document.createElement("li");
listItem.appendChild(document.createElement("strong")).textContent =
product.Name;
listItem.append(` can be found in ${product.Location}. Cost: `);
listItem.appendChild(document.createElement("strong")).textContent =
`£${product.Price}`;
myList.appendChild(listItem);
}
})
.catch(console.error);
Check out my remixed JavaScript code, DDL and ORDS module definitions (for this example) on my GitHub blog repo. I'll also include select items below.
Here are a few things to point out:
In line 16 of myindex.html code, I referenced the JavaScript code (script.js) separately. This approach achieves the same effect as embedding the JavaScript directly into the HTML file (as seen in the MDN’s version of the index.html file).
The script.js contains the Fetch API and the JavaScript concept of “promises.” The following were super helpful for me. Maybe the will be for you too:
The JSON file contains an example of what an ORDS GET request response looks like (if viewing in the browser). The structure is nearly identical if you compare it to the MDN JSON file.
This means you can take their HTML and JavaScript code and populate it with an ORDS endpoint and [subsequent] response data (i.e., the stuff you see in this localhost.json file).
const ordsApi = "http://localhost:8080/ords/ordstest/api/example/api/";
// This next one is just an example using query parameters. I just chose a random employee number:
// const filteredOrdsApi = 'http://localhost:8080/ords/ordstest/api/example/api/?q={"empno":"7876"}';
const myList = document.querySelector("ul");
fetch(ordsApi).then((response) => {
if (!response.ok) {
throw new Error(`HTTP error, status = ${response.status}`);
}
return response.json();
}).then((data) => {
for (const item of data.items) {``
const listItem = document.createElement("p");
const empnoElement = document.createElement("strong");
empnoElement.textContent = item.empno;
const enameElement = document.createElement("strong");
enameElement.textContent = `${item.ename}`;
const dnameElement = document.createElement("strong");
dnameElement.textContent = `${item.dname}`;
const jobElement = document.createElement("strong");
jobElement.textContent = `${item.job}`;
listItem.append(`Employee number `, empnoElement, ` was hired on ${item.hiredate}.`, ` Their last name is `, enameElement, ` and they work as a `, jobElement, ` in the `, dnameElement, ` department.`
);
myList.appendChild(listItem);
}
})
.catch((error) => {
const p = document.createElement("p");
p.appendChild(document.createTextNode(`Error: ${error.message}`));
document.body.insertBefore(p, myList);
});
I’m also using the Live Server extension for VS Code. If you don’t have it, you’ll need it to run the code I’ve provided. You can download it from the VS Code Marketplace here.
You’ll want Live Server for this one!
How I met your Mothra 👾
Where to start? From the beginning, right? What you see below are two JSON files. On the left, from ORDS. On the right, from the MDN Web Docs sample code (direct link to that file).
Comparing JSÒN
ORDS on the left, MDN on the right.
They are nearly identical. They are both a JSON object {} comprised of key: value pairs, where the first key’s value is an array []. In both files, this array has moreobjects {}. And each of those objects has its ownkey: value pairs…marone 🤌🏼!
I mention all this because this makes the existing code easy to work with. Which you’ll see shortly.
Comparing JavaScript
Next is the JavaScript code; I’ll compare both my version and the MDN Web Docs version.
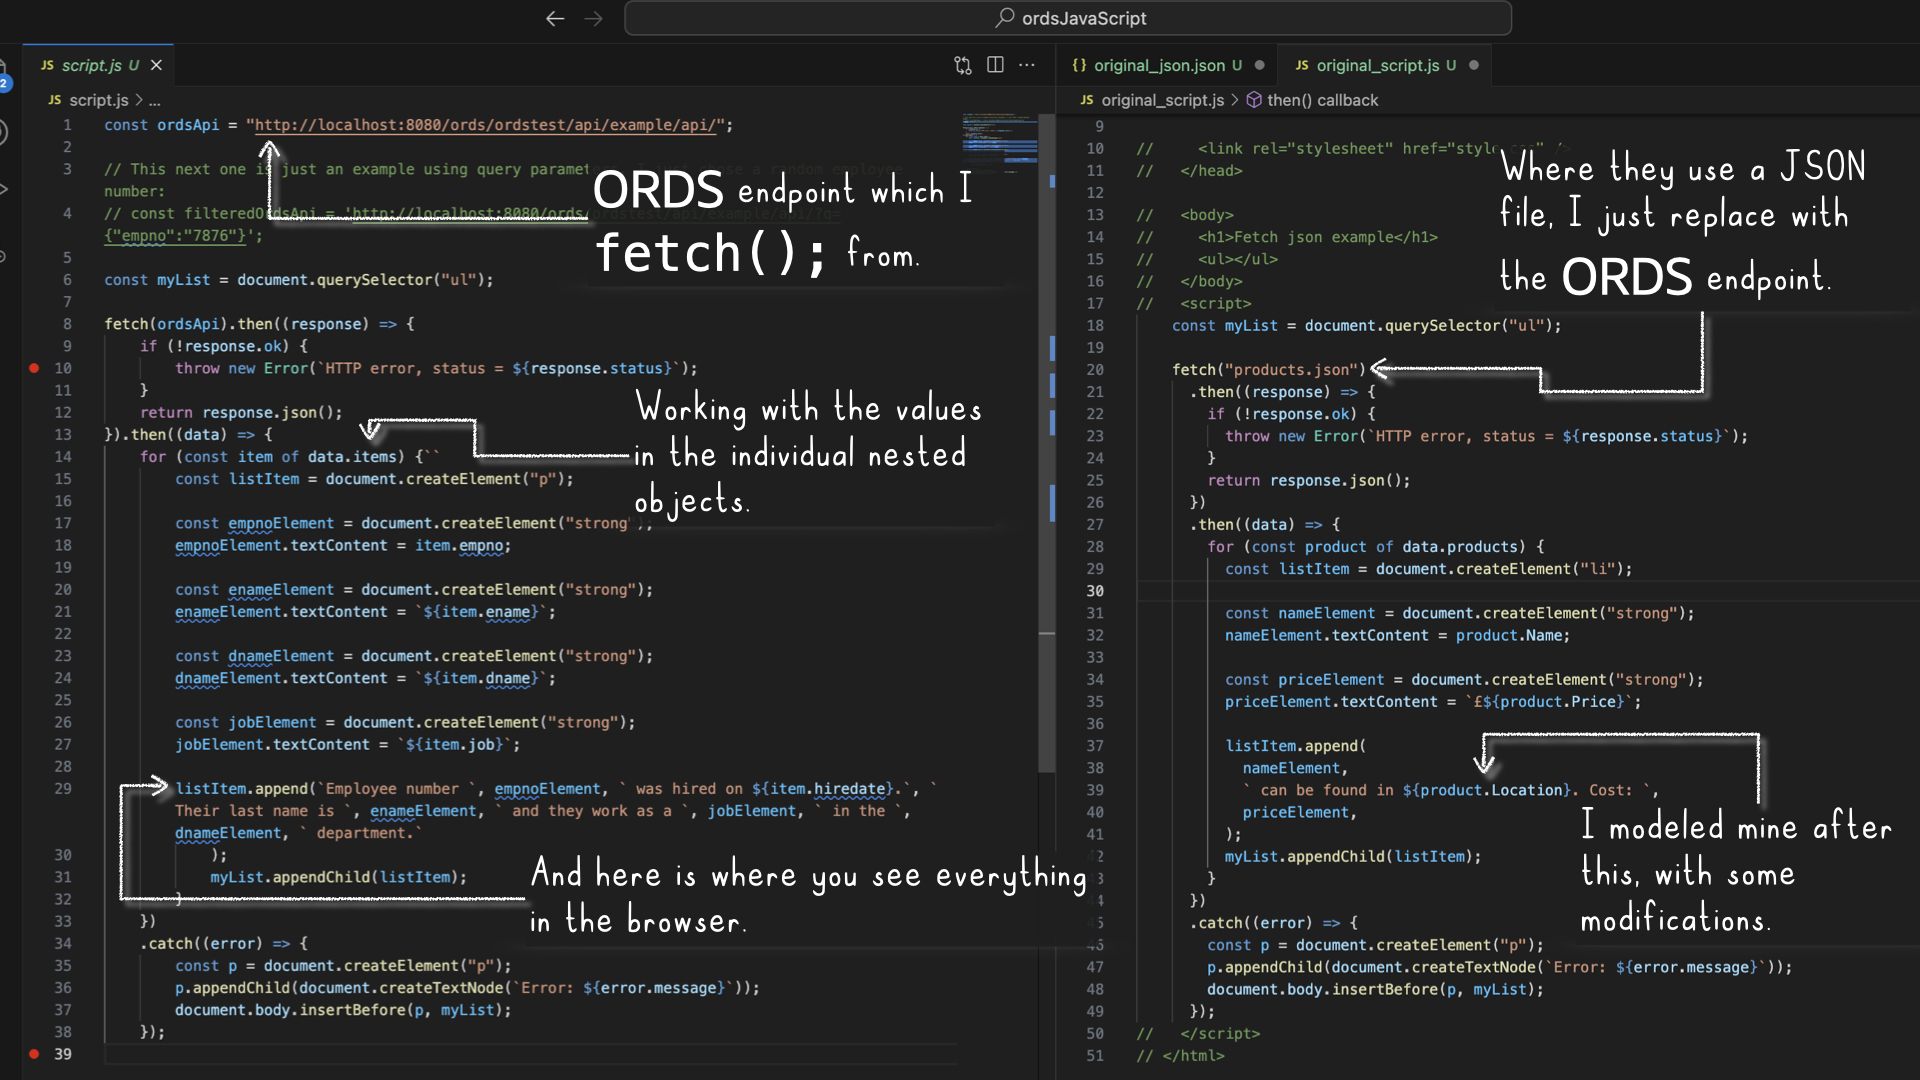
ORDS on the left; can you spot the differences?
You’ll notice that a lot of the code is quite similar. I kept it this way, so I wouldn’t unintentionally break anything. The main differences in my code are the:
const ordsAPI on Line 1 (as opposed to referencing a JSON file).
Naming conventions in lines 14-27.
listItem.append(); on line 29 is heavily remixed (I did this so I could create individual lines for each entry).
Templating in my code (i.e., wherever you see the little ``` marks; they allow you to embed text directly into the HTML) I use A LOT more of it!
About the ORDS JSON Object
If you were to navigate to your ORDS endpoint, it would look like the images below. I’m including them for a couple of reasons:
You can see those key: value pairs in a different presentation.
These images help connect what is coming through in that GET request and what you see in the JavaScript code.
The items key with its value (an array).Remember the other key: value pairs, too!
Reviewing the HTML
Assuming you’ve started up Live Server (along with setting up your environment to mimic my own), you’ll immediately see this beauty of a web page. This image alone doesn’t tell a complete story, though.
Review line 29 in the JavaScript code; it’ll help to “connect the dots.”
However, when you open up the developer tools in your browser, you’ll see what is happening under the covers.
Live Server starts up, sees the index.html file, and “serves” it up.
In that HTML file is a reference to script.js; the JavaScript is run.
The JavaScript composes a list and then appends all the data you see here (on screen):
With developer tools open, you can see the HTML. This HTML should look similar to lines 12-27 of the JavaScript code.
Summary
After writing this up, I’m realizing this clearly needs to be a video. But if you get it, great! Otherwise, stay tuned!
There isn’t anything ground-breaking here. I’m highlighting an example of manipulating existing ORDS JSON objects (with the Fetch API) because I hadn’t seen anything quite like what I am presenting here.
Also, the web page that I’m showing is very, very basic. I’m neither a UX nor UI designer, so this is what you get, folks!
The main point is that the ORDS APIs are effortless to work with if you have a fundamental understanding of manipulating JSON objects using JavaScript. They are no different than what you see out in the wild.
Some follow-up
I want to take this and add some React to it. And I’d also like to add authentication (Basic, OAuth 2.0, and Java Web Tokens). But baby steps.
Okay, that’s all for now, folks, Sayonara!
Follow
And don’t forget to follow, like, subscribe, share, taunt, troll, or stalk me!
Once you’ve installed ORDS, you need to REST-enable your schema before taking advantage of ORDS (I used to forget this step, but now it’s like second nature).
RESOURCES: I've discussed ORDS installation here and here. I'd check both pages if you're unfamiliar with it or want a refresher.
ORDS.ENABLE_SCHEMA / ADMIN_ORDS.ENABLE_SCHEMA
While logged into your database with SQLcl, you can issue the following commands to not only create a new user but grant them the required Roles (and the underlying Privileges) and REST-enable their schema (aka “ORDS-ifying” a schema):
/* Remember to remove the brackets when you run this code */
Create User [username] Identified By [password];
Grant Connect to [username];
Grant Resource to [username];
Grant Unlimited Tablespace to [newuser];
/* This PL/SQL procedure assumes you are logged in as the SYS.
If you are logged in as that new user, AND HAVE BEEN GRANTED
THE DBA ROLE, then you can execute the ORDS.ENABLE_SCHEMA
procedure */
Begin
ORDS_ADMIN.ENABLE_SCHEMA(p_schema = > '[username]');
End;
/
Create User [username] Identified By [password];
Grant Connect to [username];
Grant Resource to [username];
Grant Unlimited Tablespace to [newuser];
Begin
ORDS_ADMIN.ENABLE_SCHEMA(p_schema = > '[username]');
Commit;
End;
/
Automate because lazy
But even that is too much work for me, so I took a stab at automating this via an SQL script. As you can see, the above commands are simple and repeatable (a perfect candidate for automation). And since I’m constantly adding and dropping users for various reasons, copying and pasting code from an old blog or writing everything by hand gets annoying. Additional reasons for automating:
laziness
a desire to improve SQL and PL/SQL skills
an interest in scripting
I get easily distracted
The script
After about a day and a half, I have a working prototype script to call upon when I’m on the SQLcl command line. Here is what I came up with:
NOTE: If you just came here to remix the code, I have this in the scripts folder in my GitHub blog repo as well. Please feel free to sample it and/or roast it/me 🔥. But if you keep scrolling, I'll go into more detail section-by-section.
18-OCT-2023 UPDATE: I've slightly changed this code to include the Commit; command in the PL/SQL portion of the script. You'll see that reflected in line 44. Thanks René 🙌🏻!
INPUT
PROMPT Choose a new database username:
ACCEPT NEWUSER CHAR PROMPT 'Enter new user name hurrr:'
PROMPT Choose a temporary password for &&NEWUSER:
ACCEPT NEWPASS CHAR PROMPT 'Make it super secret:'
/*
I wish I could figure out a way to ONLY ask for username > check
that against existing database users > AND THEN allow a user to
continue with the 'choose password' step. I was only able to figure
out how to ask for the username and password AND THEN checks
against the database. I stole the code from this thread:
https://stackoverflow.com/questions/30710990/creating-an-oracle-user-if-it-doesnt-already-exist
Currently, its just extra steps for the user; kind of annoying. If you're
reading this and can figure out a way to get this working, let me know!
I'll make the change and attribute you in the comments :)
*/
Set Verify On
/*
You can refer to section 6.3.10.11 for more details on this
SET VERIFY OFF command
https://docs.oracle.com/en/database/oracle/oracle-database/23/sqpug/using-substitution-variables-sqlplus.html#GUID-3ACD41F3-A5A2-48D5-8E81-C29F9C14C865
*/
/*
The difference between using single and double ampersands:
https://docs.oracle.com/en/database/oracle/oracle-database/23/sqpug/using-substitution-variables-sqlplus.html#GUID-C6BE6E41-821F-413E-B4B1-56AAE4A46298
*/
Declare
check_if_user_exists Integer;
plsql_block VARCHAR2(500);
NEWUSER VARCHAR2(20) := '&&NEWUSER';
Begin
Select count(*) Into check_if_user_exists From dba_users Where username=NEWUSER;
If (check_if_user_exists = 0) Then
Execute Immediate 'Create User &&NEWUSER Identified By &&NEWPASS';
Execute Immediate 'Grant Connect To &&NEWUSER';
Execute Immediate 'Grant Resource To &&NEWUSER';
Execute Immediate 'Grant Unlimited Tablespace To &&NEWUSER';
plsql_block := 'Begin ORDS_ADMIN.ENABLE_SCHEMA(p_schema => :1); Commit; End;';
Execute Immediate plsql_block using NEWUSER;
End If;
End;
/
/*
The p_schema parameter is mandatory, that's why I'm including it.
If you omit the other parameters, the procedure will use the default
parameter values.
Learn more about this procedure here:
https://docs.oracle.com/en/database/oracle/oracle-rest-data-services/23.2/orddg/oracle-rest-data-services-administration-pl-sql-package-reference.html#GUID-459B8B6F-16EC-4FEC-9969-E8231668AD85
I was able to get this entire thing to work through trial-and-error,
while also using this for reference:
https://docs.oracle.com/cd/B13789_01/appdev.101/b10807/13_elems017.htm
*/
PROMPT
PROMPT
PROMPT Congrats 🎉 the user: &&NEWUSER, with the password: &&NEWPASS is now a bona fide database user 🙌🏻!
PROMPT Not only that, &&NEWUSER can log into Database Actions and REST-Enable their database objects too 😍!
PROMPT
PROMPT
PROMPT Click RETURN to return to the SQLcl prompt. And NEVER forget:
PAUSE "You're good enough, you're smart enough, and doggone it, people like you!"
PROPS: I owe much credit to this StackOverflow post and Jon Heller's and Mark Bobak's comments.
Breaking it down
Starting up podman
I’ll first start up podman and cd in the correct directory. “Correct” insomuch that this is where my ordsuserl.sql script lives.
ordsuser.sql, the script I’ll be working with.
Once my container status displays healthy, I’ll execute the ords serve command. This will launch ORDS in standalone mode (using the embedded Jetty server). I’ll use ORDS in a few minutes, so I should prepare it now.
Checking the container health.Issuing the ords serve command.ORDS is ready.
Prompting the user
I’ll then log into my podman container using the following string:
sql sys/password1234@//localhost:41465/ORCLPDB1 as sysdba
But why not the podman exec command?
NOTE: I'm logging in as SYS (I've since been informed you shouldn't really be doing this as SYS; in fact, it looks like you shouldn't be doing this as SYSTEM. Tom has some good comments in this post here.
Why am I not using the podman exec command here?
If you’ve seen my latest post on podman ports and networking, this command contradicts that entire article. There are actually two ways (maybe more, if I’m unaware) you can connect to your Oracle database in a podman container. The first way is to simultaneously hop on over to the container and sign in from inside that container. Your connection string would look like this:
podman exec -it 21entdb sql sys/password1234@//localhost:1521/ORCLPDB1 as sysdba
The second option is to sign in remotely like I’m doing in this current example:
This is analogous to when you SSH into a machine remotely. I should have mentioned it in this recent YUM/Oracle Linux post. Still, when you create a Compute Instance, you can later SSH into that Instance and perform actions like you usually would in the Terminal or the Command Prompt. But instead of being on your own machine, you’re on a remote machine. Ports are very confusing (for me, at least), so please read that podman ports post.
When you use the exec command, consider yourself on another computer on the Linux operating system. Once there, you must log in using the 1521 port because that is where the database’s TNS Listener (deep dive on Oracle database connection) is. However, when you are outside that container (i.e., that machine’s Linux OS), you need to use your local port (in this case, 41465) because it essentially acts as a proxy or a pass-through to the container’s 1521 port. Savvy 🏴☠️?
DISCLAIMER: This my best-effort attempt at explaining this confusing concept. It is subject to change. But I really want people to take advantage of our tools in the Oracle Container Registry, so I hope this helps!
Hath connected to the database
Once I’m in, I can call upon my script to quickly create a new user and REST-enable their schema (recall, I “cd” into the correct directory in an earlier step). The syntax:
@ordsuser.sql
MORE SQLcl: You can read the different SQL, SQLcl, and PL/SQL commands here.
After pressing Return/Enter, a prompt will appear; this is what it looks like on the “front end”:
Notice the prompts in those first four lines.
HINT: I would also spend some time here, learning about the PROMPT, ACCEPT, and INPUT commands. Yes, this comes from the SQL*Plus documentation, but this works as you'd expect in SQLcl.
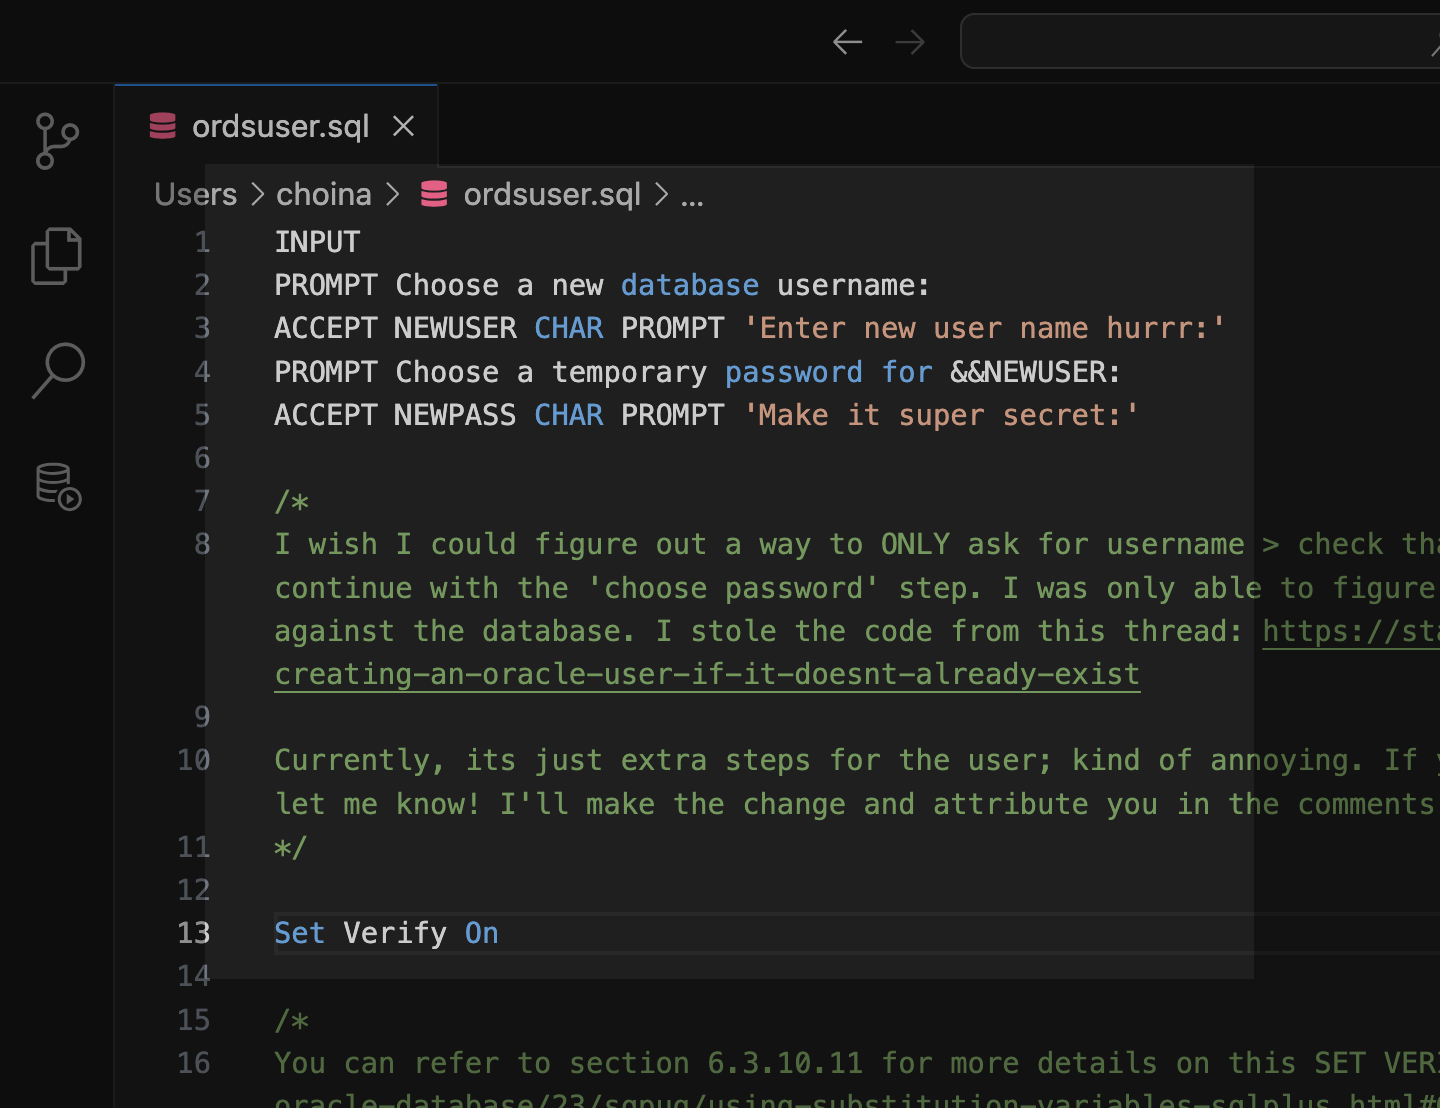
Meanwhile, here is the corresponding section in the script:
The first section of the SQL script.
Once I enter the password and press Enter/Return on my keyboard, the rest of the script is automatically executed using the provided username and passwordas substitution variables for the rest of the script! There is an in-depth explanation in the docs here, but you should grab the code and tinker with it to see how everything interacts and works together.
NOTE: The Set Verify On command displays the changes made from the original PL/SQL procedure and the updated PL/SQL procedure (with the updated username and password). It isn't necessary, but I wanted to provide some feedback to a user.
PL/SQL procedure
Assuming the user (i.e., the one you selected) doesn’t exist, the PL/SQL procedure should execute without issues. In the following image, you can see what is happening in real time:
A new user is created with the assigned username and password
That user is granted the Connect and Resource roles
The schema is then REST-enabled using the ORDS_ADMIN.ENABLE_SCHEMA PL/SQL procedure
Why NEWUSER in the Declare block?
Yeah, good question. At a minimum, you need to include the p_schema in the ORDS_ADMIN.ENABLE_SCHEMA procedure. Read up on that here. But, I wanted the username to remain in lowercase since that will later be used for my schema’s URIs (e.g., http://localhost:8080/ords/ordstest/emp/).
So I quickly taught myself/attempted a crash course on define variables and bind arguments; most of what I learned came from this EXECUTE IMMEDIATE documentation. And that’s why you see this in lines 25 and 34 of the code:
NEWUSER VARCHAR2(20) := '&&NEWUSER';
/* as well as */
ORDS_ADMIN.ENABLE_SCHEMA(p.schema => :1);
You can see the interaction between lines 25 and 34.
And on the front end, courtesy of the Set Verify On command, you’ll see that updated block of code:
The username and password fields are updated.
Feedback
I’ll then provide myself (or the user) with helpful feedback (along with words of encouragement). Once satisfied, I can click the Return/Enter key to exit the script and sign in to Database Actions as that new user.
The end of the script, after pressing Return/Enter.Exiting from SQLcl.
The corresponding section in the script looks like this:
I’m cheating by adding PROMPT to give line breaks.
Sign-in to Database Actions
Now, I can navigate to the Database Actions sign-in page at localhost:8080/ords/sql-developer. If I wanted to, I could also navigate to the newly introduced landing page at http://localhost:8080/ords/_/landing (obviously, depending on your deployment, this address will differ).
The landing page you’ve probably seen before.Signing in with the ordtest user I created with the script.This is our recently introduced landing page with more options.
SQL Worksheet then the proof
I’ll head to a SQL Worksheet, select All Objects in the Navigator tab, and a clean schema ready to take on the world!
Navigating to a SQL Worksheet.Selecting All Objects in the Navigator Tab.
Summary
And this marks the end of today’s lesson. So what did we learn?
You can execute SQL scripts directly from the SQLcl command line.
My script is cool, but I wish I could verify if a user exists sooner (I end up forcing the user to go through that password step).
The script has no exception handling (I’m giving myself a pass on this since I’m just now getting into PL/SQL).
Spend some time with the documentation on one screen and your script on another. After some time, you can actually understand how everything interacts.
One final thought. My process required a lot of trial and error, but seeing how everything flows and works is entertaining.
Please sample/remix my code; it’s located in my GitHub blog repo. Make it better, and let me know what you come up with! And be sure to check out ORDS and SQLcl 😍!
Follow
And don’t forget to follow, like, subscribe, share, taunt, troll, or stalk me!
The other day, I wrote about how I had to start from scratch on my podman containers 😢. I’m now at the step where I need to reinstall ORDS in these two new database containers (21c and 23c). And since I’m doing this install yet again, I figured I would point out some things I’ve learned while doing this with podman containers. This post isn’t meant to be all-inclusive; I’m simply highlighting the areas that gave me the most trouble.
Lettuce begin
My assumptions are that you’ve downloaded the ORDS zip file or from a Yum repository (how-to article here). You’ve also set the ORDS configuration folder path and the ORDS product folder path (both are necessary steps for ORDS pre-installation). You can read up on that step here.
The ORDS Interactive Installer
Here, I’m installing ORDS with the Interactive Installer.
Do this with the ords install command
The fine print
NOTE: For a vanilla installation, most of the default prompts are correct. But for working with a podman container, I do not believe all the default settings will work (at least, this has been my experience).
The ORDS Interactive Installer will prompt you with the default settings, where appropriate. You’ll notice the Choose [value]: convention. These settings are okay to use in many steps, but if you mindlessly follow them in specific steps, you might end up with the incorrect ORDS installation for your particular use case.
Select the type of installation
For instance, in the “Enter a number to select the type of installation” step, I’m prompted with the [1] option. For me, that is incorrect; I need to choose [2].
Option [2] I choose you!
Database pool to update or create
Things can get tricky here, too. In this step, I WILL choose option [1], but in the next step, I WILL NOT selectthe default settings (read on about host names, ports, and service names).
This default string is simply an example; with podman you may not be using 1521 as the port.
Selecting the database connection type
And here’s why I won’t use the default settings. It’s because I have mapped the ports to/from my podman containers like this:
My 21entdb container is set up such that my computer sends and receives podman container traffic on port 41465. Meanwhile, my podman container is set up so that it will send and receive data on port 1521 (which is the default port for Oracle’s TNS Listener).
Another way of looking at this is to imagine port 41465 is sort of spoofing port 1521. Ehh..maybe it’s better to think of it like a pass-through, a proxy, a go-between if you will…but more on this in a second.
Demystifying the connection string
Here, I’ll test both ports, the Container (ORCLCDB) and Pluggable (ORCLPDB1) databases, with various connection strings.
QUESTION: How do I even know my options are ORCLCDB or ORCLPDB1? Well, I learned about them in the container registry documentation.
Using port 1521
First, let’s see what happens when I try to log into my database with SQLcl, using 1521 as the port:
Attempting in the Container databaseAttempting in the Pluggable database
Nothing! Initially, for me, this made no sense! And that’s because, in my mind 1521is the port that you would expect to connect with! This whole network business was confounding! That was until I realized that you have to use your computer’s port to connect to the podman container (which is listening on port 1521).
Using the port podman assigned to you
Ah-ha! Now, if you make that slight change to the ports, you can connect to your Container (ORCLCDB) and Pluggable (ORCLPDB1) databases.
We’re sys-dba’ing now, babyyyy 🍾!
Does this help? Do you have a better understanding of why your port might not be 1521?
Host, port, and service names
You can probably keep the localhost default selection. When it comes to the listen port selection, I must choose 41465 and not1521. And for the database service name, you could choose ORCLCDB (i.e. Oracle Container Database), but we recommend installing ORDS into a Pluggable Database (read up on this in our ORDS Best Practices). Here you see me do just that; ORCLPDB1 is the ORDS default, but I wanted to highlight why this is the default.
Provide database user
In this step, I’m supplying the username and password of a user with the necessary privileges to log into the database to complete the ORDS installation. In this case, unsurprisingly, it is the SYS user (the default). We also have an ORDS Installer Privileges script you can execute if you’d rather grant another user privileges to install, upgrade, repair, and uninstall ORDS. You can find more details on that script here.
A great example showing how the JDBC driver is using the host, port, and service name values you provided.
Enabling features
This isn’t the final ORDS install step; this is just the last step I wanted to point out. The default here is also [1]. And I think you should keep it like that, here’s why. When you select [1], you’ll also give users access to Database Actions – the Graphical User Interface (which shares much in common with the SQL Developer desktop client). Once you start using Database Actions, it’s hard to stop.
Don’t ask any questions; select option [1].
NOTE: You'll also be enabling the REST-enabled SQL service (as well as the Database API). I recently wrote about the ORDS REST-Enabled SQL Service; it's very cool, and you should check out that article here.
The end
Aaanndd, that’s my time. They’re flashing the lights, so I have to get off the stage 🙁. Hopefully, this note will be helpful when you create some containers from images on the Oracle Container Registry. And if you think you might like to tinker with ORDS, bookmark this post so you can refer to it later!
Follow
And don’t forget to follow, like, subscribe, share, taunt, troll, or stalk me!
You’re working with podman containers (maybe like me – the ones from the Oracle Container Registry), and when you execute the podman ps command, you see something like this in the standard output:
A container status of unhealthy
In this case, I already had another container with an Oracle 21c database; that one washealthy. I previously wrote up a tutorial on how I did that here. But when I attempted to create another container with the Oracle 23c Free database, this is where things went sideways. This new container would constantly display an unhealthy status 😭 (not working).
Why am I even doing this? Well, we have a bunch of cool new ORDS features that take advantage of the 23c database, and we want to start showcasing that more. It would be nice to be able to show this in containers.
Digging deeper
Issue the podman logs (not log, duh) command for this particular container. Very few details are revealed (technically, it does reveal relevant information, I just need to figure out what I’m looking at here).
That ORA-12752 error message is…an error message.
You can clearly see that the database starts to provision, and then it just craps out1. I’ll spare you most of how we (I write “we” because this stuff is never really resolved by just one person) fixed this issue. But we finally figured it out; I’ll include some brief background. If you don’t care and want to see the resolution, then 👇🏼
1craps out is a technical term used by only the upper-most echelon of technical masters and internet luminaries.
Looking back, that Using default pga_aggregate_limit of 2048 MB line makes A LOT more sense now.
About podman machines
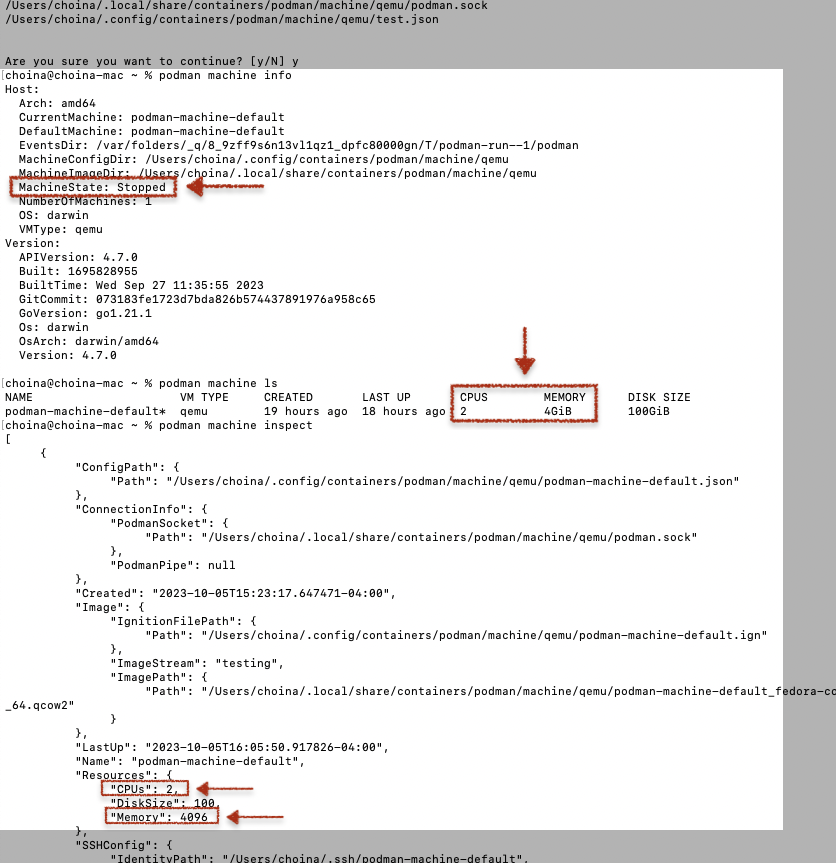
When you initiate a Podman machine, the default CPU and memory settings are 1 and 2048 MB (or 2,147,483,648 Bytes), respectively. I don’t see this in the documentation anywhere, but it is consistent with my assumptions when I created a second test podman machine with the default settings.
The test machine with default settings
After a ton of reading online, tinkering with podman volumes, pouring through the open issues in the podman and Oracle container GitHub repositories, and bugging the hell out of Gerald, we finally figured out the problem. Gerald, quite astutely, asked to see my output from the podman info command.
REMEMBER...this is the output from the original default configuration of my podman machine. The one where I already had a 21c database container. So, briefly ignore that test podman machine.
I included line numbers so you could more easily scan. Again, this output is from when I had a default podman machine. With this machine, I also had a 21c database container with a volume attached to it. I HAVE NO IDEA what the implications are of attaching volumes to containers (as far as memory is concerned)! I also don’t know what it does to the memory of the Linux virtual machine (what your podman machine actually is) 😬.
A closer look at the machine configuration
Take a look at lines 39 and 40; you’ll see
memFree: 1351737344
memTotal: 2048716800
1351737344 Bytes equals 1.35 GB, while 2048716800 is equivalent to 2 GB. That is consistent with what you see in the podman machine’s default settings. And given that I have a 21c database container with a volume attached, that used memory (696979456 or 0.7 GB) could, at least partly, be attributed to the existing container.
Aaaand…that earlier default pga_aggregate_limit of 2048 MB (read more here) line further supports the assumption that insufficient memory (in the podman machine) is the culprit. The way I read it, that database could consume as much as 2 GB of memory.
So, how could I expect to create another container of equal size in a machine that is only large enough to support one container?!
Myself
Resolving the unhealthy issue
Well, after completely removing my podman machine, I re-initiated a new one with the following parameters (docs here):
podman machine init --cpus=2 --memory=4096
NOTE: podman memory allocation is done in Megabytes. So 4096 Megabytes is equal to 4 Gigabytes.
I then recreated two separate volumes, 21cvol, and 23freevol. From there, I created a container for the 21c database using the following command (sorry, I didn’t get a screenshot of this one):
podman run -d --name 21entbd -p :1521 -v 21cvol:/opt/oracle/oradata container-registry.oracle.com/database/enterprise:latest
And then another for the 23c database:
podman run -d --name 23freedb -p :1521 -v 23freevol:/opt/oracle/oradata container-registry.oracle.com/database/free:latest
And FINALLY, as you can see in the following image, both containers show a healthy status!
NOTE: I've yet to sign into either of these databases, and I still have to reinstall ORDS in each. So if you are following along, this is where I leave you.
Inspecting the new machine
And just for fun, I inspected the sole podman machine (after removing that temporary test machine) to review its configuration.
In conclusion
After about a week, I’m NOW ready to start working in the 23c container. We have some great new functionality and other ORDS stuff planned, too. I plan to start sharing that here!
One more thing
I’m bringing these findings up with the Oracle Container Registry team. I’ll probably share with the podman squad too. I feel I’m not alone in having trouble figuring out what the hell is going on under the covers.
If you found this useful, please share the post! This one is more of a Public Service Announcement than anything else. I can’t tell you how frustrating it is when you can’t figure out why something isn’t working.
Hey, I hope this expedites your misery, though 🙃!
Follow
And don’t forget to follow, like, subscribe, share, taunt, troll, or stalk me!
A while back (yesterday), I penned a blog post highlighting the ORDS REST-Enabled SQL Service. And in that blog, I displayed the output of a cURL command. A cURL command I issued to an ORDS REST-Enabled SQL Service endpoint. Unfortunately, it was very messy and very unreadable. I mentioned that I would fix it later. Well…it’s now…later (temporal paradox, anybody 🤨?).
Recap
If you recall, the output of my POST request looked like this:
Yikes, you kiss your mother with that mouth?!
JSON is not displaying correctly
Well, the reason why I didn’t originally pipe in the json_pp command is because this is what happened when I attempted it:
Jefe to the rescue
After reading my newly published article, Jefe suggested I try the jq command.
The Yoda to my Padawan
Which, of course, I did. Still no luck:
Different issue though
Andiamo a googliare!
Online search to the rescue
Search online using the keywords “parse error: Invalid numeric literal at,” and you’ll quickly discover that you’re not the only one with this problem.
Five minutes of research revealed a potential culprit. What I was experiencing seemed to be a known issue. For example, a long-standing jqbug on GitHub details this exact scenario. This doesn’t seem to be a jq or json_pp issue. Instead, the problem is somehow related to the -i cURL command option and JSON parsing.
After another few minutes, as luck would have it, I found a Stack Overflow thread discussing the same issue I encountered! After scrolling to the bottom of the thread, I found this golden nugget:
Thank you Mattias and nhs503 🥰
Testing without -i
So, I did just what Mattias and nhs503 suggested. I removed the -i option (-i, or –include) from my cURL command, and wouldn’t you know? The damn thing works as expected! I tested while piping jq and json_pp. I also concede that jq is the prettier of the two; I appreciate the colors (although, admittedly, this would NOT pass any accessibility testing).
jq part one of the responsejq part two of the responsejson_pp part one of the responsejson_pp part two of the response
Final thoughts
And for some final thoughts…
It turns out it’s NOT ORDS – it’s something to do with an underlying JSON parser not liking the header info that is coming through
json_pp and jq both work; they output the information in different order
The ORDS REST-Enabled SQL Service returns to you not only your results, but the SQL statement initially used (that is cool and I didn’t originally realize or mention this)
And that’s it for this one! I really hope you find this useful. I hope this saves you some time from having to troubleshoot and/or hunt for a fix for this tricky problem. That’s all for now!
Follow
And don’t forget to follow, like, subscribe, share, taunt, troll, or stalk me!
I promise this post will connect back to an overarching theme. But for now, I want to show how you can take a SQL query and use that in combination with the ORDS REST-Enabled SQL Service to request data from a database table.
The SQL query
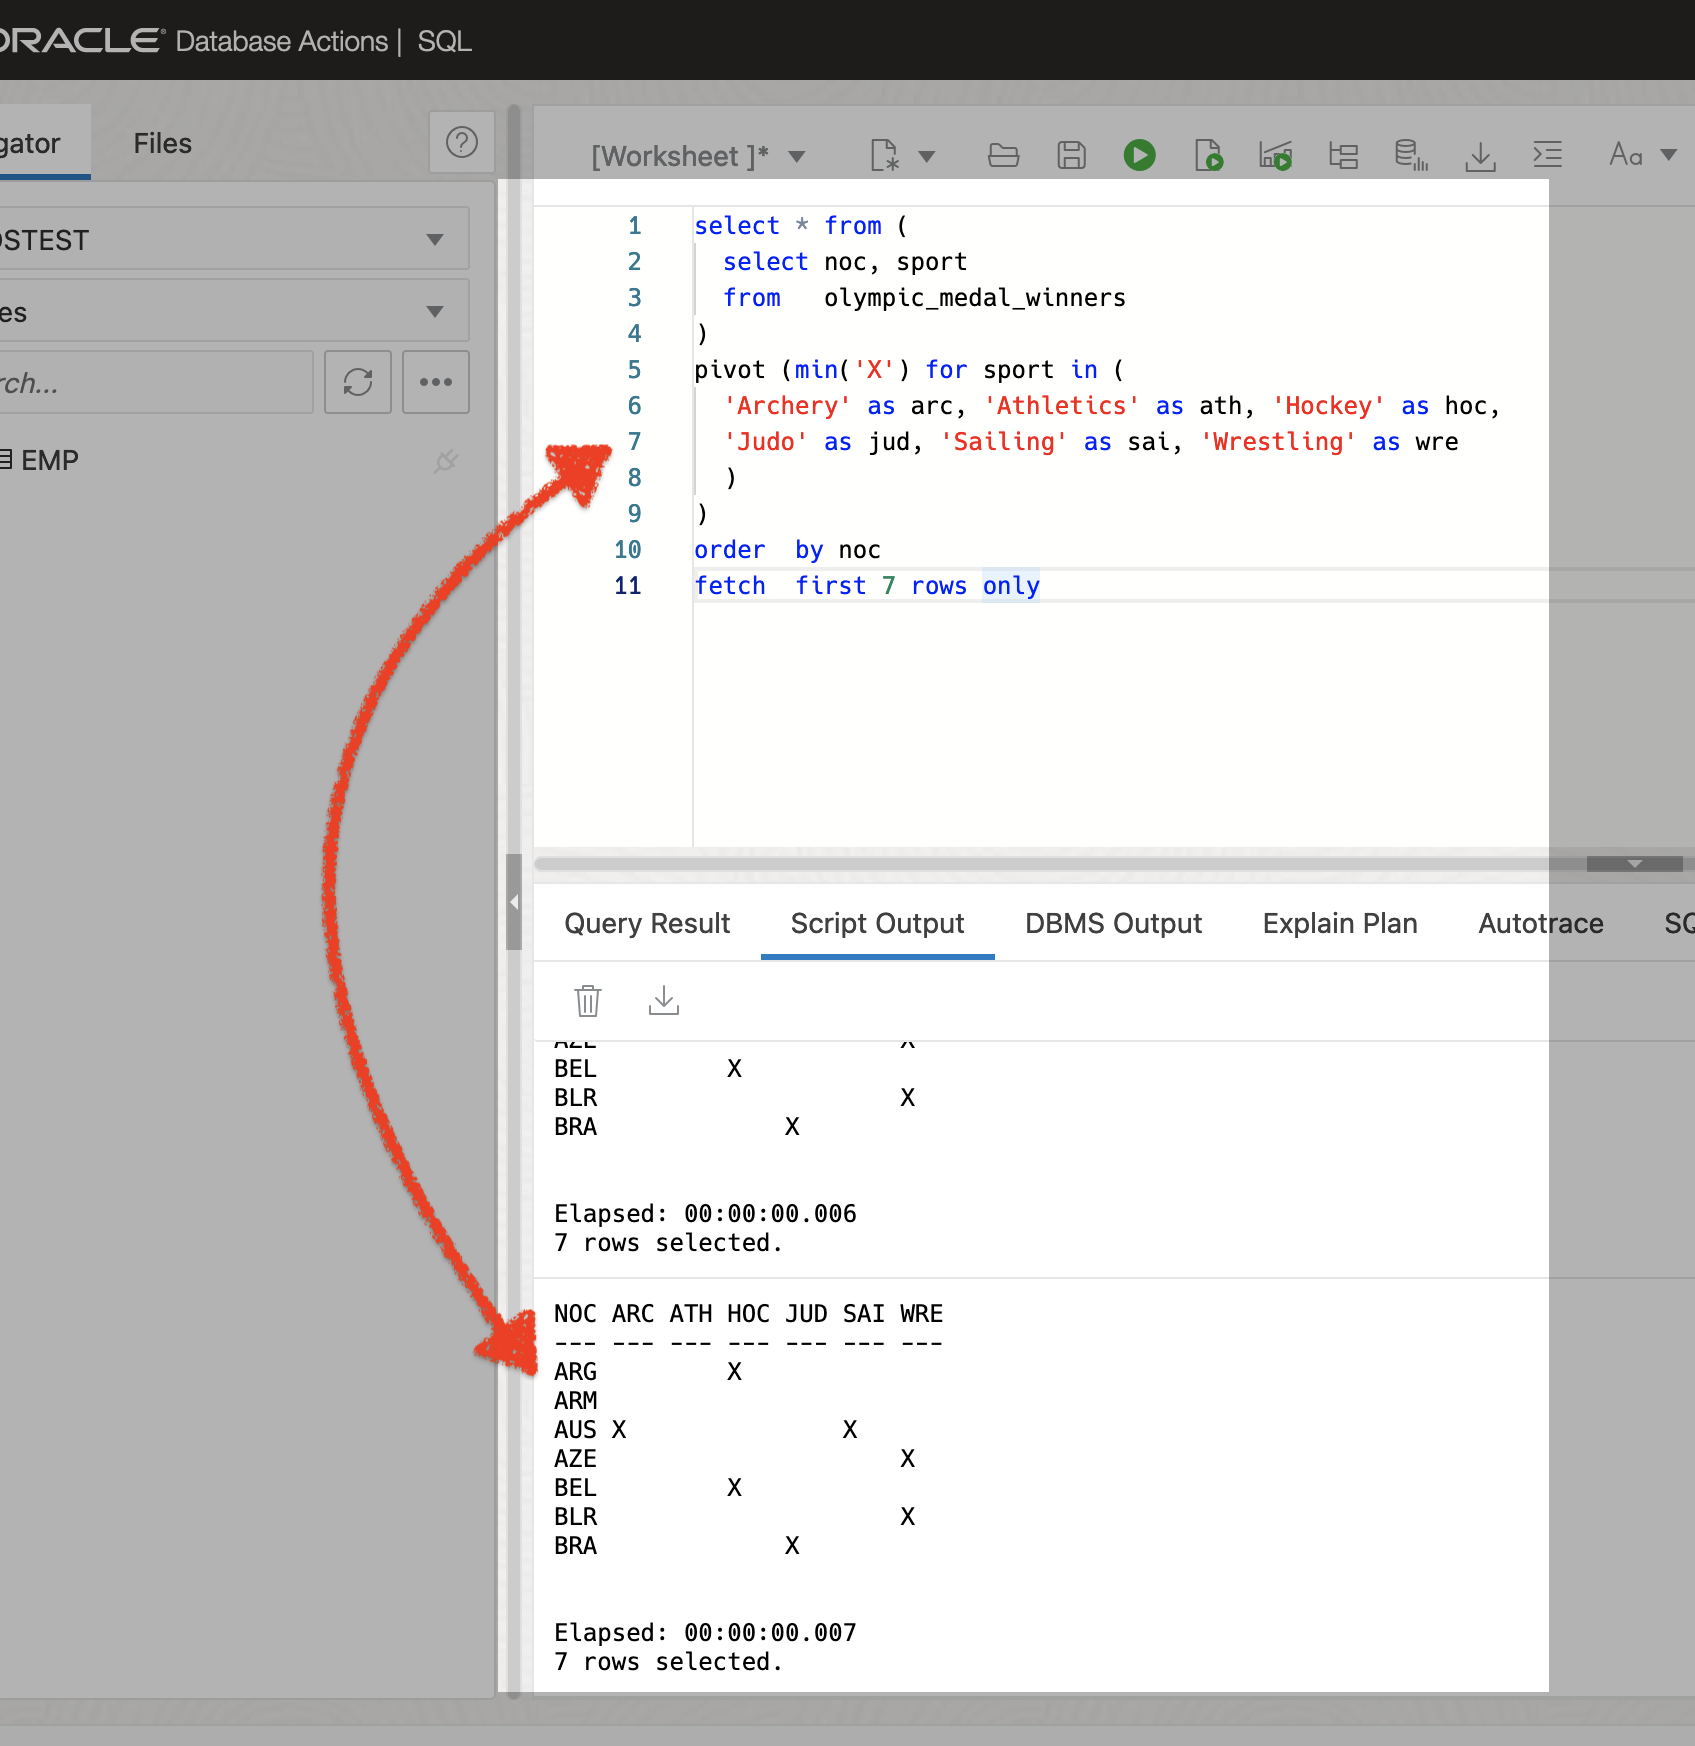
Here is the SQL query I’m using:
select * from (
select noc, sport
from olympic_medal_winners
)
pivot (min('X') for sport in (
'Archery' as arc, 'Athletics' as ath, 'Hockey' as hoc,
'Judo' as jud, 'Sailing' as sai, 'Wrestling' as wre
)
)
order by noc
fetch first 7 rows only
The SQL Script
Please feel free to cheat like me and steal this same script from the Live SQL site (direct link here). And if you can’t be bothered to do that, the script in its entirety, can be found at the bottom of the post.
PAUSE: Shout out to Chris Saxon for conceiving this. And putting in the real work. I'm both too lazy and too dumb to come up with this on my own.
The demo
Let’s assume you’ve created the table and inserted all the same data. Now, you can take a SQL query (use the same one as me, or don’t, I don’t care 😑) and run it in an SQL Worksheet (like I did here):
Coooool dude...you did a thing I already know how to do!
That’s what you’ll end up with. It’s actually a pretty neat printout; I didn’t even know you could do this! But, I want to take that SQL query and demonstrate how you can do this with the ORDS REST-Enabled SQL service.
Disclaimer
I’m performing this demo locally. I have a Podman container running with an Oracle database therein (one I grabbed from our Oracle Container Registry). I’ve also installed ORDS in this database and used my ORDSTEST user (the same setup as in my original Podman/ORDS how-to post).
About the REST-Enabled SQL Service
How do I set this service up? When you first install ORDS, if you enable Database Actions, you are also enabling this REST-Enabled SQL Service. You’ll see it in this step in the ORDS Interactive Installer:
Enter a number to select additional feature(s) to enable:
[1] Database Actions (Enables all features)
[2] REST Enabled SQL and Database API
[3] REST Enabled SQL
[4] Database API
[5] None
Choose [1]:
See it? If you select [1], then you are also enabling features [2], [3], and [4].
PRO TIP: Basically, if you can sign into Database Actions, then you're good. You're all set.
Long story short. You are taking that whacky SQL from the above example (something that would take me a week to come up with on my own) and passing it as a payload in a POST request to your REST-Enabled SQL Service 🤖 endpoint.
Since I am doing this locally, my REST-Enabled SQL Service endpoint looks like this:
You should see something similar; your REST-enabled schema alias will differ however
Next, with my Terminal open (and ORDS running, duh!) I’ll issue the following command:
Ah-ha! You probably noticed that the --data-binaryoption references a separate sportCountryMatrix.sql file. That’s because our docs recommend using an SQL file for multi-line SQL statements (like my example). I bet you could pass in this multi-line statement via the command line, but that seems unnecessarily challenging. Plus, I KNOW this works.
A quick review of the directory setup
I want to quickly review how I created this file, mostly remaining in Terminal. I first created a new ordsSqlService directory on my desktop. Then, I made an empty sportCountryMatrix.sql file.
Using VIM, I opened that file, pasted my choice SQL statement, saved it, and exited. I wanted to mention this because when I executed that cURL command, it worked because Iwas in the same directory as the SQL file!
Here are some screenshots of me going through those steps. You’ll see me creating the file but then also using the cat command so that I can double-check the contents of the .sql file.
And now, back to the cURL command. After issuing the command, here is the response to the POST request:
I know the response isn’t the most readable, but I can figure that out another time. (I have something else planned as a follow-up to this post). But it’s all there, trust me (I’m a doctor)!
Also, this blog post was about 50% me messing around and 50% reminding YOU that ORDS is capable of this (right out of the box, with the correct switches turned on). So, hopefully, you get the gist 😄.
Takeaways
Let me close this out with some final thoughts…
If you can sign into Database Actions, then you can take advantage of the REST-Enabled SQL Service
I haven’t explored how to pretty print the JSON response so it is more readable (and yes, I tried piping in | json_pp; it didn’t work)
Update on #2…I actually did figure this out. Read about that here.
You have to use your database username and password; this isn’t ideal for two reasons:
Security
Resource consumption (Basic Authentication can become costly, quick)
You can take pretty much any SQL query and turn it into a “Resource”
For instance, if you are an analyst, you can take that SQL query, save it as a file, and pass it in your cURL command to get precisely what you want.
Follow
And don’t forget to follow, like, subscribe, share, taunt, troll, or stalk me!
-- REM Script: Pivot and unpivot examples using Olympic data
-- REM Examples of pivoting and unpivoting data. Uses a subset of -- the results from the Rio Olympics as a data source.
-- For further explanation of the scripts, read the following blog -- post:
-- https://blogs.oracle.com/sql/entry/how_to_convert_rows_to
create table olympic_medal_winners (
olympic_year int,
sport varchar2( 30 ),
gender varchar2( 1 ),
event varchar2( 128 ),
medal varchar2( 10 ),
noc varchar2( 3 ),
athlete varchar2( 128 )
);
Insert into olympic_medal_winners (OLYMPIC_YEAR,SPORT,GENDER,EVENT,MEDAL,NOC,ATHLETE) values (2016,'Archery','M','Men''s Individual','Gold','KOR','KU Bonchan');
Insert into olympic_medal_winners (OLYMPIC_YEAR,SPORT,GENDER,EVENT,MEDAL,NOC,ATHLETE) values (2016,'Archery','M','Men''s Individual','Silver','FRA','VALLADONT Jean-Charles');
Insert into olympic_medal_winners (OLYMPIC_YEAR,SPORT,GENDER,EVENT,MEDAL,NOC,ATHLETE) values (2016,'Archery','M','Men''s Individual','Bronze','USA','ELLISON Brady');
Insert into olympic_medal_winners (OLYMPIC_YEAR,SPORT,GENDER,EVENT,MEDAL,NOC,ATHLETE) values (2016,'Archery','M','Men''s Team','Gold','KOR','Republic of Korea');
Insert into olympic_medal_winners (OLYMPIC_YEAR,SPORT,GENDER,EVENT,MEDAL,NOC,ATHLETE) values (2016,'Archery','M','Men''s Team','Bronze','AUS','Australia');
Insert into olympic_medal_winners (OLYMPIC_YEAR,SPORT,GENDER,EVENT,MEDAL,NOC,ATHLETE) values (2016,'Archery','M','Men''s Team','Silver','USA','United States');
Insert into olympic_medal_winners (OLYMPIC_YEAR,SPORT,GENDER,EVENT,MEDAL,NOC,ATHLETE) values (2016,'Artistic Gymnastics','M','Men''s Floor Exercise','Gold','GBR','WHITLOCK Max');
Insert into olympic_medal_winners (OLYMPIC_YEAR,SPORT,GENDER,EVENT,MEDAL,NOC,ATHLETE) values (2016,'Artistic Gymnastics','M','Men''s Floor Exercise','Bronze','BRA','MARIANO Arthur');
Insert into olympic_medal_winners (OLYMPIC_YEAR,SPORT,GENDER,EVENT,MEDAL,NOC,ATHLETE) values (2016,'Artistic Gymnastics','M','Men''s Floor Exercise','Silver','BRA','HYPOLITO Diego');
Insert into olympic_medal_winners (OLYMPIC_YEAR,SPORT,GENDER,EVENT,MEDAL,NOC,ATHLETE) values (2016,'Artistic Gymnastics','M','Men''s Horizontal Bar','Gold','GER','HAMBUECHEN Fabian');
Insert into olympic_medal_winners (OLYMPIC_YEAR,SPORT,GENDER,EVENT,MEDAL,NOC,ATHLETE) values (2016,'Artistic Gymnastics','M','Men''s Horizontal Bar','Bronze','GBR','WILSON Nile');
Insert into olympic_medal_winners (OLYMPIC_YEAR,SPORT,GENDER,EVENT,MEDAL,NOC,ATHLETE) values (2016,'Artistic Gymnastics','M','Men''s Horizontal Bar','Silver','USA','LEYVA Danell');
Insert into olympic_medal_winners (OLYMPIC_YEAR,SPORT,GENDER,EVENT,MEDAL,NOC,ATHLETE) values (2016,'Athletics','M','Men''s 10,000m','Gold','GBR','FARAH Mohamed');
Insert into olympic_medal_winners (OLYMPIC_YEAR,SPORT,GENDER,EVENT,MEDAL,NOC,ATHLETE) values (2016,'Athletics','M','Men''s 10,000m','Bronze','ETH','TOLA Tamirat');
Insert into olympic_medal_winners (OLYMPIC_YEAR,SPORT,GENDER,EVENT,MEDAL,NOC,ATHLETE) values (2016,'Athletics','M','Men''s 10,000m','Silver','KEN','TANUI Paul Kipngetich');
Insert into olympic_medal_winners (OLYMPIC_YEAR,SPORT,GENDER,EVENT,MEDAL,NOC,ATHLETE) values (2016,'Athletics','M','Men''s 100m','Gold','JAM','BOLT Usain');
Insert into olympic_medal_winners (OLYMPIC_YEAR,SPORT,GENDER,EVENT,MEDAL,NOC,ATHLETE) values (2016,'Athletics','M','Men''s 100m','Silver','USA','GATLIN Justin');
Insert into olympic_medal_winners (OLYMPIC_YEAR,SPORT,GENDER,EVENT,MEDAL,NOC,ATHLETE) values (2016,'Athletics','M','Men''s 100m','Bronze','CAN','DE GRASSE Andre');
Insert into olympic_medal_winners (OLYMPIC_YEAR,SPORT,GENDER,EVENT,MEDAL,NOC,ATHLETE) values (2016,'Badminton','M','Men''s Doubles','Gold','CHN','Zhang');
Insert into olympic_medal_winners (OLYMPIC_YEAR,SPORT,GENDER,EVENT,MEDAL,NOC,ATHLETE) values (2016,'Badminton','M','Men''s Doubles','Bronze','GBR','Langridge');
Insert into olympic_medal_winners (OLYMPIC_YEAR,SPORT,GENDER,EVENT,MEDAL,NOC,ATHLETE) values (2016,'Badminton','M','Men''s Doubles','Bronze','GBR','Ellis');
Insert into olympic_medal_winners (OLYMPIC_YEAR,SPORT,GENDER,EVENT,MEDAL,NOC,ATHLETE) values (2016,'Badminton','M','Men''s Doubles','Silver','MAS','Tan');
Insert into olympic_medal_winners (OLYMPIC_YEAR,SPORT,GENDER,EVENT,MEDAL,NOC,ATHLETE) values (2016,'Badminton','M','Men''s Doubles','Silver','MAS','Goh');
Insert into olympic_medal_winners (OLYMPIC_YEAR,SPORT,GENDER,EVENT,MEDAL,NOC,ATHLETE) values (2016,'Badminton','M','Men''s Doubles','Gold','CHN','Fu');
Insert into olympic_medal_winners (OLYMPIC_YEAR,SPORT,GENDER,EVENT,MEDAL,NOC,ATHLETE) values (2016,'Beach Volleyball','M','Men','Gold','BRA','Cerutti');
Insert into olympic_medal_winners (OLYMPIC_YEAR,SPORT,GENDER,EVENT,MEDAL,NOC,ATHLETE) values (2016,'Beach Volleyball','M','Men','Gold','BRA','Oscar Schmidt');
Insert into olympic_medal_winners (OLYMPIC_YEAR,SPORT,GENDER,EVENT,MEDAL,NOC,ATHLETE) values (2016,'Beach Volleyball','M','Men','Silver','ITA','Nicolai');
Insert into olympic_medal_winners (OLYMPIC_YEAR,SPORT,GENDER,EVENT,MEDAL,NOC,ATHLETE) values (2016,'Beach Volleyball','M','Men','Silver','ITA','Lupo');
Insert into olympic_medal_winners (OLYMPIC_YEAR,SPORT,GENDER,EVENT,MEDAL,NOC,ATHLETE) values (2016,'Beach Volleyball','M','Men','Bronze','NED','Meeuwsen');
Insert into olympic_medal_winners (OLYMPIC_YEAR,SPORT,GENDER,EVENT,MEDAL,NOC,ATHLETE) values (2016,'Beach Volleyball','M','Men','Bronze','NED','Brouwer');
Insert into olympic_medal_winners (OLYMPIC_YEAR,SPORT,GENDER,EVENT,MEDAL,NOC,ATHLETE) values (2016,'Boxing','M','Men''s Bantam (56kg)','Gold','CUB','RAMIREZ Robeisy');
Insert into olympic_medal_winners (OLYMPIC_YEAR,SPORT,GENDER,EVENT,MEDAL,NOC,ATHLETE) values (2016,'Boxing','M','Men''s Bantam (56kg)','Bronze','UZB','AKHMADALIEV Murodjon');
Insert into olympic_medal_winners (OLYMPIC_YEAR,SPORT,GENDER,EVENT,MEDAL,NOC,ATHLETE) values (2016,'Boxing','M','Men''s Bantam (56kg)','Bronze','RUS','NIKITIN Vladimir');
Insert into olympic_medal_winners (OLYMPIC_YEAR,SPORT,GENDER,EVENT,MEDAL,NOC,ATHLETE) values (2016,'Boxing','M','Men''s Bantam (56kg)','Silver','USA','STEVENSON Shakur');
Insert into olympic_medal_winners (OLYMPIC_YEAR,SPORT,GENDER,EVENT,MEDAL,NOC,ATHLETE) values (2016,'Boxing','M','Men''s Fly (52kg)','Gold','UZB','ZOIROV Shakhobidin');
Insert into olympic_medal_winners (OLYMPIC_YEAR,SPORT,GENDER,EVENT,MEDAL,NOC,ATHLETE) values (2016,'Boxing','M','Men''s Fly (52kg)','Bronze','CHN','HU Jianguan');
Insert into olympic_medal_winners (OLYMPIC_YEAR,SPORT,GENDER,EVENT,MEDAL,NOC,ATHLETE) values (2016,'Canoe Slalom','M','Canoe Double (C2) Men','Gold','SVK','PETER Skantar');
Insert into olympic_medal_winners (OLYMPIC_YEAR,SPORT,GENDER,EVENT,MEDAL,NOC,ATHLETE) values (2016,'Canoe Slalom','M','Canoe Double (C2) Men','Bronze','FRA','GAUTHIER Klauss');
Insert into olympic_medal_winners (OLYMPIC_YEAR,SPORT,GENDER,EVENT,MEDAL,NOC,ATHLETE) values (2016,'Canoe Slalom','M','Canoe Double (C2) Men','Bronze','FRA','MATTHIEU Peche');
Insert into olympic_medal_winners (OLYMPIC_YEAR,SPORT,GENDER,EVENT,MEDAL,NOC,ATHLETE) values (2016,'Canoe Slalom','M','Canoe Double (C2) Men','Silver','GBR','RICHARD Hounslow');
Insert into olympic_medal_winners (OLYMPIC_YEAR,SPORT,GENDER,EVENT,MEDAL,NOC,ATHLETE) values (2016,'Canoe Slalom','M','Canoe Double (C2) Men','Silver','GBR','DAVID Florence');
Insert into olympic_medal_winners (OLYMPIC_YEAR,SPORT,GENDER,EVENT,MEDAL,NOC,ATHLETE) values (2016,'Canoe Slalom','M','Canoe Double (C2) Men','Gold','SVK','LADISLAV Skantar');
Insert into olympic_medal_winners (OLYMPIC_YEAR,SPORT,GENDER,EVENT,MEDAL,NOC,ATHLETE) values (2016,'Canoe Sprint','M','Men''s Canoe Double 1000m','Gold','GER','Brendel');
Insert into olympic_medal_winners (OLYMPIC_YEAR,SPORT,GENDER,EVENT,MEDAL,NOC,ATHLETE) values (2016,'Canoe Sprint','M','Men''s Canoe Double 1000m','Bronze','UKR','Mishchuk');
Insert into olympic_medal_winners (OLYMPIC_YEAR,SPORT,GENDER,EVENT,MEDAL,NOC,ATHLETE) values (2016,'Canoe Sprint','M','Men''s Canoe Double 1000m','Bronze','UKR','Ianchuk');
Insert into olympic_medal_winners (OLYMPIC_YEAR,SPORT,GENDER,EVENT,MEDAL,NOC,ATHLETE) values (2016,'Canoe Sprint','M','Men''s Canoe Double 1000m','Silver','BRA','Queiroz dos Santos');
Insert into olympic_medal_winners (OLYMPIC_YEAR,SPORT,GENDER,EVENT,MEDAL,NOC,ATHLETE) values (2016,'Canoe Sprint','M','Men''s Canoe Double 1000m','Silver','BRA','de Souza Silva');
Insert into olympic_medal_winners (OLYMPIC_YEAR,SPORT,GENDER,EVENT,MEDAL,NOC,ATHLETE) values (2016,'Canoe Sprint','M','Men''s Canoe Double 1000m','Gold','GER','Vandrey');
Insert into olympic_medal_winners (OLYMPIC_YEAR,SPORT,GENDER,EVENT,MEDAL,NOC,ATHLETE) values (2016,'Cycling Road','M','Men''s Individual Time Trial','Gold','SUI','CANCELLARA Fabian');
Insert into olympic_medal_winners (OLYMPIC_YEAR,SPORT,GENDER,EVENT,MEDAL,NOC,ATHLETE) values (2016,'Cycling Road','M','Men''s Individual Time Trial','Bronze','GBR','FROOME Christopher');
Insert into olympic_medal_winners (OLYMPIC_YEAR,SPORT,GENDER,EVENT,MEDAL,NOC,ATHLETE) values (2016,'Cycling Road','M','Men''s Individual Time Trial','Silver','NED','DUMOULIN Tom');
Insert into olympic_medal_winners (OLYMPIC_YEAR,SPORT,GENDER,EVENT,MEDAL,NOC,ATHLETE) values (2016,'Cycling Road','M','Men''s Road Race','Gold','BEL','VAN AVERMAET Greg');
Insert into olympic_medal_winners (OLYMPIC_YEAR,SPORT,GENDER,EVENT,MEDAL,NOC,ATHLETE) values (2016,'Cycling Road','M','Men''s Road Race','Silver','DEN','FUGLSANG Jakob');
Insert into olympic_medal_winners (OLYMPIC_YEAR,SPORT,GENDER,EVENT,MEDAL,NOC,ATHLETE) values (2016,'Cycling Road','M','Men''s Road Race','Bronze','POL','MAJKA Rafal');
Insert into olympic_medal_winners (OLYMPIC_YEAR,SPORT,GENDER,EVENT,MEDAL,NOC,ATHLETE) values (2016,'Cycling Track','M','Men''s Keirin','Gold','GBR','KENNY Jason');
Insert into olympic_medal_winners (OLYMPIC_YEAR,SPORT,GENDER,EVENT,MEDAL,NOC,ATHLETE) values (2016,'Cycling Track','M','Men''s Keirin','Bronze','MAS','AWANG Azizulhasni');
Insert into olympic_medal_winners (OLYMPIC_YEAR,SPORT,GENDER,EVENT,MEDAL,NOC,ATHLETE) values (2016,'Cycling Track','M','Men''s Keirin','Silver','NED','BUCHLI Matthijs');
Insert into olympic_medal_winners (OLYMPIC_YEAR,SPORT,GENDER,EVENT,MEDAL,NOC,ATHLETE) values (2016,'Cycling Track','M','Men''s Omnium','Gold','ITA','VIVIANI Elia');
Insert into olympic_medal_winners (OLYMPIC_YEAR,SPORT,GENDER,EVENT,MEDAL,NOC,ATHLETE) values (2016,'Cycling Track','M','Men''s Omnium','Bronze','DEN','HANSEN Lasse Norman');
Insert into olympic_medal_winners (OLYMPIC_YEAR,SPORT,GENDER,EVENT,MEDAL,NOC,ATHLETE) values (2016,'Cycling Track','M','Men''s Omnium','Silver','GBR','CAVENDISH Mark');
Insert into olympic_medal_winners (OLYMPIC_YEAR,SPORT,GENDER,EVENT,MEDAL,NOC,ATHLETE) values (2016,'Diving','M','Men''s 10m Platform','Gold','CHN','CHEN Aisen');
Insert into olympic_medal_winners (OLYMPIC_YEAR,SPORT,GENDER,EVENT,MEDAL,NOC,ATHLETE) values (2016,'Diving','M','Men''s 10m Platform','Bronze','USA','BOUDIA David');
Insert into olympic_medal_winners (OLYMPIC_YEAR,SPORT,GENDER,EVENT,MEDAL,NOC,ATHLETE) values (2016,'Diving','M','Men''s 10m Platform','Silver','MEX','SANCHEZ German');
Insert into olympic_medal_winners (OLYMPIC_YEAR,SPORT,GENDER,EVENT,MEDAL,NOC,ATHLETE) values (2016,'Diving','M','Men''s 3m Springboard','Gold','CHN','CAO Yuan');
Insert into olympic_medal_winners (OLYMPIC_YEAR,SPORT,GENDER,EVENT,MEDAL,NOC,ATHLETE) values (2016,'Diving','M','Men''s 3m Springboard','Silver','GBR','LAUGHER Jack');
Insert into olympic_medal_winners (OLYMPIC_YEAR,SPORT,GENDER,EVENT,MEDAL,NOC,ATHLETE) values (2016,'Diving','M','Men''s 3m Springboard','Bronze','GER','HAUSDING Patrick');
Insert into olympic_medal_winners (OLYMPIC_YEAR,SPORT,GENDER,EVENT,MEDAL,NOC,ATHLETE) values (2016,'Equestrian','X','Dressage Individual','Gold','GBR','DUJARDIN Charlotte');
Insert into olympic_medal_winners (OLYMPIC_YEAR,SPORT,GENDER,EVENT,MEDAL,NOC,ATHLETE) values (2016,'Equestrian','X','Dressage Individual','Bronze','GER','BRORING-SPREHE Kristina');
Insert into olympic_medal_winners (OLYMPIC_YEAR,SPORT,GENDER,EVENT,MEDAL,NOC,ATHLETE) values (2016,'Equestrian','X','Dressage Individual','Silver','GER','WERTH Isabell');
Insert into olympic_medal_winners (OLYMPIC_YEAR,SPORT,GENDER,EVENT,MEDAL,NOC,ATHLETE) values (2016,'Equestrian','X','Dressage Team','Gold','GER','Germany');
Insert into olympic_medal_winners (OLYMPIC_YEAR,SPORT,GENDER,EVENT,MEDAL,NOC,ATHLETE) values (2016,'Equestrian','X','Dressage Team','Bronze','USA','United States');
Insert into olympic_medal_winners (OLYMPIC_YEAR,SPORT,GENDER,EVENT,MEDAL,NOC,ATHLETE) values (2016,'Equestrian','X','Dressage Team','Silver','GBR','Great Britain');
Insert into olympic_medal_winners (OLYMPIC_YEAR,SPORT,GENDER,EVENT,MEDAL,NOC,ATHLETE) values (2016,'Fencing','M','Men''s Foil Individual','Gold','ITA','GAROZZO Daniele');
Insert into olympic_medal_winners (OLYMPIC_YEAR,SPORT,GENDER,EVENT,MEDAL,NOC,ATHLETE) values (2016,'Fencing','M','Men''s Foil Individual','Silver','USA','MASSIALAS Alexander');
Insert into olympic_medal_winners (OLYMPIC_YEAR,SPORT,GENDER,EVENT,MEDAL,NOC,ATHLETE) values (2016,'Fencing','M','Men''s Foil Individual','Bronze','RUS','SAFIN Timur');
Insert into olympic_medal_winners (OLYMPIC_YEAR,SPORT,GENDER,EVENT,MEDAL,NOC,ATHLETE) values (2016,'Fencing','M','Men''s Foil Team','Gold','RUS','Russian Federation');
Insert into olympic_medal_winners (OLYMPIC_YEAR,SPORT,GENDER,EVENT,MEDAL,NOC,ATHLETE) values (2016,'Fencing','M','Men''s Foil Team','Bronze','USA','United States');
Insert into olympic_medal_winners (OLYMPIC_YEAR,SPORT,GENDER,EVENT,MEDAL,NOC,ATHLETE) values (2016,'Fencing','M','Men''s Foil Team','Silver','FRA','France');
Insert into olympic_medal_winners (OLYMPIC_YEAR,SPORT,GENDER,EVENT,MEDAL,NOC,ATHLETE) values (2016,'Handball','M','Men','Gold','DEN','Denmark');
Insert into olympic_medal_winners (OLYMPIC_YEAR,SPORT,GENDER,EVENT,MEDAL,NOC,ATHLETE) values (2016,'Handball','M','Men','Silver','FRA','France');
Insert into olympic_medal_winners (OLYMPIC_YEAR,SPORT,GENDER,EVENT,MEDAL,NOC,ATHLETE) values (2016,'Handball','M','Men','Bronze','GER','Germany');
Insert into olympic_medal_winners (OLYMPIC_YEAR,SPORT,GENDER,EVENT,MEDAL,NOC,ATHLETE) values (2016,'Handball','W','Women','Gold','RUS','Russian Federation');
Insert into olympic_medal_winners (OLYMPIC_YEAR,SPORT,GENDER,EVENT,MEDAL,NOC,ATHLETE) values (2016,'Handball','W','Women','Silver','FRA','France');
Insert into olympic_medal_winners (OLYMPIC_YEAR,SPORT,GENDER,EVENT,MEDAL,NOC,ATHLETE) values (2016,'Handball','W','Women','Bronze','NOR','Norway');
Insert into olympic_medal_winners (OLYMPIC_YEAR,SPORT,GENDER,EVENT,MEDAL,NOC,ATHLETE) values (2016,'Hockey','M','Men','Gold','ARG','Argentina');
Insert into olympic_medal_winners (OLYMPIC_YEAR,SPORT,GENDER,EVENT,MEDAL,NOC,ATHLETE) values (2016,'Hockey','M','Men','Silver','BEL','Belgium');
Insert into olympic_medal_winners (OLYMPIC_YEAR,SPORT,GENDER,EVENT,MEDAL,NOC,ATHLETE) values (2016,'Hockey','M','Men','Bronze','GER','Germany');
Insert into olympic_medal_winners (OLYMPIC_YEAR,SPORT,GENDER,EVENT,MEDAL,NOC,ATHLETE) values (2016,'Hockey','W','Women','Gold','GBR','Great Britain');
Insert into olympic_medal_winners (OLYMPIC_YEAR,SPORT,GENDER,EVENT,MEDAL,NOC,ATHLETE) values (2016,'Hockey','W','Women','Silver','NED','Netherlands');
Insert into olympic_medal_winners (OLYMPIC_YEAR,SPORT,GENDER,EVENT,MEDAL,NOC,ATHLETE) values (2016,'Hockey','W','Women','Bronze','GER','Germany');
Insert into olympic_medal_winners (OLYMPIC_YEAR,SPORT,GENDER,EVENT,MEDAL,NOC,ATHLETE) values (2016,'Judo','M','Men +100 kg','Gold','FRA','RINER Teddy');
Insert into olympic_medal_winners (OLYMPIC_YEAR,SPORT,GENDER,EVENT,MEDAL,NOC,ATHLETE) values (2016,'Judo','M','Men +100 kg','Bronze','BRA','SILVA Rafael');
Insert into olympic_medal_winners (OLYMPIC_YEAR,SPORT,GENDER,EVENT,MEDAL,NOC,ATHLETE) values (2016,'Judo','M','Men +100 kg','Bronze','ISR','SASSON Or');
Insert into olympic_medal_winners (OLYMPIC_YEAR,SPORT,GENDER,EVENT,MEDAL,NOC,ATHLETE) values (2016,'Judo','M','Men +100 kg','Silver','JPN','HARASAWA Hisayoshi');
Insert into olympic_medal_winners (OLYMPIC_YEAR,SPORT,GENDER,EVENT,MEDAL,NOC,ATHLETE) values (2016,'Judo','M','Men -100 kg','Gold','CZE','KRPALEK Lukas');
Insert into olympic_medal_winners (OLYMPIC_YEAR,SPORT,GENDER,EVENT,MEDAL,NOC,ATHLETE) values (2016,'Judo','M','Men -100 kg','Bronze','FRA','MARET Cyrille');
Insert into olympic_medal_winners (OLYMPIC_YEAR,SPORT,GENDER,EVENT,MEDAL,NOC,ATHLETE) values (2016,'Modern Pentathlon','M','Men''s Individual','Gold','RUS','LESUN Alexander');
Insert into olympic_medal_winners (OLYMPIC_YEAR,SPORT,GENDER,EVENT,MEDAL,NOC,ATHLETE) values (2016,'Modern Pentathlon','M','Men''s Individual','Silver','UKR','TYMOSHCHENKO Pavlo');
Insert into olympic_medal_winners (OLYMPIC_YEAR,SPORT,GENDER,EVENT,MEDAL,NOC,ATHLETE) values (2016,'Modern Pentathlon','M','Men''s Individual','Bronze','MEX','HERNANDEZ USCANGA Ismael Marcelo');
Insert into olympic_medal_winners (OLYMPIC_YEAR,SPORT,GENDER,EVENT,MEDAL,NOC,ATHLETE) values (2016,'Modern Pentathlon','W','Women''s Individual','Gold','AUS','ESPOSITO Chloe');
Insert into olympic_medal_winners (OLYMPIC_YEAR,SPORT,GENDER,EVENT,MEDAL,NOC,ATHLETE) values (2016,'Modern Pentathlon','W','Women''s Individual','Silver','FRA','CLOUVEL Elodie');
Insert into olympic_medal_winners (OLYMPIC_YEAR,SPORT,GENDER,EVENT,MEDAL,NOC,ATHLETE) values (2016,'Modern Pentathlon','W','Women''s Individual','Bronze','POL','NOWACKA Oktawia');
Insert into olympic_medal_winners (OLYMPIC_YEAR,SPORT,GENDER,EVENT,MEDAL,NOC,ATHLETE) values (2016,'Rhythmic Gymnastics','W','Group All-Around','Gold','RUS','Russian Federation');
Insert into olympic_medal_winners (OLYMPIC_YEAR,SPORT,GENDER,EVENT,MEDAL,NOC,ATHLETE) values (2016,'Rhythmic Gymnastics','W','Group All-Around','Bronze','BUL','Bulgaria');
Insert into olympic_medal_winners (OLYMPIC_YEAR,SPORT,GENDER,EVENT,MEDAL,NOC,ATHLETE) values (2016,'Rhythmic Gymnastics','W','Group All-Around','Silver','ESP','Spain');
Insert into olympic_medal_winners (OLYMPIC_YEAR,SPORT,GENDER,EVENT,MEDAL,NOC,ATHLETE) values (2016,'Rhythmic Gymnastics','W','Individual All-Around','Gold','RUS','MAMUN Margarita');
Insert into olympic_medal_winners (OLYMPIC_YEAR,SPORT,GENDER,EVENT,MEDAL,NOC,ATHLETE) values (2016,'Rhythmic Gymnastics','W','Individual All-Around','Silver','RUS','KUDRYAVTSEVA Yana');
Insert into olympic_medal_winners (OLYMPIC_YEAR,SPORT,GENDER,EVENT,MEDAL,NOC,ATHLETE) values (2016,'Rhythmic Gymnastics','W','Individual All-Around','Bronze','UKR','RIZATDINOVA Ganna');
Insert into olympic_medal_winners (OLYMPIC_YEAR,SPORT,GENDER,EVENT,MEDAL,NOC,ATHLETE) values (2016,'Rowing','M','Lightweight Men''s Double Sculls','Gold','FRA','Azou');
Insert into olympic_medal_winners (OLYMPIC_YEAR,SPORT,GENDER,EVENT,MEDAL,NOC,ATHLETE) values (2016,'Rowing','M','Lightweight Men''s Double Sculls','Bronze','NOR','Brun');
Insert into olympic_medal_winners (OLYMPIC_YEAR,SPORT,GENDER,EVENT,MEDAL,NOC,ATHLETE) values (2016,'Rowing','M','Lightweight Men''s Double Sculls','Bronze','NOR','Strandli');
Insert into olympic_medal_winners (OLYMPIC_YEAR,SPORT,GENDER,EVENT,MEDAL,NOC,ATHLETE) values (2016,'Rowing','M','Lightweight Men''s Double Sculls','Silver','IRL','O''Donovan');
Insert into olympic_medal_winners (OLYMPIC_YEAR,SPORT,GENDER,EVENT,MEDAL,NOC,ATHLETE) values (2016,'Rowing','M','Lightweight Men''s Double Sculls','Gold','FRA','Houin');
Insert into olympic_medal_winners (OLYMPIC_YEAR,SPORT,GENDER,EVENT,MEDAL,NOC,ATHLETE) values (2016,'Sailing','M','470 Men','Gold','CRO','Fantela');
Insert into olympic_medal_winners (OLYMPIC_YEAR,SPORT,GENDER,EVENT,MEDAL,NOC,ATHLETE) values (2016,'Sailing','M','470 Men','Bronze','GRE','Kagialis');
Insert into olympic_medal_winners (OLYMPIC_YEAR,SPORT,GENDER,EVENT,MEDAL,NOC,ATHLETE) values (2016,'Sailing','M','470 Men','Bronze','GRE','Mantis');
Insert into olympic_medal_winners (OLYMPIC_YEAR,SPORT,GENDER,EVENT,MEDAL,NOC,ATHLETE) values (2016,'Sailing','M','470 Men','Silver','AUS','Ryan');
Insert into olympic_medal_winners (OLYMPIC_YEAR,SPORT,GENDER,EVENT,MEDAL,NOC,ATHLETE) values (2016,'Sailing','M','470 Men','Silver','AUS','Belcher');
Insert into olympic_medal_winners (OLYMPIC_YEAR,SPORT,GENDER,EVENT,MEDAL,NOC,ATHLETE) values (2016,'Sailing','M','470 Men','Gold','CRO','Marenic');
Insert into olympic_medal_winners (OLYMPIC_YEAR,SPORT,GENDER,EVENT,MEDAL,NOC,ATHLETE) values (2016,'Swimming','M','Men''s 100m Backstroke','Gold','USA','MURPHY Ryan');
Insert into olympic_medal_winners (OLYMPIC_YEAR,SPORT,GENDER,EVENT,MEDAL,NOC,ATHLETE) values (2016,'Swimming','M','Men''s 100m Backstroke','Bronze','USA','PLUMMER David');
Insert into olympic_medal_winners (OLYMPIC_YEAR,SPORT,GENDER,EVENT,MEDAL,NOC,ATHLETE) values (2016,'Swimming','M','Men''s 100m Backstroke','Silver','CHN','XU Jiayu');
Insert into olympic_medal_winners (OLYMPIC_YEAR,SPORT,GENDER,EVENT,MEDAL,NOC,ATHLETE) values (2016,'Swimming','M','Men''s 100m Breaststroke','Gold','GBR','PEATY Adam');
Insert into olympic_medal_winners (OLYMPIC_YEAR,SPORT,GENDER,EVENT,MEDAL,NOC,ATHLETE) values (2016,'Swimming','M','Men''s 100m Breaststroke','Bronze','USA','MILLER Cody');
Insert into olympic_medal_winners (OLYMPIC_YEAR,SPORT,GENDER,EVENT,MEDAL,NOC,ATHLETE) values (2016,'Swimming','M','Men''s 100m Breaststroke','Silver','RSA','VAN DER BURGH Cameron');
Insert into olympic_medal_winners (OLYMPIC_YEAR,SPORT,GENDER,EVENT,MEDAL,NOC,ATHLETE) values (2016,'Table Tennis','M','Men''s Singles','Gold','CHN','MA Long');
Insert into olympic_medal_winners (OLYMPIC_YEAR,SPORT,GENDER,EVENT,MEDAL,NOC,ATHLETE) values (2016,'Table Tennis','M','Men''s Singles','Bronze','JPN','MIZUTANI Jun');
Insert into olympic_medal_winners (OLYMPIC_YEAR,SPORT,GENDER,EVENT,MEDAL,NOC,ATHLETE) values (2016,'Table Tennis','M','Men''s Singles','Silver','CHN','ZHANG Jike');
Insert into olympic_medal_winners (OLYMPIC_YEAR,SPORT,GENDER,EVENT,MEDAL,NOC,ATHLETE) values (2016,'Table Tennis','M','Men''s Team','Gold','CHN','China');
Insert into olympic_medal_winners (OLYMPIC_YEAR,SPORT,GENDER,EVENT,MEDAL,NOC,ATHLETE) values (2016,'Table Tennis','M','Men''s Team','Bronze','GER','Germany');
Insert into olympic_medal_winners (OLYMPIC_YEAR,SPORT,GENDER,EVENT,MEDAL,NOC,ATHLETE) values (2016,'Table Tennis','M','Men''s Team','Silver','JPN','Japan');
Insert into olympic_medal_winners (OLYMPIC_YEAR,SPORT,GENDER,EVENT,MEDAL,NOC,ATHLETE) values (2016,'Taekwondo','M','Men +80kg','Gold','AZE','ISAEV Radik');
Insert into olympic_medal_winners (OLYMPIC_YEAR,SPORT,GENDER,EVENT,MEDAL,NOC,ATHLETE) values (2016,'Taekwondo','M','Men +80kg','Bronze','KOR','CHA Dongmin');
Insert into olympic_medal_winners (OLYMPIC_YEAR,SPORT,GENDER,EVENT,MEDAL,NOC,ATHLETE) values (2016,'Taekwondo','M','Men +80kg','Bronze','BRA','SIQUEIRA Maicon');
Insert into olympic_medal_winners (OLYMPIC_YEAR,SPORT,GENDER,EVENT,MEDAL,NOC,ATHLETE) values (2016,'Taekwondo','M','Men +80kg','Silver','NIG','ISSOUFOU ALFAGA Abdoulrazak');
Insert into olympic_medal_winners (OLYMPIC_YEAR,SPORT,GENDER,EVENT,MEDAL,NOC,ATHLETE) values (2016,'Taekwondo','M','Men -58kg','Gold','CHN','ZHAO Shuai');
Insert into olympic_medal_winners (OLYMPIC_YEAR,SPORT,GENDER,EVENT,MEDAL,NOC,ATHLETE) values (2016,'Taekwondo','M','Men -58kg','Silver','THA','HANPRAB Tawin');
Insert into olympic_medal_winners (OLYMPIC_YEAR,SPORT,GENDER,EVENT,MEDAL,NOC,ATHLETE) values (2016,'Tennis','M','Men''s Doubles','Gold','ESP','Lopez');
Insert into olympic_medal_winners (OLYMPIC_YEAR,SPORT,GENDER,EVENT,MEDAL,NOC,ATHLETE) values (2016,'Tennis','M','Men''s Doubles','Bronze','USA','Johnson');
Insert into olympic_medal_winners (OLYMPIC_YEAR,SPORT,GENDER,EVENT,MEDAL,NOC,ATHLETE) values (2016,'Tennis','M','Men''s Doubles','Bronze','USA','Sock');
Insert into olympic_medal_winners (OLYMPIC_YEAR,SPORT,GENDER,EVENT,MEDAL,NOC,ATHLETE) values (2016,'Tennis','M','Men''s Doubles','Silver','ROU','Tecau');
Insert into olympic_medal_winners (OLYMPIC_YEAR,SPORT,GENDER,EVENT,MEDAL,NOC,ATHLETE) values (2016,'Tennis','M','Men''s Doubles','Silver','ROU','Mergea');
Insert into olympic_medal_winners (OLYMPIC_YEAR,SPORT,GENDER,EVENT,MEDAL,NOC,ATHLETE) values (2016,'Tennis','M','Men''s Doubles','Gold','ESP','Nadal');
Insert into olympic_medal_winners (OLYMPIC_YEAR,SPORT,GENDER,EVENT,MEDAL,NOC,ATHLETE) values (2016,'Trampoline Gymnastics','M','Men','Gold','BLR','HANCHAROU Uladzislau');
Insert into olympic_medal_winners (OLYMPIC_YEAR,SPORT,GENDER,EVENT,MEDAL,NOC,ATHLETE) values (2016,'Trampoline Gymnastics','M','Men','Silver','CHN','DONG Dong');
Insert into olympic_medal_winners (OLYMPIC_YEAR,SPORT,GENDER,EVENT,MEDAL,NOC,ATHLETE) values (2016,'Trampoline Gymnastics','M','Men','Bronze','CHN','GAO Lei');
Insert into olympic_medal_winners (OLYMPIC_YEAR,SPORT,GENDER,EVENT,MEDAL,NOC,ATHLETE) values (2016,'Trampoline Gymnastics','W','Women','Gold','CAN','MACLENNAN Rosannagh');
Insert into olympic_medal_winners (OLYMPIC_YEAR,SPORT,GENDER,EVENT,MEDAL,NOC,ATHLETE) values (2016,'Trampoline Gymnastics','W','Women','Silver','GBR','PAGE Bryony');
Insert into olympic_medal_winners (OLYMPIC_YEAR,SPORT,GENDER,EVENT,MEDAL,NOC,ATHLETE) values (2016,'Trampoline Gymnastics','W','Women','Bronze','CHN','LI Dan');
Insert into olympic_medal_winners (OLYMPIC_YEAR,SPORT,GENDER,EVENT,MEDAL,NOC,ATHLETE) values (2016,'Triathlon','M','Men','Gold','GBR','BROWNLEE Alistair');
Insert into olympic_medal_winners (OLYMPIC_YEAR,SPORT,GENDER,EVENT,MEDAL,NOC,ATHLETE) values (2016,'Triathlon','M','Men','Silver','GBR','BROWNLEE Jonathan');
Insert into olympic_medal_winners (OLYMPIC_YEAR,SPORT,GENDER,EVENT,MEDAL,NOC,ATHLETE) values (2016,'Triathlon','M','Men','Bronze','RSA','SCHOEMAN Henri');
Insert into olympic_medal_winners (OLYMPIC_YEAR,SPORT,GENDER,EVENT,MEDAL,NOC,ATHLETE) values (2016,'Triathlon','W','Women','Gold','USA','JORGENSEN Gwen');
Insert into olympic_medal_winners (OLYMPIC_YEAR,SPORT,GENDER,EVENT,MEDAL,NOC,ATHLETE) values (2016,'Triathlon','W','Women','Silver','SUI','SPIRIG HUG Nicola');
Insert into olympic_medal_winners (OLYMPIC_YEAR,SPORT,GENDER,EVENT,MEDAL,NOC,ATHLETE) values (2016,'Triathlon','W','Women','Bronze','GBR','HOLLAND Vicky');
Insert into olympic_medal_winners (OLYMPIC_YEAR,SPORT,GENDER,EVENT,MEDAL,NOC,ATHLETE) values (2016,'Volleyball','M','Men','Gold','BRA','Brazil');
Insert into olympic_medal_winners (OLYMPIC_YEAR,SPORT,GENDER,EVENT,MEDAL,NOC,ATHLETE) values (2016,'Volleyball','M','Men','Silver','ITA','Italy');
Insert into olympic_medal_winners (OLYMPIC_YEAR,SPORT,GENDER,EVENT,MEDAL,NOC,ATHLETE) values (2016,'Volleyball','M','Men','Bronze','USA','United States');
Insert into olympic_medal_winners (OLYMPIC_YEAR,SPORT,GENDER,EVENT,MEDAL,NOC,ATHLETE) values (2016,'Volleyball','W','Women','Gold','CHN','China');
Insert into olympic_medal_winners (OLYMPIC_YEAR,SPORT,GENDER,EVENT,MEDAL,NOC,ATHLETE) values (2016,'Volleyball','W','Women','Silver','SRB','Serbia');
Insert into olympic_medal_winners (OLYMPIC_YEAR,SPORT,GENDER,EVENT,MEDAL,NOC,ATHLETE) values (2016,'Volleyball','W','Women','Bronze','USA','United States');
Insert into olympic_medal_winners (OLYMPIC_YEAR,SPORT,GENDER,EVENT,MEDAL,NOC,ATHLETE) values (2016,'Water Polo','M','Men','Gold','SRB','Serbia');
Insert into olympic_medal_winners (OLYMPIC_YEAR,SPORT,GENDER,EVENT,MEDAL,NOC,ATHLETE) values (2016,'Water Polo','M','Men','Silver','CRO','Croatia');
Insert into olympic_medal_winners (OLYMPIC_YEAR,SPORT,GENDER,EVENT,MEDAL,NOC,ATHLETE) values (2016,'Water Polo','M','Men','Bronze','ITA','Italy');
Insert into olympic_medal_winners (OLYMPIC_YEAR,SPORT,GENDER,EVENT,MEDAL,NOC,ATHLETE) values (2016,'Water Polo','W','Women','Gold','USA','United States');
Insert into olympic_medal_winners (OLYMPIC_YEAR,SPORT,GENDER,EVENT,MEDAL,NOC,ATHLETE) values (2016,'Water Polo','W','Women','Silver','ITA','Italy');
Insert into olympic_medal_winners (OLYMPIC_YEAR,SPORT,GENDER,EVENT,MEDAL,NOC,ATHLETE) values (2016,'Water Polo','W','Women','Bronze','RUS','Russian Federation');
Insert into olympic_medal_winners (OLYMPIC_YEAR,SPORT,GENDER,EVENT,MEDAL,NOC,ATHLETE) values (2016,'Weightlifting','M','Men''s +105kg','Gold','GEO','TALAKHADZE Lasha');
Insert into olympic_medal_winners (OLYMPIC_YEAR,SPORT,GENDER,EVENT,MEDAL,NOC,ATHLETE) values (2016,'Weightlifting','M','Men''s +105kg','Bronze','GEO','TURMANIDZE Irakli');
Insert into olympic_medal_winners (OLYMPIC_YEAR,SPORT,GENDER,EVENT,MEDAL,NOC,ATHLETE) values (2016,'Weightlifting','M','Men''s +105kg','Silver','ARM','MINASYAN Gor');
Insert into olympic_medal_winners (OLYMPIC_YEAR,SPORT,GENDER,EVENT,MEDAL,NOC,ATHLETE) values (2016,'Weightlifting','M','Men''s 105kg','Gold','UZB','NURUDINOV Ruslan');
Insert into olympic_medal_winners (OLYMPIC_YEAR,SPORT,GENDER,EVENT,MEDAL,NOC,ATHLETE) values (2016,'Weightlifting','M','Men''s 105kg','Bronze','KAZ','ZAICHIKOV Alexandr');
Insert into olympic_medal_winners (OLYMPIC_YEAR,SPORT,GENDER,EVENT,MEDAL,NOC,ATHLETE) values (2016,'Weightlifting','M','Men''s 105kg','Silver','ARM','MARTIROSYAN Simon');
Insert into olympic_medal_winners (OLYMPIC_YEAR,SPORT,GENDER,EVENT,MEDAL,NOC,ATHLETE) values (2016,'Wrestling','M','Men''s Freestyle 125 kg','Gold','TUR','AKGUL Taha');
Insert into olympic_medal_winners (OLYMPIC_YEAR,SPORT,GENDER,EVENT,MEDAL,NOC,ATHLETE) values (2016,'Wrestling','M','Men''s Freestyle 125 kg','Bronze','BLR','SAIDAU Ibrahim');
Insert into olympic_medal_winners (OLYMPIC_YEAR,SPORT,GENDER,EVENT,MEDAL,NOC,ATHLETE) values (2016,'Wrestling','M','Men''s Freestyle 125 kg','Bronze','GEO','PETRIASHVILI Geno');
Insert into olympic_medal_winners (OLYMPIC_YEAR,SPORT,GENDER,EVENT,MEDAL,NOC,ATHLETE) values (2016,'Wrestling','M','Men''s Freestyle 125 kg','Silver','IRI','GHASEMI Komeil Nemat');
Insert into olympic_medal_winners (OLYMPIC_YEAR,SPORT,GENDER,EVENT,MEDAL,NOC,ATHLETE) values (2016,'Wrestling','M','Men''s Freestyle 57 kg','Gold','GEO','KHINCHEGASHVILI Vladimer');
Insert into olympic_medal_winners (OLYMPIC_YEAR,SPORT,GENDER,EVENT,MEDAL,NOC,ATHLETE) values (2016,'Wrestling','M','Men''s Freestyle 57 kg','Bronze','AZE','ALIYEV Haji');
-- This pivots the results by medal. But the columns not listed
-- in the pivot form an implicit group by. So this gives the
-- medal total per athlete per event.
select * from olympic_medal_winners
pivot ( count(*) for medal in (
'Gold' gold, 'Silver' silver, 'Bronze' bronze
))
order by noc
fetch first 6 rows only;
-- To overcome the problem in the previous statement,
-- his selects just the columns you need in the subquery.
-- But some events have multiple people who win the
-- same medal - e.g. doubles tennis. This pivot
-- counts rows in the table, not individual events.
select * from (
select noc, medal from olympic_medal_winners
)
pivot ( count(*) for medal in (
'Gold' gold, 'Silver' silver, 'Bronze' bronze
))
order by 2 desc, 3 desc, 4 desc
fetch first 5 rows only;
-- This solves the over counting problem in the
-- previous statement. It does this by finding the
-- distinct values for sport, event and gender
-- then counting the results.
select * from (
select noc, medal, sport, event, gender
from olympic_medal_winners
)
pivot ( count(distinct sport ||'#'|| event ||'#'||gender ) for medal in (
'Gold' gold, 'Silver' silver, 'Bronze' bronze
))
order by 2 desc, 3 desc, 4 desc
fetch first 5 rows only;
-- You can have many functions in the pivot.
-- Oracle generates a column for each function
-- per value in the in clause. This finds the
-- gold medal winning countries. For each it shows:
-- - The number of different events these were won in
-- - The number of different sports thy were won in
-- - The names of the athlete or team who won each medal
-- Finally it filters to only show those countries
-- that won at least two gold medals.
select * from (
select noc, medal, sport, event, gender, athlete
from olympic_medal_winners
)
pivot (
count( distinct sport ||'#'|| event ||'#'|| gender ) medals,
count( distinct sport ) sports,
listagg( athlete, ',') within group (order by athlete) athletes
for medal in ( 'Gold' gold )
)
where gold_medals > 1
order by gold_medals, gold_sports, noc
fetch first 5 rows only;
-- This is similar to the previous query.
-- But it finds those countries whose IOC code starts with D.
select * from (
select noc, medal, sport, event, gender, athlete
from olympic_medal_winners
)
pivot (
count( distinct sport ||'#'|| event ||'#'|| gender ) medals,
count( distinct sport ) sports,
listagg( athlete, ',') within group (order by athlete) athletes
for medal in ( 'Gold' gold )
)
where noc like 'D%'
order by gold_medals;
-- This produces a matrix, sports across the
-- top countries down the side. There's an X
-- for each sport that country has a row in the table for.
select * from (
select noc, sport
from olympic_medal_winners
)
pivot (min('X') for sport in (
'Archery' as arc, 'Athletics' as ath, 'Hockey' as hoc,
'Judo' as jud, 'Sailing' as sai, 'Wrestling' as wre
)
)
order by noc
fetch first 7 rows only;
-- This is the old school, pre Oracle Database
-- 11g method for pivoting data.
select noc,
count ( case when medal = 'Gold' then 1 end ) gold_medals,
count ( case when medal = 'Silver' then 1 end ) silver_medals,
count ( case when medal = 'Bronze' then 1 end ) bronze_medals
from olympic_medal_winners
group by noc
order by 2 desc, 3 desc, 4 desc
fetch first 5 rows only;
-- An example of how to build the pivot clause
-- values dynamically.
-- Note that when you do this the number of
-- columns can change between runs. So the
-- execute and fetch routine will be far
-- more complex in a real world scenario!
declare
sql_stmt clob;
pivot_clause clob;
begin
select listagg('''' || sport || ''' as "' || sport || '"', ',') within group (order by sport)
into pivot_clause
from (select distinct sport from olympic_medal_winners);
sql_stmt := 'select * from (select noc, sport from olympic_medal_winners)
pivot (count(*) for sport in (' || pivot_clause || '))';
dbms_output.put_line( sql_stmt );
execute immediate sql_stmt;
end;
/
-- The XML keyword dynamically builds the
-- list of values to pivot. But you get the
-- results in XML! Each "column" is an
-- element in this document.
select * from (
select noc, sport
from olympic_medal_winners
)
pivot xml (count(*) medal_winners for sport in (
select sport
from olympic_medal_winners
where sport like 'A%')
)
where rownum = 1;
-- This previous example gave every country
-- at least one medal in every sport! To
-- avoid this, you need to count a column
-- which will be null if the country
-- didn't win in a particular event.
select * from (
select noc, sport, athlete
from olympic_medal_winners
)
pivot xml (count(athlete) medal_winners for sport in (
select sport
from olympic_medal_winners
where sport like 'A%')
)
where rownum = 1;
-- This creates the final medal table
-- for the unpivot example below.
create table olympic_medal_tables as
select * from (
select noc, medal, sport, event, gender
from olympic_medal_winners
)
pivot ( count(distinct sport ||'#'|| event ||'#'||gender ) for medal in (
'Gold' gold_medals, 'Silver' silver_medals, 'Bronze' bronze_medals
))
order by 2 desc, 3 desc, 4 desc;
-- Unpivot takes the columns and
-- converts them back to rows.
select * from olympic_medal_tables
unpivot (medal_count for medal_colour in (
gold_medals as 'GOLD',
silver_medals as 'SILVER',
bronze_medals as 'BRONZE'
))
order by noc
fetch first 6 rows only;
drop table olympic_medal_tables purge;
create table olympic_medal_tables as
select * from (
select noc, medal, sport, event, gender
from olympic_medal_winners
)
pivot ( count(distinct sport ||'#'|| event ||'#'||gender ) medals,
count(distinct sport) sports
for medal in (
'Gold' gold, 'Silver' silver, 'Bronze' bronze
))
order by 2 desc, 4 desc, 6 desc;
-- You can unpivot two or more columns
-- to a single row. To do this, provide a
-- list of the columns you want to combine.
-- You then get a column for each in the results.
select * from olympic_medal_tables
unpivot ((medal_count, sport_count) for medal_colour in (
(gold_medals, gold_sports) as 'GOLD',
(silver_medals, silver_sports) as 'SILVER',
(bronze_medals, bronze_sports) as 'BRONZE'
))
fetch first 9 rows only;
drop table olympic_medal_tables purge;
create table olympic_medal_tables as
select * from (
select noc, medal, sport, event, gender, athlete
from olympic_medal_winners
)
pivot ( count(distinct sport ||'#'|| event ||'#'||gender ) medals,
listagg(athlete, ',') within group (order by athlete) athletes
for medal in (
'Gold' gold, 'Silver' silver, 'Bronze' bronze
))
order by 2 desc, 4 desc, 6 desc;
-- Another example of unpivoting multiple columns.
-- This time with a list of athletes.
select * from olympic_medal_tables
unpivot ((medal_count, athletes) for medal_colour in (
(gold_medals, gold_athletes) as 'GOLD',
(silver_medals, silver_athletes) as 'SILVER',
(bronze_medals, bronze_athletes) as 'BRONZE'
))
where medal_colour = 'GOLD'
and medal_count = 2
order by noc
fetch first 3 rows only;
-- This first unpivots the results to get the
-- list of athletes won two gold medals. It
-- then uses XML tokenization to split
-- the list into a row per person.
with rws as (
select * from olympic_medal_tables
unpivot ((medal_count, athletes) for medal_colour in (
(gold_medals, gold_athletes) as 'GOLD',
(silver_medals, silver_athletes) as 'SILVER',
(bronze_medals, bronze_athletes) as 'BRONZE'
))
where medal_colour = 'GOLD'
and medal_count = 2
)
select noc, athlete
from rws, xmltable (
'if (contains($X,",")) then ora:tokenize($X,"\,") else $X'
passing athletes as X
columns athlete varchar2(4000) path '.'
)
order by 1, 2
fetch first 6 rows only;
-- This creates the table of medals won by
-- each country per sport for use in the
-- examples below.
create table olympic_country_sport_medals as
select * from (
select noc, sport
from olympic_medal_winners
)
pivot (count(sport) for sport in (
'Athletics' as ath, 'Artistic Gymnastics' as gym, 'Cycling Track' as cyc,
'Boxing' as box, 'Sailing' as sai
)
)
order by 1;
-- This switches the rows and columns over
-- aka a transpose. It does so by chaining
-- a pivot followed by an unpivot.
select * from olympic_country_sport_medals
pivot (
sum(ath) ath, sum(box) box, sum(gym) gym, sum(sai) sai, sum(cyc) cyc
for noc in ('BRA' BRA, 'CHN' CHN, 'DEN' DEN, 'ESP' ESP, 'ETH' ETH, 'GRE' GRE )
)
unpivot (
(BRA, CHN, DEN, ESP, ETH, GRE ) for sport in (
(BRA_ATH, CHN_ATH, DEN_ATH, ESP_ATH, ETH_ATH, GRE_ATH) as 'Athletics',
(BRA_GYM, CHN_GYM, DEN_GYM, ESP_GYM, ETH_GYM, GRE_GYM) as 'Artistic Gym',
(BRA_BOX, CHN_BOX, DEN_BOX, ESP_BOX, ETH_BOX, GRE_BOX) as 'Boxing',
(BRA_SAI, CHN_SAI, DEN_SAI, ESP_SAI, ETH_SAI, GRE_SAI) as 'Sailing',
(BRA_CYC, CHN_CYC, DEN_CYC, ESP_CYC, ETH_CYC, GRE_CYC) as 'Track Cycling'
)
);
-- Tranposing data using unpivot and pivot.
-- Much easier to write than the other way around!
select * from olympic_country_sport_medals
unpivot (
(medals) for sport in ( ath, box, gym, sai, cyc )
)
pivot (
sum(medals) for noc in (
'BRA' BRA, 'CHN' CHN, 'DEN' DEN, 'ESP' ESP, 'ETH' ETH, 'GRE' GRE
)
);
BREAKING NEWS!! APEX packages with ORDS and SQLcl now available in Oracle Linux YUM servers and through ULN
The deets
Here is what you need to know. We are releasing three new APEX (a.k.a. “The Artist formerly known as Oracle Application Express”) packages for the following repositories:
ol7_oci_included
ol8_oci_included
ol9_oci_included
NoARCH RPMs
One more update! These RPMs will be packaged as NoArch. This means you will be free to install these on any CPU architecture (Intel x86_64, AMD, and ARM). As a reminder, OCI Always Free tenancy Compute Instances are available with:
Micro instances (I’m using a VM.Standard.E2.1.Micro; an AMD processor)
TIP: These will all be available through both the publicly available Oracle YUM servers andthe Unbreakable Linux Network (ULN) channels.
Fortunately, I was provided advanced copies of the brand-new RPM files that will be included in their respective oci_included repositories. You’ll soon have access to no less than three flavors of APEX (and their dependencies). YUM!
You’ll soon see the following packages:
Oracle Application Express 23.1
NOTE: In this write-up, and the images below, you'll see me reference this as apex-core.
The Oracle Application Express package contains everything you need to install APEX in your database. We also package it with the SQLcl package to simplify installation.
Oracle Application Express Images 23.1
NOTE: In this write-up, and the images below, you'll see me reference this as apex-images.
This Oracle Application Express Images package includes your APEX images (i.e., you may be familiar with this as these are symlinked to your /i/ virtual directory for Oracle APEX images). This package also contains the ORDS package, making it easier to run the APEX image of your choice.
This package will also automatically add a symbolic link (aka symlink) from your APEX images files to your default ORDS doc_root path.
Oracle Application Express Patch Set Bundle 23.1.3
NOTE: In this write-up, and the images below, you'll see me reference this as apex-patch.
The Oracle Application Express Patch Set Bundle provides a means for you to take the latest APEX patch sets, compare them against your existing base APEX images, overwrite those base files with the latest changes, and then place them into their own /opt/oracle/apex/[latest patch]/images directory. Oh, and you’ll also retain the APEX base images in their own /opt/oracle/apex/[apex base]/images directory too!
And when you’re ready, you can update APEX in your database with the latest patches. The package even symlinks the newest patch set images to your APEX installation’s virtual image directory (i.e., the /i/ directory). And finally, we automatically symlink (as mentioned in the Oracle Application Express Images 23.1 section) this folder to your default ORDS doc_root path.
REMEMBER: If you create a Compute Instance in OCI, these repositories will automatically be accessible to you (if you aren't though, check this resource out to get set up)!
A week ago, I had limited (i.e., zero) experience with the Linux package managers Yellowdog Updater Modified (YUM) and Dandified YUM (DNF). But since then, I’ve tinkered around with Oracle Linux (OL) quite a bit. I even successfully installed Oracle Linux 8 (OL8) on an old Raspberry PI 3 Model B V1.2 (which, if you can believe it, was first released in 2016)!
PAUSE: If you want to see a tutorial of I how I did this, let me know in the comments, or @ me on Twitter/X or Threads.
Exploring OL8 and OCI Compute Instances
If you have an OCI Always Free account, you too can get acquainted with Oracle Linux 8 (OL8), as that is provided when creating a new Compute Instance in your OCI tenancy.
After creating that Instance, you can SSH into it and check out what Oracle Linux ships with. Once in, use one of these commands (depending on the version):
# Command for Oracle Linux 7:
yum list *release-el7
# Command for Oracle Linux 8:
dnf list *release-el8
# Command for Oracle Linux 9:
dnf list *release-el9
And here I am checking the packages and repositories (with the dnf list *release-ol8 command) in my Compute Instance:
Since I first created this Compute Instance, I’ve been tinkering with DNF and the repositories, so your output might look different. But at a minimum, you can expect to see the ol8_oci_included and ol8_baseos_latest repositories.
Oracle Database Tools via YUM or DNF
NOTE: This next section WILL NOT apply if you are working with the Oracle Linux that is provided in your OCI Compute Instance!!!
You won’t find a direct link to our Database Tools repository if you do this independently (i.e., not creating an OCI Compute Instance as I did). That is an easy fix; you can manually configure the repositories.
NOTE: If you are doing this through OCI (as in with a newly-created Compute Instance), you won't need to configure this, it will be included in the ol8_oci_included repository (this applies to OL7 and OL9 too)!
But for manual configuration, here are the direct links for the available Oracle Linux versions (you’ll want to use whichever one corresponds to your Linux version):
Oracle Linux 7 http://yum.oracle.com/repo/OracleLinux/OL7/oracle/software/x86_64
Oracle Linux 8 http://yum.oracle.com/repo/OracleLinux/OL8/oracle/software/x86_64
You can manually configure the repositories like this:
You can then inspect the packages in this repository with the following command:
dnf repository-packages [the repo id] info --all
I can now download our ORDS and SQLcl packages, our two must-haves:
In the above images, you can see these packages are being installed from the ol8_oci_included repository. This is because Compute Instances in OCI automatically have access to the Unbreakable Linux Network (ULN); you can read all about it in the OCI documentation found here.
NOTE: Once again, taking the extra step to configure this additional repository is unnecessary; I'm only demonstrating how to do it if you are working with something other than an OCI Compute Instance.
The big reveal/super secret surprise
If you’ve been working with Linux (and specifically Oracle Linux), then none of this will be much of a surprise to you. And you probably (definitely) know more about this than I do. But what youDON’T know is that we are releasing three new APEX packages for the ol7_oci_included, ol8_oci_included, and ol9_oci_included repositories.
Since I know a guy (thanks, Adrian 🤫), I was provided advanced copies of the brand-new RPM files that will be included in the respective oci_included repositories. You’ll soon have access to three flavors of APEX (and their dependencies):
Oracle Application Express 23.1
The Oracle Application Express package contains everything you need to install APEX in your database. We also package it with the SQLcl package to simplify installation.
Oracle Application Express Images 23.1
The Oracle Application Express Images package includes your APEX images (i.e., you may be familiar with this as these are symlinked to your /i/ virtual directory). This package also contains the ORDS package, making it easier to run the APEX image of your choice.
It will also automatically add a symbolic link (aka symlink) from your APEX image files to your default ORDS doc_root path.
Oracle Application Express Patch Set Bundle 23.1.3
The Oracle Application Express Patch Set Bundle provides a means for you to take the latest APEX patch sets, compare them against your existing base APEX images, overwrite those base files with the latest changes, and then place them into their own /opt/oracle/apex/[latest patch]/images directory. Oh, and you’ll also retain the APEX base images in their own /opt/oracle/apex/[apex base]/images directory too!
And when you’re ready, you can update APEX in your database with the latest patches. The package even symlinks the newest patch set images to your APEX installation’s virtual image directory (i.e., the /i/ directory). And finally, we automatically symlink (as mentioned in the Oracle Application Express Images 23.1 section) this folder to your default ORDS doc_root path.
REMEMBER: If you create a Compute Instance in OCI, these repositories will automatically be accessible to you (if you aren't though, check this resource out to get set up)!
That was a lot of words. But in practice, the following images illustrate what to expect when you issue the dnf install command (for the APEX-CORE or APEX-IMAGES packages).
APEX-CORE
REMINDER: The official package name will be Oracle Application Express 23.1.
APEX-CORE install via a local RPMCompleting the APEX-CORE package installation, revealing helpful installation information
APEX-IMAGES
REMINDER: The official package name will be Oracle Application Express Images 23.1.
Alternatively, you may also decide to install the APEX-IMAGES packages (if you intend on using many versions of APEX along with its ORDS companion):
APEX-IMAGES install via a local RPMCompleting the APEX-IMAGES package installation, revealing helpful installation information
Once these packages are available in the ol7_oci_included, ol8_oci_included, and ol9_oci_included repositories, install commands become much more straightforward. You won’t have to bother with the individual RPM files; you can issue either the yum install or dnf install commands.
NOTE: We switched to DNF for OL8 and later but the commands are symlink'd so I believe either will work. You can read about that here.
The only thing you have to do now is decide which packages you’ll want to install!
Check for updates
This last section is just a reminder. If you haven’t done so yet, check for updates to all your repositories (namely the ol7_oci_included, ol8_oci_included, and ol9_oci_included repositories).
TIP: You can issue the yum --help or dnf --help command to refresh your memory on which "update" command to use.
But once again, I suspect you already know how to do this if you have more than a week’s experience with Oracle Linux, YUM, or DNF. Be on the lookout for updates to the Oracle Linux release notes too!
I explore ETags and how they can be used in cURL commands when interacting with Oracle REST APIs. I also discuss some of the performance benefits of using ETags. This is not exhaustive, but I hope it introduces you to ETags or reminds you of their existence! But first…
LATE-BREAKING NEWS!!
A related video
FYI: I reference a CSV_DATA table throughout this post. We use it pretty extensively in this LiveLab. And we just recently presented a webinar based on that same LiveLab. You can check that out below!
Don’t know what ETags are? No worries, here is a definition:
The ETag (or entity tag) HTTP response header is an identifier for a specific version of a resource. It lets caches be more efficient and save bandwidth, as a web server does not need to resend a full response if the content was not changed. Additionally, etags help to prevent simultaneous updates of a resource from overwriting each other (“mid-air collisions”).
If the resource at a given URL changes, a new Etag value must be generated. A comparison of them can determine whether two representations of a resource are the same.
ETags can help to guarantee the provenance of your resources (like the auto-REST enabled table you’ll see shortly) but they can also ensure your applications consume fewer server/database resources, and load comparatively faster.
To illustrate how ETags work, I did some tinkering with cURL commands, ORDS, and a Podman container. Read on if ye dare…to see what I discovered!
Oracle REST APIs and ETags
A couple of weeks ago, I noticed in the cURL documentation there was support for ETags. And the cURL docs have options for both --etag-save and --etag-compare (practical examples to follow). When you use these options in your cURL commands, you’ll either:
save an eTag to a separate text file (locally, like on your desktop in my example below), or
compare the ETag (in that existing file) to an ETag that belongs to your REST-enabled resource (the CSV_DATA table, which you’ll see in a second)
Oh, that’s a lot of words! So read it again and then continue with my walkthrough. Meanwhile, I’ll spin up this Podman container.
We are back in Podman.
INFO: Want to learn more about using Podman and Oracle database tools? Check out my other two Podman-related posts here and here!
ORDS in Standalone mode
I need ORDS up and running for this demonstration, so I issued the ords serve command in my Terminal. This will launch ORDS in standalone mode (using a Jetty server, as seen in the image). Once it’s initialized, I can log into SQL Developer Web to interact with my database (remember, in this example, it lives in a Podman container).
Here, I’ve logged into SQL Developer Web as a non-ADMIN user (ORDSTEST in this case).
From the Database Actions Launchpad, I navigated to the SQL Worksheet.
And to keep this quick, I reused a table I created for that webinar we just did. I also auto-REST enabled it (so I could play with the cURL commands). Below, you’ll see it’s just a quick right-click with the mouse.
FYI: As a reminder, if you want to learn more about cURL commands, check out the LiveLabs workshop that this is based on. You can find that here.
Getting the cURL Command
Once I auto-REST enabled the CSV_DATA table, I selected the GET ALL REST cURL command.
This is the cURL command I’ll use for this experiment.
At this point, I still wasn’t sure that an ETag was sent from the server for those auto-REST-enabled resources (in this case, the CSV_DATA table). I know they are present when you build your own REST Modules with ORDS; (at the time) I was just less confident about the auto-REST resources.
SPOILER ALERT: ETags are present for auto-REST-enabled resources too (I'm dumb, and this is pretty widely known)!
–etag cURL options
Once I knew ETags were accessible for auto-REST-enabled resources, I experimented with cURL‘s --etag options (you’ll see how I implemented these in the upcoming cURL command).
The --etag-save [filename] and --etag-compare [filename] options work such that when you issue the --etag-save in addition to that initialcURL command, a single-line file will be saved to the directory you are currently in (you’ll see that file shortly).
This differs from how an application might work, but the concept is the same. You’re storing the ETag’s value somewhere accessible to the application. For my purposes, I need to keep this ETag somewhere the cURL command line utility can find it.
The initial cURL command
I hopped over to my Terminal and used that [slightly modified] cURL command (the one I previously retrieved from the SQL Worksheet). You’ll see that I included additional options/arguments:
--verbose
--etag-save
| json_pp
This is the first cURL command I issued.
FYI: Apparently, the json_pp command utility is a part of Perl. I think this ships with the macOS, but I'm not 100% sure. Do you know? It worked for me and pretty printed out my JSON response (notice how I used the pipe "|" in addition to the actual command).
When you use that --etag-save option, a file with the value of the ETag will be saved locally. You can see me retrieving that file and reviewing the ETag file (note in the above cURL command, I named the file “myobjectetag.txt“).
Listing the files in the current directory.Locating the myobjectetag.txt file.Opening the file and inspecting the ETag value.
I can now use this ETag in subsequent GET requests to determine if the resource (the CSV_DATA table) I’m requesting has changed since I last interacted with it. What would constitute a change? Maybe rows have been updated or removed; perhaps an additional column was added. Or maybe the table was restructured somehow; it could be any change.
But, let me pause briefly and explain the --verbose option.
About the verbose option
The printout from the --verbose option.The remaining JSON object is nicely printed out.
I used the --verbose option to inspect the information available when interacting with this Oracle REST endpoint. I don’t need to include it now since I know the ETag is coming through, but I left it in this cURL command example so that you could have a look yourself. You’ll see loads of information, including (but not limited to):
Connection information
The cURL version used
The Status Code returned (200 or OK in this case)
ETag info
In this example, all I care about is the presence of an ETag. I can now use that ETag in a subsequent GET request to determine if the resource on the server side has changed. Here is what the cURL command looks like with the --etag-compare option:
That cURL command looks very similar, except for that --etag-compare option. In this situation, cURL first checks to see if your ETag and the resource’s (the API endpoint on your server) ETag match. If they do, the request stops. And if you use the --verbose option, you can see what comes back from the server:
A whole bunch of nothing. Not really, though. That “If-None-Match” Header is the secret sauce, though. That is a conditional Header that is passed over to the server. Essentially it says, “If this Header value doesn’t match yours, then send over the requested data; otherwise, end the request here because we already have the information we need/. It’s stored/saved (presumably) locally.“
INFO:Read up on caches, because that's essentially what your application is going to use instead of having to go through the entire GET request/response cycle.
The request is terminated, but what does this mean from a performance perspective? Well, say you have a webpage that loads and later reloads in response to a user’s interaction (I simulated this with the two cURL commands). That page will probably need some information from the server to populate that page. In a situation like this, you could first ask your application to share your copy of the ETag with the server in a subsequent GET request header (“If-None-Match“). And if nothing has changed, you could speed up page load times by just refreshing with what you have stored in a cache while freeing up resources on your server for other processes. But this is just one example.
Possibilities with ETag
I’ve given this some thought, and I bet there are quite a few use cases where referring to an ETag before executing an HTTP method (like a GET or GET ALL) might be helpful.
You may want to periodically check to see if a resource has changed since you last interacted with it. Could you incorporate ETags into your build processes or longer-running jobs (maybe something around data analysis)?
Actually, ETags play a massive role in JSON-Relational Duality Views. We have an entire section in the ORDS docs on how to use them! And suppose you want to download a containerized version of the Oracle database 23C (the one that supports JSON-Relational Duality views). You can do that via this link (I think I should do this too and highlight some of the cool ORDS + JSON Duality View features)!
Well, this brings me to the end of this post. I’m hoping you learned something and came away with some good resources. And if you found this post helpful, please pass it along! And don’t be afraid to comment too! I’d love to hear your thoughts. Maybe I’ll even include your idea in a follow-up post 🤩!
The title says it all. I’ve run through this about ten times now. But I’ll show you how to start a Podman container (with a volume attached) and install ORDS on your local machine. And then, once installed, we’ll create and REST-enable a user so that the user can take full advantage of Oracle REST APIs. (aka ORDS). I’ll finally show you how to log into a SQL Worksheet as that new user. Ready? Let’s go!
Oracle Container Registry
First, visit the registry. Navigate to the Database product category, then select Enterprise. Even better, just navigate to the 21cor23ai images directly (thanks Killian 😉! Ensure you’ve also signed into the site (otherwise, you won’t be able to pull this image).
For Podman, I’ll review the preferred way to start this container (with a volume; for persisting your data across sessions).
Volumes
Start your Podman machine with the podman machine startcommand. Then create a volume with the podman volume create command (that way, you can save data locally and use that volume each time you start your container). Now that we have the volume, we can create a new container and attach that volume simultaneously (more Podman volume info here).
There are a few ways you can attach volumes when starting a container, but I like the one I found in this video:
Ironically, this is an Oracle video. But it is one of the most straightforward ones I found. To start the container, here is the command I used:
podman run -d --name entdb213 -p 1521:1521 --mount=type=volume,source=entdb213vol,destination=/opt/oracle/oradata container-registry.oracle.com/database/enterprise:21.3.0.0
About port mapping
You’ll notice that I used the following port mapping -p 1521:1521. You can remove that leading 1521. If you do, Podman will bind any exposed port to a random port on your host (a MacBook, in my case) within an ephemeral port range. Ephemeral?? (I guess that means all/any available ports, assuming none of these).
At this point, I have created a volume and started a container (with an Oracle Enterprise database inside).
PRO TIP: If this is your first time starting a container with a database of this size, it will take several minutes. So go do some chores while you're waiting 🤪
Altering the db password
I’ll change the database Administrator password to something I can easily remember (“oracle“) using this command:
# Original command
# docker exec <oracle-db> ./setPassword.sh <your_password>
# My modified command
podman exec entdb213 ./setPassword.sh oracle
Changing the password to something I can easily remember.
Note: There are several shell scripts included in this container; one of which is the change password script. There are more details on the Oracle Container Registry > Oracle Database Enterprise Edition page (redirects prevent me from linking directly to that page).
Downloading ORDS
Next, I’ll head to the Oracle REST Data Services download page. And download the latest ORDS build (I’ll be setting this up shortly, I’m just gathering and configuring everything now).
Once that ZIP file is in my downloads folder, I’ll unzip it. At this point, this folder will still be named ords latest. You can certainly keep it like that, but I’ve renamed it to ords_product_folder. This is similar to how we refer to it in our installation/configuration documentation (changing it might make it easier to follow along).
ORDS Configuration
There are two configuration steps I need to perform before I can begin the ORDS installation. You’ll need to set an Environment Variable to the binaries (these are in the bin folder, you should see that in the above image) found in the ords_product_folder. Secondly, you’ll need to create an ORDS Configuration folder.
WAIT: If you're still reading this, how is my approach? After some research, placing these two folders in the "Library" seemed to make the most sense. I'm not sure what the analog on a Windows machine would be though. Drop a comment below if you know!
At this point, I’m nearly finished with this initial configuration. I next opened my .zprofile file (this is the file where I’m keeping most of my environment variables) and added the following paths:
Pourquoi? I can't seem to find a definitive answer as to where these paths should be saved, but this thread on Stack Exchange does a great job explaining all these files (and when/where they are used).
ORDS Installation
You’ll want to exit out of all your Terminal sessions so that the next session can pick up those changes to the .zprofile file. Podman will still keep doing its thing in the background, and hopefully, by this time, the database container will display as “healthy.”
🛑 STOP: This may be obvious to you, but it wasn't to me, the database needs to be ready (healthy), online, and active (whatever you want to call it) for ORDS to install. You can always issue the podman ps command to check the status of the container.
Remember this; you’ll need it shortly.
ORDS install, the first attempt
In a new Terminal, I’ll issue the ords installcommand. If you’ve set up your bin and config environmental variables like me, then you shouldn’t have any issues. Moving through the first few steps is easy.
The ORDS interactive installer will default to recommended settings. Most of the time, these will be correct. Since this is my first time installing ORDS, I’ll choose Option 2 in that first step. I can use “localhost” as the database hostname and 1521 as the port.
When you get to the database service name, that’s where you might get hung up. The ORDS installer assumes default configuration settings. But here, if you select “orcl” as the database service name, it will install ORDS in the entire database. This is not technically incorrect, but our ORDS Best Practices recommends you install ORDS in a Pluggable Database (PDB). So I’ll issue the podman logscommand (in my case: podman logs entdb213) to find the name of the PDB; ORCLPDB1 (that’s the default for this container, it’s well-documented in the container registry docs, I’m just an idiot).
This is a neat trick, but it’s also documented in the Container Registry docs.
The ORDS interactive installer is very forgiving. I’ve noticed I can exit out of the installation process pretty much anywhere. Given that fact, I’ll restart my Terminal and start the ORDS install over (now that I have the correct database service name).
ORDS install, for real this time
In these images, you can better see the ords installcommand (it was slightly grayed out in the previous image). And you’ll also see all the steps completed. You can probably keep everything default as I did. You might want to since our documentation refers to that 8080 port (as seen in the images) in most of our tutorials and examples. I find it easier to follow along with the docs when everything matches.
🗒️ NOTE: Make sure you choose to run ORDS in standalone mode. That way you can continue to follow along in later steps.
Here you can see the paths to the bin and config folders.Conditions are perfect.
The rest of the installation is largely unremarkable. You will notice a few things, though:
The paths we’ve pointed to for the config and bin folders
The “settings” names(no action required by you, it’s just cool to see)
once the installation finishes, the text “Oracle REST Data Services initialized” will appear
That final image confirms that ORDS is now running in standalone mode. You can visit the following:
localhost:8080/ords/sql-developer
Logging into the SQL Worksheet, the first attempt
And try to log in with the SYS credentials.
One does not simply log into Database Actions…you must REST-enable a user first.
SPOILER ALERT: You can't 😕! Muahahahahaha!
That was a dirty trick. While ORDS is installed in ORCLPDB1, we must first create and REST-enable a user. I will make up for this dirty trick by sharing one of my favorite cheat codes for learning SQL and PL/SQL.
🗒️ NOTE: You cannot REST-enable the SYSTEM or SYS user.
If lucky enough, you have an Oracle Cloud Free Tier account with at least one Autonomous database provisioned.
CORPORATE SHILL ALERT: You can sign up for one here 😘.
Code cheating with the Autonomous database
Login to Database Actions as the Administrator. Navigate to User Management. In that dashboard, select the + Create User button.
In the Administration section.Click the Create User button.
When the slider appears, enter the information for the ORDSTEST user (like you see in the image here).
Once you’ve entered everything in, hit that “Show code” switch.
You’ll need to enable “Web Access” for this user. When you do this (click the switch), two things will happen:
The CONNECT and RESOURCE roles will be automatically selected for you
The Authorization required toggle will be enabled – shut this off for now
Once you’ve done that, you can select the “Show code” switch at the bottom of the slider. This will reveal the actual code that is being executed should you click the “Create User” button (which you will most certainly NOT!).
Copy and paste this into a text editor.
I copied this code and placed it into a text editor. I made one small change to the QUOTA line (at the bottom of the script).
Stole this from the ORDS Quick Start Guide.I am making a slight change to that last line.
Then I headed back to my Terminal and opened a new tab. I’ll execute this code in the database (remember, it’s in that Podman container running idle in the background this entire time) using SQLcl.
Forgot your connection string?
IF YOU FORGET the connection string format for logging in, have no fear! That Jeff Smith recently showed me the history command. I also have a couple of shorts on how I used the command:
Using the history + the number of your choice.Here is a connection string that is close enough!Entering the slightly modified string into SQLcl.
Using SQLcl to REST-enable a user
Now that I have the proper format for the connection string, I’ll adjust it so the password is correct. Then I’ll execute the code in SQLcl to create a new database user and REST-enable that user’s schema.
I changed that final line; this is what it looks like in SQLcl.
Cheat code with PL/SQL in SQLcl
I’ve just learned you can REST-enable yourself by logging into SQLcl (i.e., connecting to the database in the Podman container) and issuing the following command:
EXECUTE ORDS.ENABLE_SCHEMA;
This command assumes that you have already been granted the CONNECT and RESOURCE roles but have yet to REST-enable your schema (what allows ORDS to act as the intermediary between the database and the rest of the web).
The command will employ the procedure’s default parameters, which are:
ORDS.ENABLE_SCHEMA( p_enabled IN boolean DEFAULT TRUE, p_schema IN ords_schemas.parsing_schema%type DEFAULT NULL, p_url_mapping_type IN ords_url_mappings.type%type DEFAULT 'BASE_PATH', p_url_mapping_pattern IN ords_url_mappings.pattern%type DEFAULT NULL, p_auto_rest_auth IN boolean DEFAULT NULL);
Here is what a sample output would look like, if I were signed in as the HR user:
An example output is if I were signed in as the HR user.
🛑 FYI: This above image is just a sample, and not related to the rest of the images in this article. Be sure to pay attention to the connection string (sql hr/oracle@localhost:1521/freepdb1). This is if the HR user is logging into SQLcl and REST-enabling their own schema. That's why you see references to HR throughout. I don't want anybody to get confused!
Logging into the SQL Worksheet, for real this time
With all this code executed, I can NOW go back to the SQL Worksheet (remember, we’re on localhost:8080/ords/sql-developer) and log in as the newly created ORDSTEST user.
I am logging in as the ORDSTEST user.A true “will-they, won’t they” moment.Congrats, you have arrived!
And once you’re in, you’ll notice the SQL Worksheet is no different than what you might expect in the Oracle Autonomous database. So if you made it this far, go forth and CREATE, DELETE, INSERT, SELECT, and Query away, friends!
Shutting it all down
Once you are done playing and tinkering, you can log out of the SQL Worksheet, stop the ORDS process with CTL + C (on Mac, at least), stop the Podman container, and shut down the Podman virtual machine.
Use Control + C to stop the ORDS process.I am stopping the entdb213 container.Exiting from the Podman virtual machine.
And since we set this all up with a volume (so….so long ago, I know; we called it entdb213vol), you can start the container later on, and all your work will still be there (i.e., It shall persist!).
The end
Congrats, we made it! What do you think? Did I miss anything? If so, comment, and I’ll respond and update this post as needed. And if you think this could be useful for others, do share!