Tag: OCI

  • Configuring OCI IAM Domain JWTs to use with ORDS OAuth2.0 protected APIs

    Configuring OCI IAM Domain JWTs to use with ORDS OAuth2.0 protected APIs

    Table of Contents

    Intended Audience/Purpose

    Does this describe you?

    If this describes you, then keep reading!


    Creating a Domain

    Assuming you are at the central OCI Console, click the navigation icon at the top of your screen. Then, navigate to Identity & Security and click Create domain.

    NOTE: Make sure you are in your correct Compartment (this will be up to you to decide)! Everything I show here is done within the same /ords Compartment. 

    In this example, I’ve chosen to create an “External User” Domain type. I haven’t tested with any other Domain types, but I assume they all work similarly.

    Once you’ve entered all the information (e.g., Domain administrator values and Compartment), click Create Domain. Then, click on the Domain you just created. Next, you’ll need to create and add an “Integrated application.”

    Mini-tutorial: Adding a user to your Domain

    In this mini-tutorial, I demonstrate how to create a new user. Notice how I am using a personal email account, you can totally do this!

    Once you’ve added this user, they recieve a password reset email for this Domain. They must create a new password before logging in.

    Configure client access

    First, navigate to your domain, then selectย Settings.

    If thisย Configure client accessย box is unchecked, check it, then selectย Save Changes (the button at the bottom of the screen).

    That’s it. You’re done!

    Adding an Integrated Application to the Domain

    Adding the application

    From within your Domain dashboard, click the Integrated Applications menu item. The “Add application” modal will appear. Read through the application types and choose the most appropriate one. For this demo, I selected “Confidential Application.”

    Continue filling in the modal fields. Make sure you choose a unique name!

    I’ve left the URLs section empty for this demo and kept the Display settings checked. The Display settings are options for users when logging into their Domain (i.e., they don’t impact this workflow, but they are nice to have set for later).

    Click Next to continue to the Resource server configuration section.

    Configuring OAuth2.0

    In this section, you’ll configure your Resouce server and Client. First, we’ll create a Scope1.

    Resource server configuration

    When you configure your Scope, you must include a Primary audience field. Here, I’m just choosing the Domain’s name. The Primary audience needs to be structured exactly like this (with the trailing backslash)! Next, create a Scope (I’m using dot notation, since this will mirror the privilege I’ll create in ORDS, later).

    When finished, click Add.

    Client Configuration

    Next, you’ll include details about your client. In this demo, I use Postman as a client application stand-in. For this example I’m using the Authorization code grant type2, along with a Redirect URL.

    FYI: Postman has a /callback URL that you can use as a Redirect URL.
    Mini-tutorial: How do I find Postman’s Callback URL?

    From the Authorization tab, select OAuth 2.0. Then scroll down to the Configure New Token section. There you will find the Callback URL. Copy it. You’ll need it!

    I’ve chosen “All” for the Token issuance policy. Next, click Finish.

    Issuing a POST request to obtain a JWT

    You can send off that initial POST request to obtain the JWT from IAM with your Domain set. You’ll then use the details contained in that JWT to configure ORDS.

    Gathering the required values for the request

    If your application hasn’t already been activated, do so now.

    Next, click the Edit OAuth configuration button and retrieve your Client ID and Client secret. Save it to a clipboard or your environment files (if using this for an application).

    You will also need the Domain URL. Navigate to your Domain’s main dashboard (โ—๏ธmake sure you are still in the correct Compartment). Then copy the Domain URL to your clipboard, or environment file (aka .env file).

    Setting up Postman

    In Postman, make sure you have selected “Request Headers” in the Add authorization data to field. Also, add the word “Bearer” to the Header Prefix field.

    You’ll want to select Authorization Code as the Grant Type. For the Authorization URL and Access Token URL, you will use your Domain URL followed by:

    • Auth URL
      [Your Domain URL]/oauth2/v1/authorize
    • Access Token URL
      [Your Domain URL]/oauth2/v1/token

    Next, add your Client ID, Client Secret, and Scope. Notice how the Scope in Postman uses the Primary audience and the Scope (if you don’t remember where these came from, review the Resource server configuration section). Select “Send as Basic Auth header” for the Client Authentication field.

    Requesting the JWT

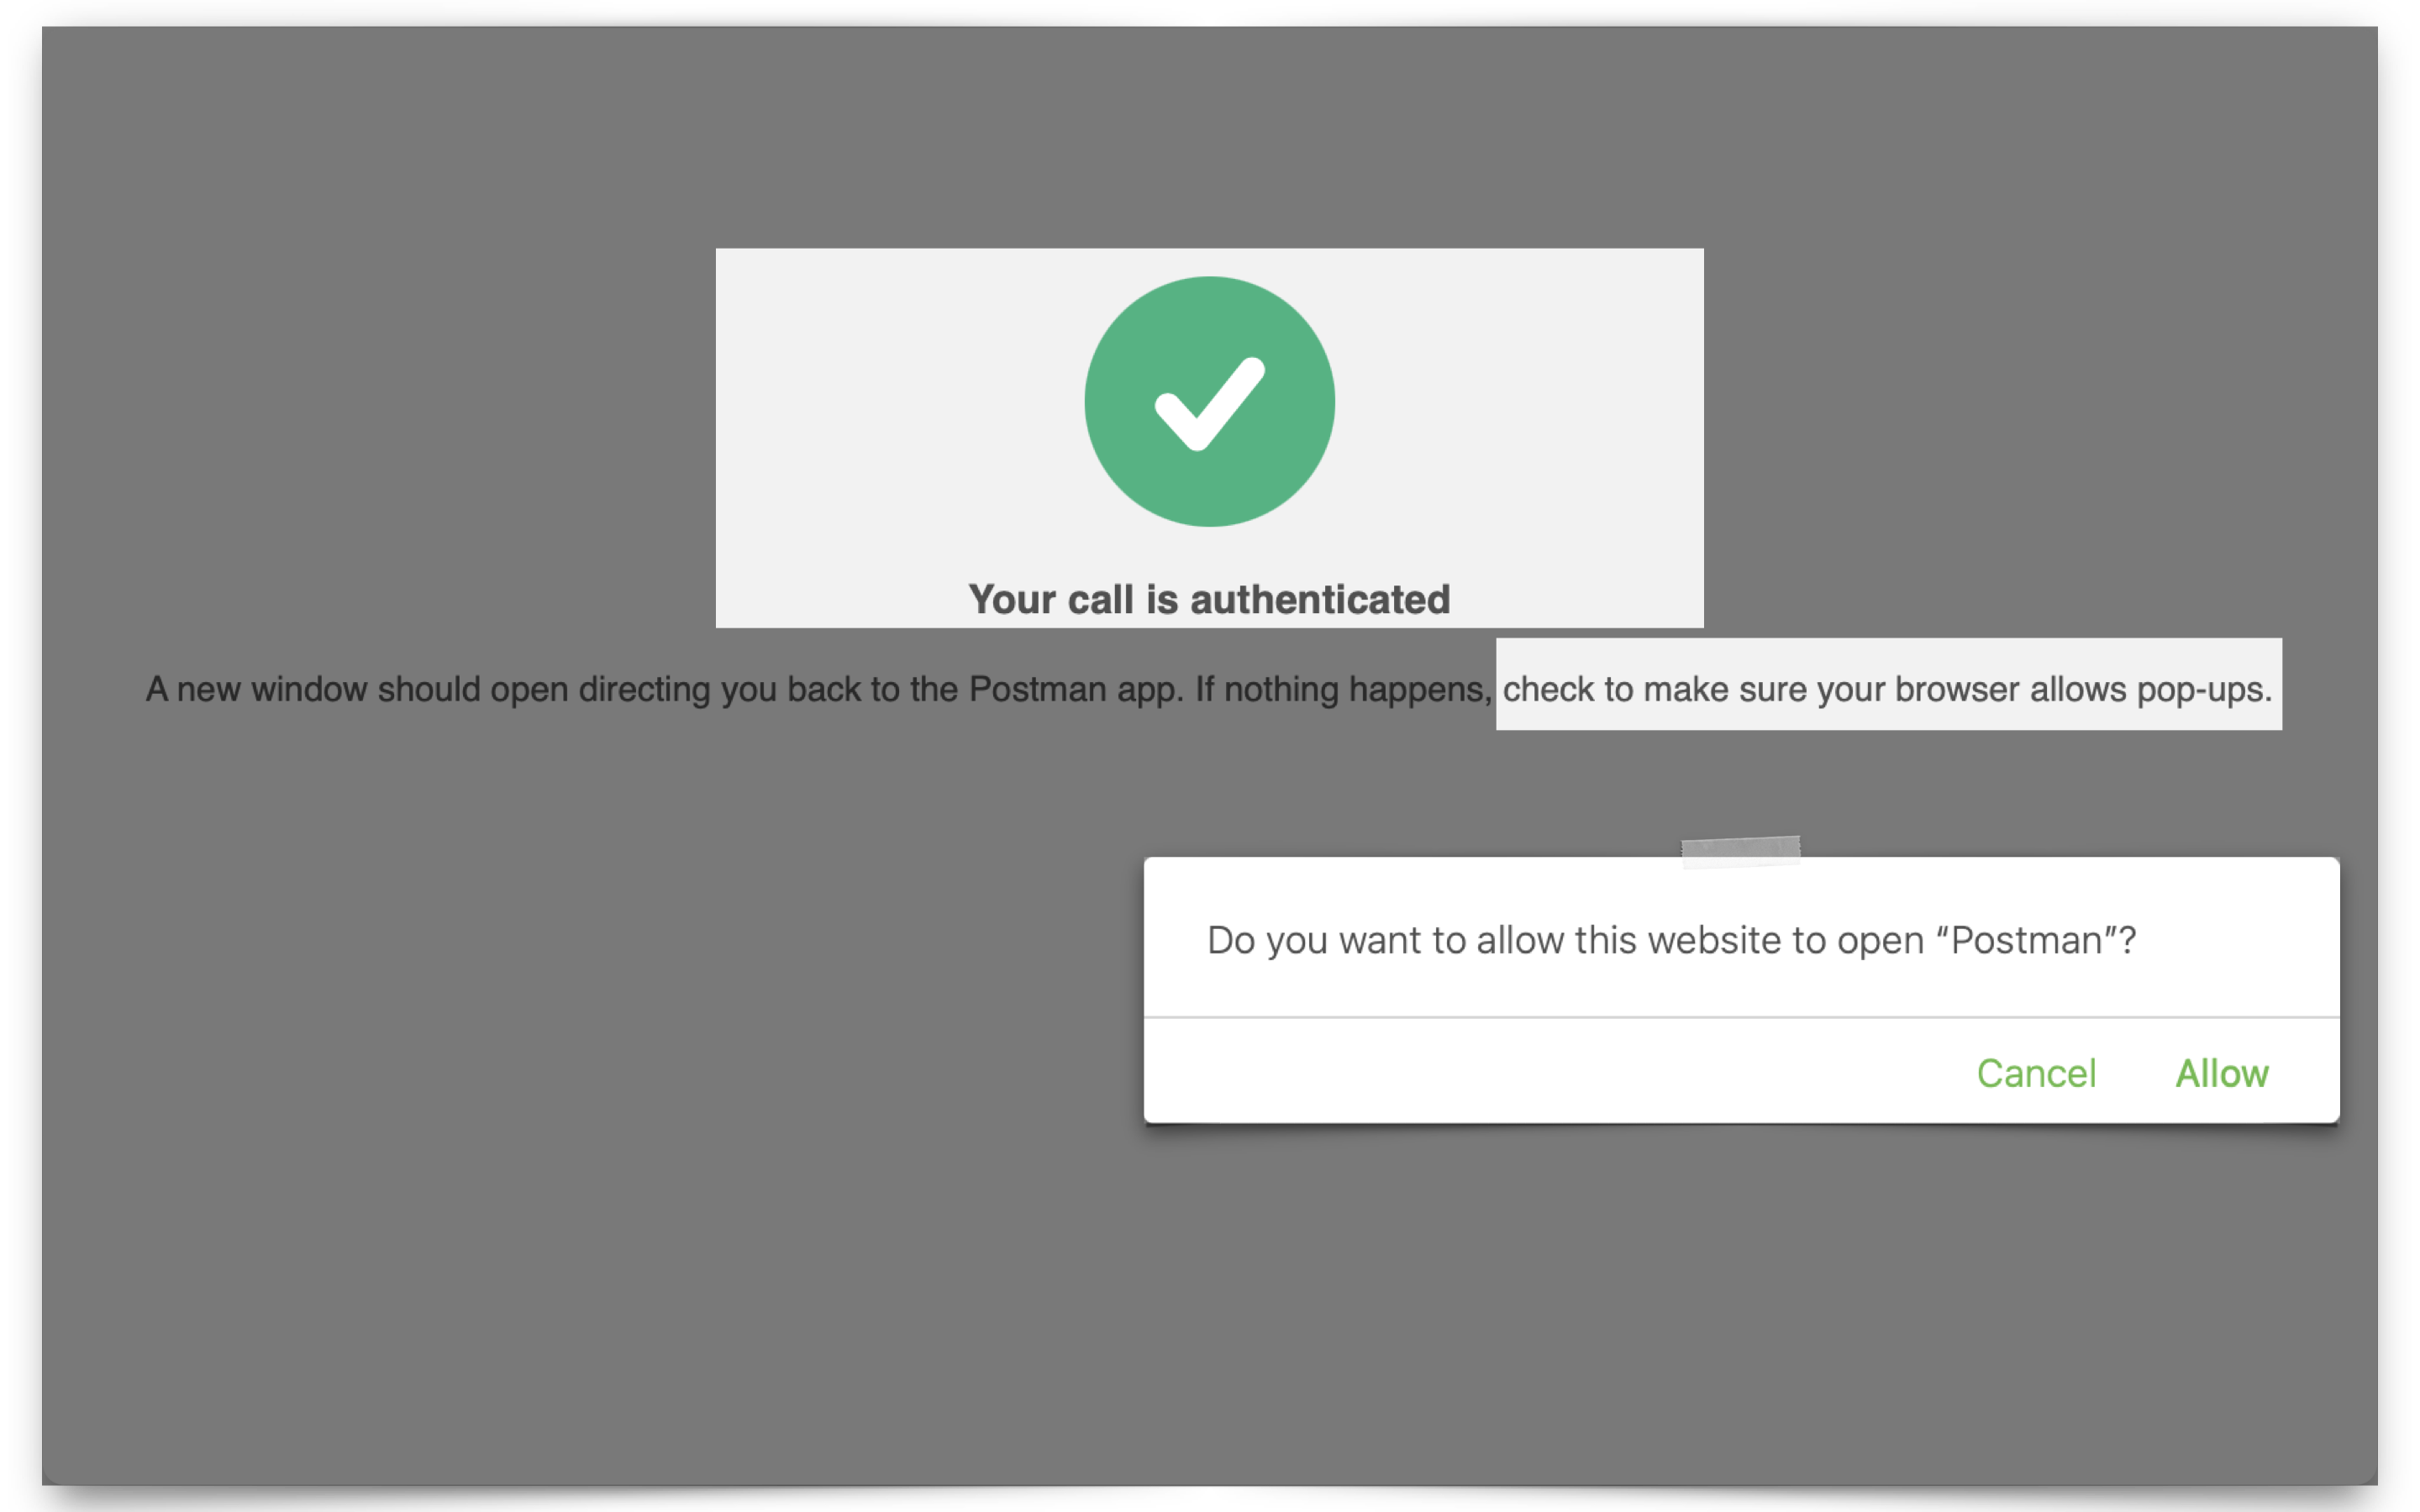
    This next part is easy. From Postman, scroll down to the bottom of the Authorization window until you see the Get New Access Token button. Click it; a new browser window will appear. Enter the user credentials (I’m using the one I created specifically for this demo), and if any pop-up blocker notifications appear, make sure you “allow pop-ups.”

    Once authenticated with IAM, you’ll be redirected back to Postman (remember, this is the Redirect URL you added in the Client Configuration section).

    Copy the entire JWT, and then click Use Token. You’ll now see the token in the Current Token field in Postman.

    HELP ME! Okay, if the Sign-in and/or Redirect didn't work for you, it might be that you are still signed into another OCI session, with a different user (a user that doesn't belong to this Domain). So, what I've had to do in the past is make sure I'm logged out of all OCI sessions, clear my cookies, close out my browser, and then restart with a new one. This has nothing to do with ORDS, but its what worked for me.

    ORDS configuration

    In these following sections, you will configure your ORDS JWT Profile and ORDS Privilege (associated with the Scope you’ve created). But first, you’ll need to decode your JWT.

    Decoding the JWT

    In the past, I’ve used two different tools for decoding these JWTs: JWT.io and JWT.ms. In this demonstration I’m using JWT.io.

    Paste your JWT into one of the decoders and copy the following values to your clipboard:

    • iss
    • scope
    • aud

    The values you’ll need:

    Creating the ORDS JWT profile

    Step one: Create your JWT Profile. This process “registers” a JWT profile with ORDS, so when an incoming request comes in, ORDS can “cross-reference” information related to Issuers, Audiences, and Scopes.

    The easiest way to do all this is to first navigate to an SQL Worksheet and then select the schema from the Navigator tab. Then, under the database objects drop-down menu, choose Packages.

    Click the OAUTH package to expand it, scroll to the bottom of that list, right click the CREATE_JWT_PROFILE PL/SQL procedure, and click Run. A slider will appear.

    Enter your details exactly like you see below:

    • P_ISSUER is https://identity.oraclecloud.com
    • P_AUDIENCE should be whatever your Primary audience is, with the trailing slash included!
    • P_JWK_URL
    FYI: The P_JWK_URL is a combination of [Your Domain URL] + /admin/v1/SigningCert/jwk (this is the endpoint identified in the OCI IAM Domains API doc). And since this is a /v1 endpoint, I assume there may be more. So, double-check the docs in case of a different/updated version. 

    Then, execute the PL/SQL procedure.

    Next, you’ll create an ORDS Privilege (to associate with our protected ORDS Resources).

    Creating an ORDS privilege

    Aka, the “thing” we are protecting and making accessible with a valid JWT. Navigate to your REST Workshop. From the Security tab, select Privileges.

    Create a new Privilege and name it exactly the same as the Scope you created in IAM. DO NOT INCLUDE the Primary audience in this scope name (In fact, you can’t; we won’t let you anyway ๐Ÿคฃ)! In the Protected Modules tab, select the Module you want to protect. Either drag it from the Available Modules tab to the Selected Modules tab or use the arrows to move it over. Then click Create.

    A peek at the ORDS API I’m using:

    This just prints out the Current User, using the ORDS :current_user Implicit parameter.

    Accessing your protected Resource (aka ORDS API) with the JWT

    Now, you may access this protected resource. Unless you’ve taken an hour to set ORDS up, your token will still be valid (it’s valid for an hour). Otherwise, you’ll need to obtain a new, fresh JWT. Using the target ORDS API (mine is the “Hello :current_user” endpoint) in your Postman request field, click Send. You’ll see two things happen (if you are viewing your Postman Console):

    1. An initial POST request to the Token server, and
    2. A subsequent GET request to your target ORDS API

    I should clarify…you might not see that initial POST request because you would have accomplished this before you opened the Postman Console. So, if you’d like to see these requests in real time, do this:

    • Clear out your cookies
    • Delete your existing token
    • Clear out the Console
    • Open the Console back up
    • Request a new JWT
    • Request your ORDS API (your protected Resource)

    The End

    And that’s it, finished! If you’ve made it this far, congratulations. That was a lot of work. Time for a coffee break!

    Follow

    And don’t forget to follow, like, subscribe, share, taunt, troll, or stalk me!

    1. Read up on Scopes here. โ†ฉ๏ธŽ
    2. There are four different Grant Types in the OAuth 2.0 framework: Authorization Code, Implicit, Resource Owner Password Credentials, and Client Credentials. You can read more about them here. โ†ฉ๏ธŽ

  • ORDS 24.3 Release Highlights

    ORDS 24.3 Release Highlights

    Overview

    There’s plenty to talk about in this release. However, I’m most excited about the performance improvements, ORDS sample applications, and documentation changes. Read on to get the whole story.

    Enhancements

    API Performance

    REST API responses from either AutoREST or customer based modules could see as much as a 30% improvement in response times.

    About a year ago, we introduced (we owe all our progress to Orla though) an internal program to track performance changes/improvements across ORDS APIs quantitatively. I can’t go into too much detail, but here is what I can divulge:

    • Although we use K6 for our performance testing, we are not promoting its use over any other available performance testing solution. There are other great tools available (e.g., Artillery, JMeter, and, of course, k6).
    • Testing is performed nightly against a 23ai database (installed in a PDB); we also include APEX in these tests.
    • For the tests, 250 schemas are created and then populated with various database objects (e.g., Functions, Materialized Views, PLSQL Packages, Sequences, Tables, Triggers, JSON Relational Duality Views, etc.)
      • These schemas are then absolutely hammered with Virtual Users. Users perform actions such as auto-REST enabling objects, creating custom Resource Modules, creating JSON Relational Duality Views, interrogating ORDS Metadata, and performing bulk inserts (BATCHLOAD) GETs, POSTs, etc.
    • These metrics are what we use to track the ORDS quantitative metrics longitudinally.

    So, that’s what we mean by “performance improvements.” Pretty cool, eh?

    ORDS Sample applications

    We have not one but TWO sample ORDS applications for you ๐Ÿ˜!

    Flask/Python

    The first is a fully contained LiveLabs sandbox workshop, which can be found here. But if you want to remix the code, check out my repo here (everything is heavily commented; hopefully, this will ease your pain).

    Node.js/React

    Secondly, our development team has created a brand new advanced application. Details are here.

    OAuth2.0 changes

    A consolidation and streamlining of the OAUTH and OAUTH_ADMIN PLSQL packages. The details:

    • We’ve consolidated those mentioned above into these two new packages: 
      • ORDS_SECURITY
      • ORDS_SECURITY_ADMIN
    • The OAUTH and OAUTH_ADMIN PL/SQL Packages have been deprecated by royal decree. However, they’ll still be included until ORDS version 25.3 (this time next year).
    • Creating a client and receiving your Client ID and Client Secret is now streamlined, and Client Secrets can now be rotated (by supporting two active Client Secrets while in rotation).

    Locating the new PL/SQL Packages:

    Finding PL/SQL Packages in Database Actions.

    23ai Boolean

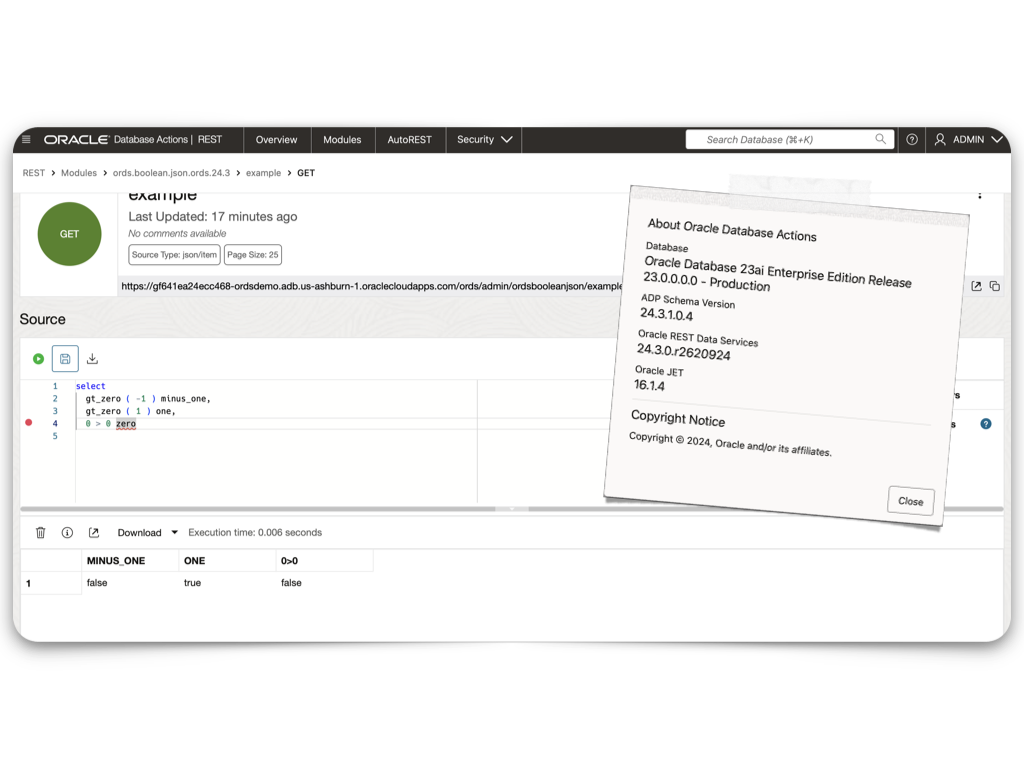
    ORDS now returns BOOLEAN types as JSON TRUE|FALSE properties instead of 0|1.

    What this looks like in practice with various configurations1:

    Oracle Database 23ai + ORDS 24.3
    Oracle Database 23ai + ORDS 24.2
    Oracle DB 21c Enterprise Edition + ORDS 24.3

    1Thank you internet stranger for providing us with this juicy bit of code.

    Mong[ooohhh, no, you didn’t?!] DB API

    • Support for even more Database Administration commands:
      • listIndexes
      • dropIndexes, and
      • optional parameter expireAfterSeconds (which applies to the createIndexes command)
    • The following MongoDB Aggregation Stages are now supported:
    • Users may now specify a JSON Schema validator when creating a collection
    • You may now create MongoDB API connections without TLS connections (Oracle Database 19c and later) can now be made.
    • Users can now set the createIndexes’ “online” option to TRUE to allow DML operations at index creation time.

    In the meantime, here are some resources I found:

    UPDATE: MongoDB API update article (October 10, 2024)

    A brand new article about the latest MongoDB API updates just dropped! Thanks to Hermann for publishing and sharing the latest. Details are here

    Documentation

    Introduced the following new sections:

    • 6.2.4 Using OCI Monitoring Service with Oracle REST Data Services
      • This new section details the configuration of the recently added ords-metrics utility. You can find details on how to set up this monitoring service (to communicate with OCI) here.
    • 3.2 Deploying ORDS with Central Configuration Server
    • Appendix D ORDS Central Configuration OpenAPI
      • Along with the updated docs, we’ve included the OpenAPI spec for creating the endpoints required for a central configuration server (and a special video clip of me retrieving the PL/SQL definitions and the OpenAPI spec in Database Actions).
      • OpenAPI spec doc here.

    Java notes

    In our Release Notes, we claim support for the following JDKs:

    • Oracle Java 11, 17, or 21
    • Oracle GraalVM Enterprise Edition for Java 11
    • Oracle GraalVM Enterprise Edition for Java 17
    • Oracle GraalVM Enterprise Edition for Java 21

    However, this may be confusing regarding Oracle GraalVM Enterprise Editions. You should know that there are currently TWO Oracle GraalVM Enterprise Edition JDKs:

    • Oracle GraalVM Enterprise Edition 20
    • Oracle GraalVM Enterprise Edition 21

    Instead of how we’ve presented, here is another, cleaner presentation of these JDKs:

    Oracle GraalVM Enterprise Edition 20Oracle GraalVM Enterprise Edition 21
    Linux (x86-64): Java 8, 11Linux (x86-64 and aarch64): Java 8, 11, 17
    macOS (x86-64): Java 8, 11macOS (x86-64 only): 8, 11, 17
    Windows (x86-64): Java 8, 11Windows (x86-64 only): 8, 11, 17
    Oracle GraalVM Enterprise Edition details

    So when you are choosing your JDK (to use with ORDS), make sure you consider your platform and use cases. Details on using GraalVM with ORDS here.

    fin

    This concludes the release notes supplement.

    This space โฌ‡๏ธ left intentionally blank.

    Follow

    And don’t forget to follow, like, subscribe, share, taunt, troll, or stalk me!

  • Extending ORDS with a Java plugin

    Extending ORDS with a Java plugin

    About this article

    This article is a walkthrough and overview of setting up the example Java plugin that ships with ORDS. These plugins allow you to add functionalities and capabilities above what is possible with a standard ORDS configuration.

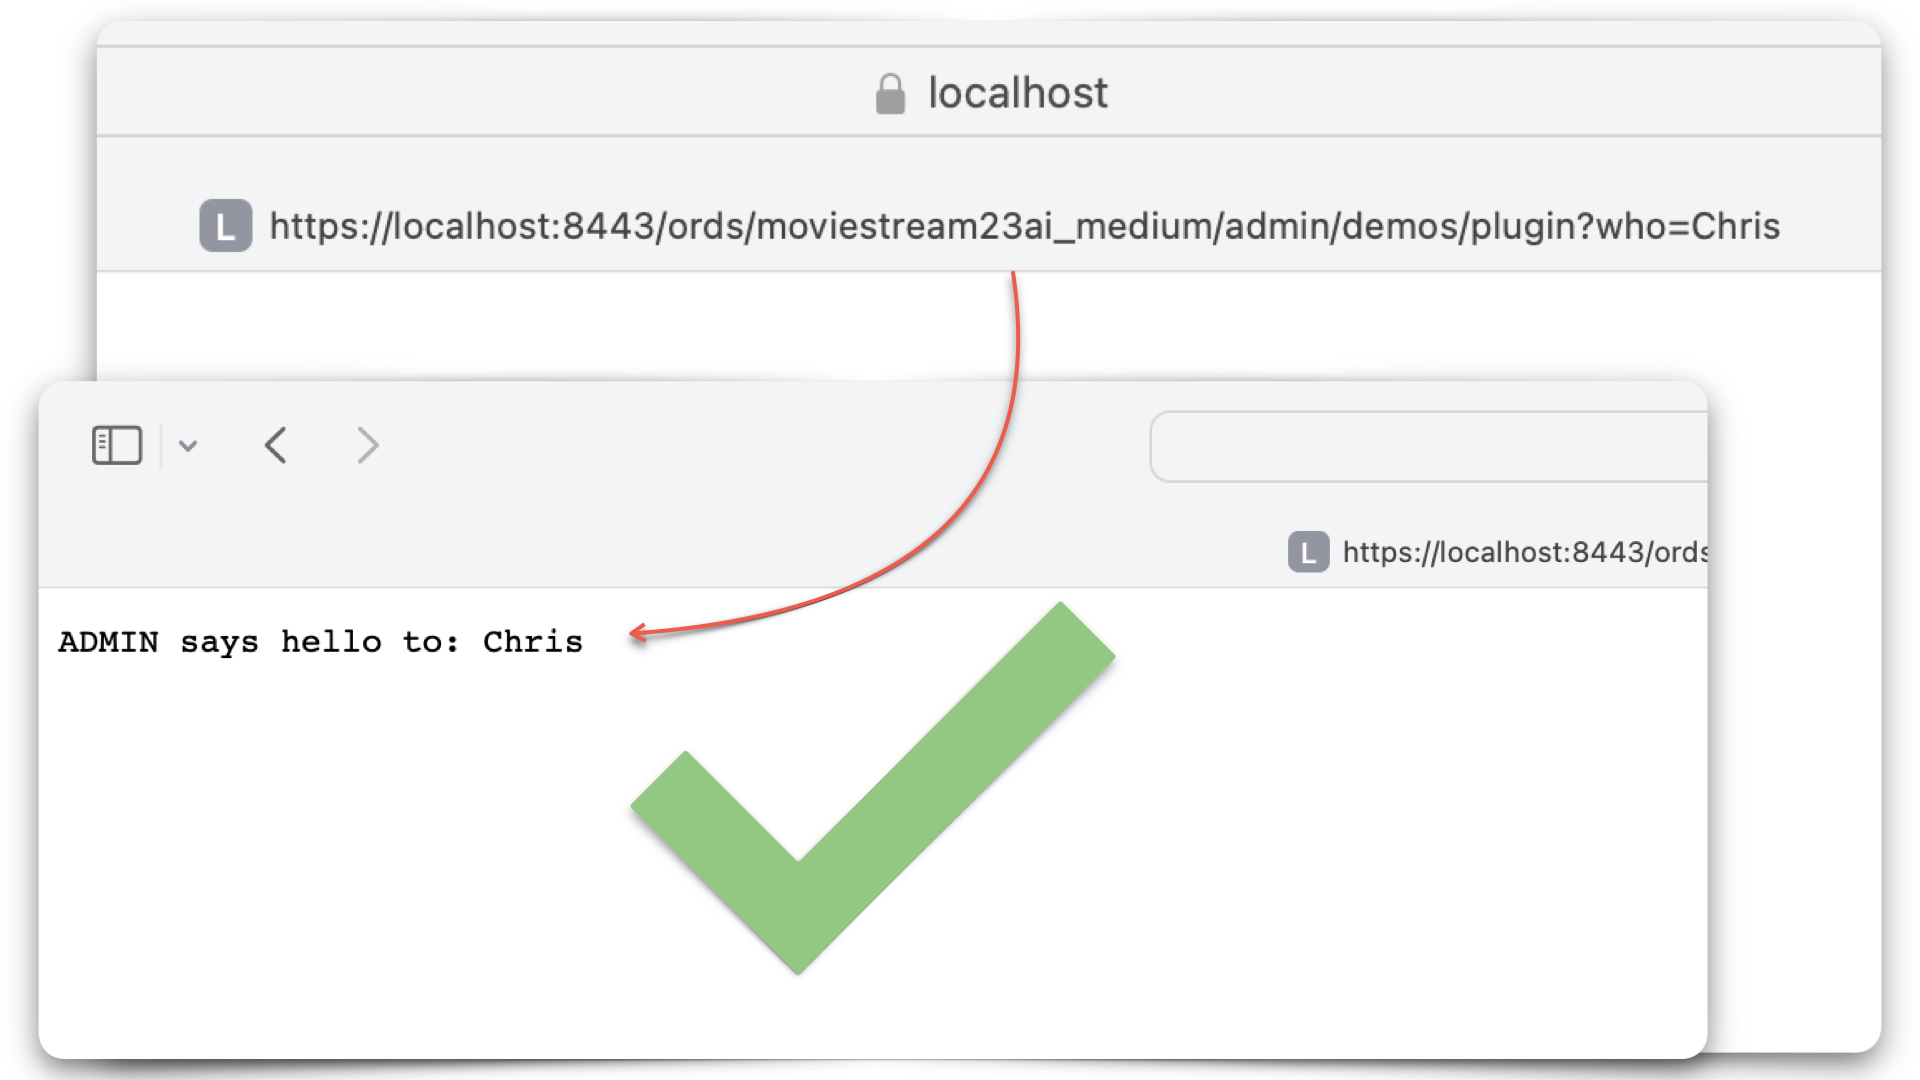
    In this example, the plugin allows you to use a name as a query parameter in an HTTP request. What you receive in response is a greeting from the schema plus the name you used in that HTTP request. Like this:

    I know what you are thinking…so what? And for about a day and a half, I felt the same. Eventually, it dawned on me that since this plugin relies on APIs from theย Oracle REST Data Services Java API Reference, you can create a plugin for anything in that book. Iโ€™ll have to spend time in another article, stepping through the Java code. Iโ€™m realizing that you donโ€™t need to know Java fluently to understand what is happening with this application. So, if you are a Java newbie (like me), this is a great way to get acquainted with the language.

    Chapter 11 Extending ORDS Functionality with Plugins

    Below, youโ€™ll see the exact text from Chapter 11 Extending ORDS Functionality with Plugins of the ORDS Developerโ€™s Guide. If you want to follow along, you wonโ€™t have to switch between the official docs and this blog post.

    Further still, Iโ€™ve broken up the steps in Section 11.1 Plugin Demonstration Example into individual sections. Iโ€™ve added some commentary and images throughout. Some directions were challenging for me, and pictures are always helpful.

    Oh! And thereโ€™s a special โ€œHow the hell do I set up Ant?!โ€ section, too. Since it took me about 30 mins to figure out how to download, install, and configure the damn thing. It would be best if you didnโ€™t have to suffer like I did ๐Ÿ˜˜.

    The unadulterated ORDS docs

    HINT: Click the expand/collapse arrow to view the full text.
    11 Extending ORDS Functionality with Plugins

    This chapter explains and provides examples on using ORDS plugin framework.

    ORDS has a plugin framework that allows you to add your own custom functionality into the ORDS web application. Plugins can be added to the ORDS runtime by placing the jar files in the lib/ext directory. The ORDS distribution contains the source for example plugins. The plugin examples can be built using Apache ant, a software tool used for automating the build processes.

    11.1 Plugin Demonstration Example

    This section shows how you can locate and build a plugin demonstration example.

    The plugin-demonstraion example is at examples/plugins/plugin-demo location and contains the source for a HttpServlet that gets a database connection injected at runtime. The servlet uses that JDBC database connection to run a query in the database and return a response at runtime.

    Perform the following steps to build and use the demonstration example:

    1. Change the directory to examples/plugins/plugin-demo
    2. Run ant to build the examples/plugins/plugin-demo/built/plugin-demo.jar file
    3. Copy the plugin-demo.jar to the ORDS distribution lib/ext directory and start an ORDS instance.
    4. Invoke the servlet using the following URL pattern:http://server/ords/schema/demos/plugin?who=somebody
      1. For example: http://localhost:8080/ords/hr/demos/plugin?who=scott where ORDS is configured with a default pool and HR is an alias for a REST Enabled Schema in that database.

    The details of developing and deploying Java based plugins is available in the Oracle REST Data Services Java API Reference book.

    See Also:

    Route Patterns Specification

    Getting Started Guide

    Developer Guide

    Chapter 11.1 Steps, expanded

    Locate the directory

    Change the directory to examples/plugins/plugin-demo.

    This step assumes you have Ant installed and are ready to build the application. In other words:

    1. Youโ€™re in your Terminal, Shell, or Command Prompt.
    2. You have issued the cd command, so you are in the /plugin-demo directory, and
    3. Youโ€™re about to run the ant command on the command line.

    HOWEVER…If you don’t have Ant installed, this exercise won’t work. Let’s get Ant.

    Get Ant

    Introducing a special section dedicated to making Ant acquisition much easier!

    Youโ€™ll need to visit the Apache Ant main page. But donโ€™t waste your time navigating to the Downloads page. It makes no sense.

    Just click Manual (located under the Documentation section). A new page will appear, and youโ€™ll see a Table of Contents. Click โ€œInstalling Apache Ant.โ€ Then, click โ€œGetting Ant.โ€

    Once you are at the โ€œGetting Apache Antโ€ page, you’ll see five steps. For Step 1, Iโ€™ll assume you have Java installed.

    Also, if own a computer, one that you bought and didn't build, there's like a 99% chance you have Java installed. It just might not be the latest version.

    In Step 2, we need the Binary Distribution. Of the four links there, I chose the .zip file. It seemed the most normal (I havenโ€™t seen .tar files since working on IBM Z ๐Ÿ˜ตโ€๐Ÿ’ซ).

    Step 3 states to unzip and then place the directory somewhere. Iโ€™ll show you what I did in a second.

    Step 4 instructs you to do some things and references the Setup page for details.

    If you donโ€™t understand any of the instructions in Step 4, please feel free to click the Setup link. Youโ€™ll be presented with even more steps that don’t make sense.

    Let me show you how I have this all set up. If you are on a Mac, you can see how I have this bin directory and ANT_HOMEvariable set up. I open a new Terminal and issue the following command: open .zprofile

    At the bottom of the file, youโ€™ll see how I have Apache Ant set up for both bin and ANT_HOME. Set yours up like this: save the file, then restart your Terminal.

    Wut did I just do? My idiot's take...After doing this, you can now execute the ant command in any terminal. And you've also "pointed" to all the required dependencies (i.e., ANT_HOME) for Ant to make the magic happen.

    After restarting, you can issue the ENV or env command to review your environment settings. Here, you’ll see the Ant bin is in my PATH. You can now build with Ant ๐Ÿ‘๐Ÿป.

    And to answer the question, โ€œWhere do I put the Ant files?โ€ I placed them in my Library on my Mac.

    The Apache Ant docs mention two commands for testing to see if Ant is working as expected. The first command ant can be issued anywhere.

    However, I assume if you issue this command in a directory where source files are waiting to be built, then you'll actually end up building a new Java app. I believe this is why they recommend issuing this command in a new shell. It assumes you don't have files there, waiting to be built.

    Secondly, you can issue the ant -version command. If you have Ant installed, you’ll see the version information.

    Okay! You now have Ant; letโ€™s get back to the colony ๐Ÿœ๐Ÿœ๐Ÿœ.

    Build with Ant

    Run ant to build the examples/plugins/plugin-demo/built/plugin-demo.jar file

    README: The plugin-demo directory is located in your ORDS product folder. This step assumes you have ORDS installed and configured for Standalone, Weblogic, or an Apache Tomcat server.

    Next, โ€œcd” to the plugin-demo directory. I am lazy, so I right-click on the folder and choose to open a “New Terminal at Folder.”

    The official instructions state that the source files for this Java plugin are contained in this folder. You do not need to modify these files for this to work. They are shipped with every ORDS version, so they will always be there, even when you upgrade (have you upgraded to the latest ORDS?).

    You are not losing your mind. The build literally takes about 5 seconds. Youโ€™ll see a printout like the image below. You only need to be concerned with the dist: row at this stage. That is your plugin, and it is ready to be deployed.

    Jar configuration

    Copy the plugin-demo.jar to the ORDS distribution lib/ext directory

    Navigate back to the plugin-demo directory. While you’re there, you can expand the sub-directories. You will see the original src directory and the new built directory, with its sub-directories and files. Copy the plugin-demo.jarfile.

    Return to your ORDS product folder and place the plugin-demo.jar file in the lib/ext directory. Just so we are clear, there is another lib directory nested in examples/plugins/lib. You DO NOT want to move the jar to that folder; you must go to the ords product folder/lib/ext directory.

    Starting ORDS

    Start an ORDS instance with the ords serve command.

    Okay, we are almost there. I have a couple of ORDS configurations here. One is for working in ORDS Standalone mode with a 23ai database via a Podman container (the Podman image can be found here), and another is a Customer-managed ORDS installation (identified by the moviestream23ai_medium database pool name) for working with my Autonomous database (in OCI).

    ORDS customer-managed installation instructions can be found here. 

    Test the plugin

    Invoke the servlet using the following URL pattern: http://server/ords/schema/demos/plugin?who=somebody.

    For example: http://localhost:8080/ords/hr/demos/plugin?who=scott where ORDS is configured with a default pool and HR is an alias for a REST Enabled Schema in that database.

    Now that ORDS is up and running, we can do some testing. In this first example, I challenged my creativity by using the name โ€œChrisโ€ for the test. Here, Iโ€™m issuing a request to the plugin. Of which it successfully returns the following message:

    [ORDS REST-enabled schema] says hello to: [the name passed as a query parameter in the original request].
    
    OR
    
    ORDSTEST says hello to: Chris

    Testing with the Podman container:

    And with the Customer-managed ORDS with Autonomous database installation:

    Success! I am me!

    Next steps

    Youโ€™re probably asking yourself, โ€œNow what?โ€ Well, here is what I would do:

    1. Review the above steps again and on the docs for building this Java plugin.
    2. Look at our support for JavaScript plugins and the extra configuration step if you use GraalVM for your JVM.
    3. Start learning Java. The two resources Iโ€™ve been reading in my spare time:
    4. Check out Peter’s ORDS plugin example too
    5. Make your own plugin and share it with me so I can try it out ๐Ÿ˜ฌ

    Oracle CloudWorld 2024 updates

    And finally, yes, we are fast approaching this yearโ€™s CloudWorld conference. If you didnโ€™t see my last post on our teamsโ€™ activities, review it (and hopefully register for at least some of our sessions). Details are here. And thatโ€™s all for now!

    Follow

    And don’t forget to follow, like, subscribe, share, taunt, troll, or stalk me!

  • Setting up SSH to GitHub git clone into your Oracle Cloud Linux Ubuntu VM with VNC

    Setting up SSH to GitHub git clone into your Oracle Cloud Linux Ubuntu VM with VNC

    I’m trying to be as succinct as possible. I just accomplished this but couldn’t find anything that explicitly walked me through how to do it. Here are some assumptions:

    • You have followed these instructions for Installing Flask on an Ubuntu Virtual Machine (VM) in Oracle Cloud Infrastructure1
    • You at least have a Free Tier account in OCI
    • You have an existing GitHub account
    • You’re already or presently signed into (via SSH presumably) your Linux Virtual Machine (like I am in the images you’ll soon see)
    1. I suppose you don’t need anything related to Flask or Python; you need to follow the steps to the point where you need to git clone something in your Virtual Machine (aka your Compute Instance). โ†ฉ๏ธŽ

    What happened?

    I received the following fatal: Authentication failed for... error when attempting to authenticate with GitHub from within my Virtual Machine with my GitHub username and password:

    Authenticating with SSH

    Since the HTTPS method of authenticating doesn’t work, the next available option is to clone via SSH.

    Even if you don’t know what this means, as long as you follow the Linux instructions in the GitHub documentation, you’ll be fine. First, you’ll want to check to see if you have existing SSH keys in your Linux VM (spoiler: you won’t, at least not for GitHub).

    Next, follow the Linux instructions for generating new SSH keys.

    Then, add your PRIVATE key (NOT your public key) to your SSH agent (don’t even ask me what the hell an SSH agent is, isn’t, or does). I presume the SSH agent assists in authentication.

    Finally, add your Public key to GitHub. They’ve provided instructions here, but I have included some screenshots of what this looks like when done for your OCI VM.

    Once you’ve saved it, you can use it git pull from within your OCI VM. As can be seen here:

    And that’s all for now. I mostly wrote this blog out of sheer frustration. Please share it with your friends and bookmark it for future use!

    Follow

    And don’t forget to follow, like, subscribe, share, taunt, troll, or stalk me!

  • Python script to retrieve objects from Oracle Cloud Bucket

    Python script to retrieve objects from Oracle Cloud Bucket

    For…reasons, I needed a way to retrieve all the .CSV files in a regional bucket in Oracle Cloud Object Storage, located at this address:

    https://objectstorage.us-phoenix-1.oraclecloud.com/n/dwcsprod/b/moviestream_data_load_workshop_20210709/o

    You can visit it; we use it for one of our LiveLabs (this one), so I’m sure it will stay live for a while ๐Ÿ˜˜. Once there, you’ll see all the available files in that bucket:

    FYI: A bucket is one of the three core components of Oracle Cloud's Object Storage. The other two are Objects and Namespaces (more details at Object Storage FAQs).

    In this case, there were more than just .CSV files; the script I created will also download those. But, of course, your specific situation may vary. Onto the Python script!

    The code

    Allow me to first address a few considerations and limitations:

    1. There is probably a way to create a function that accepts a parameter to make this even more elegant and compact. I’m not “there” yet. So, if you have a better solution, please comment, and I’ll amend my code!
    2. I still haven’t learned error and exception handling in Python. So anytime you see me “code in” print(...) that is basically me attempting to check to see if what I think will happen actually happens.
    3. I’m not sure if my range() and len() practices are appropriate, but it works, so I’m going with it!
    4. Don’t ask me how I even found out about the webbrowser library. I must have found it on a forum, or StackOverflow (hate that I can’t attribute credit to my savior).

    The code for real

    import requests
    import json
    import webbrowser
    
    url = 'https://objectstorage.us-phoenix-1.oraclecloud.com/n/dwcsprod/b/moviestream_data_load_workshop_20210709/o/'
    
    r = requests.get(url)
    
    data = r.json()
    # print(data)
    
    newlist = []
    for name in data['objects']:
        newlist.append((name['name']))
    
    # print(newlist)
    length = len(newlist)
    newurl = []
    
    for i in range(length):
        newurl = url + newlist[i]
        webbrowser.open(newurl, new=0, autoraise=True)

    As you can see, with spacing, it’s less than 25 lines of code. I’m using a total of three libraries: requests, json, and webbrowser. The first two libraries you are probably familiar with, the third maybe not so much. Webbrowser() is great, when used correctly, the code will automatically open a new browser tab and execute whatever it is told to do (in this case, go to a URL and issue a GET request). Make sense?

    Not to worry, I’ll break this down into smaller blocks, to better understand what is happening.

    Lines 1-10

    import requests
    import json
    import webbrowser
    
    url = 'https://objectstorage.us-phoenix-1.oraclecloud.com/n/dwcsprod/b/moviestream_data_load_workshop_20210709/o/'
    
    r = requests.get(url)
    data = r.json()
    # print(data)

    I’ve imported the three relevant libraries (remember if you don’t have these libraries, you can use pip and perform a pip install to grab them). And I assign URL equal to the target bucket. And from here I perform my first GET request. I do this for two main reasons:

    1. to remind me of the structure of the JSON, and
    2. because I am about to loop through all the available files in this bucket (so I need to capture them somehow)

    Since I’ve essentially assigned the value of r.json() equal to data, I can now print(data) to visually inspect the….um….data. After executing lines 1-10, I can see the corresponding output in my terminal:

    Now that I know this is working (because of my manual check), I can proceed to the next step.

    Lines 12-16

    Executing this code…

    import requests
    import json
    import webbrowser
    
    url = 'https://objectstorage.us-phoenix-1.oraclecloud.com/n/dwcsprod/b/moviestream_data_load_workshop_20210709/o/'
    
    r = requests.get(url)
    
    data = r.json()
    print(data)
    
    newlist = []
    for name in data['objects']:
        newlist.append((name['name']))
    
    print(newlist)

    Will yield a new list:

    But how you ask? Good question, lots of trial and error. In short, I created an empty list, named newList. And later populated it with “stuff”. In normal people speak, lines 13-14 say the following,

    “There is an item, actually many items in the JSON payload we received from our GET request. For simplicity, lets call each of those items name, since ultimately what we want are file names. And we’ll use bracket notation to ‘drill’ down into more specific sections of the original JSON payload. And since we want just the file name (values), we want all the stuff that is in objects (if that doesn’t make sense review the lines 1-10 section again). We are then going to add to newList only the names (aka values) of the files. And these lines of code are what help us to populate the newList list.

    Maybe by this stage, you’ve caught on to what I’m trying to do. If not, I won’t spoil it for you ๐Ÿ™ƒ.

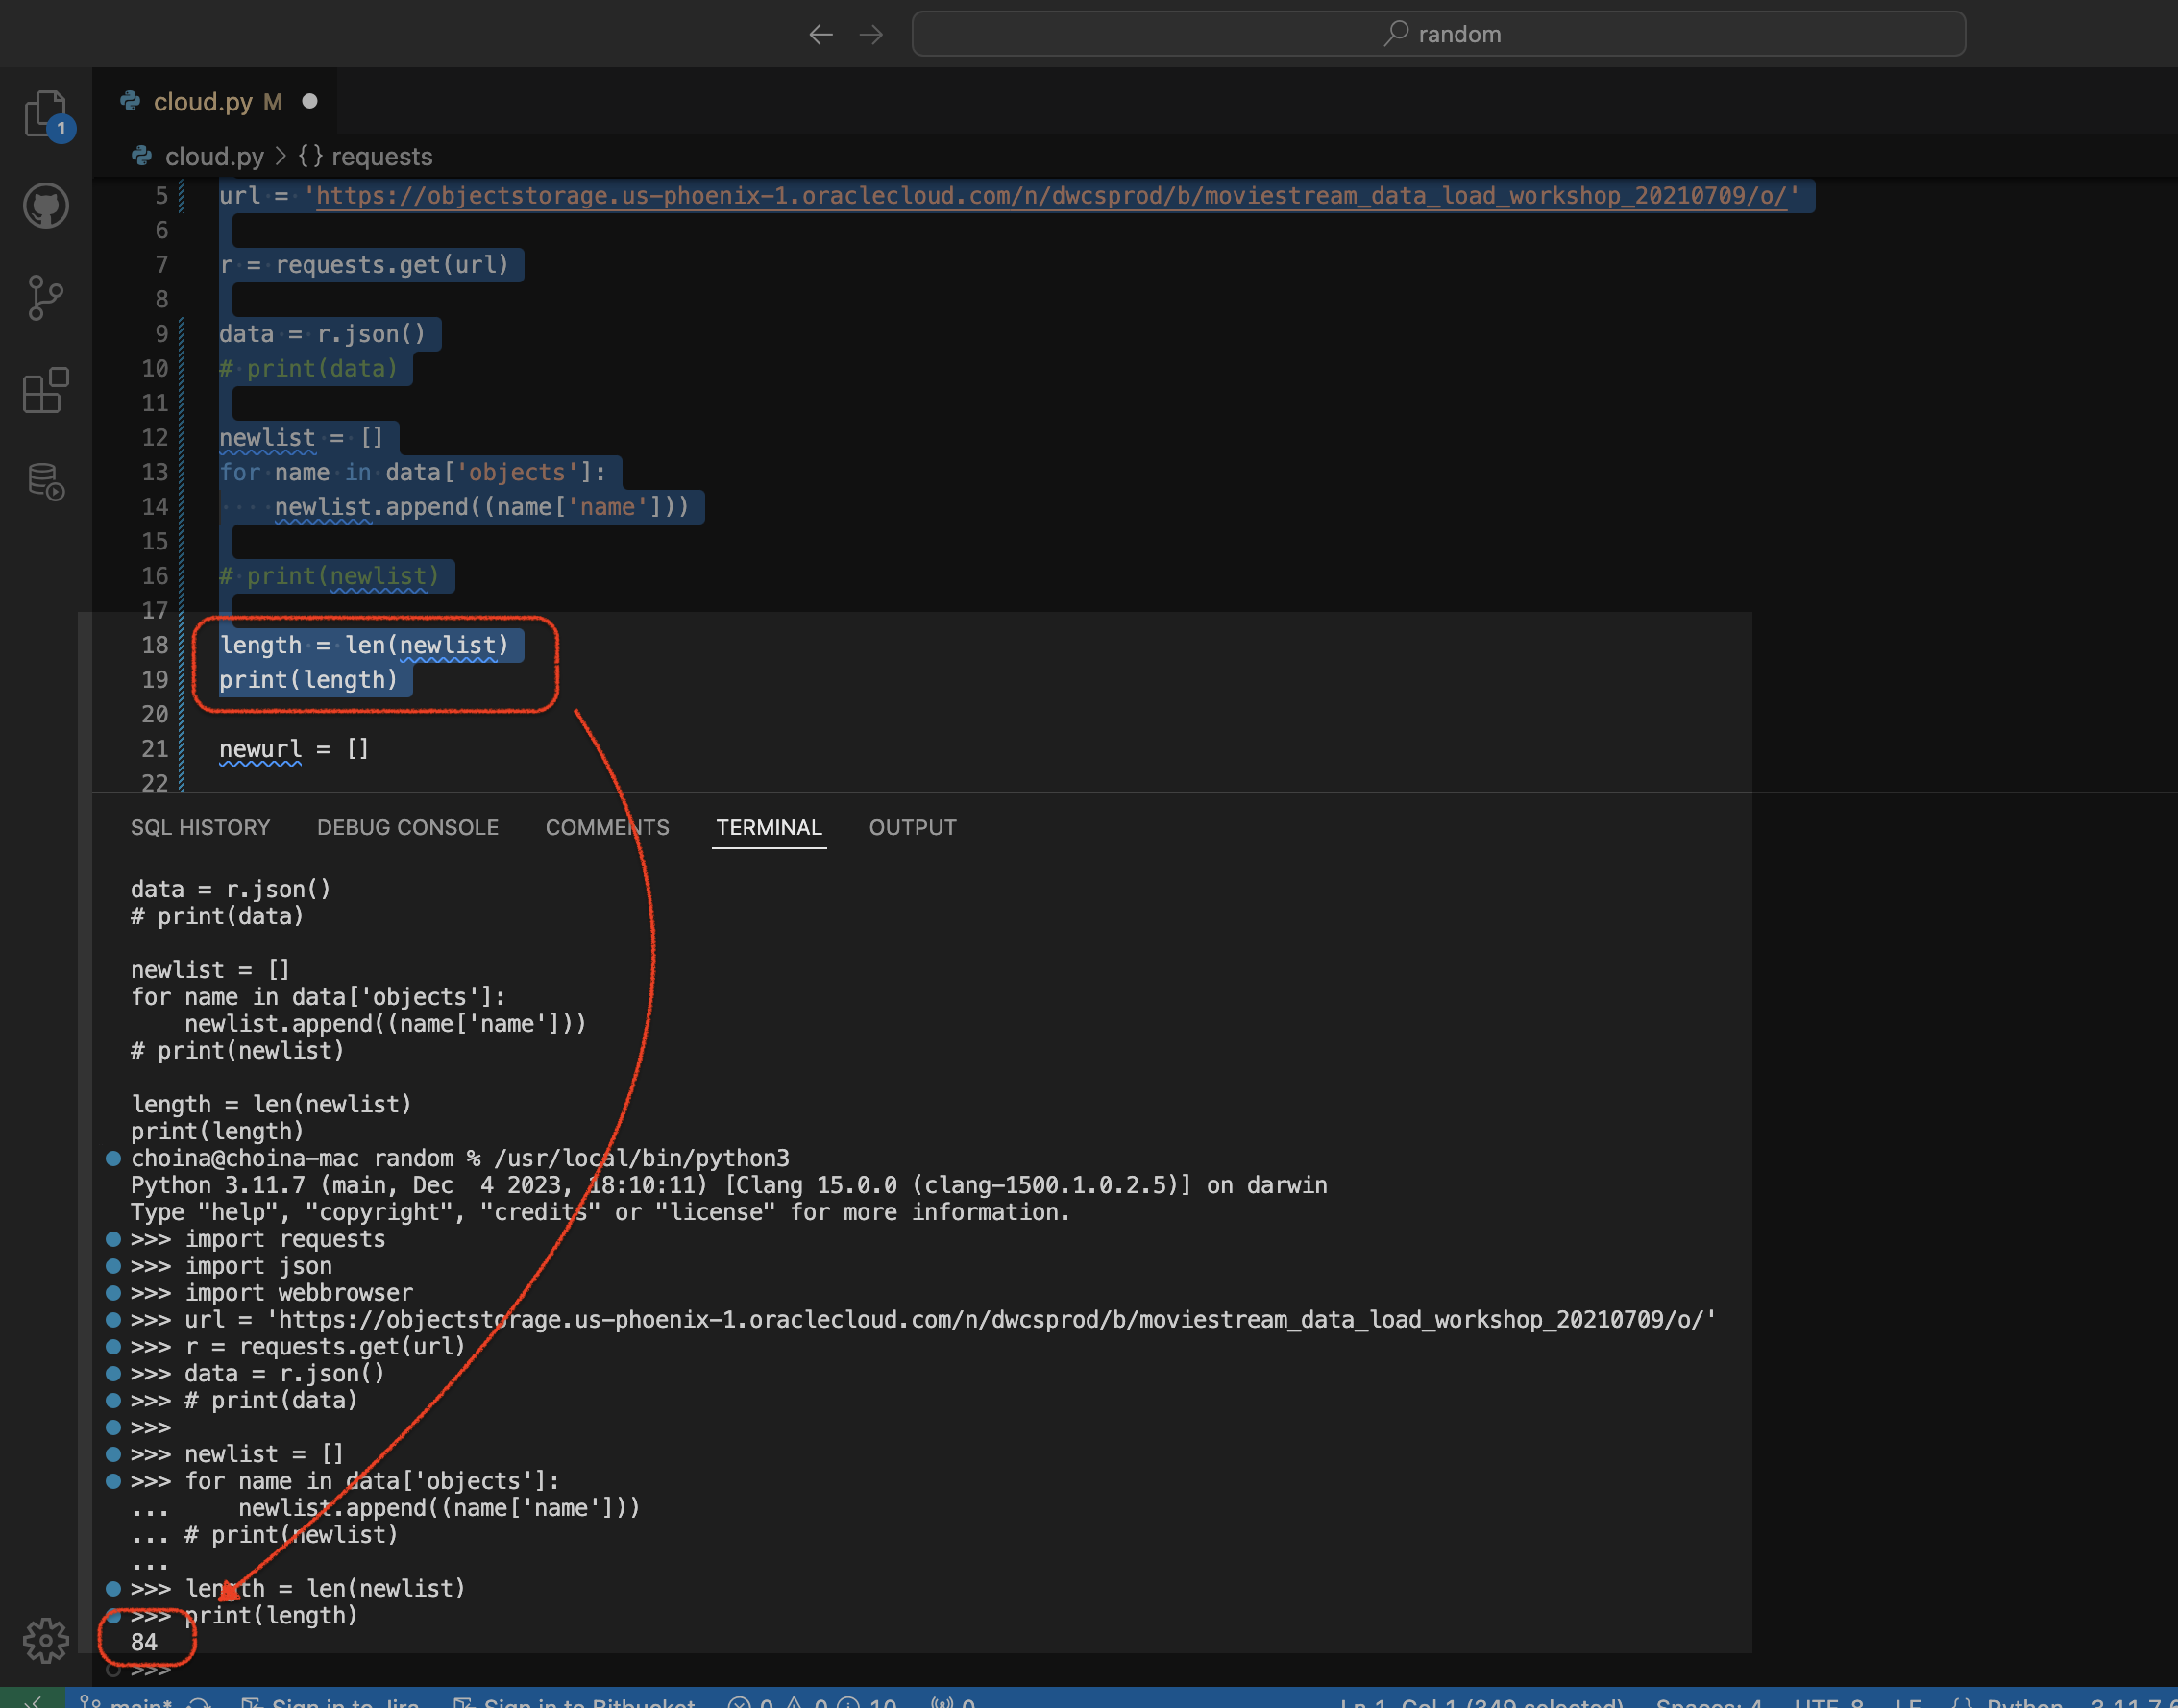
    Lines 18-19

    And if you don’t quite “get it” yet, not to worry, it’ll click here in a second. Next, I need to see how many items are in this newlist I just created. Here is the code that is responsible for making that happen:

    import requests
    import json
    import webbrowser
    
    url = 'https://objectstorage.us-phoenix-1.oraclecloud.com/n/dwcsprod/b/moviestream_data_load_workshop_20210709/o/'
    
    r = requests.get(url)
    
    data = r.json()
    # print(data)
    
    newlist = []
    for name in data['objects']:
        newlist.append((name['name']))
    
    # print(newlist)
    
    length = len(newlist)
    print(length)

    Here is the result in my terminal:

    It looks like I have 85 elements, things, stuffs in my list. I’ll use that knowledge for the final steps in my script.

    Lines 21-26

    import requests
    import json
    import webbrowser
    
    url = 'https://objectstorage.us-phoenix-1.oraclecloud.com/n/dwcsprod/b/moviestream_data_load_workshop_20210709/o/'
    
    r = requests.get(url)
    
    data = r.json()
    # print(data)
    
    newlist = []
    for name in data['objects']:
        newlist.append((name['name']))
    
    # print(newlist)
    
    length = len(newlist)
    # print(length)
    
    newurl = []
    
    for i in range(length):
        newurl = url + newlist[i]
        webbrowser.open(newurl, new=0, autoraise=True)
        print(newurl)

    Line 21, you’ve seen this before (like 2 mins ago).

    However, lines 23-25 are new. If you recall my “considerations and limitations” section. I bet there is a better way to do this (or all of this actually), but this worked for me, so I’ll keep it. In short, we know we have 85 “iterables” (that’s the for i seen in line 23) and the range(length) portion simply says, “Begin at 0 and then keep going till you reach the entire length of…length()…which in this case is 85).”

    Next, I take the original URL (from line 5 in the code) and add each element of the newList to the end, making a newurl. From there, we open a web browser (new tabs actually) and visit that new amended URL aka newurl (I think more appropriately this is a URI, no?).

    And for the visual, a video of the entire process (no audio):

    And finally, for my own gratification, I’ll print out the newurl list just so I can marvel at my work. The new URLs:

    Now that I have these individual files, I can simply drag and drop them into my tables (in Database Actions obviously).

    As always, this and other code can be found in my blog repo. I hope this comes in handy someday! That’s all for now ๐Ÿ˜€!

    Follow

    And don’t forget to follow, like, subscribe, share, taunt, troll, or stalk me!

  • Create a view from a JSON Collection and REST-enable it with ORDS

    The DBMS_CLOUD PL/SQL Package

    You can use this PL/SQL procedure (in the DBMS_CLOUD package) along with the file_uri_list URL (seen in the code below) to create and then add JSON documents to a JSON Collection (good info on JSON Collections in the Oracle database).

    In this example, we call this collection Movie_Collection.

    -- create and load movie json collection from a public bucket on object storage

    begin
    dbms_cloud.copy_collection (
    collection_name => 'MOVIE_COLLECTION',file_uri_list => 'https://objectstorage.us-ashburn-1.oraclecloud.com/n/c4u04/b/moviestream_gold/o/movie/movies.json',
    format => '{ignoreblanklines:true}');
    end;
    /

    Create a view

    With that JSON collection in place, I can then create (aka I’ll continue stealing this code from the same LiveLab) a View of it using the following SQL code:

    /* Create a view over the collection to make queries easy */

    create or replace view movie as
    select
    json_value(json_document, '$.movie_id' returning number) as movie_id,
    json_value(json_document, '$.title') as title,
    json_value(json_document, '$.budget' returning number) as budget,
    json_value(json_document, '$.list_price' returning number) as list_price,
    json_value(json_document, '$.gross' returning number) as gross,
    json_query(json_document, '$.genre' returning varchar2(400)) as genre,
    json_value(json_document, '$.sku' returning varchar2(30)) as sku,
    json_value(json_document, '$.year' returning number) as year,
    json_value(json_document, '$.opening_date' returning date) as opening_date,
    json_value(json_document, '$.views' returning number) as views,
    json_query(json_document, '$.cast' returning varchar2(4000)) as cast,
    json_query(json_document, '$.crew' returning varchar2(4000)) as crew,
    json_query(json_document, '$.studio' returning varchar2(4000)) as studio,
    json_value(json_document, '$.main_subject' returning varchar2(400)) as main_subject,
    json_query(json_document, '$.awards' returning varchar2(4000)) as awards,
    json_query(json_document, '$.nominations' returning varchar2(4000)) as nominations,
    json_value(json_document, '$.runtime' returning number) as runtime,
    json_value(json_document, '$.summary' returning varchar2(10000)) as summary
    from movie_collection
    ;

    Here is what the code looks like in the SQL Worksheet (a part of Database Actions).

    With that View created, you could go one step further and query with even more specific SQL. In this case, I’ll query the View but exclude any entries where a movie cast does not exist:

    Select
    title,
    year,
    gross,
    cast
    from movie
    Where cast is not null
    Order By 3 DESC nulls last
    Fetch first 10 rows only;

    Here is the SQL, with the Script Output below:

    ORDSify itยฎ

    With ORDS, we can REST-enable pretty much any database object we want.

    I have objects, Greg. Can you REST-enable me?

    But after spending a few minutes with this collection, I found the MOVIE View to be the easiest, most sensible object to highlight. It’s a straightforward process, with primarily right-mouse clicks.

    From the Navigator Panel, select Views from the list of available database objects.

    Then, right-click on the Movie View, and select REST, then Enable.

    A slider will appear, for this example, I’ll keep everything default and click Enable (no authentication either, I’m being lazy).

    A Confirmation notification will appear in the upper right-hand corner of the browser ๐Ÿ‘๐Ÿป.

    Navigate back to the Movie View, and select the cURL command option. Twasn’t there before, tis now!

    Select the GET ALL endpoint, and copy the URI. JUST the URI portion!

    Open a new browser tab, or window, and navigate to the URI. You’ll see everything in the Movie View now!

    Why a view?

    Yeah, good question. There is probably a performance improvement with using Views. Based on what I’m finding, I can’t definitively say, but they require zero storage, so that’s at least a savings on some resource somewhere. Additionally, I think the customization is pretty compelling, too. What do I mean by that? Well, allow me to elucidate:

    Views can provide a different representation (such as subsets or supersets) of the data that resides within other tables and views. Views are very powerful because they allow you to tailor the presentation of data to different types of users.

    Oracle Database Administrator’s Guide Release 23

    In this case, the Movie View returns everything found in the collection. I can subset this even further though; by taking that SQL query and REST-enabling it, too. I will, but in a future post.

    For now, I’ve left you with an easy way to REST-enable a View (In this case, based on a JSON Collection) that resides in your Autonomous Database.

    If you want to try the LiveLab (which you should, as it’s easy and VERY informative), go here. You’ll need an Always Free OCI account, too (so you can provision an Autonomous Database). You can sign up here.

    Oh, and we are entering into the season of Cloud World 2024, so mark your calendars ๐Ÿคช!

    That’s all for now ๐Ÿ˜˜.

    Follow

    And don’t forget to follow, like, subscribe, share, taunt, troll, or stalk me!

  • ORDS, SQLcl, APEX via YUM and DNF

    TL;DR

    BREAKING NEWS!! APEX packages with ORDS and SQLcl now available in Oracle Linux YUM servers and through ULN

    The deets

    Here is what you need to know. We are releasing three new APEX (a.k.a. “The Artist formerly known as Oracle Application Express”) packages for the following repositories:

    • ol7_oci_included
    • ol8_oci_included
    • ol9_oci_included

    NoARCH RPMs

    One more update! These RPMs will be packaged as NoArch. This means you will be free to install these on any CPU architecture (Intel x86_64, AMD, and ARM). As a reminder, OCI Always Free tenancy Compute Instances are available with:

    • Micro instances (I’m using a VM.Standard.E2.1.Micro; an AMD processor)
    • Ampere A1 Compute instances (Arm processor)
    DOCS: You can review details on our standard Compute Instance shapes as well as those available with an Always Free account.
    TIP: These will all be available through both the publicly available Oracle YUM servers and the Unbreakable Linux Network (ULN) channels. 

    Fortunately, I was provided advanced copies of the brand-new RPM files that will be included in their respective oci_included repositories. You’ll soon have access to no less than three flavors of APEX (and their dependencies). YUM!

    You’ll soon see the following packages:

    Oracle Application Express 23.1

    NOTE: In this write-up, and the images below, you'll see me reference this as apex-core.

    The Oracle Application Express package contains everything you need to install APEX in your database. We also package it with the SQLcl package to simplify installation.

    Oracle Application Express Images 23.1

    NOTE: In this write-up, and the images below, you'll see me reference this as apex-images.

    This Oracle Application Express Images package includes your APEX images (i.e., you may be familiar with this as these are symlinked to your /i/ virtual directory for Oracle APEX images). This package also contains the ORDS package, making it easier to run the APEX image of your choice.

    This package will also automatically add a symbolic link (aka symlink) from your APEX images files to your default ORDS doc_root path.

    Oracle Application Express Patch Set Bundle 23.1.3

    NOTE: In this write-up, and the images below, you'll see me reference this as apex-patch.

    The Oracle Application Express Patch Set Bundle provides a means for you to take the latest APEX patch sets, compare them against your existing base APEX images, overwrite those base files with the latest changes, and then place them into their own /opt/oracle/apex/[latest patch]/images directory. Oh, and you’ll also retain the APEX base images in their own /opt/oracle/apex/[apex base]/images directory too!

    And when you’re ready, you can update APEX in your database with the latest patches. The package even symlinks the newest patch set images to your APEX installation’s virtual image directory (i.e., the /i/ directory). And finally, we automatically symlink (as mentioned in the Oracle Application Express Images 23.1 section) this folder to your default ORDS doc_root path.

    REMEMBER: If you create a Compute Instance in OCI, these repositories will automatically be accessible to you (if you aren't though, check this resource out to get set up)!

    A YUM, DNF, and Oracle Linux reminder

    A week ago, I had limited (i.e., zero) experience with the Linux package managers Yellowdog Updater Modified (YUM) and Dandified YUM (DNF). But since then, I’ve tinkered around with Oracle Linux (OL) quite a bit. I even successfully installed Oracle Linux 8 (OL8) on an old Raspberry PI 3 Model B V1.2 (which, if you can believe it, was first released in 2016)!

    PAUSE: If you want to see a tutorial of I how I did this, let me know in the comments, or @ me on Twitter/X or Threads.

    Exploring OL8 and OCI Compute Instances

    If you have an OCI Always Free account, you too can get acquainted with Oracle Linux 8 (OL8), as that is provided when creating a new Compute Instance in your OCI tenancy.

    reviewing-instance-image-and-shape-yum-ol8-dnf-rpm-chris-hoina-senior-product-manager-oracle-database-ords-sqlcl-actions

    After creating that Instance, you can SSH into it and check out what Oracle Linux ships with. Once in, use one of these commands (depending on the version):

    # Command for Oracle Linux 7:
    yum list *release-el7
    
    # Command for Oracle Linux 8:
    dnf list *release-el8
    
    # Command for Oracle Linux 9:
    dnf list *release-el9

    And here I am checking the packages and repositories (with the dnf list *release-ol8 command) in my Compute Instance:

    dnf-list-release-command-for-oracle-linux-info-chris-hoina-senior-product-manager-oracle-database-ords-sqlcl-actions

    Since I first created this Compute Instance, I’ve been tinkering with DNF and the repositories, so your output might look different. But at a minimum, you can expect to see the ol8_oci_included and ol8_baseos_latest repositories.

    Oracle Database Tools via YUM or DNF

    NOTE: This next section WILL NOT apply if you are working with the Oracle Linux that is provided in your OCI Compute Instance!!!

    You won’t find a direct link to our Database Tools repository if you do this independently (i.e., not creating an OCI Compute Instance as I did). That is an easy fix; you can manually configure the repositories.

    NOTE: If you are doing this through OCI (as in with a newly-created Compute Instance), you won't need to configure this, it will be included in the ol8_oci_included repository (this applies to OL7 and OL9 too)!

    But for manual configuration, here are the direct links for the available Oracle Linux versions (you’ll want to use whichever one corresponds to your Linux version):

    • Oracle Linux 7 http://yum.oracle.com/repo/OracleLinux/OL7/oracle/software/x86_64
    • Oracle Linux 8 http://yum.oracle.com/repo/OracleLinux/OL8/oracle/software/x86_64

    You can manually configure the repositories like this:

    adding-database-tools-repository-via-dnf-on-oracle-linux-8-chris-hoina-senior-product-manager-oracle-database-ords-sqlcl-actions

    You can then inspect the packages in this repository with the following command:

    dnf repository-packages [the repo id] info --all
    inspecting-the-newly-created-repository-and-packages-oracle-linux-8-chris-hoina-senior-product-manager-oracle-database-ords-sqlcl-actions

    I can now download our ORDS and SQLcl packages, our two must-haves:

    In the above images, you can see these packages are being installed from the ol8_oci_included repository. This is because Compute Instances in OCI automatically have access to the Unbreakable Linux Network (ULN); you can read all about it in the OCI documentation found here.

    NOTE: Once again, taking the extra step to configure this additional repository is unnecessary; I'm only demonstrating how to do it if you are working with something other than an OCI Compute Instance.

    The big reveal/super secret surprise

    If you’ve been working with Linux (and specifically Oracle Linux), then none of this will be much of a surprise to you. And you probably (definitely) know more about this than I do. But what you DON’T know is that we are releasing three new APEX packages for the ol7_oci_included, ol8_oci_included, and ol9_oci_included repositories.

    Since I know a guy (thanks, Adrian ๐Ÿคซ), I was provided advanced copies of the brand-new RPM files that will be included in the respective oci_included repositories. You’ll soon have access to three flavors of APEX (and their dependencies):

    Oracle Application Express 23.1

    The Oracle Application Express package contains everything you need to install APEX in your database. We also package it with the SQLcl package to simplify installation.

    Oracle Application Express Images 23.1

    The Oracle Application Express Images package includes your APEX images (i.e., you may be familiar with this as these are symlinked to your /i/ virtual directory). This package also contains the ORDS package, making it easier to run the APEX image of your choice.

    It will also automatically add a symbolic link (aka symlink) from your APEX image files to your default ORDS doc_root path.

    Oracle Application Express Patch Set Bundle 23.1.3

    The Oracle Application Express Patch Set Bundle provides a means for you to take the latest APEX patch sets, compare them against your existing base APEX images, overwrite those base files with the latest changes, and then place them into their own /opt/oracle/apex/[latest patch]/images directory. Oh, and you’ll also retain the APEX base images in their own /opt/oracle/apex/[apex base]/images directory too!

    And when you’re ready, you can update APEX in your database with the latest patches. The package even symlinks the newest patch set images to your APEX installation’s virtual image directory (i.e., the /i/ directory). And finally, we automatically symlink (as mentioned in the Oracle Application Express Images 23.1 section) this folder to your default ORDS doc_root path.

    REMEMBER: If you create a Compute Instance in OCI, these repositories will automatically be accessible to you (if you aren't though, check this resource out to get set up)!

    That was a lot of words. But in practice, the following images illustrate what to expect when you issue the dnf install command (for the APEX-CORE or APEX-IMAGES packages).

    APEX-CORE

    REMINDER: The official package name will be Oracle Application Express 23.1.
    rpm-installing-apex-core-package-oracle-linux-8-chris-hoina-senior-product-manager-oracle-database-ords-sqlcl-actions
    APEX-CORE install via a local RPM
    completing-the-package-installation-for-apex-core-oracle-linux-8-chris-hoina-senior-product-manager-oracle-database-ords-sqlcl-actions
    Completing the APEX-CORE package installation, revealing helpful installation information

    APEX-IMAGES

    REMINDER: The official package name will be Oracle Application Express Images 23.1.

    Alternatively, you may also decide to install the APEX-IMAGES packages (if you intend on using many versions of APEX along with its ORDS companion):

    completing-the-package-installation-for-apex-images-oracle-linux-8-chris-hoina-senior-product-manager-oracle-database-ords-sqlcl-actions
    APEX-IMAGES install via a local RPM
    completing-the-package-installation-for-apex-images-oracle-linux-8-chris-hoina-senior-product-manager-oracle-database-ords-sqlcl-actions
    Completing the APEX-IMAGES package installation, revealing helpful installation information

    Once these packages are available in the ol7_oci_included, ol8_oci_included, and ol9_oci_included repositories, install commands become much more straightforward. You won’t have to bother with the individual RPM files; you can issue either the yum install or dnf install commands.

    NOTE: We switched to DNF for OL8 and later but the commands are symlink'd so I believe either will work. You can read about that here.

    The only thing you have to do now is decide which packages you’ll want to install!

    Check for updates

    This last section is just a reminder. If you haven’t done so yet, check for updates to all your repositories (namely the ol7_oci_included, ol8_oci_included, and ol9_oci_included repositories).

    TIP: You can issue the yum --help or dnf --help command to refresh your memory on which "update" command to use. 
    issuing-dnf-help-command-oracle-linux-8-chris-hoina-senior-product-manager-oracle-database-ords-sqlcl-actions

    But once again, I suspect you already know how to do this if you have more than a week’s experience with Oracle Linux, YUM, or DNF. Be on the lookout for updates to the Oracle Linux release notes too!

    Other stuff

    The end.

    Follow

    And don’t forget to follow, like, subscribe, share, taunt, troll, or stalk me!

  • Python and the Oracle Autonomous Database: Three Ways to Connect

    Python and the Oracle Autonomous Database: Three Ways to Connect

    Watch the deep dive videos:

    Part I

    Overview and connecting with the python-oracledb library

    Part II

    Connecting with Oracle REST APIs unauthenticated

    Part III

    Custom Oracle REST APIs with OAuth2.0 Authorization

    Welcome back

    I finally had a break in my PM duties to share a small afternoon project [I started a few weeks ago]. I challenged myself to a brief Python coding exercise. I wanted to develop some code that allowed me to connect to my Autonomous Database using either our python-oracledb driver (library) or with Oracle REST Data Services (ORDS).

    I undertook this effort as I also wanted to make some comparisons and maybe draw some conclusions from these different approaches.

    NOTE: If you don't feel like reading this drivel, you can jump straight to the repository where this code lives. It's all nicely commented and has everything you need to get it to work. You can check that out here. 

    The test files

    Reviewing the code, I’ve created three Python test files. test1.py relies on the python-oracledb library to connect to an Oracle Autonomous database while test2.py and test3.py rely on ORDS (test3.py uses OAuth2.0, but more on that later).

    Configuration

    Configuration directory

    I set up this configuration directory (config_dir) to abstract sensitive information from the test files. My ewallet.pem and tnsnames.ora files live in this config_dir. These are both required for Mutual TLS (mTLS) connection to an Oracle Autonomous database (you can find additional details on mTLS in the docs here).

    config directory files first test case, chris hoina, senior product manager, oracle rest apis, database tools
    ewallet.pem and tnsnames.ora files

    Other files

    oauth testyurls and wallet creds files for tests, chris hoina, senior product manager, ords, oracle rest apis, database tools, sqlcl
    OAuth2.0, Test URLs, and Wallet Credential files

    Other files include oauth2creds.py, testurls.py, and walletcredentials.py. Depending on the test case, I’ll use some or all of these files (you’ll see that shortly).

    NOTE: If not obvious to you, I wouldn't put any sensitive information into a public git repository. 

    Connecting with python-oracledb

    One approach to connecting via your Oracle database is with the python-oracledb driver (library). An Oracle team created this library (people much more experienced and wiser than me), and it makes connecting with Python possible.

    FYI: I’m connecting to my Autonomous Database. If you want to try this, refer to the documentation for using this library and the Autonomous database. You can find that here.

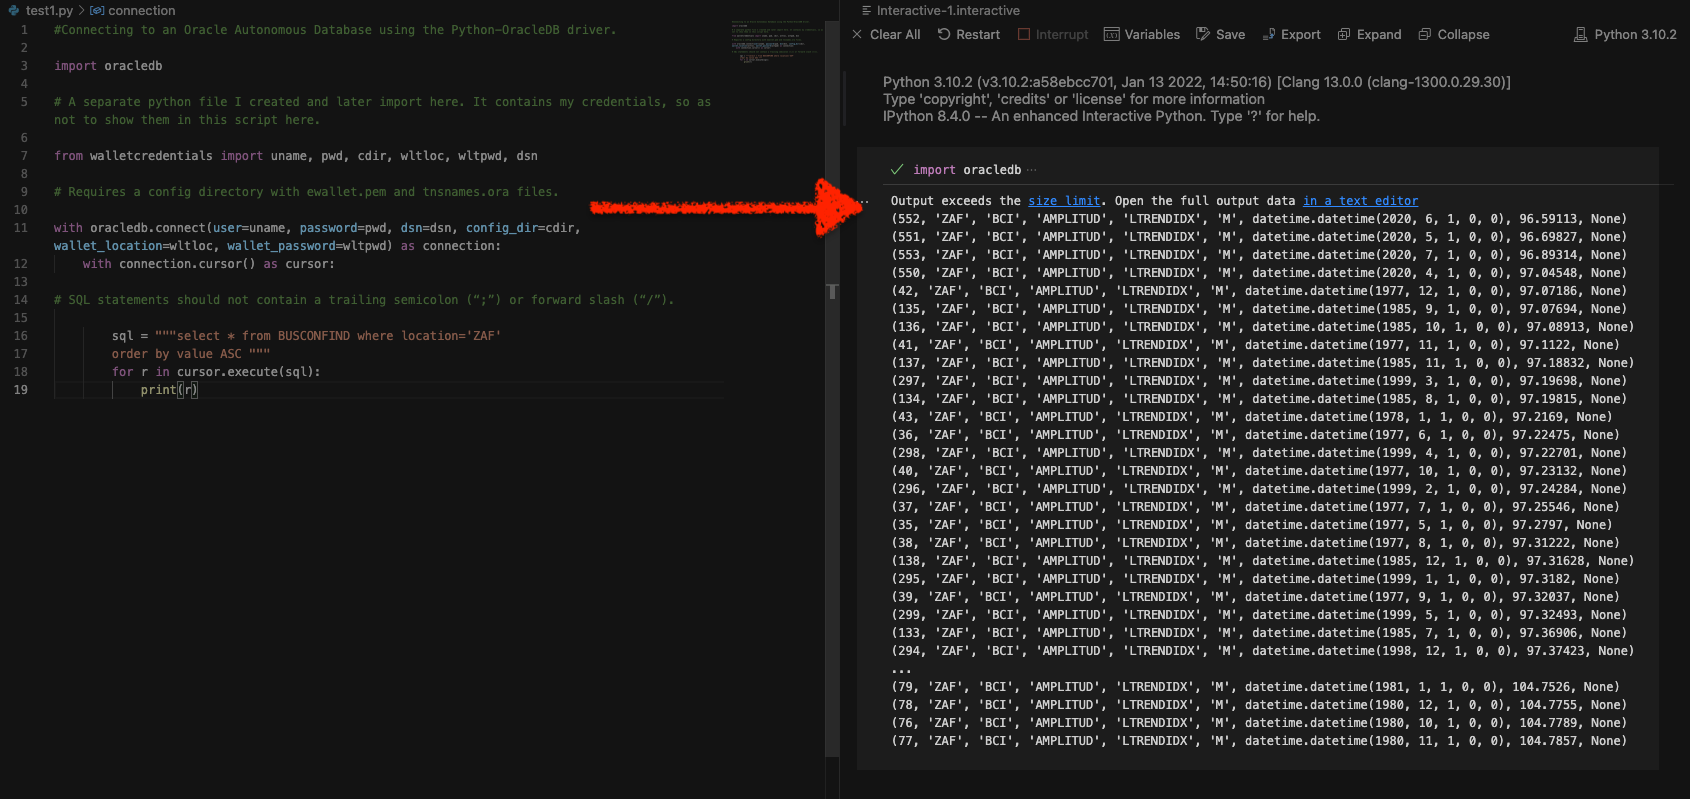
    The Python code that I came up with to make this work:

    #Connecting to an Oracle Autonomous Database using the Python-OracleDB driver.
    
    import oracledb
    
    # A separate python file I created and later import here. It contains my credentials, so as not to show them in this script here. 
    
    from walletcredentials import uname, pwd, cdir, wltloc, wltpwd, dsn
    
    # Requires a config directory with ewallet.pem and tnsnames.ora files.
    
    with oracledb.connect(user=uname, password=pwd, dsn=dsn, config_dir=cdir, wallet_location=wltloc, wallet_password=wltpwd) as connection:
        with connection.cursor() as cursor:
    
    # SQL statements should not contain a trailing semicolon (โ€œ;โ€) or forward slash (โ€œ/โ€).
    
            sql = """select * from BUSCONFIND where location='ZAF'
            order by value ASC """
            for r in cursor.execute(sql):
                print(r)

    In Line 7, you can see how I import the wallet credentials from the walletcredentials.py file. Without that information, this code wouldn’t work. I also import the database username, password, and configuration directory (which includes the ewallet.pem and tnsnames.ora files).

    From there, the code is pretty straightforward. However, some library-specific syntax is required (the complete details are in the docs, found here), but aside from that, nothing is too complicated. You’ll see the SQL statement in Lines 16-17; the proper SQL format looks like this:

    SELECT  * FROM busconfind WHERE location='zaf'
    ORDER BY value ASC;

    And here is an example of this SQL output in a SQL Worksheet (in Database Actions):

    testing sql in database actions for python-oracledb driver, chris hoina, senior product manager, oracle rest apis, ords, python, autonomous database
    Reviewing the SQL in Database Actions
    FYI: This is a Business Confidence Index data-set, in case you were curious (retrieved here). 

    That SQL allows me to filter on a Location and then return those results in ascending order according to the Value column. When I do this using the python-oracledb driver, I should expect to see the same results.

    NOTE: You've probably noticed that the SQL in the python file differs from that seen in the SQL Worksheet. That is because you need to escape the single quotes surrounding ZAF, as well as remove the trailing semi-colon in the SQL statement. Its all in the python-oracledb documentation, you just have to be aware of this.

    Once I have all the necessary information in my walletcredentials.py file, I can import that into the test1.py file and execute the code. I chose to run this in an Interactive Window (I’m using VS Code), but you can also do this in your Terminal. In the images (from left to right), you’ll see the test1.py file, then a summary of the output from that SQL query (contained in the test1.py code), and finally, the detailed output (in a text editor).

    Wrap-up

    For those that have an existing Free Tier tenancy, this could be a good option for you. Of course, you have to do some light administration. But if you have gone through the steps to create an Autonomous database in your cloud tenancy, you probably know where to look for the tnsnames.ora and other database wallet files.

    I’m not a developer, but I think it would be nice to simplify the business logic found in this Python code. Maybe better to abstract it completely. For prototyping an application (perhaps one that isn’t micro services-oriented, this could work) or for data- and business analysts, this could do the trick for you. In fact, the data is returned to you in rows of tuples; so turning this into a CSV or reading it into a data analysis library (such as pandas) should be fairly easy!

    Connecting via ORDS: sans OAuth2.0

    Auto-REST and cURL

    I’m still using the “devuser” (although this may be unnecessary, as any unsecured REST-enabled table would do). I’m using the same table as before; the only change I’ve made is to auto-REST enable the BUSCONFIND table for the test2.py code.

    In the following images, I’m retrieving the cURL command for performing a GET request on this table.

    NOTE: In a recent ORDS update, we made available different shell variations (this will depend on your OS); I've selected Bash.

    From there, I take the URI (learn more on URIs) portion of the cURL command and place it into my browser. Since this table is auto-REST enabled, I’ll only receive 25 rows from this table.

    NOTE: The ORDS default pagination is limit = 25.

    The code

    And the code for this test2.py looks like this:

    # Auto-REST enabled with ORDS; in an Oracle Autonomous Database with query parameters.
    
    import requests
    import pprint
    
    # Importing the base URI from this python file.
    
    from testurls import test2_url
    
    # An unprotected endpoint that has been "switched on" with the ORDS Auto-REST enable feature. 
    # Query parameters can be added/passed to the Base URI for GET-ing more discrete information.
    
    url = (test2_url + '?q={"location":"ZAF","value":{"$gt":100},"$orderby":{"value":"asc"}}}')
    
    # For prototyping an application, in its earlier stages, this could really work. On your front end, you 
    # expect the user to make certain selections, and you'll still pass those as parameters. 
    # But here, you do this as a query string. In later stages, you may want to streamline your application
    # code by placing all this into a PL/SQL or SQL statement. Thereby separating application
    # logic and business logic. You'll see this approach in the test3.py file. 
    # This works, but you can see how it gets verbose, quick. Its a great jumping-off point.
    
    responsefromadb = requests.get(url)
    pprint.pprint(responsefromadb.json())

    Lines 8 and 13 are the two areas to focus on in this example. In Line 8 imported my URL from the testurls.py file (again, abstracting it, so it’s not in the main body of the code).

    test2 python file and testurls file for second test, chris hoina, senior product manager, oracle rest apis, ords, python, autonomous database
    The test2.py and testurls.py files

    And then, in Line 13, I appended a query string to the end of that URL. ORDS expects the query parameters to be a JSON object with the following syntax:

    [ORDS Endpoint]/?q={"JSON Key": "JSON Value"}

    The new, complete query string below requests the same information as was requested in the test1.py example:

    url = (test2_url + '?q={"location":"ZAF","value":{"$gt":100},"$orderby":{"value":"asc"}}}')

    This string begins with that same BASE URI for the ORDS endpoint (the auto-REST enabled BUSCONFIND table) and then applies the query string prefix “?q=” followed by the following parameters:

    1. Filter by the location "ZAF"
    2. Limit the search of these locations to values (in the Value column) greater than ($gt) 100
    3. Return these results in ascending order (asc) of the Value column
    NOTE: You can manipulate the offsets and limits in the python-oracledb driver too. More info found here. And filtering in queries with ORDS can be found here. 

    And if I run the test2.py code in the VS Code Interactive Window, I’ll see the following summary output.

    summary output from python test2, chris hoina, senior product manager, oracle rest apis, ords, python, autonomous database
    Summary output from the response in test2.py

    Here is a more detailed view in the VS Code text editor:

    detailed output from python test2, chris hoina, senior product manager, oracle rest apis, ords, python, autonomous database
    Detailed output with helpful links

    Wrap-up

    A slightly different approach, right? The data is all there, similar to what you saw in the test1.py example. There are a few things to note, though:

    • The consumer of this ORDS REST API doesn’t need access to the database (i.e. you don’t need to be an admin or have a schema); you can perform GET requests on this URI.
    • The response body is in JSON (ubiquitous across the web and web applications)
      • Also, language and framework agnostic (the JSON can be consumed/used widely, and not just with Python)
    • You are provided a URI for each item (i.e. entry, row, etc.)
    • No need for SQL; just filter with the JSON query parameters
    • No business logic in the application code
    • Needless to say, no ORMs or database modeling is required for this approach

    However…security is, ahem…nonexistent. That is a problem and flies in the face of what we recommend in our ORDS Best Practices.

    Connecting via ORDS: secured with OAuth2

    Note: This is an abbreviated explanation, I'll be posting an expanded write-up on this example post haste!

    Since this is what I’m considering “advanced” (it’s not difficult, there are just many pieces) I’m going to keep this section brief. Long story short, I’ll take those query parameters from above and place them into what is referred to as a Resource Handler.

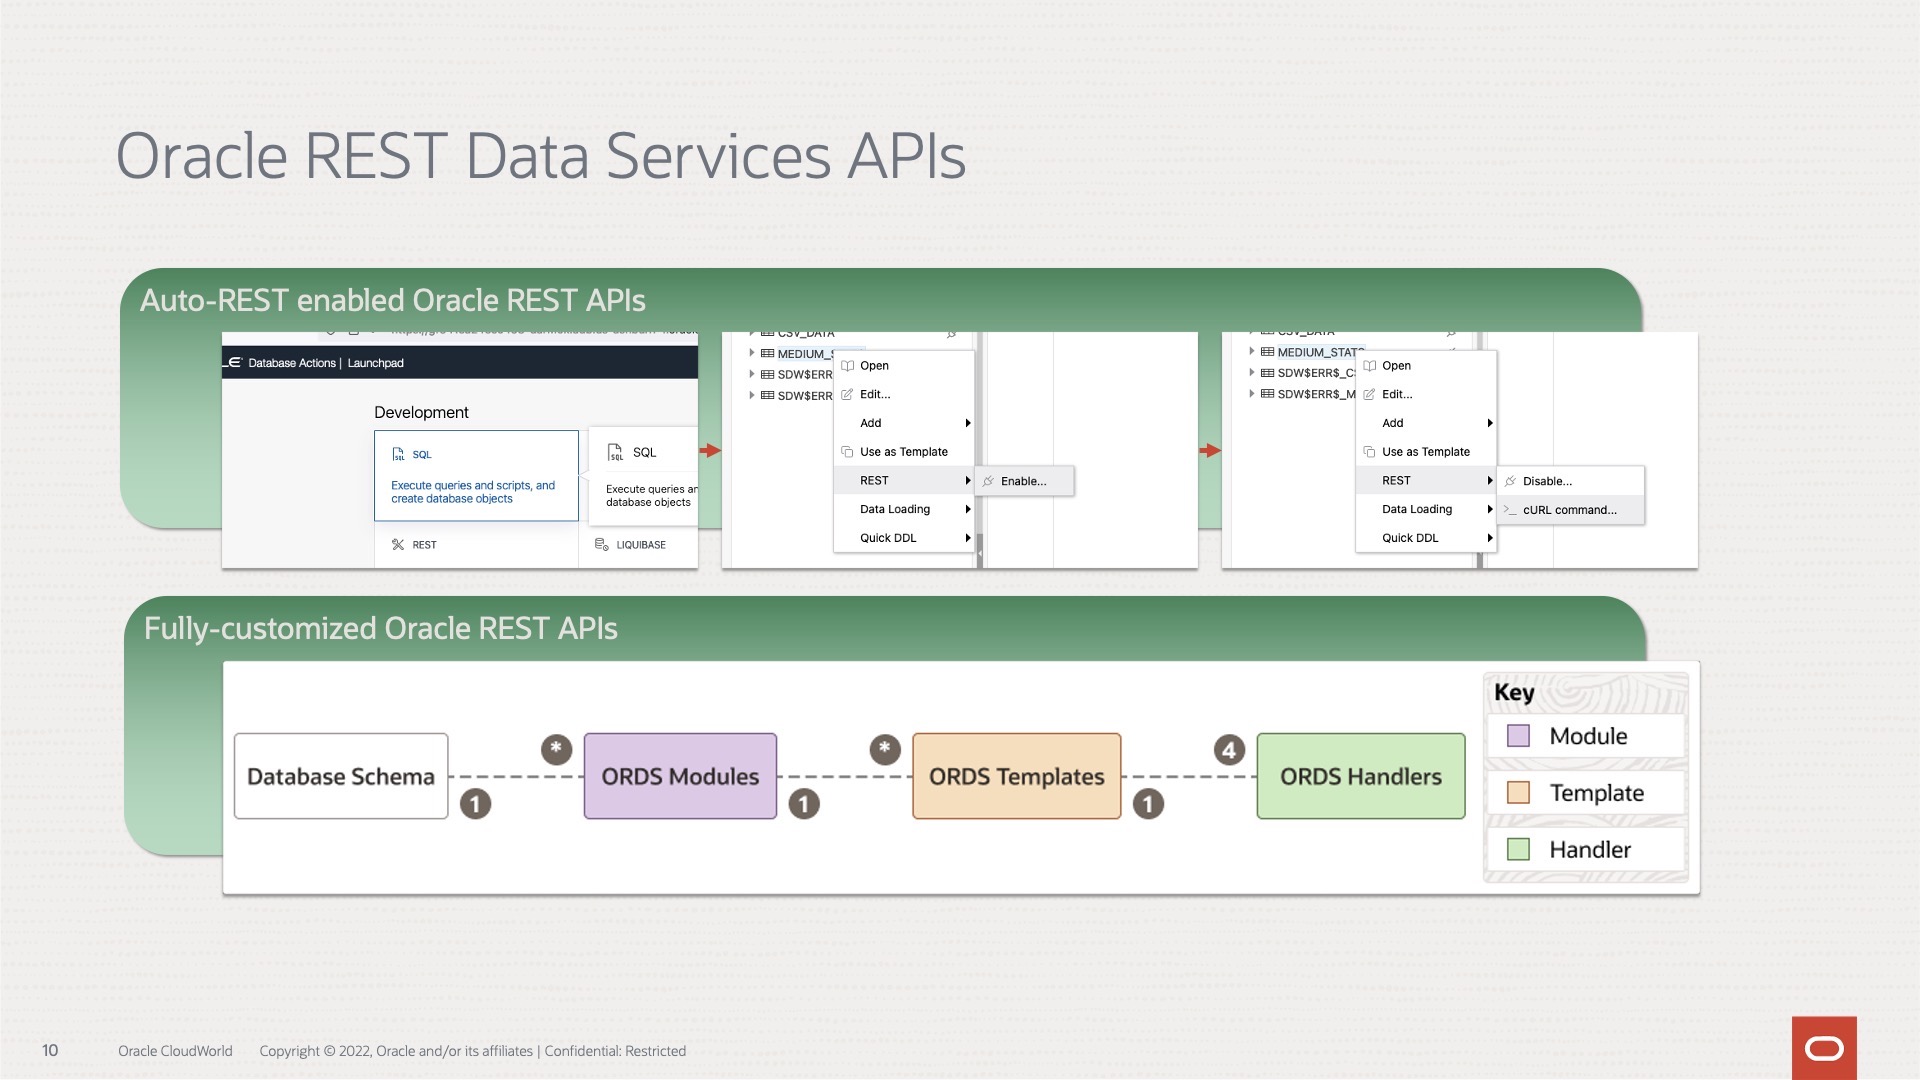
    TIME-OUT: Auto-REST enabling a database object (the BUSCONFIND table in this case) is simple in Database Actions. Its a simple left-click > REST-enable. You saw that in the previous example. You are provided an endpoint and you can use the query parameters (i.e. the JSON {key: value} pairs) to access whatever you need from that object. 
    
    However, creating a custom ORDS REST endpoint is a little different. First you create a Resource Module, next a (or many) Resource Template/s, and then a (or many) Resource Handler/s. In that Resource Handler, you'll find the related business logic code for that particular HTTP operation (the menu includes: GET, POST, PUT, and DELETE). 

    The Resource Module

    The process of creating a custom ORDS API might be difficult to visualize, so I’ll include the steps I took along with a sample query (in that Resource Handler) to help illustrate.

    Chances are you may be the administrator of your Always Free tenancy, so you have full control over this. Other times, you might be provided the REST endpoint. In that case, you may not ever have to worry about these steps. Either way, you can see how we’re simulating (as well as both abstracting and keeping the business logic in the database) the query with this final example (test3.py).

    Security

    The OAuth 2.0 authorization framework enables a third-party application to obtain limited access to an HTTP service, either on behalf of a resource owner by orchestrating an approval interaction between the resource owner and the HTTP service, or by allowing the third-party application to obtain access on its own behalf.

    RFC 6749: The OAuth 2.0 Authorization Framework

    I’ll keep this section brief, but I’m protecting this resource through the aid of an ORDS OAuth2.0 client. I’ve created one here:

    creating an oauth2 client for test3 example, chris hoina, senior product manager, oracle rest apis, ords, python, autonomous database
    After creating a client you can use the provided URL for requesting a new Bearer Token

    And, as you’ll see shortly, I’ll rely on some Python libraries for requesting an Authorization Token to use with the related Client ID and Client Secret. If you want to nerd out on the OAuth2.0 framework, I challenge you to read this.

    test3.py example

    NOTE: Remember, I'm keeping this section intentionally brief. It deserves a slightly deeper dive, and class is almost over (so I'm running out of time). 

    The code for this example:

    # Custom ORDS Module in an Oracle Autonomous Database.
    
    import requests
    from requests_oauthlib import OAuth2Session
    from oauthlib.oauth2 import BackendApplicationClient
    import pprint
    import json
    
    # Importing the base URI from this python file.
    
    from testurls import test3_url
    
    # A separate python file I created and later import here. It contains my credentials, 
    # so as not to show them in this script here. 
    
    from oauth2creds import token_url, client_id, client_secret
    
    token_url = token_url
    client_id = client_id
    client_secret = client_secret
     
    client = BackendApplicationClient(client_id=client_id)
    oauth = OAuth2Session(client=client)
    
    token = oauth.fetch_token(token_url, client_id=client_id, client_secret=client_secret)
    
    bearer_token = token['access_token']
    
    # Location can be anything from the table. Now, only the single variable needs to be passed. Business logic has been abstracted somewhat; as it now resides within
    # ORDS. This could make your application more portable (to other languages and frameworks, since there are fewer idiosyncracies and dependencies):
    
    location = "ZAF"
    
    # print(location)
    
    # ------------------------------------------------------------------------------ # 
    # In Database Actions, we:
    #   1. Create an API Module
    #   2. Then create a Resource Template
    #   3. Finally, a GET Resource Handler that consists of the code from test1.py:
    
    #           select * from BUSCONFIND where location= :id
    #               order by value ASC
    # ------------------------------------------------------------------------------ # 
    url = (test3_url + location)
    # print(url)
    
    responsefromadb = requests.get(url, headers={'Authorization': 'Bearer ' + bearer_token}).json()
    
    # This step isn't necessary; it simply prints out the JSON response object in a more readable format.
    
    pprint.pprint(responsefromadb)

    Lines 11 and 16 deserve some attention here. The URL for Line 11 comes from the testurls.py file; seen in the previous example. And the contents from Line 16 come from the oauth2creds.py file. Here are the files, side-by-side:

    test3 python oauthcreds and test url files, chris hoina, senior product manager, oracle rest apis, ords, python, autonomous database
    The test3.py, testurls.py, and oauth2creds.py files

    As you can see in the testurls.py file, I’m relying on the test3_url for this example. And the OAuth2.0 information you see comes directly from the OAuth Client I created in Database Actions:

    creating an oauth2 client for test3 example, chris hoina, senior product manager, oracle rest apis, ords, python, autonomous database
    In this image, you can see the Client ID and Client Secret

    If I put that all together, I can execute the code in test3.py and “pretty print” the response in my Interactive Window. But first I need to adjust the Resource Handler’s URI (the one I copied and pasted from the “REST Workshop”). It retains the “:id” bind parameter. But the way I have this Python code set up, I need to remove it. It ends up going from this:

    test3_url = 'https://test3_url = 'https://abc123def456ghi789-darmok.adb.us-ashburn-1.oraclecloudapps.com/ords/devuser/myapi/locations/:id'

    To this:

    test3_url = 'https://abc123def456ghi789-darmok.adb.us-ashburn-1.oraclecloudapps.com/ords/devuser/myapi/locations/'

    Otherwise, if I don’t remove that bind parameter when the code executes, the target URL will end up looking like this:

    'https://abc123def456ghi789-darmok.adb.us-ashburn-1.oraclecloudapps.com/ords/devuser/myapi/locations/:idZAF'

    With that out of the way, I can run this code and review the output.

    From top-to-bottom, left-to-right you’ll see I first execute the code in the Interactive Window. From there I can review a summary of the response to my GET request. That pretty print library allows us to see the JSON array in a more readable format (one that has indentation and nesting); which you can see in the second image. The third image is a more detailed view of the first half of this response. And I include the final image to highlight the helpful URLs that are included in the response body.

    Since I know my limit = 25, and the 'hasMore': True (seen in the output in that third image) exists, I know there are more items. You can adjust the limit and offset in subsequent requests, but I’ll save that for another day.

    Wrap-up

    You can probably tell, but this is like an expansion of the previous example. But instead of relying on the auto-REST enabling, you are in full control of the Resource Module. And while you don’t need to use OAuth2.0 it’s good practice to use it for database authentication. You can see how the response comes through a little differently, compared to the previous example, but still very similar.

    In this example, I did all the work, but that might not be the case for you; much of it might be handled for you. The main thing I like about this example is that we rely on stable and popular Python libraries: requests, requests_oauthlib, and oautlib.

    The fact that this is delivered as a JSON object is helpful as well (for the same reasons mentioned in the second example). And finally, I enjoy the fact that you only need to pass a single parameter from your (assumed) presentation layer to your application layer; an example might be a selection from an HTML form or drop-down menu item.

    The end

    We’re at the end of this fun little exercise. As I mentioned before, I will expand on this third example. There are so many steps, and I think it would be helpful for people to see a more detailed walk-through.

    And be on the lookout (BOLO) for a video. There’s no way around this, but a video needs to accompany this post.

    And finally, you can find all the code I review in this post in my new “blogs” repository on GitHub. I encourage you to clone, fork, spoon, ladle, knife, etc…

    Oh and…

  • More fun with Medium story stats, JSON, Python, Pandas, and Oracle SQL Developer Web

    More fun with Medium story stats, JSON, Python, Pandas, and Oracle SQL Developer Web

    That’s right; I’m back again for yet another installment of this ongoing series dedicated to working with Medium.com story stats. I first introduced this topic in a previous post. Maybe you saw it. If not, you can find it here.

    Recap

    My end goal was to gather all story stats from my Medium account and place them into my Autonomous Database. I wanted to practice my SQL and see if I could derive insights from the data. Unfortunately, gathering said data is complicated.

    Pulling the data down was a breeze once I figured out where to look for these story statistics. I had to decipher what I was looking at in the Medium REST API (I suppose that was somewhat tricky). My search was mostly an exercise in patience (there was a lot of trial and error).

    I uploaded a quick video in the previous post. But I’ll embed it here so you can see the process for how I found the specific JSON payload.

    Obtaining the raw JSON

    Once I found that URL, I saved this JSON as a .json file. The images below show remnants of a JavaScript function captured with the rest of the JSON. I’m no JavaScript expert, so I can’t tell what this function does. But before I load this into my Autonomous Database (I’m using an OCI Free Tier account, you can check it out here if you are curious), it needs to go.


    README

    I am pointing out a few things that may seem convoluted and unnecessary here. Please take the time to read this section so you can better understand my madness. 
    
    FIRST: Yes, you can manually remove the [presumably] JavaScript saved along with the primary JSON payload (see above paragraphs). I'm showing how to do this in Python as a practical exercise. But I'm also leaving open the opportunity for future automation (as it pertains to cleaning data). 
    
    SECOND: When it comes to the Pandas data frame steps, of course, you could do all this in Excel, Numbers, or Sheets! Again, the idea here is to show you how I can clean and process this in Python. Sometimes doing things like this in Excel, Numbers, and Sheets is impossible (thinking about enterprise security here). 
    
    THIRD: Admittedly, the date-time conversion is hilarious and convoluted. Of course, I could do this in a spreadsheet application. That's not the point. I was showing the function practically and setting myself up for potential future automation. 
    
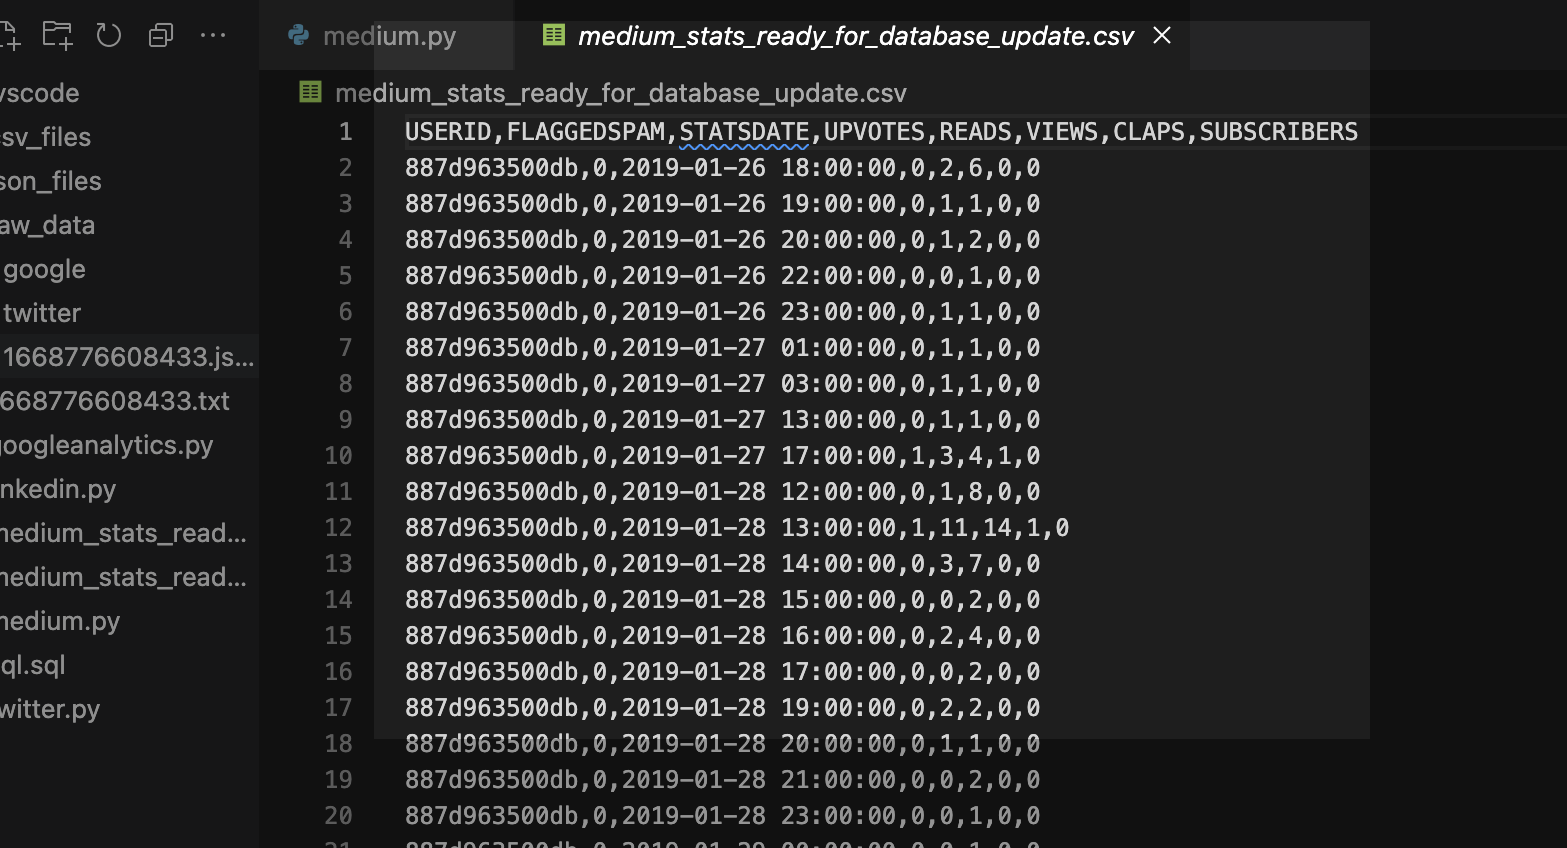
    FOURTH: I'll be the first to admit that the JSON > TXT > JSON > CSV file conversion is comical. So if you have any suggestions, leave a comment here or on my GitHub repository (I'll link below), and I'll attribute you!

    The code

    Explaining the code in context, with embedded comments, will be most illuminating.

    I’ve named everything in the code as literally as possible. In production, this feels like it might be impractical; however, there is no question about what the hell the code is doing! Being more literal is ideal for debugging and code maintenance.

    Here is the entire code block (so CTRL+C/CTRL+V to your heart’s content ๐Ÿ˜˜). I’ll still break this down into discrete sections and review them.

    import csv
    import json
    import pandas as pd 
    import datetime
    from pathlib import Path
    
    # You'll first need to sign in to your account, then you can access this URL without issues: 
    # https://medium.com/@chrishoina/stats/total/1548525600000/1668776608433
    # NOTES:
    # Replace the "@chrishoina" with your username 
    # The two numbers you see are Unix Epochs; you can modify those as # needed; in my case, I
    # wanted to see the following:
    # * 1548525600000 - At the time of this post, this seems to be 
    # whenever your first post was published or when 
    # you first created a Medium account. In this case, for me, this 
    # was Sat, Jan/26/2019, 6:00:00PM - GMT
    # * 1665670606216 - You shouldn't need to change this since it will # just default to the current date.
    
    # For the conversion, I an Epoch Converter tool I found online: https://www.epochconverter.com/
    
    # Step 1 - Convert this to a,(.txt) file
    p = Path("/Users/choina/Documents/socialstats/1668776608433.json")
    p.rename(p.with_suffix('.txt'))
    
    # Step 2 - "read" in that text file, and remove those pesky
    # characters/artifacts from position 0 through position 15. 
    # I'm only retaining the JSON payload from position 16 onward.
    
    with open("/Users/choina/Documents/socialstats/1668776608433.txt", "r") as f:
    stats_in_text_file_format = f.read()
    
    # This [16:] essentially means grabbing everything in this range. Since
    # there is nothing after the colon; it will just default to the end (which is
    # what I want in this case).
    
    cleansed_stats_from_txt_file = stats_in_text_file_format[16:]
    
    print(cleansed_stats_from_txt_file)
    
    # This took me a day to figure out, but this text file needs to be encoded
    # properly, so I can save it as a JSON file (which is about to happen). I
    # always need to remember this, but I know that the json.dumps = dump
    # string, which json.dump = dump object. There is a difference, I'm not
    # the expert, but the docs were helpful. 
    
    json.dumps(cleansed_stats_from_txt_file)
    
    # Step 3 - Here, I create a new file, then indicate we will "w"rite to it. I take the 
    # progress from Step 2 and apply it here. 
    
    with open('medium_stats_ready_for_pandas.json', 'w') as f:
    f.write(cleansed_stats_from_txt_file)
    
    # Step 4 - Onto Pandas! We've already imported the pandas library as "pd."
    # We first create a data frame and name the columns. I kept the names
    # very similar to avoid confusion. I feared that timestampMs might be a
    # reserved word in Oracle DB or too close, so I renamed it. 
    
    df = pd.DataFrame(columns=['USERID', 'FLAGGEDSPAM', 'STATSDATE', 'UPVOTES', 'READS', 'VIEWS', 'CLAPS', 'SUBSCRIBERS']) 
    
    with open("/Users/choina/Documents/socialstats/medium_stats_ready_for_pandas.json", "r") as f: 
    data = json.load(f)
    data = data['payload']['value']
    
    print(data)
    
    for i in range(0, len(data)):
    df.loc[i] = [data[i]['userId'], data[i]['flaggedSpam'], data[i]['timestampMs'], data[i]['upvotes'], data[i]['reads'], data[i]['views'], data[i]['claps'], data[i]['updateNotificationSubscribers']]
    
    df['STATSDATE'] = pd.to_datetime(df['STATSDATE'], unit="ms")
    
    print(df.columns)
    
    # Step 5 - use the Pandas' df.to_csv function and save the data frame as
    # a CSV file
    
    with open("medium_stats_ready_for_database_update.csv", "w") as f:
    df.to_csv(f, index=False, header=True)

    I used several Python libraries I use for this script:

    Step 1

    p =  Path("/Users/choina/Documents/socialstats/1668776608433.json")
    p.rename(p.with_suffix('.txt')

    Pathlib allows you to assign the file’s path to “p”. From there, I changed the .json file extension to a .txt extension.

    Note: Again, I'm sure there is a better way to do this, so if you're reading, leave a comment here or on my GitHub repository so I can attribute it to you ๐Ÿ™ƒ. 

    The before and after of what this step looks like this:

    With that out of the way, I needed to remove that JavaScript “prefix” in the file. I do this in Step 2 (I got so fancy that I probably reached diminishing returns). My approach works, and I can repurpose this for other applications too!

    Step 2:

    # Step 2 - "read" in that text file, and remove those pesky
    # characters/artifacts from position 0 through position 15. Or in other
    # words, you'll retain everything from position 16 onward because that's
    # where the actual JSON payload is.
    
    with open("/Users/choina/Documents/socialstats/1668776608433.txt", "r") as f:
    stats_in_text_file_format = f.read()
    
    # This [16:] essentially means grabbing everything in this range. Since
    # there is nothing after the colon; it will just default to the end (which is
    # what I want in this case).
    cleansed_stats_from_txt_file = stats_in_text_file_format[16:]
    
    print(cleansed_stats_from_txt_file)
    
    # This took me a day to figure out, but this text file needs to be
    # appropriately encoded to save as a JSON file (which is about to
    # happen). I always forget the difference between "dump" and "dumps";
    # json.dumps = dump string, whereas json.dump = dump object. There is
    # a difference, I'm not the expert, but the docs were helpful (you should
    # read them). 
    
    json.dumps(cleansed_stats_from_txt_file)
    
    json with characters that need to be removed in vs code context chris hoina senior product manager oracle rest apis database tools autonomous database
    I needed to remove these remnants from the Medium JSON response

    While this initially came through as a JSON payload, those first 0-15 characters had to go.

    FULL DISCLAIMER: I couldn't figure out how to get rid of this while it was still a JSON file hence why I converted this to a text file (this was the only way I could figure it out).

    I captured position 16 to infinity (or the end of the file, whichever occurs first), then I re-encoded the file as JSON (I interpreted this as “something the target machine can read and understand as JSON“).

    OPEN SEASON: CompSci folks, please roast me in the comments if I'm wrong. 

    Step 3

    # Step 3 - I create a new file, then I'll "w"rite to it. I took the result from Step 2 and applied it here. 
    
    with open('medium_stats_ready_for_pandas.json', 'w') as f: 
    f.write(cleansed_stats_from_txt_file)

    I’m still at the data-wrangling portion of this journey, but I’m getting close to the end. I’ll create a new JSON file, take the parts of the (freshly encoded) text file I need, and then save them as that new JSON file.

    Step 4

    # Step 4 - Onto Pandas! We've already imported the pandas library as "pd"
    
    # I first create a data frame and name the columns. I kept the names 
    # similar to avoid confusion. I feared that timestampMs might be a
    # reserved word in Oracle DB or too close, so I renamed it. 
    
    df = pd.DataFrame(columns=['USERID', 'FLAGGEDSPAM', 'STATSDATE', 'UPVOTES', 'READS', 'VIEWS', 'CLAPS', 'SUBSCRIBERS']) 
    
    with open("/Users/choina/Documents/socialstats/medium_stats_ready_for_pandas.json", "r") as f: 
    data = json.load(f)
    data = data['payload']['value']
    
    print(data)
    
    for i in range(0, len(data)):
    df.loc[i] = [data[i]['userId'], data[i]['flaggedSpam'], data[i]['timestampMs'], data[i]['upvotes'], 
    data[i]['reads'], data[i]['views'], data[i]['claps'], data[i]['updateNotificationSubscribers']]
    
    df['STATSDATE'] = pd.to_datetime(df['STATSDATE'], unit="ms")
    
    print(df.columns)

    I won’t teach Pandas (and honestly, you do NOT want me to be the one to teach you Pandas), but I’ll do my best to explain my process. I first created the structure of my data frame (“df” in this case). And then, I named all the column headers (these can be anything, but I kept them very close to the ones found in the original JSON payload).

    I then opened the newly-saved JSON file and extracted what I needed.

    NOTE: I got stuck here for about a day and a half, so let me explain this part. 

    The data['payload']['value'] refers to the key and value in this particular {key: value} pair. This approach allowed me to grab all the values of “value“. This image explains what I started with (on the left) and what I ended up with (on the right).

    retrieving all the values in the payload-value key-value pair, chris hoina, ords, oracle rest apis, database tools, sql developer web
    The before and after JSON payload

    You’ll notice a {"success": true} key: value pair. With this method, I removed that pair and shed others at the end of the JSON payload.

    three additional key value pairs i remove from the json, chris hoina, senior product manager, ords, oracle rest apis, database tools, sql developer web, oracle autonomous database
    Removing a great deal of trash

    I can’t take credit for organically coming up with this next part; Kidson on YouTube is my savior. I’d watch this video to understand what is happening in this piece of code entirely:

    for i in range(0, len(data)):
        df.loc[i] = [data[i]['userId'], data[i]['flaggedSpam'], data[i]['timestampMs'], data[i]['upvotes'],                                   
        data[i]['reads'], data[i]['views'], data[i]['claps'], data[i]['updateNotificationSubscribers']]

    In short, you take the values from the columns in the JSON file (above) and then put them into the column locations named in this piece of code:

    df = pd.DataFrame(columns=['USERID', 'FLAGGEDSPAM', 'STATSDATE', 'UPVOTES', 'READS', 'VIEWS', 'CLAPS', 'SUBSCRIBERS'])  

    For instance, the "userId" values in the JSON file will all go into the 'USERID' column in the Pandas data frame. And the same thing will happen for the other values and associated (Pandas data frame) columns.

    Finally, I changed the date (which, if you recall, is still in this Epoch format) with the Datetime library to a more friendly, readable date. Using this code:

    df['STATSDATE'] = pd.to_datetime(df['STATSDATE'], unit="ms")

    Step 5

    with open("medium_stats_ready_for_database_update.csv", "w") as f:
        df.to_csv(f, index=False, header=True)

    I’m at the home stretch now. I take everything I’ve done in Pandas and save it as a CSV file. I wanted to keep the headers but ditch any indexing. The clean CSV file will look like this:

    completed csv ready for oracle autonomous database chris hoina senior product manager oracle rest apis database tools autonomous database
    Cleaned, tidy CSV ready for Data Load via SQL Developer Web

    Step 6

    Lastly, I logged into SQL Developer Web and clicked the new Data Load button (introduced in Oracle REST Data Services version 22.3) to upload the CSV file into a new table. The Autonomous Database automatically infers column names and data types. I slightly modified the "statsdate" column (honestly, I could have left it alone, but it was easy enough to change).

    Before and After

    And that’s it! Once uploaded, I can compare what I did previously to what I have achieved most recently. And both ways are correct. For instance, depending on your requirements, you can retain the JSON payload as a CLOB (as seen in the first image) or a more traditional table format (as seen in the second image).

    Wrap up

    If you’ve made it this far, congrats! You should now have two ways to store Medium stats data in a table (that lives in the Oracle Autonomous Database) either as:

    • a CLOB
    • an OG table

    And if you’d like to review the code, you can find it here.

    And until next time ๐Ÿซ , happy querying.

  • Oracle REST APIs: A LiveLabs review

    Oracle REST APIs: A LiveLabs review

    Recently Jeff and I were invited by the Oracle Developers and Developer Relations teams to do a walkthrough of a LiveLabs workshop, โ€œHow to Build Powerful and Secure REST APIs for Your Oracle Autonomous Database.โ€

    We spent about 90 minutes moving through selected labs in the workshop. Luckily they recorded it for us; you can watch it in all its glory here.

    If that video piques your interest, I encourage you to complete the workshop since it provides an excellent overview of Oracle REST Data Services APIs โ€” specifically when working in Database Actions (in the Oracle Autonomous Database).


    About the workshop

    Workshop overview from sept 2022 ords api masterclass jeff smith and chris hoina oracle rest apis oracle autonomous database database tools dql developer web
    Labs 1, 2, and 7 are common across many workshops. These were our focus.

    The workshop consists of seven labs, but labs 3-6 were the main focus.

    Two approaches to Oracle REST APIs, Chris Hoina, Senior Product Manager, ORDS, Database Tools
    Two approaches to REST-enabling your Oracle database objects.

    We also wanted to highlight the two ways a user could create Oracle REST APIs in Database Actions (formerly SQL Developer Web). You can jump right in with auto-REST enabling or get creative by building your Resource Modules > Templates > Handlers.


    Workshop highlights

    I wonโ€™t walk through the labs in detail here, but what I will do is highlight areas that:

    • Were cool/worth revisiting, or
    • Have (or continue to) helped speed up my productivity in Database Actions (and through association with the Autonomous Database)
    The videos are queued up to the related topic.

    Lab 3

    Lab 3 walks you through connecting to an Autonomous Database with Database Actions. From there, you create a table from a CSV file. And finally, youโ€™ll auto-REST enable the table with simple mouse clicks.

    Data Loading

    I’ve found no less than three GUI-based ways to load data in Database Actions.

    Auto-REST enabling

    We are using mouse clicks for auto-REST enabling database objects in the Oracle Autonomous Database.

    Show Code toggle

    The new “Show Code” toggle switch in Database Actions.

    This feature isnโ€™t limited to the SQL Worksheet; it's found across Database Actions!

    cURL command options for your environment

    cURL commands now provide Power Shell, Command Prompt, and Bash examples.

    Lab 4

    Lab 4 walks you through using a Batch Load API for loading two million+ rows into the table you previously created (in Lab 3). We also make a SQL procedure and later use PL/SQL to simulate a REST API call to the table.

    We briefly discussed the Cloud Shell and Code Editor (both in Oracle Cloud Infrastructure). Click the links to learn more, they are free and included in your OCI tenancy ๐Ÿ˜€.

    A crash course on query parameters

    Jeff has a helpful article here (one I reference A LOT).
    You can review our docs here (we mention it in several areas).

    Graduating from auto-REST

    A short discussion on when and why you may want to move away from auto-REST-enabled Oracle APIs to more customized Oracle REST APIs.

    Lab 5

    In Lab 5, you use Database Actions and the REST console to build a REST API using a parameterized PL/SQL procedure and SQL statement. We do this manually in the previous lab but then REST-enable it here (this is a continuation and refinement of the last lab).

    Bind variables in a POST request

    ORDS docs on Bind variables.
    This continues to confound me, so if you are in the same boat as me and you want me to do some more dedicated posts on this, let me know!

    Lab 6

    The goal of this lab was to educate you on Roles, Privileges, and OAuth 2.0 Client Authentication. Unfortunately, we ran out of time and had to speed through this final section. However, I did show off some of the OpenAPI functions within Database Actions.

    OpenAPI Specifications

    Specifically, we reviewed how you can view your Resource Modules in the OpenAPI view (displayed as a Swagger UI implementation). And view/execute handlers to observe their responses.

    We also mentioned how you can export a Resource Module in either PL/SQL code or the OpenAPI JSON code.


    I suspect you should be all set to complete this workshop (located here). But why stop the fun there? We have some other LiveLabs workshops that might interest you, too. You should check them out!

    Our other LiveLabs workshops

    The last workshop on the list is our newest one! So if you do attempt it, feel free to create an issue for enhancements (or if anything is unclear and needs updating) on my GitHub repository ๐Ÿ˜Š!

    That’s all for now, but first…