Tag: Oracle Database

  • Troubleshooting: reviewing ORDS connections, your application server, and response times

    Troubleshooting: reviewing ORDS connections, your application server, and response times

    Symptom/Issue

    In an internal Slack thread today, a user was trying to diagnose browser latency while attempting to connect to the ORDS landing page.

    Peter suggested what I thought was a pretty neat heuristic for checking connections to ORDS and your database, as well as latency.

    Methodology

    Let’s say your symptoms are either slow loading or intermittent loss of service when attempting to reach an ORDS landing page. Your immediate thought might be to refresh your browser or bounce the ORDS server (if running in Standalone mode). But this isn’t practical in a production environment, nor is it practical if you have ORDS deployed on a Weblogic Server or Apache Tomcat (you can deploy using any of those three servers).

    Quick Heuristic

    Use cURL to test two different endpoints, compare their response times to each other, and compare to the response time you’ve observed historically1.

    URL one

    This first URL points to where your ORDS instance “lives.”

    https://[my host]/ords

    “Lives,” what does that mean? If you’re deploying to Weblogic Server ORDS would “live” in the $WEBLOGIC_HOME/application directory. In Apache Tomcat it is the $CATALINA/webapps directory, and on Standalone (using the ORDS embedded Jetty server) that might be $HOME/[your ords product folder].

    So if you execute a cURL command to that URL, you’re issuing a request to your application server. With that single command, you can determine:

    1. if it’s even up
    2. what the response is, and
    3. how fast that response is

    Honestly, this sounds silly and obvious at first. But it costs you nothing to just rule out the application server as a culprit. The command2 I tested (with the response included):

    choina@MacBook-Pro-2 ~ % curl -v -s -w "\nTotal time: %{time_total}\n" http://localhost:8080/ords                               
    * Host localhost:8080 was resolved.
    * IPv6: ::1
    * IPv4: 127.0.0.1
    *   Trying [::1]:8080...
    * Connected to localhost (::1) port 8080
    > GET /ords HTTP/1.1
    > Host: localhost:8080
    > User-Agent: curl/8.7.1
    > Accept: */*
    > 
    * Request completely sent off
    < HTTP/1.1 301 Moved Permanently
    < Location: /ords/
    < Content-Length: 0
    < 
    * Connection #0 to host localhost left intact
    
    Total time: 0.001882

    URL two

    The second cURL command you can issue is to the Metadata catalog for your/a target schema. In this example, I’m working with my ordsdemo user. He’s been REST-enabled, and I’ve already set up some Resource Modules (aka ORDS APIs). So I know there is “stuff” at that endpoint.

    https://[my host]/ords/[target schema]/metadata-catalog/

    Here is the cURL command I used (with the response included):

    choina@MacBook-Pro-2 ~ % curl -v -s -w "\n\nTotal time: %{time_total}\n" http://localhost:8080/ords/ordsdemo/metadata-catalog/
    
    * Host localhost:8080 was resolved.
    * IPv6: ::1
    * IPv4: 127.0.0.1
    *   Trying [::1]:8080...
    * Connected to localhost (::1) port 8080
    > GET /ords/ordsdemo/metadata-catalog/ HTTP/1.1
    > Host: localhost:8080
    > User-Agent: curl/8.7.1
    > Accept: */*
    > 
    * Request completely sent off
    < HTTP/1.1 200 OK
    < Content-Type: application/json
    < X-ORDS_DEBUG: true
    < X-Frame-Options: SAMEORIGIN
    < Transfer-Encoding: chunked
    < 
    * Connection #0 to host localhost left intact
    {"items":[{"name":"MOVIE","links":[{"rel":"describes","href":"http://localhost:8080/ords/ordsdemo/movie/"},{"rel":"canonical","href":"http://localhost:8080/ords/ordsdemo/metadata-catalog/movie/","mediaType":"application/json"},{"rel":"alternate","href":"http://localhost:8080/ords/ordsdemo/open-api-catalog/movie/","mediaType":"application/openapi+json"}]},{"name":"moviestream","links":[{"rel":"describes","href":"http://localhost:8080/ords/ordsdemo/mymovies/movie-all"},{"rel":"canonical","href":"http://localhost:8080/ords/ordsdemo/metadata-catalog/mymovies/movie-all","mediaType":"application/json"},{"rel":"alternate","href":"http://localhost:8080/ords/ordsdemo/open-api-catalog/mymovies/","mediaType":"application/openapi+json"}]},{"name":"moviestream","links":[{"rel":"describes","href":"http://localhost:8080/ords/ordsdemo/mymovies/movie-genre"},{"rel":"canonical","href":"http://localhost:8080/ords/ordsdemo/metadata-catalog/mymovies/movie-genre","mediaType":"application/json"},{"rel":"alternate","href":"http://localhost:8080/ords/ordsdemo/open-api-catalog/mymovies/","mediaType":"application/openapi+json"}]},{"name":"test_endpoints","links":[{"rel":"describes","href":"http://localhost:8080/ords/ordsdemo/no_objects/hello_auth"},{"rel":"canonical","href":"http://localhost:8080/ords/ordsdemo/metadata-catalog/no_objects/hello_auth","mediaType":"application/json"},{"rel":"alternate","href":"http://localhost:8080/ords/ordsdemo/open-api-catalog/no_objects/","mediaType":"application/openapi+json"}]},{"name":"test_endpoints","links":[{"rel":"describes","href":"http://localhost:8080/ords/ordsdemo/no_objects/hello_client_cred"},{"rel":"canonical","href":"http://localhost:8080/ords/ordsdemo/metadata-catalog/no_objects/hello_client_cred","mediaType":"application/json"},{"rel":"alternate","href":"http://localhost:8080/ords/ordsdemo/open-api-catalog/no_objects/","mediaType":"application/openapi+json"}]}],"hasMore":false,"limit":25,"offset":0,"count":5,"links":[{"rel":"self","href":"http://localhost:8080/ords/ordsdemo/metadata-catalog/"},{"rel":"first","href":"http://localhost:8080/ords/ordsdemo/metadata-catalog/"}]}
    
    Total time: 0.030173

    In the above example, we are hitting the database server (because we are grabbing the metadata catalog for the target schema). Consequently, the Total time for the round trip is slightly higher. Now, I can compare the two times against each other and against what I’ve seen historically. Are they reasonable? Do they pass the “sniff test”? Or do the results merit a deeper investigation?

    Fin

    I cannot stress this enough; this is just a simple heuristic to get you started. It takes 20 seconds to execute these commands. You’re really just “slicing the pie” at this stage. I honestly don’t think that simile applies here (unless you’ve ever cleared a room before), but you get the idea – thin slicing. Inching your way ever closer to the solution. This is just a part of the route-cause analysis.

    That’s all for now. Keep this in your back pocket. If you have your own heuristics or troubleshooting tips, leave them in a comment below. I’d love to hear how you diagnose issues related to networking, connectivity, latency, etc.

    Follow

    And don’t forget to follow, like, subscribe, share, taunt, troll, or stalk me!

    1. I was hesitant to include this last part, “you’ve observed historically,” because I don’t give a metric. Honestly, it depends on your workload. But if you are doing any sort of performance testing you probably have at least a good sense of what response times should be like for your application (I’m talking directly to developers here). Even if you don’t know these expected response times, you can still compare the individual results against each other: the first URL vs the second URL, in this example. ↩︎
    2. What do the optional -v -w -s variables mean? Good question -v is shorthand for “Verbose;” which means print out as much info as is available. The -s is shorthand for “Silent;” in other words, don’t show any progress bars. And the -w means “Write Out,” in this case, “explicitly write out the Total time for me please.” ↩︎
  • ORDS 24.4 Release Highlights

    ORDS 24.4 Release Highlights

    Pre-Authenticated endpoints

    Using the new ORDS_PAR PL/SQL package, users can create, revoke, issue and set tokens and token life for specific resources. Your REST-enabled schema will automatically have access to this new feature in 24.4. You can execute these functions and procedures from within the Database Actions SQL Worksheet, the SQL Developer for VS Code extension, the SQL Developer desktop client, and SQLcl (new version out) too!

    A mini-tutorial

    Here is an easy way to test these new PAR functions and procedures from the SQL Worksheet. First, Select the ORDS_METADATA schema from the SQL Worksheet Navigator. Then, select “All Objects,” scroll down to, and right-mouse-click on the ORDS_PAR PL/SQL package. Then select Run.

    The first function you see will be the DEFINE_FOR_HANDLER function. Enter your details in the required fields, and execute the code in the SQL Worksheet. You’ll see a new URI populate.

    You can now share that URI (or use it in your test). And it will remain valid for however long you set for the P_DURATION parameter.

    A reminder of where you can locate all these required fields

    Navigate to the REST Workshop; choose your target Resource Module, then…

    ORDS Central Configuration

    ORDS Central Configuration now natively supports pool identifiers in URLs. We still have the Header method of mapping for Central Configuration. But now we support the Request Host Method, too. For instance, if your Global configuration’s (when using a Central Configuration deployment) URI is:

    https://central-config.example.com:8585/central/v1/config/pool/{host}

    You can issue a GET request (something like this, perhaps) to:

    curl https://my_database_pool.localhost:8080.com/ords/hr/employees/

    Your ORDS Central Configuration will take that database pool “prefix” and use it to “look up” that database pool’s settings (in the Central Configuration server). From there, your ORDS instance would have both Global and Pool configuration settings, and it would then be able to satisfy the above GET request.

    Previously, to “inform” the Central Configuration of the {host} value (the URI you see in the first code block), you’d have to pass in a request header. YOU CAN STILL DO THIS! But we support both methods now. Depending on your use case, you may prefer one method over the other. Details here.

    Plain-text in XML Files

    ORDS will notify users when plain-text “secrets,” such as passwords, are present in the ORDS configuration XML files. What does this look like? You can “test” this new functionality by retrieving something like the db.password configuration property.

    Typically, ORDS looks for this value in the cwallet.sso file, but you can add it here (it will just be redundant).

    We then warn you not once but twice! Once when ORDS first starts up and then again when it fully initializes.

    A new ORDS CLI option

    The ORDS CLI now includes a script-friendly --quiet option, which hides banner, copyright, and configuration location information from the ORDS STDOUT.

    Here is an example where we use the standard command:

    ords config get db.servicename

    Followed by the much leaner version:

    ords config --quiet get db.servicename

    As you can see, this makes it much easier for scripts and automation tools to navigate the ORDS STDOUT.

    APEX updates to ORDS access logs

    Standalone access log records now include an APEX app_id and APEX page_id for records, where applicable. The end of the log captures both app_id and page_id (in this example, 4550:1, respectively).

    [0:0:0:0:0:0:0:1] - [21/Nov/2024:17:37:42 +0000] "POST /ords/wwv_flow.accept?p_context=workspace-sign-in/oracle-apex-sign-in/12558700474753 HTTP/1.1" 200 6494 "http://localhost:8080/" "Mozilla/5.0 (Macintosh; Intel Mac OS X 10_15_7) AppleWebKit/537.36 (KHTML, like Gecko) Chrome/131.0.0.0 Safari/537.36" 1362 localhost:8080 - 4550:1

    In cases where APEX is absent, dashes will replace these fields.

    JSON Syntax highlighting

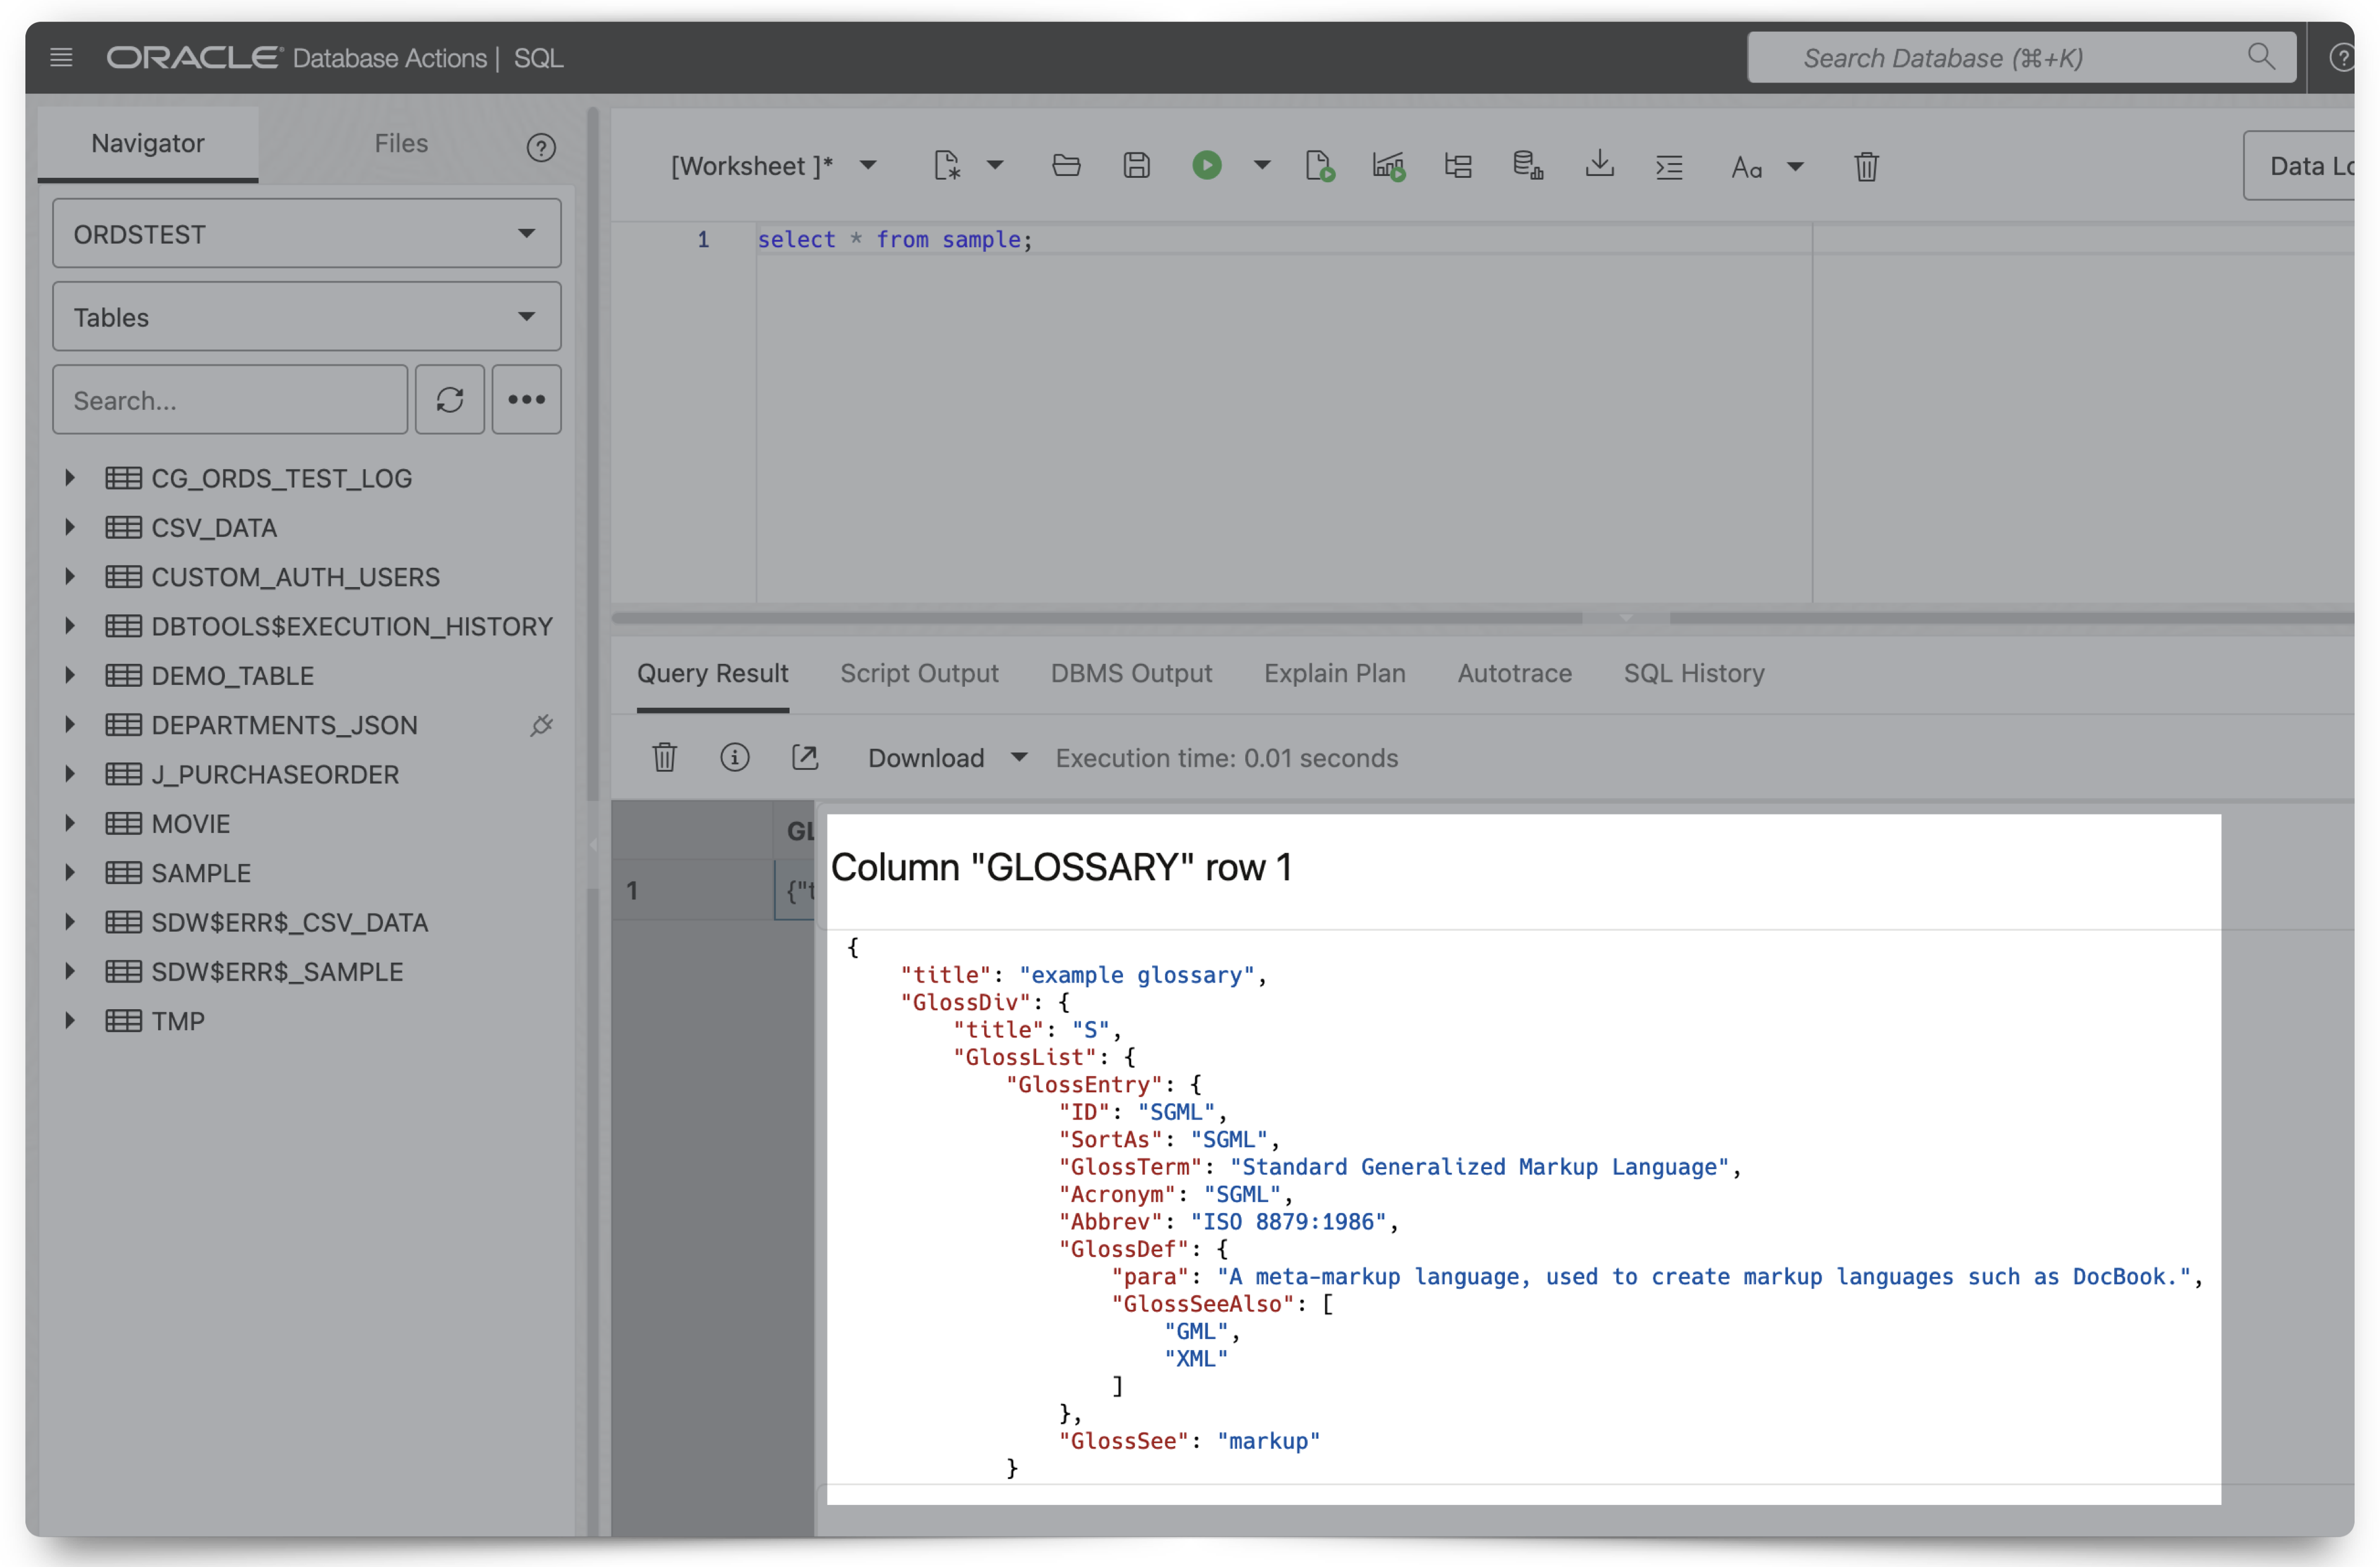
    When viewing JSON data from a query result in the SQL Worksheet, pretty printing, and JSON syntax highlighting are now applied. In this example, you’ll notice a single-row table with the column “Glossary.” Clicking the “Eyeball” icon on the Select * From... results reveal this gorgeously formatted and highlighted JSON object.

    Click to add Implicit, Handler parameters

    You can now add user-defined parameters (i.e., Handler parameters) and Implicit parameters to Handler code blocks with a single mouse click of the parameter name. Take a look at the examples below:

    SQL Worksheet file functionality

    You can now rename SQL Worksheet files (from within Database Actions and the OCI console). This update applies to browser files and OCI object storage files. You can now open, rename, and trash these files.

    And those are just some of the highlights. But be sure to review the links below!

    The links

    1. Download ORDS /latest today.
    2. Read the complete, official Release Notes.
    3. Read the latest edition of the ORDS Developer’s Guide and ORDS Installation/Configuration Guide.
    4. Check out our latest ORDS npm samples.

    And that’s all for now! Enjoy 😊

    Follow

    And don’t forget to follow, like, subscribe, share, taunt, troll, or stalk me!

  • ETags and Oracle REST APIs

    ETags and Oracle REST APIs

    About this post

    I explore ETags and how they can be used in cURL commands when interacting with Oracle REST APIs. I also discuss some of the performance benefits of using ETags. This is not exhaustive, but I hope it introduces you to ETags or reminds you of their existence! But first…


    LATE-BREAKING NEWS!!

    A related video

    FYI: I reference a CSV_DATA table throughout this post. We use it pretty extensively in this LiveLab. And we just recently presented a webinar based on that same LiveLab. You can check that out below! 

    About ETags

    ORDS supports using Entity Tags, ETags for short.

    What are THEY?!?

    FYI: We discuss ETags in our ORDS Best Practices, and our bossman Kris Rice has previously experimented with them too!

    Don’t know what ETags are? No worries, here is a definition:

    The ETag (or entity tag) HTTP response header is an identifier for a specific version of a resource. It lets caches be more efficient and save bandwidth, as a web server does not need to resend a full response if the content was not changed. Additionally, etags help to prevent simultaneous updates of a resource from overwriting each other (“mid-air collisions”).

    If the resource at a given URL changes, a new Etag value must be generated. A comparison of them can determine whether two representations of a resource are the same.

    MDN Web Docs

    ETags can help to guarantee the provenance of your resources (like the auto-REST enabled table you’ll see shortly) but they can also ensure your applications consume fewer server/database resources, and load comparatively faster.

    To illustrate how ETags work, I did some tinkering with cURL commands, ORDS, and a Podman container. Read on if ye dare…to see what I discovered!


    Oracle REST APIs and ETags

    A couple of weeks ago, I noticed in the cURL documentation there was support for ETags. And the cURL docs have options for both --etag-save and --etag-compare (practical examples to follow). When you use these options in your cURL commands, you’ll either:

    1. save an eTag to a separate text file (locally, like on your desktop in my example below), or
    2. compare the ETag (in that existing file) to an ETag that belongs to your REST-enabled resource (the CSV_DATA table, which you’ll see in a second)

    Oh, that’s a lot of words! So read it again and then continue with my walkthrough. Meanwhile, I’ll spin up this Podman container.

    1-podman-ps-checking-container-status-chris-hoina-oracle-rest-senior-product-manager-podman-curl-commands
    We are back in Podman.
    INFO: Want to learn more about using Podman and Oracle database tools? Check out my other two Podman-related posts here and here!

    ORDS in Standalone mode

    I need ORDS up and running for this demonstration, so I issued the ords serve command in my Terminal. This will launch ORDS in standalone mode (using a Jetty server, as seen in the image). Once it’s initialized, I can log into SQL Developer Web to interact with my database (remember, in this example, it lives in a Podman container).

    2-and-3-initializing-ords-chris-hoina-oracle-rest-senior-product-manager-podman-curl-commands

    Here, I’ve logged into SQL Developer Web as a non-ADMIN user (ORDSTEST in this case).

    4-signing-into-sql-developer-web-chris-hoina-oracle-rest-senior-product-manager-podman-curl-commands

    From the Database Actions Launchpad, I navigated to the SQL Worksheet.

    5-navigating-to-sql-worksheet-from-launchpad-chris-hoina-oracle-rest-senior-product-manager-podman-curl-commands

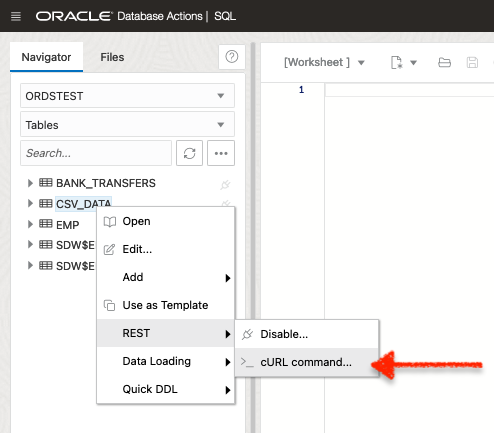
    And to keep this quick, I reused a table I created for that webinar we just did. I also auto-REST enabled it (so I could play with the cURL commands). Below, you’ll see it’s just a quick right-click with the mouse.

    6-navigating-to-curl-commands-for-csv_data-table-chris-hoina-oracle-rest-senior-product-manager-podman-curl-commands
    FYI: As a reminder, if you want to learn more about cURL commands, check out the LiveLabs workshop that this is based on. You can find that here.

    Getting the cURL Command

    Once I auto-REST enabled the CSV_DATA table, I selected the GET ALL REST cURL command.

    7-retrieving-the-get-all-rest-endpoint-chris-hoina-oracle-rest-senior-product-manager-podman-curl-commands
    This is the cURL command I’ll use for this experiment.

    At this point, I still wasn’t sure that an ETag was sent from the server for those auto-REST-enabled resources (in this case, the CSV_DATA table). I know they are present when you build your own REST Modules with ORDS; (at the time) I was just less confident about the auto-REST resources.

    SPOILER ALERT: ETags are present for auto-REST-enabled resources too (I'm dumb, and this is pretty widely known)!

    –etag cURL options

    Once I knew ETags were accessible for auto-REST-enabled resources, I experimented with cURL‘s --etag options (you’ll see how I implemented these in the upcoming cURL command).

    The --etag-save [filename] and --etag-compare [filename] options work such that when you issue the --etag-save in addition to that initial cURL command, a single-line file will be saved to the directory you are currently in (you’ll see that file shortly).

    This differs from how an application might work, but the concept is the same. You’re storing the ETag’s value somewhere accessible to the application. For my purposes, I need to keep this ETag somewhere the cURL command line utility can find it.

    The initial cURL command

    I hopped over to my Terminal and used that [slightly modified] cURL command (the one I previously retrieved from the SQL Worksheet). You’ll see that I included additional options/arguments:

    • --verbose
    • --etag-save
    • | json_pp
    This is the first cURL command I issued.
    FYI: Apparently, the json_pp command utility is a part of Perl. I think this ships with the macOS, but I'm not 100% sure. Do you know? It worked for me and pretty printed out my JSON response (notice how I used the pipe "|" in addition to the actual command).

    When you use that --etag-save option, a file with the value of the ETag will be saved locally. You can see me retrieving that file and reviewing the ETag file (note in the above cURL command, I named the file “myobjectetag.txt“).

    I can now use this ETag in subsequent GET requests to determine if the resource (the CSV_DATA table) I’m requesting has changed since I last interacted with it. What would constitute a change? Maybe rows have been updated or removed; perhaps an additional column was added. Or maybe the table was restructured somehow; it could be any change.

    But, let me pause briefly and explain the --verbose option.

    About the verbose option

    I used the --verbose option to inspect the information available when interacting with this Oracle REST endpoint. I don’t need to include it now since I know the ETag is coming through, but I left it in this cURL command example so that you could have a look yourself. You’ll see loads of information, including (but not limited to):

    • Connection information
    • The cURL version used
    • The Status Code returned (200 or OK in this case)
    • ETag info

    In this example, all I care about is the presence of an ETag. I can now use that ETag in a subsequent GET request to determine if the resource on the server side has changed. Here is what the cURL command looks like with the --etag-compare option:

    That cURL command looks very similar, except for that --etag-compare option. In this situation, cURL first checks to see if your ETag and the resource’s (the API endpoint on your server) ETag match. If they do, the request stops. And if you use the --verbose option, you can see what comes back from the server:

    A whole bunch of nothing. Not really, though. That “If-None-Match” Header is the secret sauce, though. That is a conditional Header that is passed over to the server. Essentially it says, “If this Header value doesn’t match yours, then send over the requested data; otherwise, end the request here because we already have the information we need/. It’s stored/saved (presumably) locally.

    INFO: Read up on caches, because that's essentially what your application is going to use instead of having to go through the entire GET request/response cycle. 

    The request is terminated, but what does this mean from a performance perspective? Well, say you have a webpage that loads and later reloads in response to a user’s interaction (I simulated this with the two cURL commands). That page will probably need some information from the server to populate that page. In a situation like this, you could first ask your application to share your copy of the ETag with the server in a subsequent GET request header (“If-None-Match“). And if nothing has changed, you could speed up page load times by just refreshing with what you have stored in a cache while freeing up resources on your server for other processes. But this is just one example.

    Possibilities with ETag

    I’ve given this some thought, and I bet there are quite a few use cases where referring to an ETag before executing an HTTP method (like a GET or GET ALL) might be helpful.

    You may want to periodically check to see if a resource has changed since you last interacted with it. Could you incorporate ETags into your build processes or longer-running jobs (maybe something around data analysis)?

    Actually, ETags play a massive role in JSON-Relational Duality Views. We have an entire section in the ORDS docs on how to use them! And suppose you want to download a containerized version of the Oracle database 23C (the one that supports JSON-Relational Duality views). You can do that via this link (I think I should do this too and highlight some of the cool ORDS + JSON Duality View features)!

    Well, this brings me to the end of this post. I’m hoping you learned something and came away with some good resources. And if you found this post helpful, please pass it along! And don’t be afraid to comment too! I’d love to hear your thoughts. Maybe I’ll even include your idea in a follow-up post 🤩!

  • An intro to using Oracle SQLcl on Mac

    An intro to using Oracle SQLcl on Mac

    Oracle SQLcl blurb, chris hoina, senior product manager, oracle database tools, command line, oracle autonomous database
    SQLcl…my newest crush?

    Did you know you can use Homebrew to install Oracle’s SQLcl on Mac? I just realized this about a week ago (always the bridesmaid, never the bride…amirite??).

    Homebrew

    First you’ll need to install Homebrew (I’m sure there are other ways to install SQLcl, but installing through Homebrew was a breeze).

    You can install Homebrew on your Mac by first opening up a new terminal window and typing/entering:

    /bin/bash -c "$(curl -fsSL https://raw.githubusercontent.com/Homebrew/install/HEAD/install.sh)"

    That Shell script should walk you through the setup.

    DISCLAIMER: I didn't go that route, but if you follow the directions on the Homebrew site I assume it should work.

    If you want a more hands-on approach, visit this site for a complete walk through of setting up your new Mac for application development. You may not need to do everything on that site, but read up on the Homebrew & Cask sections.

    Installing SQLcl

    I’ve since learned that you are really installing the SQLcl app via Cask (which is included in Homebrew). Cask allows the installation of “large binary files” (see the site from the paragraph above for more details). A list of the current Cask applications available.

    cask applications sqlcl now available, chris hoina, senior product manager, oracle database tools, command line, oracle autonomous database
    We’re giving Pi a run for its money with that semantic versioning…

    Once you are all updated with Homebrew, you can then open up a new terminal and enter the following:

    brew install sqlcl 

    As it installs, you’ll see a lot of activity in the terminal window. Once complete, you’ll see something that looks like this (I’ve already installed/reinstalled it tons of times, so there may be some slight difference):

    sqlcl install complete, chris hoina, senior product manager, oracle database tools, command line, oracle autonomous database
    Don’t forget to review the Caveats section!

    Caveats

    The main things to review are in the “Caveats” section. First, you’ll need Java 11+ or higher for this to work (i.e., connect to an Oracle database). I didn’t realize this, but we give you a command to update to the latest Java version. I wish I had known that, as I spent way too much time figuring out the best way to update.

    brew command for upgrading java, chris hoina, senior product manager, oracle database tools, command line, oracle autonomous database
    Upgrading Java through Homebrew

    Second, you’ll need to add a new line to your “PATH environment variable”.

    Line to be added to PATH environment variable, chris hoina, senior product manager, oracle database tools, command line, oracle autonomous database copy
    New line to be added to your PATH Environment Variable

    What is “PATH?”:

    PATH is an environment variable on Unix-like operating systems, DOS, OS/2, and Microsoft Windows, specifying a set of directories where executable programs are located. In general, each executing process or user session has its own PATH setting.

    Wikipedia.org

    I understand this, as specific applications will only work if you’ve predefined the locations of their dependencies. You can indicate where your operating system looks for these dependencies by updating the PATH Environment Variable (a separate file; more on this in a second). We have another excellent resource here (it explains PATH and CLASSPATH well).

    Locating PATH on Mac

    On a Mac, there are a couple of ways you can find PATH.

    PRO TIP: PATH export definitions are located in a .zprofile file.

    The easiest way (for me) to find this file is by typing/entering in a terminal window:

    open .zprofile 

    LEARN ZSH: Want to learn all there is about zsh , .zshenv, .zprofile, .zshrc or .zlogin? Bookmark this manual for future use.

    From there, your .zprofile file will appear in a new window. Mine looks like this:

    Initial zprofile file without new sqlcl line, chris hoina, senior product manager, oracle database tools, command line, oracle autonomous database
    A look at my .zprofile file.

    If you recall from the “Caveats” section, you may need to add a line to your PATH. I’ve already done that; I added a comment for reference (optional, but make sure the comment is preceded with a “#”).

    zprofile file for PATH environment variable, chris hoina, senior product manager, oracle database tools, command line, oracle autonomous database
    .zprofile file with the new line added.

    Remember to save (with CMD + S)! After which, you can close out the window.

    Also, it’s a good idea to close any active terminals and open a new one (this way your terminal picks up any changes you’ve made).

    You can also perform a check to see what is installed via Homebrew with the following command:

    brew list

    You’ll see something akin to this (depending on what you have installed):

    brew list printout, chris hoina, senior product manager, oracle database tools, command line, oracle autonomous database
    Use brew list to see current Homebrew installs.

    Dive into SQLcl

    Okay, now we are ready to explore SQLcl!

    DISCLAIMER: I'm not connecting to my database yet (I will be in my next post as I'm just working out the kinks on my Podman setup…containers, baby!). 

    I’ll keep this next section simple. Begin with a new terminal and type/enter:

    sql -h 

    or

    sql -help 

    You’ll see the following printout:

    sqlcl initial help screen, chris hoina, senior product manager, oracle database tools, command line, oracle autonomous database
    Help printout.

    If you look closely, you’ll see information for Usage 1 and Usage 2.

    README: When in doubt, refer to the help!

    Usage 1

    Usage 1 – great for reviewing in-context help documentation as well as version information.

    Usage 1 sqlcl initial help screen, chris hoina, senior product manager, oracle database tools, command line, oracle autonomous database
    Usage 1 focus.

    Regarding help, I’ve tried the following (they all work):

    • sql -h
    • sql -help
    • sql -Help
    • sql -H
    • sql -HELP
    HINT: Type/enter exit into the command line to exit the SQLcl help screen.
    type exit to return to the shell, chris hoina, senior product manager, oracle database tools, command line, oracle autonomous database
    Using the exit command.

    Usage 2

    Usage 2 sqlcl initial help screen, chris hoina, senior product manager, oracle database tools, command line, oracle autonomous database
    Usage 2 focus.

    In Usage 2, you’ll find information for two login options:

    • Login with a “Connect Identifier”
    • No logon

    The Connect Identifier can be either:

    • “Net Service Name”
    • “Easy Connect”

    Wut r theez?

    I found some information relating to the “Net Service Name” method of connection; you can refer to that here. Be forewarned – there seems to be some configuration required to use the Net Service Name method (I’ve not tested this yet).

    Conversely, the Easy Connect Method looks well…easier. I found a good resource here. This was the method I used when experimenting with containers and Podman (blog coming soon!).

    Now, if you are like me and want to explore SQLcl (without connecting to an Oracle database), you can log in using the /NOLOG option. Make sure you exit out of the SQLcl help screen first.

    Once you’re out, type/enter the following command:

    sql /NOLOG 
    NOTE: Make sure you have a space between the "l" in sql and the "/" of /NOLOG. 

    Once you hit enter, you should see a screen like this:

    sqlcl nolog option, chris hoina, senior product manager, oracle database tools, command line, oracle autonomous database
    Logging in with the /NOLOG option.

    Unimpressive, right? Well, allow me to whet your appetite some. From here, you have two more options. Those are:

    • h
    • help

    Entering h will reveal a history of the most recent shell commands you’ve executed.

    sqlcl history, chris hoina, senior product manager, oracle database tools, command line, oracle autonomous database
    Shell command history.

    Type/enter help and you’ll; reveal a list of the available SQLcl commands and options. It looks like this:

    help screen once logged on with sqlcl, chris hoina, senior product manager, oracle database tools, command line, oracle autonomous database
    So. Many. Options.

    Pretty cool, eh?

    You can take this one step further by typing/entering a topic of interest. Here are a couple random topics I explored (ALIAS and MODELER):

    Final thoughts

    While I have yet to take full advantage of what SQLcl offers, I see the potential time savings for application developers who want to stay in a text editor while coding (without switching to another GUI application).

    I’ll include the SQLcl documentation so you have it for reference. But be forewarned we’re updating this document; some instructions may be changed.

    And check back in a week or two once I get Podman fully working with one of our Database Containers. I’ll test SQLcl, ORDS, and an Oracle Enterprise database 21.3.x (if you’re curious about our available containers, you can find them here).

    Want to learn even more about SQLcl? Check out these helpful resources:

    And finally…