Category: Autonomous Database

  • Oracle REST APIs: A LiveLabs review

    Oracle REST APIs: A LiveLabs review

    Recently Jeff and I were invited by the Oracle Developers and Developer Relations teams to do a walkthrough of a LiveLabs workshop, “How to Build Powerful and Secure REST APIs for Your Oracle Autonomous Database.”

    We spent about 90 minutes moving through selected labs in the workshop. Luckily they recorded it for us; you can watch it in all its glory here.

    If that video piques your interest, I encourage you to complete the workshop since it provides an excellent overview of Oracle REST Data Services APIs — specifically when working in Database Actions (in the Oracle Autonomous Database).


    About the workshop

    Workshop overview from sept 2022 ords api masterclass jeff smith and chris hoina oracle rest apis oracle autonomous database database tools dql developer web
    Labs 1, 2, and 7 are common across many workshops. These were our focus.

    The workshop consists of seven labs, but labs 3-6 were the main focus.

    Two approaches to Oracle REST APIs, Chris Hoina, Senior Product Manager, ORDS, Database Tools
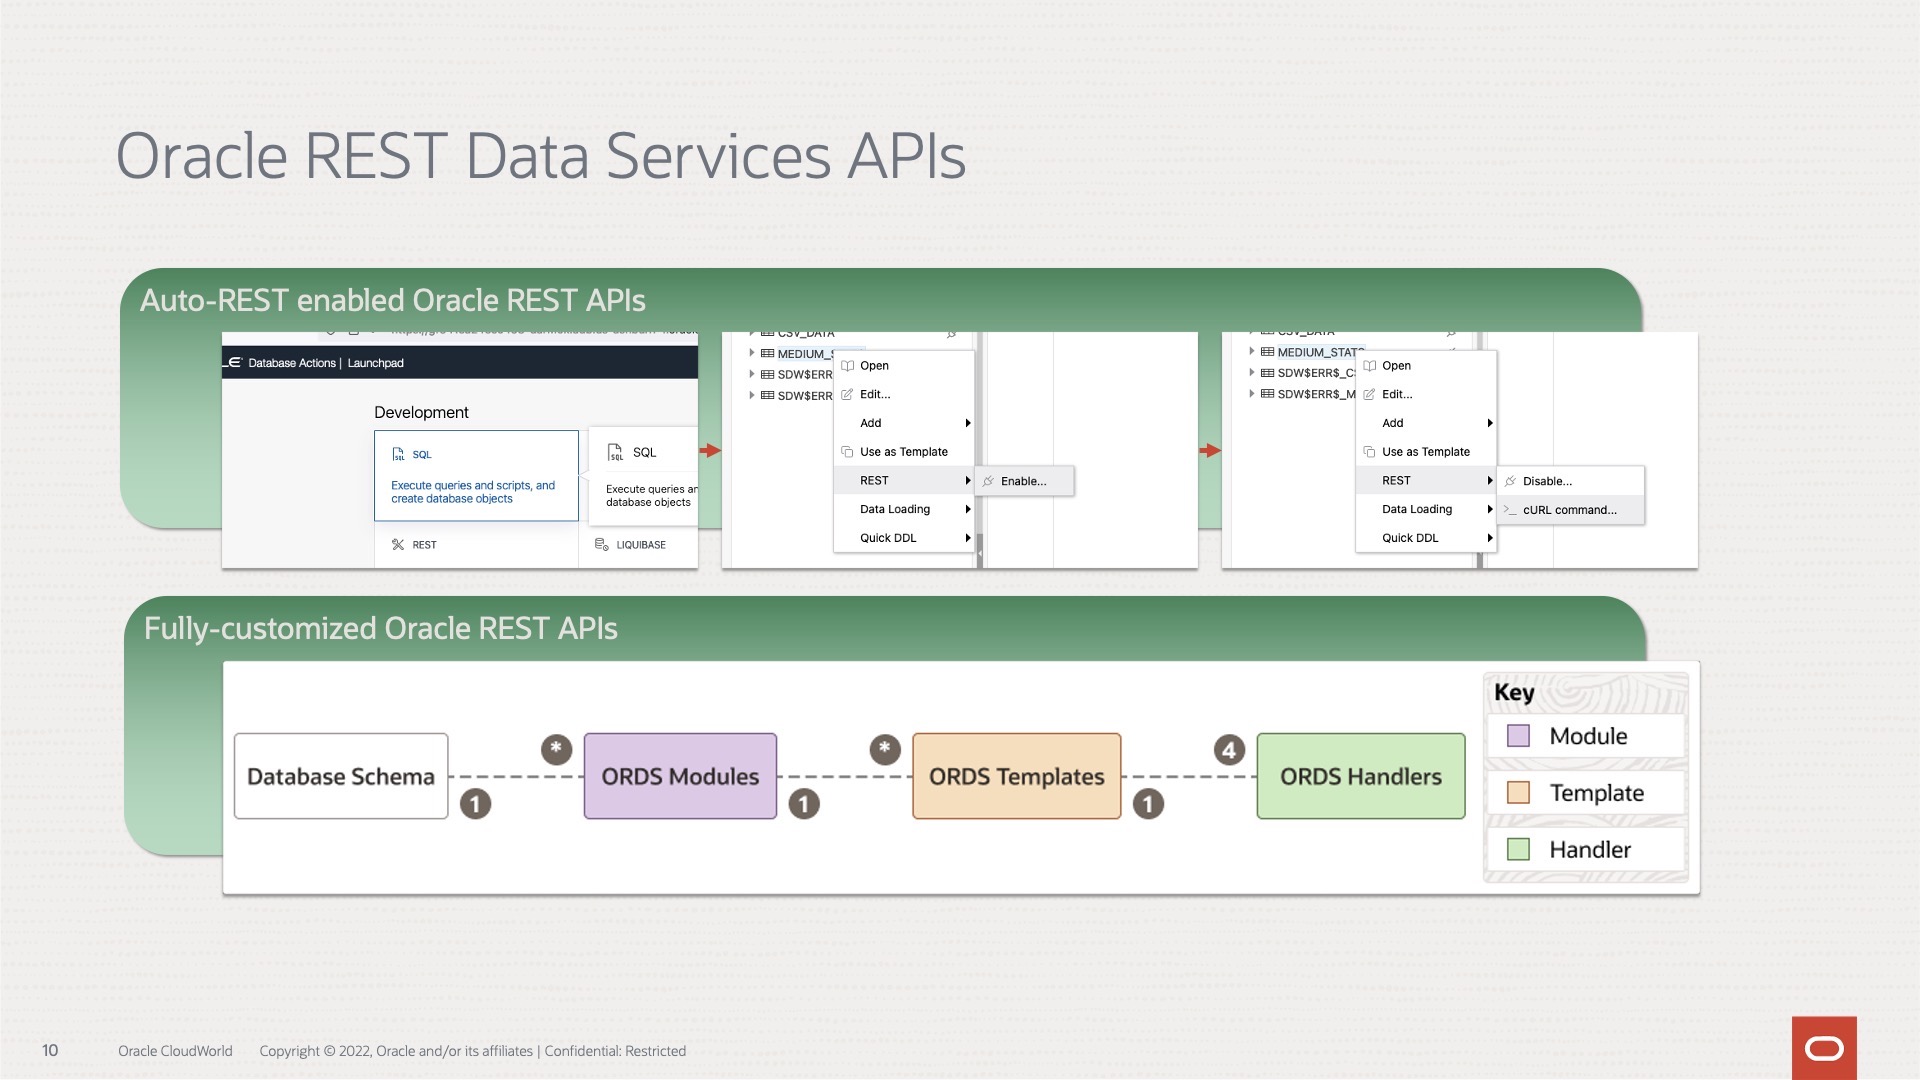
    Two approaches to REST-enabling your Oracle database objects.

    We also wanted to highlight the two ways a user could create Oracle REST APIs in Database Actions (formerly SQL Developer Web). You can jump right in with auto-REST enabling or get creative by building your Resource Modules > Templates > Handlers.


    Workshop highlights

    I won’t walk through the labs in detail here, but what I will do is highlight areas that:

    • Were cool/worth revisiting, or
    • Have (or continue to) helped speed up my productivity in Database Actions (and through association with the Autonomous Database)
    The videos are queued up to the related topic.

    Lab 3

    Lab 3 walks you through connecting to an Autonomous Database with Database Actions. From there, you create a table from a CSV file. And finally, you’ll auto-REST enable the table with simple mouse clicks.

    Data Loading

    I’ve found no less than three GUI-based ways to load data in Database Actions.

    Auto-REST enabling

    We are using mouse clicks for auto-REST enabling database objects in the Oracle Autonomous Database.

    Show Code toggle

    The new “Show Code” toggle switch in Database Actions.

    This feature isn’t limited to the SQL Worksheet; it's found across Database Actions!

    cURL command options for your environment

    cURL commands now provide Power Shell, Command Prompt, and Bash examples.

    Lab 4

    Lab 4 walks you through using a Batch Load API for loading two million+ rows into the table you previously created (in Lab 3). We also make a SQL procedure and later use PL/SQL to simulate a REST API call to the table.

    We briefly discussed the Cloud Shell and Code Editor (both in Oracle Cloud Infrastructure). Click the links to learn more, they are free and included in your OCI tenancy 😀.

    A crash course on query parameters

    Jeff has a helpful article here (one I reference A LOT).
    You can review our docs here (we mention it in several areas).

    Graduating from auto-REST

    A short discussion on when and why you may want to move away from auto-REST-enabled Oracle APIs to more customized Oracle REST APIs.

    Lab 5

    In Lab 5, you use Database Actions and the REST console to build a REST API using a parameterized PL/SQL procedure and SQL statement. We do this manually in the previous lab but then REST-enable it here (this is a continuation and refinement of the last lab).

    Bind variables in a POST request

    ORDS docs on Bind variables.
    This continues to confound me, so if you are in the same boat as me and you want me to do some more dedicated posts on this, let me know!

    Lab 6

    The goal of this lab was to educate you on Roles, Privileges, and OAuth 2.0 Client Authentication. Unfortunately, we ran out of time and had to speed through this final section. However, I did show off some of the OpenAPI functions within Database Actions.

    OpenAPI Specifications

    Specifically, we reviewed how you can view your Resource Modules in the OpenAPI view (displayed as a Swagger UI implementation). And view/execute handlers to observe their responses.

    We also mentioned how you can export a Resource Module in either PL/SQL code or the OpenAPI JSON code.


    I suspect you should be all set to complete this workshop (located here). But why stop the fun there? We have some other LiveLabs workshops that might interest you, too. You should check them out!

    Our other LiveLabs workshops

    The last workshop on the list is our newest one! So if you do attempt it, feel free to create an issue for enhancements (or if anything is unclear and needs updating) on my GitHub repository 😊!

    That’s all for now, but first…

  • Python POST requests three ways with Oracle REST Data Services (ORDS)

    Python POST requests three ways with Oracle REST Data Services (ORDS)

    The simple POST request

    It was bugging me that I couldn’t perform a simple Python POST request to an ORDS REST-enabled table.

    I wanted to send HTTPS POST requests to this table in my Oracle Autonomous Database, ORDS, Oracle REST APIs, Chris Hoina, Product Manager, Database Actions, Database Tools
    This one actually…

    I don’t mean to convey that this isn’t possible. Up until very recently, I wasn’t able to do this. Luckily I had a few hours free, so I took to the docs to do some reading. And wouldn’t you know it, like most things in tech, reading the documentation was a practical and valuable use of my time.

    Side note

    Let me pause here for a minute or two. I should add this disclaimer that none of what I share here uses OAuth 2.0 authentication. Of course, I wish it did, but I’m just not there yet (technical proficiency). In the future, I’d like to update this with security in mind1:

    1We have an API security section in our ORDS Best Practices guide.

    The other thing I’ll mention is that I’m going to include the SQL for creating this table along with all the Python code in my GitHub repo (I’ll also add any code updates to my repo! will also add any updates I make to this code to the repo!).

    Also, did you know that saving DDL with Database Actions is just a mouse click away?

    New User speed run

    This section is a bit of an aside, but I also created a new Python Developer user in one of my Autonomous Databases. It’s straightforward to do as the admin. Here is a “speed run”:

    POST haste

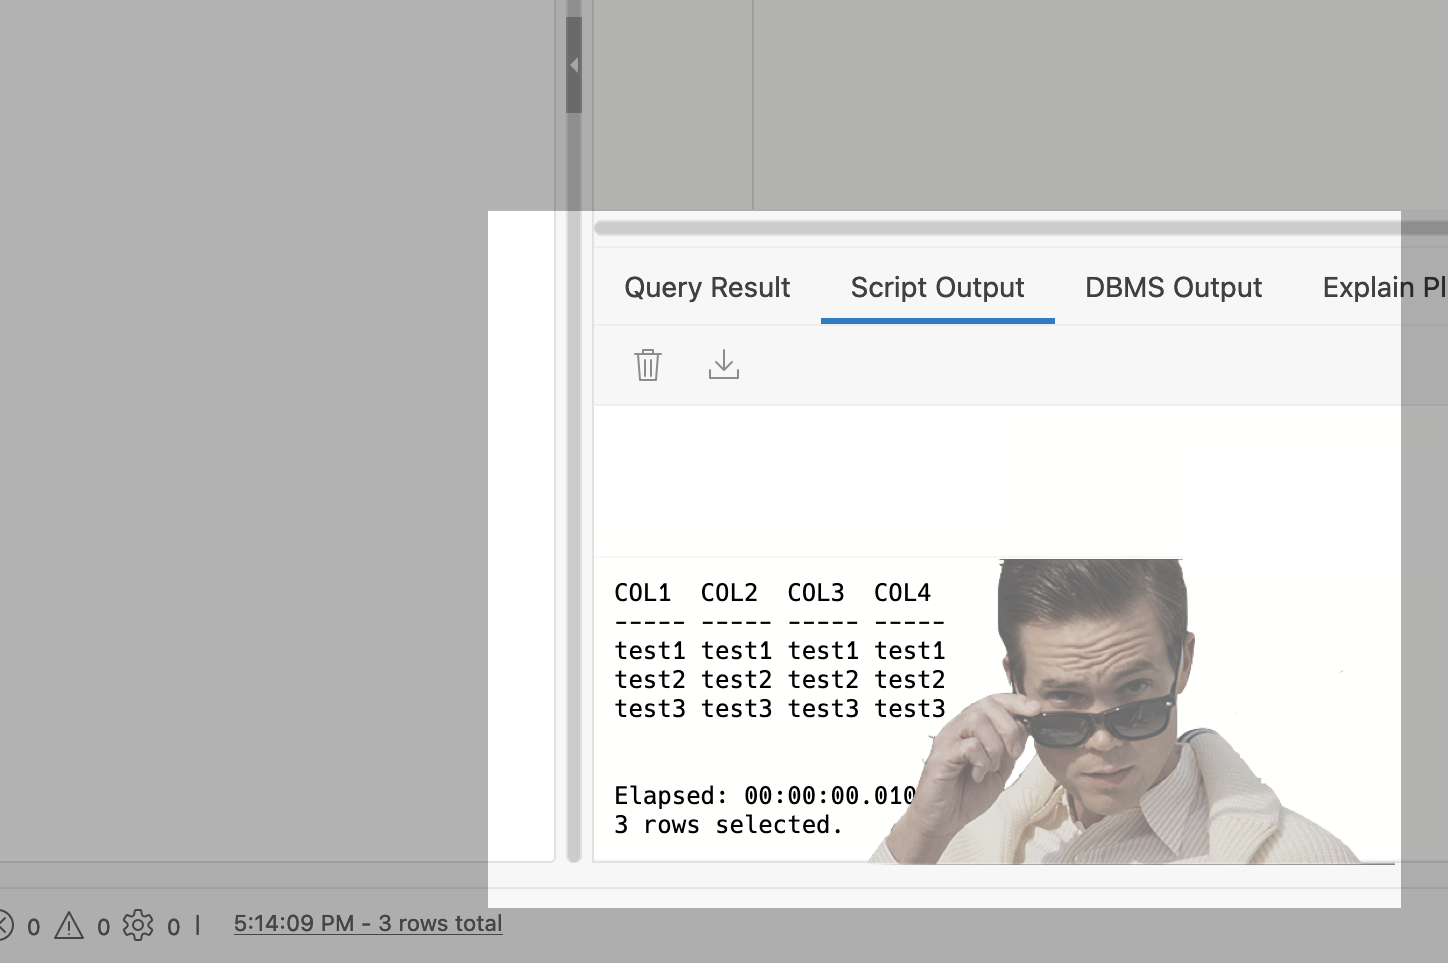
    After creating my new user, I created a “Python_Post” table. Super imaginative, right? And I kept things simple, naming the four columns (wait for it): "col1", "col2", "col3", and "col4".

    Columns in POST table in Oracle Autonomous Database to test requests in Python, ORDS, Oracle REST APIs, Chris Hoina, Product Manager, Database Actions, Database Tools
    Damn…he actually did that.

    Cheat codes

    I auto-REST enabled my table and reviewed a Bash cURL command so I could remind myself of the expected data (aka payload).

    Reviewing a Bash POST cURL command for reference in my Oracle Autonomous Database, ORDS, Oracle REST APIs, Chris Hoina, Product Manager, Database Actions, Database Tools
    A Bash cURL command for POST requests; can be used as later reference in your editor.

    I’ve noticed that if I don’t specify a ‘rowid’ the Autonomous Database automatically does this. SQL-newbies (like me) might appreciate this since we still don’t know all the best practices for database design (or DDL, for that matter)!

    My process might differ from yours, but I’ve used the cURL commands in Database Actions as a cheat. I’ve been copying/pasting this cURL command into my working Python file, so I don’t have to switch screens. Additionally, it helps to remind me what the {‘key’:‘value’} pairs are (even though I just created all this, I STILL can’t remember what I did).

    In this case, I’m referencing a POST request, but you could do this for the other HTTPS methods too:

    • GET ALL
    • GET
    • POST
    • BATCH LOAD
    • PUT
    • DELETE

    Moving on…

    I could omit the ‘rowid’ when making these POST requests. I don’t know if this is typical when working with databases, but this seems to work consistently (at least with the testing I did) with Python and the Requests library.

    If you weren’t taken aback by my imaginative table name and column names, then get ready because I’m about to blow your mind with this next bit. I created a payload for each of these POST request variations:

    Oracle Autonomous Database, ORDS, Oracle REST APIs, Chris Hoina, Product Manager, Database Actions, Database Tools
    And I’m just going to be as literal as possible to avoid confusion…is it lame? Yes. Does it work? Undecided, you tell me.

    In case you didn’t catch it, they were: payload1, payload2, and payload3.

    On feedback…

    Lack of communication is disturbing, Oracle Autonomous Database, ORDS, Oracle REST APIs, Chris Hoina, Product Manager, Database Actions, Database Tools

    I also included some feedback for myself. And I feel like this is a good practice because if you successfully POST something, how would you know? Conversely, the same would be true if you unsuccessfully POSTed something. If I were smart, I’d design a REST API in Database Actions that automatically includes some feedback. But I am not.

    If you want to read about this Implicit Parameter and others, click here.

    Luckily, the Python Requests library includes various feedback methods. I’ve included the following in my Python file:

    • status_code – returns the response status code
    • raise_for_status() – this will display the error message (if applicable); displays "None" if the request was successful
    • headers – returns the server’s response headers as a Python dictionary

    Different payloads

    My Python code is simple enough. It looks more than it is because I include three POST request variations. I’ve also tested payloads, and it seems like we can send a "payload" as:

    • params – query parameters (e.g. https://httpbin.org/get?key2=value2&key1=value1)
    • json – JSON data
    • data – a Python dictionary (in this use case)

    Oracle REST Data Services has a ton of documentation on filtering with query parameters… I’m still learning about it, but they are powerful. Check them out here.

    You can even send payloads consisting of nested items/objects, too (e.g., an array or list as one of your values). I’m sure this violates normalization rules, but it’s possible. In my case, I didn’t do this; I just stuck to my four columns.

    Executing the code

    After I executed the code, I received the following feedback for these POST requests:

    Feedback from post to my Oracle Autonomous Database, ORDS, Oracle REST APIs, Chris Hoina, Product Manager, Database Actions, Database Tools
    If you squint, you can see three separate responses. I’ve only boxed one, but you should be able to point out the other two.

    You should see:

    • a 201 status code, which indicates “the request has been fulfilled and has resulted in one or more new resources being created2.
    • None – which if there were a 400 error, that would show me the error message
    • {key: value} pairs displaying all header details

    2About the 201 Status Code in Hypertext Transfer Protocol (HTTP/1.1): Semantics and Content

    Double checking

    While in VS Code, the POST requests appeared successful. But since I had access, I logged into Database Actions and manually inspected my table. Success!

    Double checking the post requests in database actions, Oracle Autonomous Database, ORDS, Oracle REST APIs, Chris Hoina, Product Manager, Database Actions, Database Tools
    Reviewing the new updates in Database Actions.

    And that’s it…zero to POST request in my Oracle Autonomous Database + ORDS in no time!

    Was this helpful?

    I have this code in my GitHub repository, so feel free to fork, download, or add comments. But I’ll include here too:

    import requests 
    
    url = "[Your ORDS URL goes here]"
    
    payload1 = {'col1': 'test1', 'col2':'test1', 'col3':'test1', 'col4': 'test1'}
    
    r1 = requests.post(url, json=payload1)
    
    print(r1.status_code)
    print(r1.raise_for_status())
    print(r1.headers) 
    
    payload2 = {'col1': 'test2', 'col2':'test2', 'col3':'test2', 'col4': 'test2'}
    
    r2 = requests.post(url, data=payload2)
    
    print(r2.status_code)
    print(r2.raise_for_status())
    print(r2.headers) 
    
    payload3 = {'col1': 'test3', 'col2':'test3', 'col3':'test3', 'col4': 'test3'}
    
    r3 = requests.post(url, params=payload3)
    
    print(r3.status_code)
    print(r3.raise_for_status())
    print(r3.headers) 

    And if you are still here — was this helpful? Want to see more or something else that is Python + ORDS-related? Let me know here in the comments, on Twitter, or by email!

  • Python + Folium + Oracle REST APIs (aka ORDS)

    Python + Folium + Oracle REST APIs (aka ORDS)

    Willkommen

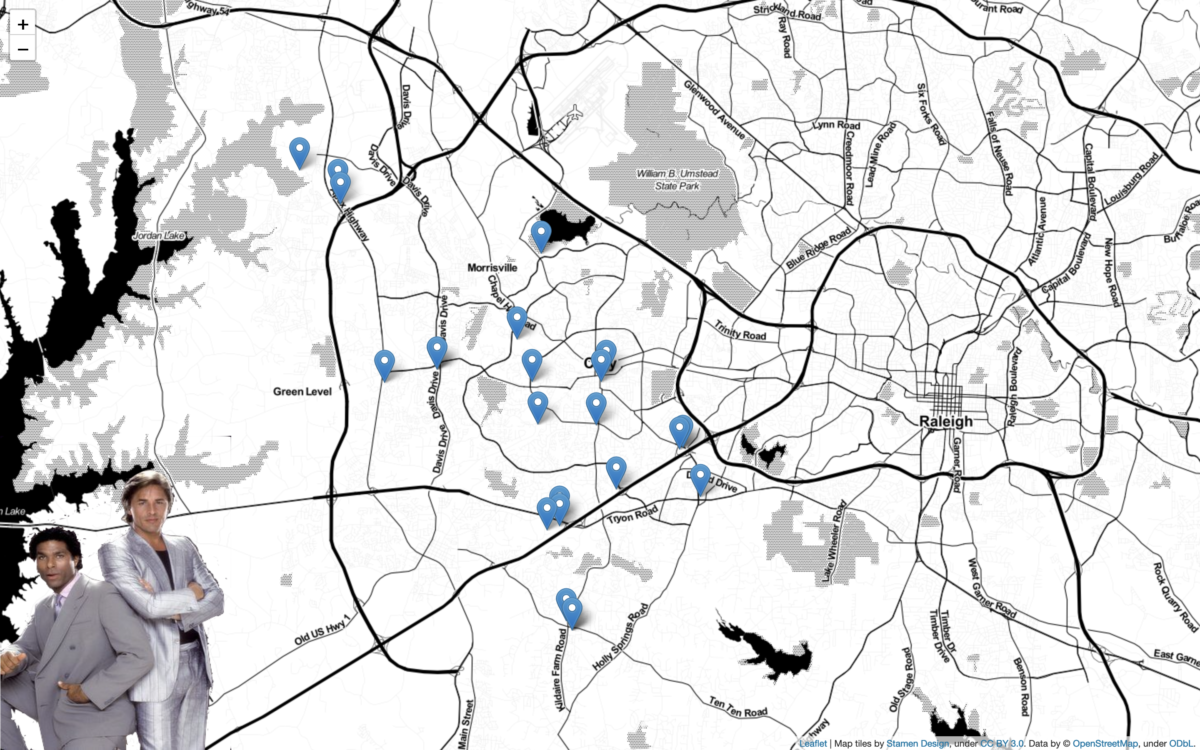
    I stumbled upon a new [to me] python library called Folium. It’s a mapping tool that enables python developers (or is it programmers, which is less offensive?) to visualize data on a Leaflet map.

    About folium

    Folium makes it easy to visualize data that’s been manipulated in Python on an interactive leaflet map. It enables both the binding of data to a map for choropleth visualizations as well as passing rich vector/raster/HTML visualizations as markers on the map.

    The library has a number of built-in tilesets from OpenStreetMap, Mapbox, and Stamen, and supports custom tilesets with Mapbox or Cloudmade API keys. Folium supports Image/Video, GeoJSON and TopoJSON overlays.

    Folium docs

    …but what about leaflet.js?

    Leaflet.js is the leading open-source JavaScript library for mobile-friendly interactive maps. Out-of-the-box features include: tile layers/WMS, markers/popups, vector layers (polylines, polygons, circles, rectangles), image overlays, and GeoJSON

    Leaflet.js “Features” page

    Tilesets

    I highlighted the tilesets above, and I’m not sure if this is a GIS or a leaflet term, but it seems that tilesets refer to different map renderings. Folium includes the following:

    • OpenStreetMap
    • Stamen Terrain
    • Stamen Toner
    • Stamen Watercolor

    At the time of writing, I didn’t have API credentials for Mapbox Bright or Mapbox Control Room. But I’m assuming they still work if you have the appropriate API credentials.

    Excluding the Mapbox tiles, those packaged by default are more than sufficient:

    Tip: Read more on Stamen here, s'il vous plaît. They seem to be the original creators of these Stamen tiles. 

    Python + Folium + ORDS = Happiness

    Folium installation and quick start pages are straightforward – requiring minimal steps and effort. The same goes for installing the Live Server extension too. Once installed, you can right-click on a .html file to load it onto a local development server (so it displays in a new browser window).

    Let me jump right into how I set up Folium to work with ORDS. If you recall, most of the tables I have in my Autonomous Databases are REST-enabled (previous post working with ORDS).

    An ORDS Review

    Step 1 REST Enabling your table with ORDS in Database Actions Oracle Autonomous Database Chris Hoina Senior Product Manager Database Tools
    1. Once in Database Actions, right-click on an object and select REST > Enable.
    Step 2 REST Enabling your table with ORDS in Database Actions Oracle Autonomous Database Chris Hoina Senior Product Manager Database Tools
    2. Choose an alias (good security measure) along with Authentication (also good practice).
    Step 3 REST Enabling your table with ORDS in Database Actions Oracle Autonomous Database Chris Hoina Senior Product Manager Database Tools
    3. If you forget the URI, you can review the cURL command.
    Step 4 REST Enabling your table with ORDS in Database Actions Oracle Autonomous Database Chris Hoina Senior Product Manager Database Tools
    4. There you can copy/paste directly into a Command-Line or copy the URI portion and place into your browser’s address bar.

    …and now back to your regularly scheduled blog post

    Since I needed latitude and longitude coordinates for Folium, I decided to work with my Restaurant table. Put the REST endpoint (URI) directly into the browser; and you’ll see this:

    ORDS REST URI Endpoint from Oracle Autonomous Database, Chris Hoina Senior Product Manager Database Tools

    Afterward, I looked at the JSON object to see how it was structured (there are too many lists, dictionaries, arrays, etc. to remember amirite?!) because I’d need to iterate through all the items in the GET Response – to tease out what Folium needs.

    The play-by-play

    Printing the response (to see what it looks like)

    Walkthrough 1 Folium Python VS Code ORDS API GET Requests Oracle Autonomous Database Chris Hoina Senior Product Manager Database Tools
    • I’m covering all my bases here; reviewing the ORDS-provided request/object from a table in my Autonomous Database
    • Using json.() to “decode” it into a python dictionary
    • Please pay attention to line 10, where I actually create the base map

    Review of what Folium needs

    Walkthrough 2 Folium Python VS Code ORDS API GET Requests Oracle Autonomous Database Chris Hoina Senior Product Manager Database Tools
    • Looping through the python dictionary, pulling out what I need for the next step
    • Including lines 25-29 to create the pop-up markers.
    • The ('<i>{}</i>'.format(Resty)) allows me to pass the names to the string (stuff in quotes, plus the {}). The HTML for italics is optional.
    • In this case, ‘x’ and ‘y’ are the coordinates
    • Line 31 saves a .html file (which uses Bootstrap!)

    Newly rendered .HTML

    Walkthrough 3 Folium Python VS Code ORDS API GET Requests Oracle Autonomous Database Chris Hoina Senior Product Manager Database Tools
    • Using the Live Server extension, I can review the Folium map plus the pop-up markers!
    NOTE: This isn't the focus, but spoiler alert, I'll be putting this into a Flask application. I'll also build this out, so the individual markers/popups have charts/graphs for each restaurant. Again, all of which will be provided by ORDS-enabled tables (not so shameless plug).

    Summary

    After it is all said and done, it took me less than an afternoon to figure out how to make this work. So if you have a table with latitude and longitude, what are you waiting for?! REST-enable it with ORDS, and you can come up with a very quick demo on your own!

    Also, I didn’t have to create any database models, the dependencies are minimal (a few python libraries), and an Always Free OCI account is really all you need to get started.

    Code

    import json
    import requests
    import folium
    
    m = folium.Map(location=[35.78742648626059, -78.78122033558192], zoom_start=12, tiles="Stamen Watercolor")
    
    response = requests.get('your ORDS enpoint/URI').json()
    
    # print(type(response))
    # print(response)
    
    for entry in response['items']:
        Resty = entry['name']
        Lat = entry['y']
        Long = entry['x']
        
        folium.Marker(
    
            location=[Lat, Long], 
            popup = folium.Popup('<i>{}</i>'.format(Resty))
    #this line is optional/an alternative to the above line
            # popup = folium.Popup('<i>{}</i>'.format(entry['name']))
    
                    ).add_to(m)
            
        m.save("index.html")

    [I did not] reinvent the wheel

    Lastly, much of what I learned about Folium came from the following two videos (I recommend bookmarking them for reference):

    Follow me…

    That’s it for now folks!

    Roger Rabbit Please follow me, Chris Hoina, Senior Product Manager, ORDS, Oracle Database Tools
  • Working with WTForms and Oracle REST Database Services (ORDS) APIs

    Working with WTForms and Oracle REST Database Services (ORDS) APIs

    Welcome Back

    The title pretty much speaks for itself, and if you’ve been following along, you’d know that I’m working on a demo application that uses Flask (a web application microframework) connected to my Oracle Autonomous Database (ADB) via Oracle REST Data Services (ORDS) APIs.

    One of Flask’s strengths is that it allows you to extend functionality and allows for a good bit of customization. But…

    By default, Flask does not include a database abstraction layer, form validation or anything else where different libraries already exist that can handle that. Instead, Flask supports extensions to add such functionality to your application as if it was implemented in Flask itself.

    Flask Docs

    Why ADB and ORDS?

    I’m primarily using this specific configuration (with ORDS and ADB) for obvious reasons. But secondarily, I haven’t come across anything that actually references the Oracle ADB or ORDS (in the context of Flask, WTForms, and python of course).

    Most of the online tutorials I’ve seen and books I’ve read reference SQLlite or (in one case) MongoDB for the database. SQLite does seem like a good entry point, especially if you are putting together a proof of concept. But as things scale, I suspect you’ll reach diminishing performance returns with SQLite. In fact, the Flask documentation mentions exactly that:

    Python comes with built-in support for SQLite in the sqlite3 module. SQLite is convenient because it doesn’t require setting up a separate database server and is built-in to Python. However, if concurrent requests try to write to the database at the same time, they will slow down as each write happens sequentially. Small applications won’t notice this. Once you become big, you may want to switch to a different database.

    Flask Docs

    That last sentence is significant. I know ORDS can be set up with High Availability in mind, so why not take advantage of that from the beginning? Also, with my ADB, the effort to create a database schema and tables is very minimal (fun even).

    Regarding, MongoDB, obviously, I’m biased but I’m also disorganized. And I’m still a “technical toddler.” So having to download, install, and configure MongoDB Community Edition plus the MongoDB Compass GUI would end up being an unnecessary step for me (I actually ended up doing this for a previous tutorial).

    Regardless, I already have my OCI tenancy and my Autonomous Database, and I continue to get more and more comfortable with our ecosystem.

    Sign up for an Always Free OCI account, Oracle Cloud Infrastructure, Chris Hoina, Senior Product Manager, Database Tools, ORDS
    Also: You should sign up for an 
    Always Free OCI account.

    Moving on…I also want to use Database Actions, and the REST API features provided by ORDS. Not to mention, from everything I’ve seen in the Flask tutorials you have to first create database models before you can do anything really meaningful. I’m not entirely sure how to go about that (please check back in 2023).

    ORDS is straightforward – just give me the URI for the API endpoint and I’ll take it from there. If I need something additional we can modify the API accordingly.

    API GET Request response (via ORDS)

    Speaking of which, here is what the JSON looks like from my ORDS-powered API GET request:

    ORDS REST API response from Autonomous Database, Chris Hoina, Senior Product Manager, Database Tools, ORDS

    I won’t spend too much time explaining this image (you can read about it in detail, here), but I’m most interested in the city: (found under items). There are 18 cities, and I’ll need all of them for Flask. More specifically, I need them for WTForms.

    About WTForms

    I won’t give a crash course on WTForms, but bottom line it’s another way to extend the capabilities of Flask.

    WTForms is a flexible forms validation and rendering library for Python web development. It can work with whatever web framework and template engine you choose. It supports data validation, CSRF protection, internationalization (I18N), and more.

    WTForms Docs

    In my scenario, WTForms allows me to easily make and handle (as in routing) forms in the Flask application. More specifically, there is a SelectFields() form that I need to use (this is just how I initially designed the app, you can review it here).

    Choices

    The forms have fields. Here are details on the form I’m most interested in:

    WTForms Flask Python ORDS REST APIs Autonomous Database, Chris Hoina, Senior Product Manager, ORDS, Database Tools

    You’ll notice there are various parameters I can include, but all I care about are the choices[]. You can either hard (static) code in a list of choices, or (as I just successfully did as of this week), pass a list from an API GET request to the choices[] parameter.

    If you’ve looked at the documentation, then you’ve seen that choices[] can be”passed” in one of three ways:

    1. a list of (value, label) pairs (it can also be a list of only values, in which case the value is used as the label)
    2. a dictionary of {label: list} pairs defining groupings of options, or
    3. a function taking no argument, and returning either a list or a dictionary

    My approach used the first option. Actually, the values-only approach, in my case.

    The breakdown

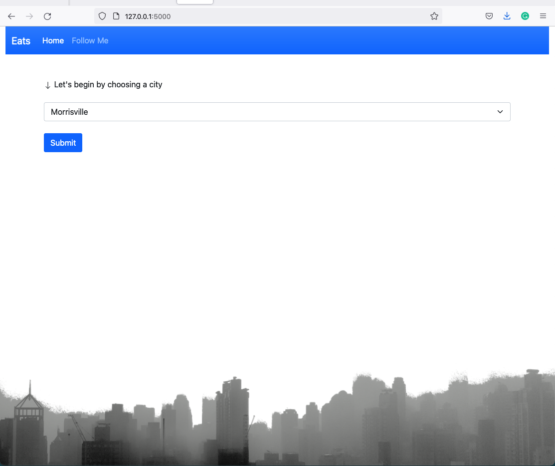
    First, I’ll show the dropdown list; it will look like this in my application (FYI this actually works):

    Flask application in action

    I know that video is fast, but you should be able to see the dropdown list (at around the :15-:17 mark) and how it renders.

    This dropdown list is made possible from an initial GET request to my ORDS-enabled “Cities” table. And the code in its entirety (including the Flask bits), looks like this:

    Flask WTForms Python ORDS REST APIs Autonomous Database, Chris Hoina, Senior Product Manager, ORDS, Database Tools
    NOTE: I'm working off the assumption that you may have some familiarity with flask and WTForms. And also that your focus is the REST API - to - choices part of this problem. 

    By the numbers

    Okay, a quick overview:

    • Lines 27-29: This is pretty standard for Flask, no explanation is needed
    • Lines 31-33: Are where I build out the form:
      • You’ll see that city is the field (to select from)
      • The dropdown will have a heading that says, “Let’s begin by choosing a city” (you can see this in the video)
      • And the choices will be a list []
      • Submit on line 33 is just how you’d create the submit button
    • Lines 37-39: Are also pretty standard for any GET request using the Requests library in python
    NOTE: But here, you'll see that my URL is actually the URI provided by ORDS (remember, I REST-enabled my cities table - that is the "endpoint" we are seeing) 
    • Line 40: I make a list (it’s empty at this step, so sad)
    • Lines 41-43: This is the pièce de résistance.
      • Here we perform a loop through the items: in the JSON response, and since this is a nested array, you have to specify what array you want and what exactly in that array you want to pull out (in this case the “city”)
      • Line 43 was a suggestion by thatjeffsmith, to display the list in alphabetical order (I must confess, it does better)
    • Lines 45-48: These are pretty standard for Flask as well. You need to set city (in line 32) equal to the city_list so WTForms knows where the SelectField(choices=[]) comes from

    The Code

    With the brief explanation out of the way, here is the code. Please, help yourself:

    #For the GET request portion, you'll at a minimum need requests and json. If you are working in Flask already, then you know the rest. 
    import requests
    import json 
    from wtforms import SelectField, SubmitField
    from flask import Flask, json, jsonify, render_template, request
    from flask_wtf import FlaskForm
    
    #Creating the Flask instance.
    app = Flask(__name__)
    app.config['SECRET_KEY'] = 'password1234'
    
    #Creating the Form.
    class CitiesForm(FlaskForm):
      city = SelectField("Let's begin by choosing a city", choices=[])
      submit = SubmitField('Submit')
    
    #Routes, used for displaying the html on your web app.
    @app.route('/', methods = ['GET', 'POST'])
    def index():
    
    #This is the section where you perform the GET request to retrieve the JSON from your ORDS endpoint.
        URL = '[your ORDS endpoint]'
        response = requests.get(URL)
        r = json.loads(response.text)
    
    #Creating the list of cities; which will be populated shortly.
    city_list = []
    
    #Looping through the nested array (from the inital JSON / API response). 
        for nestedArr in r['items']:
          city_list.append(nestedArr['city'])
          city_list.sort()
    
    #Finishing touches so WTForms, and Flask know where to look. And also setting up how/where the html on your web application renders.
    
        city=city_list
        form = CitiesForm()
        form.city.choices = city_list 
        return render_template('index.html', form=form)

    Obviously, you’ll want to change up some of the names. But the ORDS pieces should remain pretty similar.

    Next up

    My next steps are to create a second and third dependent dropdown for the app. What I mean is that, based on a user’s city selection, that city would then be used as a query parameter for a subsequent GET request (to my ADB). And ORDS would respond with a list that includes restaurant information for the target city (everything else would be excluded).

    If you’ve made it this far and you have any questions, please send me a note.

    And if you think this is worth sharing, and that it might help others, please pass it around!

    Cash me outside

    As always, you can find me on:

  • Clean up a .CSV file with Regular Expressions, Pandas, and Python

    Clean up a .CSV file with Regular Expressions, Pandas, and Python

    Let us begin

    I log into Database Actions as my newly created “Python Developer” and navigate directly to the “Data Load” page (found under the Data Tools section of the Launchpad). I choose to “Load Data” from a “Local File.” I click “next,” click the pencil icon (see the arrow in the image), and navigate to the “File” tab. I scroll to the “RESTAURANTOPENDATE” column and see this:

    CSV file in data load, Database Actions, Oracle Autonomous Database, Chris Hoina, Senior Product Manager, ORDS, Database Actions

    In a previous post (if you’re new, you can read the end-to-end process), I discussed how this time (“04:00:00+00” or “05:00:00+00”) wasn’t necessary for me. At that time, I used the “Find and Replace” function in Excel (I’m sure you can do the same with Numbers, Sheets, or Calc) to replace all occurrences of time with “” (i.e., nothing).

    But in the spirit of doing things in five days, when they could have taken but five minutes, I opted to see if I could achieve a similar result in python.

    Goal

    Create a python script that will allow you to remove part of a value in a .CSV file.

    WARNING: I thought this would be a simple task. I should have known better. My approach may not be ideal for your situation, but hopefully you’ll learn something. Or at the very least maybe you can bookmark this post, along with the resources (at the end of the post) I'm including for later use.

    Regular Expressions

    I am confident there is a way to achieve this goal with the .CSV library in python. There is probably a way to do this with python out of the box. I couldn’t figure it out.

    I’m also reasonably confident that my approach is on the verge of ridiculous. Nevertheless, Regular Expressions, and the Pandas library, in python are what worked for me.

    What are Regular Expressions?

    Good question. I still don’t know, but here is what I found on Wikipedia:

    “A regular expression (shortened as regex or regexp; also referred to as rational expression) is a sequence of characters that specifies a search pattern in text. Usually, such patterns are used by string-searching algorithms for “find” or “find and replace” operations on strings, or for input validation. It is a technique developed in theoretical computer science and formal language theory.”

    That is so painful to read, but the way I understand it is that we use Regular Expressions in pattern-matching. Essentially you create a pattern and then tell your application (or script) to search for it. From there, you can include more code to perform more actions. In my case, those actions would be to find a pattern and replace that pattern with nothing.

    So what is the pattern?

    One of the benefits of having zero formal training in application development (in this case, computer science and formal language theory) is that occasionally, you might take an approach that, while unintuitive, works well enough.

    And after many, many hours of trial and error, parsing through Stack Overflow, reviewing hours of YouTube, reading pages of blogs, and occasional use of the “I’m Feeling Lucky” button on Google, it occurred to me that my pattern was:

    Pattern for Regular Expressions, Database Actions, Oracle Autonomous Database, Chris Hoina, Senior Product Manager, ORDS, Database Actions

    After reviewing more documentation and other various resources (I have an entire section at the end), I more clearly identified a pattern:

    A more formal pattern for Regular Expressions, Database Actions, Oracle Autonomous Database, Chris Hoina, Senior Product Manager, ORDS, Database Actions

    Coming up with a clearly-defined pattern helped inform me as to how I could create the following Regular Expression:

    '\s\d+:\d+:\d+[^a-c6]\d+$'

    I then did some more stuff, and that was it! Follow me for more…

    I’m kidding.

    Deep Dive

    I can’t teach you everything, because I’m probably only ahead of you by a week at this point. But I can explain, in the hopes that it will make sense. Let me continue with the above Regular Expression (again, you’ll want to spend some time in the resources section I’ve included to understand better how this all fits together).

    But the above Regular Expression can be defined like this:

    Regular Expression definition for this script, Database Actions, Oracle Autonomous Database, Chris Hoina, Senior Product Manager, ORDS, Database Actions

    I then took the above and plugged it into this nine (12 with sections, slightly more with comments) line script:

    from pickle import NONE, TRUE
    #This doesn't seem work without pickle, still not sure why
    import pandas as pd
    #You need this to do anything related to dataframes (i.e. "df"); 
    # if you're a data scientist and you use python, you may already 
    # be familiar with this
    import re 
    #You need this for Regular Expressions to work
    
    d = '/Users/choina/Documents/untitled folder/Restaurants_in_Wake_County.csv'
    #I'm assigning the file to "d"
    df = pd.read_csv(d)
    #df means dataframe. Here I'm telling panda to read the .CSV file 
    # that I just created ("d"), and consider that the "dataframe".
    
    print(df.dtypes)
    #This is optional, but when I do this I can see what the various 
    # datatypes are (according to pandas). The RESTAURANTOPENDATE column 
    # is an 'object'.
    for RESTAURANTOPENDATE in df:
        df['RESTAURANTOPENDATE'] = df['RESTAURANTOPENDATE'].str.replace('\s\d+:\d+:\d+[^a-c6]\d+$', '', regex=TRUE)
    #This is a "For Loop" that says set the RESTAURANTOPENDATE column 
    # contents equal to the following: FIRST, consider the values in the 
    # column as string and replace the contents using this process: 
    # find a pattern that matches this Regular Expression, replace
    # it with NOTHING, then take that column,along with the other 
    # columns and...
    df.to_csv('newrest.csv')
    #Save it to a new .CSV file called "newrest.csv"

    Code as an image for reference:

    Python script to clean CSV file for data load, Database Actions, Oracle Autonomous Database, Chris Hoina, Senior Product Manager, ORDS, Database Actions

    In short, (I’ve left detailed comments for reference), these nine lines of code search for a pattern and replace it with nothing when found. We then take these results (including the rest of the .CSV file) and save them to a new file called “newrest.csv.”

    Please, reference this script. Tweak it as needed. Or drop me a note if you need an outside perspective. Good luck!

    One more thing

    Pickle, Pandas, and RE are all required for this script to work.

    Note: While I understand Pickle is a library that deals with the serialization of objects in python. I've no idea what that means, and reading about it makes my brain melt. Additionally, I’m not sure if this is expected behavior, but when I ran an earlier version of this script, this "Pickles" library just appeared at the very top. If this has happened to you, please leave a comment, because I'm scared there may be an actual ghost in my machine.

    Moving on

    The rest is pretty straightforward.

    I then went back into Database Actions (it had been so long that I’d expected a new version had been released already), loaded my data, and inspected the column in question:

    Updated CSV file in data load, Database Actions, Oracle Autonomous Database, Chris Hoina, Senior Product Manager, ORDS, Database Actions

    Looks good to me!

    Magic

    Something I noticed was that my Autonomous Database automatically recognizes the “RESTAURANTOPENDATE” column as a data type of “Date.” I didn’t have to do anything special here, and I thought this was pretty cool. Take a look:

    Database Actions automatically recognizes datatypes Oracle Autonomous Database, Chris Hoina, Senior Product Manager, ORDS, Database Actions

    Addendum to the addendum

    Once imported, you can also use Regular Expressions in your database (with SQL). But if you’d like to clean your data before it reaches your ADB, the approach I’m writing about here is also a great option!

    Resources

    As promised, here are all the resources I’ve curated that might assist you should you choose to take the road less traveled…

    • Important/relevant documentation:
    • Stack Oveflow – this is a series of “bookmarked” questions about Python and Regular Expressions, that helped me. They might be of use. They aren’t intended to teach you, but rather aide you in gaining a better perspective.
    • YouTube – a playlist I created that might be worth reviewing (at a minimum watch Case Digital’s “How to Remove Characters From a Pandas Dataframe In Python” video).
    • Regular Expression Editors:
      • Pythex (make sure you click the “Regular expression cheatsheet” button to expand/see a valuable quick reference – also, apparently a more complete version can be found here)
      • Regular Expressions 101 – this includes an enormous library of previously created Regular Expressions. There is a “debugger” too!

    An even simpler solution

    I discovered an even simpler solution to this problem. As I was reviewing the Pandas documentation I noticed there was functionality built directly into Pandas. This can be done with the “datatime” function.

    And you can take it one step further with what is referred to as a “.dt accessor.” (you’ll see this in the updated code I’m including). This accessor allows you to manipulate a Series (aka a column) within a Pandas dataframe (df).

    There are quite a few time-date properties you can manipulate in Pandas, all of which can be found here. The “Time Zone Operations” section is where the “.dt accessor”, is briefly mentioned. For more context, I’d recommend reviewing this section on the .dt accessor and how they interplay with a Pandas Series.

    Don’t stop there though, the main python documentation discusses the basics of date and time operations. Without further ado, on to the new code:

    import pandas as pd 
    import numpy as np 
    
    #You don't have to do it like this. You could have a single "d" and then just comment/uncomment each line as needed. 
    
    d1 = '/Users/choina/Downloads/Food_Inspections.csv'
    d2 = '/Users/choina/Downloads/Food_Inspection_Violations copy.csv'
    d3 = '/Users/choina/Downloads/Restaurants_in_Wake_County copy.csv'
    
    #The same thing here, you could just have a single "d" and then just comment out the other two, when not needed.
    
    df_1 = pd.read_csv(d1)
    df_2 = pd.read_csv(d2)
    df_3 = pd.read_csv(d3)
    
    #Same goes for this too. This is either very slick of me, or incredibly lazy. 
    
    df_1['DATE_'] = pd.to_datetime(df_1['DATE_']).dt.date
    df_2['INSPECTDATE'] = pd.to_datetime(df_2['INSPECTDATE']).dt.date
    df_3['RESTAURANTOPENDATE'] = pd.to_datetime(df_3['RESTAURANTOPENDATE']).dt.date
    
    #Same, same here as well. You could do one at a time. But it works, I double-checked my work. 
    
    df_1.to_csv('newninspect.csv')
    df_2.to_csv('newviolate.csv')
    df_3.to_csv('newrest.csv')
    New python script to change date time in csv files, Chris Hoina, Senior Product Manager, ORDS, Database Tools, Oracle Autonomous Database

    About the update

    This code is certified fresh – meaning, it works. I triple-checked. The only thing I’ve noticed is that lines 12-14 must-have “.dt.date” at the end. From what I am reading (and am inferring from the documentation), it looks as though you need to first “treat” the Series with the “to_datatime” function. After that, the entire dataframe is in limbo (not quite written out to a new .CSV), waiting. Before the next step, we can strip the time portion out using the .dt accessor (i.e. the “.dt.date” portion located at the end of lines 12-14).

    From there it is simply a matter of writing out these updated dataframes to the three new expectant .CSV files.

    Find Me

    Please come back for more. I’m going to be working on views in my Autonomous Database, and then later, I’ll REST-enable them with the help of ORDS!

  • GET requests with Python, ORDS, and the Oracle Autonomous Database

    GET requests with Python, ORDS, and the Oracle Autonomous Database

    Problem

    I wanted to take the Objects,

    Objects in SQL Worksheet in Oracle Autonomous Database, Chris Hoina, Senior Product Manager, ORDS, Database Tools,
    Objects

    In my Admin schema and copy them into a newly created Python Developer database user/schema. I have been meaning to do this for a while now since I’d to approach all future development work as a typical [developer] user might.

    I previously created a “developer” user, but the recommendation was to create a user specifically for python development. This recommendation makes sense because I’d like to explore other developer frameworks — JavaScript/React, Derelicte, Golang, Hoobastank, Swift, Smashmouth.

    DISCLAIMER: Some of the aforementioned languages/frameworks are entirely fictional.

    So in creating this user and populating the schema, I could have just copied these objects over in seconds. I’m sure some already existing would have enabled me to do this. A less-elegant option would be to do a local upload. I’m confident I could export the tables of my Admin schema and then upload them as a developer in Database Actions. Doing so here:

    Data Load in Database Actions Oracle Autonomous Database, Chris Hoina, Senior Product Manager, ORDS, Database Tools

    But those options were too straightforward, effortless, and expeditious. I needed an approach that would make me question my life decisions. Something that would force me to rethink what it meant to be human.

    Mostly, I wanted an excuse to tinker with ORDS some more. While I didn’t start with a well-defined use case, I was able to retcon (a portmanteau of the words retroactive and continuity) one.

    Scenario

    The scenario is that we have REST-enabled schema objects (in this case, various tables), and maybe we want to execute GET requests on that table. Perhaps we want all the data from that table (having been returned in JSON). And for whatever reason, we want to save this information in a JSON file. Plausible? Not likely. Possible? If I can do it, then yes, 100% possible.

    Solution

    NOTE: I've since disabled REST for these tables. So none of these URLs currently work. Also for security reasons you probably want to a require authentication to access these. The below screenshots and code snippets are for demonstration purposes.  In this case, probably acceptable, but please (PLEASE) exercise caution if you are recreating at your workplace.

    REST-enabling

    When you REST-enable a table, you’re provided a URL (aka a REST Endpoint) for viewing. It will look something like this:

    https://gf641ea24ecc468-dbmcdeebyface.adb.us-ashburn-1.oraclecloudapps.com/ords/admin/scores/

    The response looks like this:

    First 25 results via ORDS Oracle Autonomous Database, Chris Hoina, Senior Product Manager, ORDS, Database Tools,

    You are seeing the first 25 results from my “Scores” table. I’ve also created an alias name for that table as an extra level of protection. The table’s actual name is not “Scores,” but rather something else.

    If you collapse the “items,” it’s easier to see the rest of the “name: value” pairs:

    Collapsed results via ORDS Oracle Autonomous Database, Chris Hoina, Senior Product Manager, ORDS, Database Tools,

    I can do my best to explain what we see here:

    • ‘items: […]” are the individual entries in my table (the columns would be the items you see in the black bold). ORDS includes links for calling that single entry only
    • ‘hasMore”: true,” essentially means that there are more pages with information to follow
    • “limit: 25” refers to the fact that ORDS is only returning 25 results at a time. I didn’t set this; it was the default.
    • “offset: 0” this is tricky. From what I can tell, the offset only becomes a consideration after the first page. You begin with no offset (this makes no sense, I know, but I will explain this shortly)
    • “count: 25” – we have entries 1-25 on this page
    • “links: […]” these are all pretty self-explanatory. Two links, in particular, are pretty interesting. They are:
      • “describedby” and
      • “next”

    If I click the “describedby” link, you’ll see something that looks like this:

    Described by URL ORDS Oracle Autonomous Database, Chris Hoina, Senior Product Manager, ORDS, Database Tools,

    On this page, you can review valuable information without ever logging into Database Actions. I found this extremely helpful; from here, I could see the table name, Primary Key (if it exists), and the column names and types for the table.

    Another link I wanted to highlight was “next.” If you look closely, you’ll see that the “next” URL includes an offset of zero:

    Initial 25 results via ORDS Oracle Autonomous Database, Chris Hoina, Senior Product Manager, ORDS, Database Tools,

    However, if I click that URL (I’ve collapsed all the items on this page as well), I can see that “offset” has increased to 25, and the new “next” URL shows “offset=50”. This next part will do a better job of explaining what is happening.

    Next 25 results via ORDS Oracle Autonomous Database, Chris Hoina, Senior Product Manager, ORDS, Database Tools,

    Since we are on the second page of results, ORDS knows that we began with an offset of zero (the beginning of the table) and a limit of 25. Each “next” URL will increment by 25 (the offset) and return 25 results at a time. And it will keep producing “next” URLs until the “hasMore: false” condition is finally satisfied. We can modify a lot of this, but this is what ORDS does for you automatically/by default. Great news for me because at my current level of experience, the more steps that I can automate, the better!

    Python

    Prepare yourself for a bit of a leap. At this point, I was pretty confident I could copy/paste my way through some python code and pull down this data, and then save it in some format.

    Finally, after about a week, I was able to duct-tape something together. Courtesy of Google, StackOverflow, so many YouTube video tutorials (so, so many), here is what I’ve arrived at:

    import requests
    import json 
    
    # requests is a python library that allows you to send GET, 
    # PUT, DELETE, HEAD, and OPTIONS requests. I'm just doing 
    # GET requests though. The json library comes with python, 
    # but I need it here to be able to work with the json that # is returned. I'll also need it to create the json file 
    # (at the end).
    
    offset = 0
    
    # I'm basically telling this little script that we should 
    # expect to start with an offset of zero. If you recall, 
    # this just means we are beginning on the first page. 
    # Hence, there is no offset. 
    
    url = 'https://gf641ea24ecc468-dbmcdeebyface.adb.us-ashburn-1.oraclecloudapps.com/ords/admin/places/?offset={}'
    
    # I've added in this modifier {}, which, as you'll see in a # bit, allows me to increment by 25 with each subsequent 
    # GET request.
    
    hasMore = True
    
    # Read this as "hasMore is equal to True". In other words, 
    # if there is more STUFF, then we should see "true" (go 
    # back and look at the screenshots if you don't know what 
    # this means.)
    
    while hasMore:
    
    # We are saying, "While 'hasMore is equal to true, then..."
    
    response = requests.get(url.format(offset))
        
    #...recognize that "response" is a GET request that 
    # consists of the URL (from above) plus whatever the offset # is (we'll indicate the offset below).
    
    data = response.json()
    
    #data is just whatever the results are from the above 
    # response.
    
    filename = 'places.json'
    
    # "filename" is the json file we are going to create to 
    # put all these results into.
    
    if data.get('hasMore'):
         offset += 25
         with open(filename, 'a') as json_file:
              json.dump(data, json_file)
    else:
         break 
    
    # I'm going to switch to narrating here, this one is just 
    # too verbose. In lay terms, we are saying: if the GET 
    # request "data" (which is essentially a composite variable # at this point) has "hasMore: true" on the page, then keep # doing this next thing. 
    
    # With the next "thing" being: take the results from that 
    # URL and save it into a file called "places.json". Once 
    # you've done that, keep doing it, but add 25 to the offset # for that URL for subsequent GET requests. And whenever 
    # you have results, append it (that's what that "a" is on 
    # line 44) to the file you created, and just keep going 
    # until "hasMore" doesn't satisfy that condition on line 
    # 20. 
    
    # If it doesn't satisfy that condition then that means 
    # "hasMore" is equal to false. In other words, there is 
    # nothing more to request, so stop (that is what the "else: # break" means). 

    I’m going to include an image to see the nesting better.

    python script for ORDS, Oracle Autonomous Database, Chris Hoina, Senior Product Manager, ORDS, Database Tools,

    And once I run this, I’m left with a JSON file (“places.json”) that has all my entries saved à la:

    json file output from ORDS, Oracle Autonomous Database, Chris Hoina, Senior Product Manager, ORDS, Database Tools,

    Now what?

    At this point, I have a few options. I could:

    • include code that would convert this JSON file to a . CSV file
    • include code to indent the JSON file, making it more readable, or
    • drag and drop it into my Autonomous Database (via Data Load in Database Actions) with some slight tweaking (I just tried, so I already know I need to do more massaging)

    The End

    So what have we learned here? Even somebody with very basic skills can interact with an Autonomous Database via ORDS.

    If you have an internet connection and are eager enough, the sky is the limit. Putting things into perspective, I wouldn’t have been able to do this about a week and a half ago.

    Truthfully, you’re not that far behind! I encourage you to give it a go.

    Find me

  • Updating VARCHAR2 fields in Oracle Database Actions

    Updating VARCHAR2 fields in Oracle Database Actions

    Update

    I’ve run into more problems with this python/flask/ords/adb app idea of mine. Turns out I’m too [developer] dumb to do some of the things that I’d originally envisioned. Now that I’ve become more familiar with python, flask, the Oracle Autonomous Database, and our Database Tools (like ORDS and Database Actions), I’m realizing that I need to rethink my approach.

    First off, I’ve updated the (not trying to be pretentious here) User Journey for this project.

    SIDE NOTE: The User Journey is something that I really should pay more attention to (especially considering it was one of my concentrations in my MBA program, and it was a huge initiative in my previous role at Big Blue) and you should too!

    Ch-ch-ch-ch-changes

    I’m leaning towards (after a recent discussion with that jeff smith) more of a drop-down style of search. I’d like to present a user with all the available cities (having taken these from my “Restaurants” table) in Wake County.

    I think I can populate a list of cities to choose from with the help of REST APIs (via ORDS). But I need to do some clean-up first.

    Side note

    In about a minute, you’ll probably come to the realization that my approach is less than elegant. Remember, I’m not a developer. I’m kind of stumbling through this, and I’ll need to make some sacrifices along the way (we call those “trade-offs” in business-speak). Unfortunately, there are simply some techniques/skills that I do not know yet. For a visual representation of these deficits, I draw your attention to:

    Me the develper versus an actual developer, Chris Hoina, Senior Product Manager, ORDS, Database Tools, Oracle Autonomous Database, Database Actions

    Back to your regularly scheduled program

    On to clean-up. The cities in this table are a bit all over the place. Let’s take a look.

    From Database Actions, I can navigate to a SQL Worksheet. From there I can inspect my tables (Right-click > Edit), or jump straight into the SQL. Since I know my “CITIES” column is the problem, I’ll run this:

    SELECT DISTINCT CITY
    FROM ADMIN.RESTAURANTS
    ORDER BY 1

    Some screenshots of what this looks like in Database Actions:

    NOTE: The "DISTINCT" parameter drops any duplicates, "ORDER BY" returns results in ascending order.

    I suspect that the program used to input health inspections allows for some level of free text.

    Tangent / Story

    I’ve used an application similar to this in a previous life, but it was a Computer Aided Dispatch (CAD) application. You could enter in free-text, or select from users’ previous entries. There was a lot of flexibility, but because of that, there were many variations on things like street names, cities, locations, parking lots, person names, etc. For the user, awesome, for the developer or database administrator, less so.

    At this point, it is pretty clear the amount of normalization I’ll have to do to all these city names. Now I just need to figure out:

    • case to use (Upper, Sentence, Lower, SaRCaSTic, etc.)
    • city name variations to use

    I randomly chose a city with the following SQL command:

    UPDATE Restaurants SET CITY = 'Holly Springs'
    WHERE UPPER(CITY) = 'HOLLY SPRING'

    In this example, I searched for all instances of “Holly Spring” and replaced them with the correct “Holly Springs”. I can then repeat the process for all other cities. Again, the abridged walk-through of this is here.

    I actually know this data well, since I grew up in the area. So deciding on the correct city names shouldn’t be too challenging. But familiarizing yourself with your own data might not be such a bad idea. For instance, in this table, one of the cities displays as “Research Triangle Park”. I don’t think it’s common to refer to it like this; we usually just call it “RTP”. I think little details like that really help to elevate your application.

    Next steps

    I’ll keep this brief. But what I think I’m going to have to do next is create a REST API based on this Restaurant table. I should have a better idea in a few days. But the idea is, that once a user selects a city, it will pass that city as a parameter to a GET request (again, courtesy of ORDS) and then return additional data. A user would then be able to further filter on that returned data, eventually ending on their target restaurant.

    Okay, stay tuned…as I feel like I’m on the precipice of something exciting!

    Catch me if you can


    Abridged walk-through

    Select Worksheets in Database Actions Oracle Autonomous Database, Chris Hoina, Senior Product Manager, ORDS, Database Tools

    From Database Actions, navigate to the “SQL” feature. You’ll see this screen appear.

    NOTE: I had a previous SQL Worksheet saved, but you can enter SQL statements directly into the default worksheet. 
    Before city field has been updated in Database Actions Oracle Autonomous Database, Chris Hoina, Senior Product Manager, ORDS, Database Tools

    *If you expand, you can see the statement that I used.

    SELECT DISTINCT CITY
    FROM ADMIN.RESTAURANTS
    ORDER BY 1

    This will produce a list of all the cities in their current form. Notice the four different variations of “Fuquay-Varina”.

    Updating fields in City Column Database Actions Oracle Autonomous Database, Chris Hoina, Senior Product Manager, ORDS, Database Tools

    I’ll comment out lines 1-3 and enter the following SQL statement to update Fuquay-Varina:

    UPDATE Admin.Restaurants SET CITY = 'Fuquay-Varina'
    WHERE UPPER(CITY) = 'FUQUAY VARINA'

    I use the “DISTINCT” parameter to drop any duplicates in the results. “ORDER BY” returns results in ascending order.

    You’ll see that 77 rows have been updated.

    After Fuquay Varina has been updated in Database Actions Oracle Autonomous Database, Chris Hoina, Senior Product Manager, ORDS, Database Tools

    I’ll un-comment lines 1-3, and comment lines 5-6.

    Based on the results, we’ve reduced the variations of “Fuquay-Varina”. I’ll continue this work until I have a smaller set of more consistent cities.

  • Add Primary and Foreign Keys to your Oracle Autonomous Database

    Add Primary and Foreign Keys to your Oracle Autonomous Database

    I’m not a Database Administrator, but I feel as though I may be slowly evolving into one…

    In a previous post, I left myself the task of correcting the html on a proposed Python/Flask/ORDS/Autonomous Database application. My then next step was to add a search bar (which I did):

    Search bar added to application for python, flask, ords, oracle autonomous database application. Chris Hoina, Oracle Senior Product Manager.
    Search bar added to the html for searching my Autonomous Database.

    Although this was a small step forward it led to some serious questions. While having a search feature like this is good in theory, in practice it is totally unusable.

    The Problem

    If a user wants to search for a specific restaurant, they’d need to know a lot of information beforehand. At a minimum, the name of their target restaurant. But even that isn’t enough. Look at when I query for a single restaurant (randomly chosen – I’m not sponsored by Wendy’s btw):

    SELECT FROM LIKE SQL statement showing a single restaurant name. Chris Hoina, ORDS, Oracle Autonomous Database
    SQL statement and the output (a single restaurant in this case).

    Some of these restaurants come back with additional store numbers (probably a reference to either a corporate- or franchise-owned property). So a search like this simply will not do.

    That’s problem number one. The second problem is that in the original datasets, while HSISID and Permit ID (read about them here) are unique in the Restaurants table. That isn’t the case with the Violations and Inspections tables. There are a TON of entries for each restaurant in these tables, and the HSISID and Permit IDs are used repeatedly for subsequent inspections. Just take a look at this example (they’re all like that though!):

    Viewing the HSISID in my table; unique identifier complications, Chris Hoina, ORDS, Oracle Autonomous Database
    Using the HSISID over and over again make it challenging to gather necessary information across all tables.

    A Closer look

    Above, is the Violations table, but the Inspection table looks similar. From what I observer, each time a violation or inspection is recorded that same HSISID is used (Permit IDs too). But in these two tables an Entry ID is used as the unique identifier. I know the image is greyed out, but if you look closely you can see the “Object ID” in that screenshot.

    But these Object IDs don’t mean anything outside of this table. And it underscores the point that my original approach to searching (i.e search bar) using a single identifier won’t work. Across the three tables these restaurants are uniquely identified in different ways.

    At a minimum, these tables should be linked so that when an HSISID is searched for in the Restaurant table, it gathers all associated data from the Violations and Inspections table too. Meaning, if I search for a specific “Wendy’s” only that target restaurant comes back along with all historical inspection and inspection violation information as well.

    Now that we understand the problem, I’ll attempt a solution. For my next feat, I’ll relate the three tables to one another in a logical way. Continue on dear reader…


    Navigating

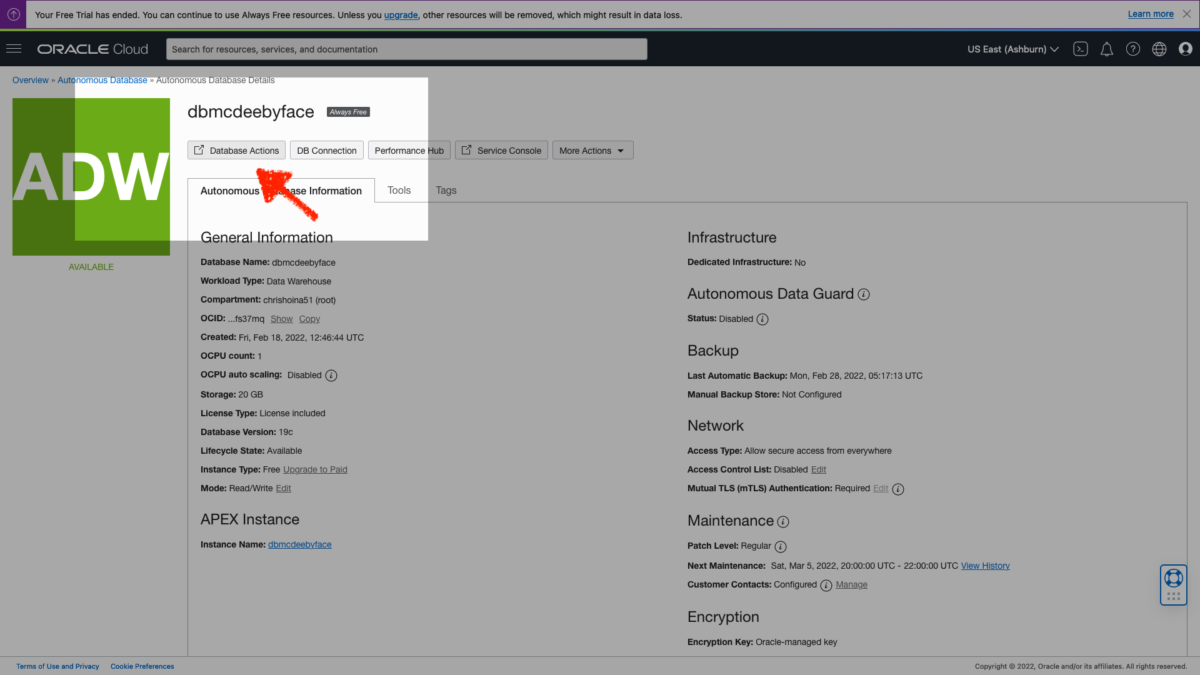
    Navigate to your Autonomous Database, then Database Actions. Once there, look under the “Development” section, and choose “SQL”.

    Database Actions Development SQL Worksheet Oracle Autonomous Database, Chris Hoina, Senior Product Manager, Database Tools, ORDS
    NOTE: I'm sure there are other ways to accomplish this, but this is what worked for me. 

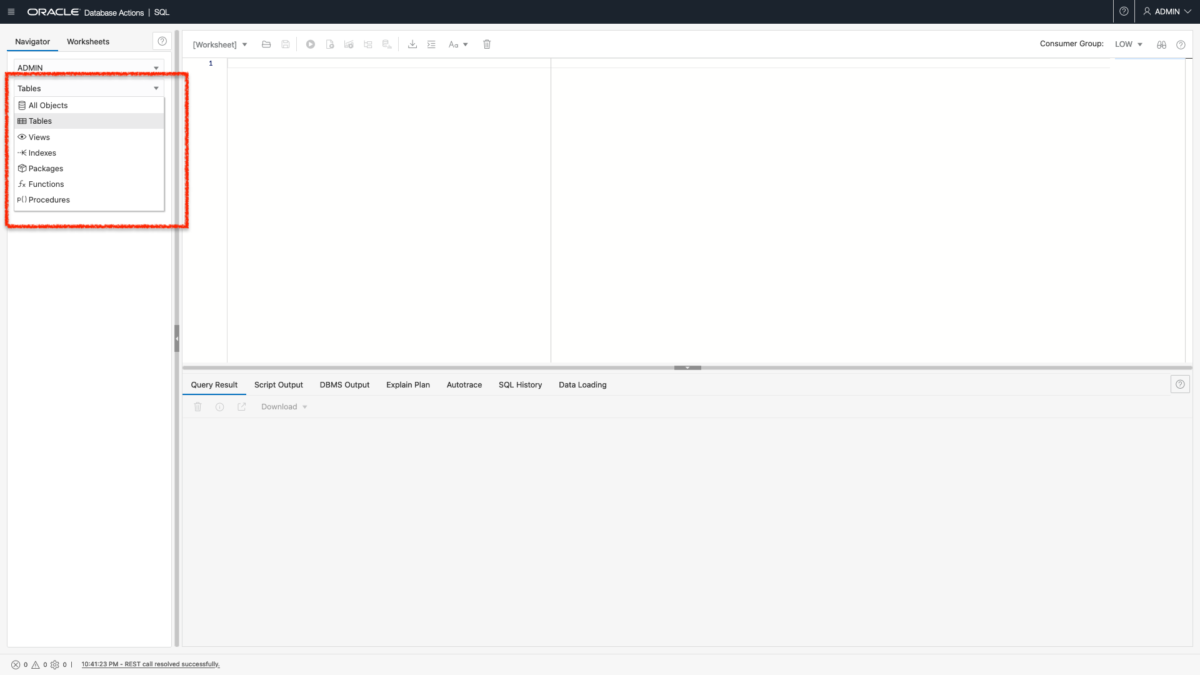
    Once in that SQL Worksheet, look at the the left side of your browser, you’ll see the Navigator tab. Of the two drop-down lists, look at the second one. That is the “Object” selector; for my purposes I made sure that Tables was selected.

    Navigator tab in Oracle Database Actions, Chris Hoina, Senior Product Manager, Database Tools, OCI, Autonomous Database
    Navigator tab in Oracle Database Actions in my Autonomous Database Always Free OCI account.

    I have the three tables; two of which (Inspections and Violations) need Foreign Keys while the third table (Restaurants) will need a Primary Key.

    My three tables in Oracle Database Actions, Chris Hoina, Senior Product Manager, Database Tools, OCI, Autonomous Database
    My three tables in Oracle Database Actions: Inspections, Restaurants, Violations
    TL;DR - The Restaurant table is like my Parent table, whereas the other two tables are like children (or dependents). Establishing these Primary and Foreign keys is a way for me to easily establish interdependence/relation among these three tables. 

    Establishing a Primary Key

    I’ll use the Restaurant table as an example. Here is the step-by-step…

    Editing my table in Oracle Database Actions, Chris Hoina, Senior Product Manager, Database Tools, OCI, Autonomous Database

    Right-click on the table (Restaurants), then select “Edit”.

    Table Properties my table in Oracle Database Actions, Chris Hoina, Senior Product Manager, Database Tools, OCI, Autonomous Database

    If a Primary Key has already been established, then you’ll see a Column (which is actually displayed as a row in this Table Properties table) that already has a check in the “PK” column.

    If there isn’t one, continue by clicking the Primary Key option (see the left-most red arrow).

    Primary Keys section in Database Actions SQL Worksheet Oracle Autonomous Database, Chris Hoina, Senior Product Manager, Database Tools, ORDS

    Once in the Primary key option, you’ll see the following boxes with checks:

    • Enabled
    • Initially Immediate,
    • Validate
    Choosing HSISID as the Primary Key in Database Actions SQL Worksheet Oracle Autonomous Database, Chris Hoina, Senior Product Manager, Database Tools, ORDS

    I’m using the HSISID (found in the “Available Columns” list) as my Primary Key. Once I select that, the “Add Selected Columns” arrow will illuminate (from white to gray). Click it once to move your selection over to the right in the “Selected Columns” list.

    Once your column has been moved, you can click “Apply”.

    Output from establishing the Primary Key in Database Actions SQL Worksheet Oracle Autonomous Database, Chris Hoina, Senior Product Manager, Database Tools, ORDS

    You’ll see this “Output” screen appear. Here you can see that my table was successfully altered. If there are errors, it’ll let you know, and there will be A LOT of red (trust me, I saw tons of red prior to writing this post).

    The DDL from a table in Database Actions SQL Worksheet Oracle Autonomous Database, Chris Hoina, Senior Product Manager, Database Tools, ORDS

    Bonus points, you can always find the Data Definition Language (DDL) in the DDL option (read up on this and the other types of SQL statements here).

    As I see it, it looks like everything since the inception of this table has been recorded. I would imagine you could take this and build some sort of automation/orchestration script with it (along with the DDL from the other tables too).

    Sample Code

    Table as a Primary Key

    CREATE TABLE ADMIN.RESTAURANTS 
        ( 
         OBJECTID           NUMBER , 
         HSISID             NUMBER , 
         NAME               VARCHAR2 (4000) , 
         ADDRESS1           VARCHAR2 (4000) , 
         ADDRESS2           VARCHAR2 (4000) , 
         CITY               VARCHAR2 (4000) , 
         STATE              VARCHAR2 (4000) , 
         POSTALCODE         VARCHAR2 (4000) , 
         PHONENUMBER        VARCHAR2 (4000) , 
         RESTAURANTOPENDATE DATE , 
         FACILITYTYPE       VARCHAR2 (4000) , 
         PERMITID           NUMBER , 
         X                  NUMBER , 
         Y                  NUMBER , 
         GEOCODESTATUS      VARCHAR2 (4000) 
        ) 
        TABLESPACE DATA 
        LOGGING 
    ;
    
    
    CREATE UNIQUE INDEX ADMIN.RESTAURANTS_PK ON ADMIN.RESTAURANTS 
        ( 
         HSISID ASC 
        ) 
        TABLESPACE DATA 
        LOGGING 
    ;
    
    ALTER TABLE ADMIN.RESTAURANTS 
        ADD CONSTRAINT RESTAURANTS_PK PRIMARY KEY ( HSISID ) 
        USING INDEX ADMIN.RESTAURANTS_PK ;

    That is literally all did to set this up. Very straightforward, next I’ll walk through how to set up Foreign keys. Then I’ll show you what it looks like in the Data Modeler so you can visually see the newly-established relationships of the tables.


    Establishing a Foreign Key

    We’re still in the SQL worksheet (found in Database Actions). Both Inspections and Violations tables need a Foreign key; I’ll demonstrate with Inspections.

    Foreign Key in Database Actions SQL Worksheet Oracle Autonomous Database, Chris Hoina, Senior Product Manager, Database Tools, ORDS

    Right-click on the table and select “Edit”, just like I did when establishing a Primary Key. Next, navigate to the “Foreign Keys” option in the Table Properties.

    Adding a Foreign Key in Database Actions SQL Worksheet Oracle Autonomous Database, Chris Hoina, Senior Product Manager, Database Tools, ORDS

    It’ll be empty, but you’ll want to click the
    “+” key (see the arrow). You’ll see “NEW_FK_1” appear under the Foreign Key table. If you click on that you can change the name to whatever your heart desires.

    I then changed the Foreign Key name to something that I could remember (and something that would make sense at a later date); “Inspections_FK”. I then selected “HSISID” as the Local Column.

    And automatically, the schema recognizes the Primary Key I previously established in the Restaurants table. I didn’t do that, that was all done for me automatically! Very cool.

    Output of the Foreign Key name change in Database Actions SQL Worksheet Oracle Autonomous Database, Chris Hoina, Senior Product Manager, Database Tools, ORDS

    After I click “Apply” you’ll see the output from this change. I can then return to the Foreign Keys option and voilà, the Foreign Key name has been changed. I’ll proceed to do the same to my “Violations” table as well.

    Sample Code

    Table as a Foreign Key

    CREATE TABLE ADMIN.INSPECTIONS 
        ( 
         OBJECTID    NUMBER , 
         HSISID      NUMBER , 
         SCORE       NUMBER , 
         DATE_       DATE , 
         DESCRIPTION VARCHAR2 (4000) , 
         TYPE        VARCHAR2 (4000) , 
         INSPECTOR   VARCHAR2 (4000) , 
         PERMITID    NUMBER 
        ) 
        TABLESPACE DATA 
        LOGGING 
    ;
    
    ALTER TABLE ADMIN.INSPECTIONS 
        ADD CONSTRAINT INSPECTIONS_FK FOREIGN KEY 
        ( 
         HSISID
        ) 
        REFERENCES ADMIN.RESTAURANTS ( HSISID ) 
        ON DELETE CASCADE 
        NOT DEFERRABLE 
    ;

    Data Modeler Primer

    This isn’t a “How-to” on the Data Modeler (Documentation here though), but rather just me taking a minute to share how you can visually see the relationships between tables. It definitely helped me better understand why I needed to establish Primary and Foreign Keys.

    Andiamo!

    Data Modeler in Database Actions in Oracle Autonomous Database, Chris Hoina, Senior Product Manager, Database Tools, ORDS

    From the Database Actions Launchpad, select “Data Modeler”.

    Navigator Tab in Data Modeler in Database Actions in Oracle Autonomous Database, Chris Hoina, Senior Product Manager, Database Tools, ORDS

    Once there, you’ll see two drop-down menus. You’ll see your current Schema (Admin for me, in this case). In the second drop-down menu, you’ll see a list of available “Objects”. I’ll want to make sure that I have “Tables” selected.

    Adding Objects to the Diagram Editor in Data Modeler in Database Actions in Oracle Autonomous Database, Chris Hoina, Senior Product Manager, Database Tools, ORDS

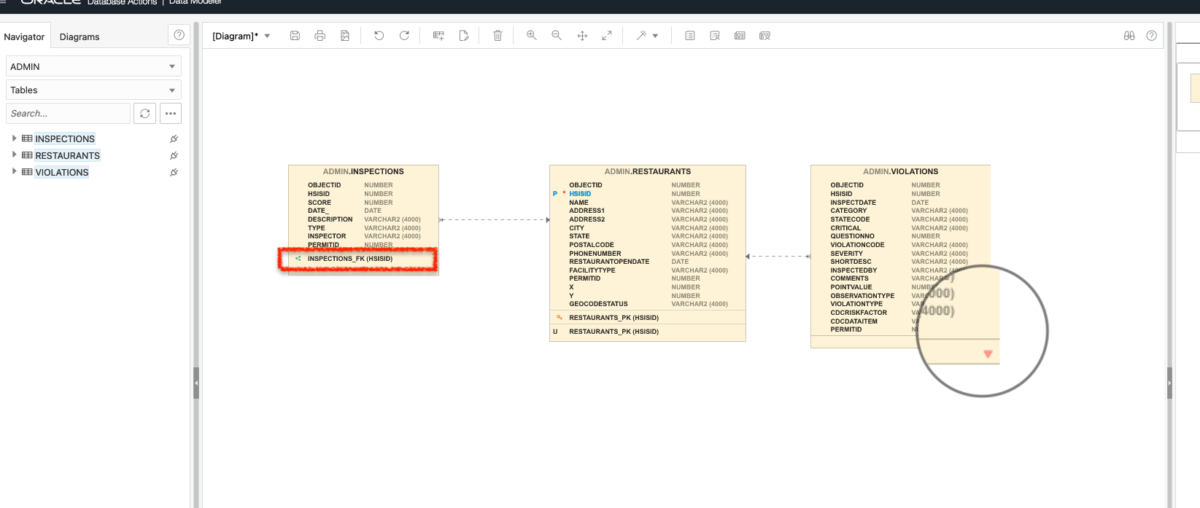
    You can drag these over one at a time, or select them all and drag all at once. They’ll appear in the Diagram Editor, with the relationships already included (since I already set up the Primary and Foreign Keys).

    New Diagram of tables in the Data Modeler Diagram Editor in Database Actions in Oracle Autonomous Database, Chris Hoina, Senior Product Manager, Database Tools, ORDS

    Expand these diagrams and you’ll reveal additional information. In this image, I’ve expanded the Inspections table to reveal Foreign Key details. I’ll do the same by expanding the bottom of the Violations table to reveal its Foreign Key. That little red arrow signifies that there is additional information hidden.

    Okay, but what is this?

    What we are looking at is a visual representation of the relationships between these tables. Everything is “linked” through the HSISID. My interpretation of this is that everything begins with the Restaurant table, and then the other two tables act as subordinates.

    For a single Restaurant (which has a unique HSISID) there are many entries in both Inspections and Violations that use the HSISID repeatedly. In those cases, that HSISID is no longer unique. It is still important, necessary information.

    And now that everything is linked, I’ll want to create a single query (SQL presumably) that when executed will return all relevant information from a single entry in the Restaurant table with all associated (HSISID) entries from the Inspections and Violations table, nested underneath it.

    Clear as mud? Good. Hope this helps more than it hurts.

    Now what

    Next I’ll need to come up with something (in SQL perhaps) that I believe I’ll use in tandem with ORDS. From there I’ll work on building the html portion of this python + flask application so that the search is more intuitive (to the user) and elegant (for the Autonomous Database). Believe it or not, but it took about a week to wrap my head around all this key business. Needless to say, I’m slightly behind schedule. But expect more updates as I progress.

    Hope you learned something.

    Find me

    HMU on:

  • Project Overview: python – flask – ORDS – Autonomous Database

    Project Overview: python – flask – ORDS – Autonomous Database

    Update

    For the past week and a half I’ve been immersed in learning how python and flask interact with each other so a developer can create a quick/crude web application. I’ve also spent time becoming more familiar with virtual environments (as they pertain to python + flask), jinja, and WTForms (I’m sure I’m forgetting other stuff too). But if you are like me (circa two weeks ago), then most of what I just wrote means nothing. But that’s okay, you have to start somewhere.

    I’m trying to learn all I can because I want to share my ideas (and code) with the Oracle community in the hopes that it will lead to more creative and innovative ways to connect with our Autonomous Databases.

    If you recall, as of this writing, I currently have my Autonomous Database (ADB) set up; and my three tables are REST enabled (with the help of ORDS). I also have a newly created “appdev” user (for accessing the database remotely).

    And what I’m attempting to do is develop a very basic web/mobile-friendly application in python. An application that will transform the JSON (provided via ORDS) coming from the ADB, into a readable and helpful tool.

    Which prompts the first question: how do I intend to do this?

    I think the best way to tell the story is by starting at the end, briefly, then going back to the beginning, and then periodically returning to the end, maybe giving different characters’ perspectives throughout. Just to give it a bit of dynamism, otherwise, it’s just sort of a linear story.

    David Ershon (as portrayed by the legendary Steve Coogan in the critically acclaimed 2010 film The Other Guys

    First off, its ridiculously easy to REST enable tables in your ADB. Simple mouse clicks really, take a look:

    https://twitter.com/chrishoina/status/1499829222315118596

    Now that I’ve REST enabled my tables, I can take the provided URL (see below in the image) and paste it in a separate browser window. Here you see the default is that the first 25 entries in the target table are returned.

    JSON output from my Oracle Autonomous Database, courtesy of ORDS.

    Of course, with some manipulation I can do much more than what is seen here. But the point is that everything works, thanks to ORDS (huge time saver). Although, we still need to clean up the presentation (or what a typical user might expect).

    The actual application

    So what I’d like to do is take this…word salad, and clean it up a bit; make it more presentable. Up until now I haven’t stumbled across anything that takes our JSON (via ORDS) and presents it in such a way using python + flask. I think it would be really neat, and a good chance for me to contribute something more than just funny memes and GIFs.

    If you recall, I have three datasets:

    1. Wake County Restaurants
    2. Restaurant Health Code Inspections
    3. Restaurant Inspection Violations

    All of which share the same primary key (a restaurant ID). So I thought I would produce something that would use all three of these tables in some combination.

    SHOUT OUT: Thanks to Wake County, NC for providing people with these openly-available datasets.

    The direction I’m headed is to develop a Minimum Viable Product (MVP), share the code via GitHub, then move onto the next ORDS-inspired project! After spending a few days researching and learning, I’ve cobbled together what I think might work:

    A simple mock-up of what this python, flask, autonomous database app might look like.
    A simple mock-up of what this python, flask, autonomous database + ORDS app might look like.

    This needs explanation. Let me discuss what is going on here.

    1. A user would begin on the landing page (name yet to be determined). This page of course is displayed in html.
    2. Next a user would enter in a restaurant of interest (I’ll have to begin with Wake County, NC as that is all I have access to at the moment). From there the python application would use ORDS to request information from my autonomous database.
    3. Skipping several steps for brevity, eventually this information would then be transmitted back to the user (in html).
    NOTE: I intend to follow-up with subsequent posts detailing my development progress. So this should become less opaque as we near the finish line! 

    More explanation

    Right, so what are flask, jinja, and WTForms?

    • As I understand it, Flask is a web framework that allows python developers to more easily create web applications.
    • Jinja. Apparently writing html is annoying, so jinja is an “engine” that allows developers to write in python-like code and have that code “transformed” into html. Seems like it makes it that much easier to stay in your native language (python in this case).
    • WTForms is used for form “input handling and validation”. My interpretation of this is that python developers aren’t expected to know how to communicate with databases. Much like they wouldn’t be expected to be fluent in html. So it is a way of extended python to handle requests to the ADB.

    Learning resources

    No single person is an island. Having said that, what follows (in no specific order) are resources that have helped me get to this level of understanding/comprehension. Maybe they’ll help you too.

    I’m more of a visual and practical learner, so I’ve primarily been working through tutorials on YouTube and LinkedIn Learning. I found a course on LinkedIn Learning; one that I actually did.

    Meanwhile on YouTube, I did a lot of pausing/reviewing/rewinding so I could figure out how everything works together. Luckily, python and flask seem to be very formulaic; not too dissimilar to COBOL.

    LinkedIn Learning

    Full Stack Web Development with Flask (LinkedIn Learning)

    Note: I did sections 1-4. When I got to section 5, I passively followed along for about ¾ of the section, but then reached diminishing returns. I skipped section 6; twas irrelevant.  

    YouTube

    The two channels I found helpful:

    • Codemy.com (channel) – you’ll want to use the keywords “flask Fridays”; they go as far back as 2021 and are still on-going
    • Corey Schafer (playlist) – a great start-to-finish series for building a flask/python-based web application (although not Autonomous Database + ORDS specific)

    Mac set-up

    Bookmark this guide if you want to set up your Mac for anything development-related. In my case the following sections were extremely important for this project:

    • xCode (for some reason doesn’t come preinstalled on Mac)
    • Homebrew
    • Visual Studio Code
    • Python, along with:
      • Pip
      • Virtualenv (where I learned more about virtual environments)

    Up next

    Next up, I’ll be taking what I’ve learned so far and applying it to this project. Since a user wouldn’t log in, update, or modify anything in this application, the complexity should be low.

    That isn’t to say it won’t have its challenges. But in a couple weeks I hope to have the front end connected (via ORDS) to the ADB. I’ve got a good start on what the landing page might look like. And of course once it is all polished up and properly commented, I’ll be sure to share the code.

    Screen shot of the landing page for this python, flask, ORDS, Oracle Autonomous Database application
    Screen shot of what the landing page currently looks like; running locally in a virtual environment (venv). Next up is to add a search bar and then connect to my Autonomous Database via ORDS.

    The dig continues

    Time to hit the books.

    If you want to learn more about ORDS check out these resources.

    And as always, you can find me here:

  • Create a user in Oracle Autonomous Database [for Dummies]

    Create a user in Oracle Autonomous Database [for Dummies]

    An OCI user does not ≠ ADB user

    Creating an additional user in your Oracle Cloud Infrastructure (OCI) is not the same thing as creating an additional user in your Autonomous Database (ADB). I spent about two days (on and off) last week, wrapping my head around this. Maybe you knew this…I did not.

    Chris Hoina – 2022

    If however, you want to create an additional OCI user; one that would be able to access various resources in OCI, then please bookmark this page. This is all you need to get started.

    However, you may not even need to create this additional user (as was the case with me). While I followed the steps in that documentation (very simple/straightforward actually), it wasn’t till after I finished, did I realize that doing it was completely unnecessary. What I was really trying to do was create a new database user, not an OCI user. The steps are different, simpler.

    Federations

    Another area that I got really hung up was with “Federations”. This was a relatively new concept for me. And I’m not sure if I should even do a deep dive on how Federations work. However, let it be known, if I receive even one (legitimate) comment on this subject, I will put together a treatise on Federations in OCI.

    It took me about a day and a half to educate myself on how Federations and Identity Providers work in OCI. So, if you are reading this, and you think you’d benefit from a standalone article, then let me know. Otherwise, this page and this page are both very helpful for learning more about Federations in OCI.

    Are you me?

    If so, then you are acting as an administrator in your Always Free OCI account, as well as the database administrator. Being both is confusing for me, and maybe it is for you too. Since I don’t consider myself a traditional user (I’m blurring the lines when it comes to the different roles), I’m tasked with managing my OCI tenancy and also setting up my development environment. All this so I can begin to work on some applications/proofs of concepts (POCs) for interacting with my Autonomous Database via ORDS (Oracle REST Database Services aka our REST APIs).

    Don’t be like me and allow yourself to get too weighed down with all the technical jargon thrown your way. Naturally, our docs read like they are geared toward the System or Database Administrator. And this makes sense; remember when you are in your tenancy you’re the de-facto admin for everything. At a larger organization/enterprise a developer would probably never do any of this setup. You’d just sign in to the database directly or connect via a command line.

    Workflow for the “Every Person”

    But for me (with my limited experience), the workflow looks something like this:

    Start here

    Sign-up for an Oracle Cloud Account. You’ll be provided a Cloud Account Name* and credentials.

    *You’ll also hear this account being referred to as your Tenancy name (you can modify the name later if you want).

    When you sign in, you can quickly tell if you are the administrator by seeing if the "Service User Console" option is available. This is the administrator for the Oracle Cloud Infrastructure. Your tenancy.

    Next, create an Autonomous Database and create the “ADMIN” credentials* for said database. You can see how to do that in Lab 1 of this workshop

    REMINDER: This administrator is different that the OCI Tenancy administrator.

    Add a new user by:

    Navigating to your Autonomous Database under "Oracle Database".  It might be in your recently viewed.

    Navigating to your Autonomous Database under “Oracle Database”. It might be in your recently viewed.

    Once you've created your Autonomous Database, navigate to Database Actions. This is where you need to go to create a new user.

    After you click the database, you’ll see this screen. Click “Database Actions”. You’ll link out to the Database Actions dashboard.

    Navigate to the Administration tile, and click it. It will take you to a dashboard of all current users, along with an option to create a new user.

    Select the Database Users option in the Administration section.

    Create a new user. Afterward, you'll be provided an URL that allows a user to directly log into the Oracle Autonomous Database Actions Launchpad.


    Select the “Create User” option.

    Toggling the Web Access switch will automatically grant the user the CONNECT and RESOURCE roles.

    At a minimum, you’ll want to enable “Web Access” for this user. This will automatically grant two roles for the user:

    1. CONNECT
    2. RESOURCE

    Both are needed for the developer though.

    Here you can see all the available roles. The CONNECT and RESOURCE roles are already checked because you will have selected "Web Access" in the previous tab.

    If you want to take a look at the different roles available, click this tab. Scrolling through, you can see the CONNECT and RESOURCE roles are checked.

    HINT: You can always go back and edit the roles if more roles need to be granted. Both are needed for the developer though.

    Finish (kind of)

    You can see the URLs in this image.  This, along with the login credentials are what should be provided to the user.  They can log in to the Database Actions console directly.

    Once complete, you’ll see a URL in that user’s newly-created tile. This URL will link you out to a login page, for accessing the Database Actions console. Since you are the only user, you’ll just want to document the URL. Otherwise, as the admin, I’m assuming you’d share this with the respective recipient.

    Next Up

    From here on out, I’ll do all my development work with this account (I called mine “appdev”), to mimic what a typical user might encounter in a practical setting.

    Right now, I’ m wrapping up a python + flask + database course on LinkedIn Learning. So far, its been pretty informative. If you are interested, you can take a look as well (to see the direction I’m headed). My goal will be to use the templates in this course as a resource for connecting to my database, but with ORDS.

    I hope to have something small in the next week or so. And I’ll be sharing here, and on my GitHub as well. So stay tuned.

    Helpful resources

    What I did here was very simplified, a distillation for creating a new user in your Autonomous Database. But I’ll include some of the resources that helped get me to this level of understanding:

    Find me

    And that’s it for now. But if you want to follow along then check me out at these places…