Tag: oauth 2.0

  • Configuring OCI IAM Domain JWTs to use with ORDS OAuth2.0 protected APIs

    Configuring OCI IAM Domain JWTs to use with ORDS OAuth2.0 protected APIs

    Table of Contents

    Intended Audience/Purpose

    Does this describe you?

    If this describes you, then keep reading!


    Creating a Domain

    Assuming you are at the central OCI Console, click the navigation icon at the top of your screen. Then, navigate to Identity & Security and click Create domain.

    NOTE: Make sure you are in your correct Compartment (this will be up to you to decide)! Everything I show here is done within the same /ords Compartment. 

    In this example, I’ve chosen to create an “External User” Domain type. I haven’t tested with any other Domain types, but I assume they all work similarly.

    Once you’ve entered all the information (e.g., Domain administrator values and Compartment), click Create Domain. Then, click on the Domain you just created. Next, you’ll need to create and add an “Integrated application.”

    Mini-tutorial: Adding a user to your Domain

    In this mini-tutorial, I demonstrate how to create a new user. Notice how I am using a personal email account, you can totally do this!

    Once you’ve added this user, they recieve a password reset email for this Domain. They must create a new password before logging in.

    Configure client access

    First, navigate to your domain, then selectย Settings.

    If thisย Configure client accessย box is unchecked, check it, then selectย Save Changes (the button at the bottom of the screen).

    That’s it. You’re done!

    Adding an Integrated Application to the Domain

    Adding the application

    From within your Domain dashboard, click the Integrated Applications menu item. The “Add application” modal will appear. Read through the application types and choose the most appropriate one. For this demo, I selected “Confidential Application.”

    Continue filling in the modal fields. Make sure you choose a unique name!

    I’ve left the URLs section empty for this demo and kept the Display settings checked. The Display settings are options for users when logging into their Domain (i.e., they don’t impact this workflow, but they are nice to have set for later).

    Click Next to continue to the Resource server configuration section.

    Configuring OAuth2.0

    In this section, you’ll configure your Resouce server and Client. First, we’ll create a Scope1.

    Resource server configuration

    When you configure your Scope, you must include a Primary audience field. Here, I’m just choosing the Domain’s name. The Primary audience needs to be structured exactly like this (with the trailing backslash)! Next, create a Scope (I’m using dot notation, since this will mirror the privilege I’ll create in ORDS, later).

    When finished, click Add.

    Client Configuration

    Next, you’ll include details about your client. In this demo, I use Postman as a client application stand-in. For this example I’m using the Authorization code grant type2, along with a Redirect URL.

    FYI: Postman has a /callback URL that you can use as a Redirect URL.
    Mini-tutorial: How do I find Postman’s Callback URL?

    From the Authorization tab, select OAuth 2.0. Then scroll down to the Configure New Token section. There you will find the Callback URL. Copy it. You’ll need it!

    I’ve chosen “All” for the Token issuance policy. Next, click Finish.

    Issuing a POST request to obtain a JWT

    You can send off that initial POST request to obtain the JWT from IAM with your Domain set. You’ll then use the details contained in that JWT to configure ORDS.

    Gathering the required values for the request

    If your application hasn’t already been activated, do so now.

    Next, click the Edit OAuth configuration button and retrieve your Client ID and Client secret. Save it to a clipboard or your environment files (if using this for an application).

    You will also need the Domain URL. Navigate to your Domain’s main dashboard (โ—๏ธmake sure you are still in the correct Compartment). Then copy the Domain URL to your clipboard, or environment file (aka .env file).

    Setting up Postman

    In Postman, make sure you have selected “Request Headers” in the Add authorization data to field. Also, add the word “Bearer” to the Header Prefix field.

    You’ll want to select Authorization Code as the Grant Type. For the Authorization URL and Access Token URL, you will use your Domain URL followed by:

    • Auth URL
      [Your Domain URL]/oauth2/v1/authorize
    • Access Token URL
      [Your Domain URL]/oauth2/v1/token

    Next, add your Client ID, Client Secret, and Scope. Notice how the Scope in Postman uses the Primary audience and the Scope (if you don’t remember where these came from, review the Resource server configuration section). Select “Send as Basic Auth header” for the Client Authentication field.

    Requesting the JWT

    This next part is easy. From Postman, scroll down to the bottom of the Authorization window until you see the Get New Access Token button. Click it; a new browser window will appear. Enter the user credentials (I’m using the one I created specifically for this demo), and if any pop-up blocker notifications appear, make sure you “allow pop-ups.”

    Once authenticated with IAM, you’ll be redirected back to Postman (remember, this is the Redirect URL you added in the Client Configuration section).

    Copy the entire JWT, and then click Use Token. You’ll now see the token in the Current Token field in Postman.

    HELP ME! Okay, if the Sign-in and/or Redirect didn't work for you, it might be that you are still signed into another OCI session, with a different user (a user that doesn't belong to this Domain). So, what I've had to do in the past is make sure I'm logged out of all OCI sessions, clear my cookies, close out my browser, and then restart with a new one. This has nothing to do with ORDS, but its what worked for me.

    ORDS configuration

    In these following sections, you will configure your ORDS JWT Profile and ORDS Privilege (associated with the Scope you’ve created). But first, you’ll need to decode your JWT.

    Decoding the JWT

    In the past, I’ve used two different tools for decoding these JWTs: JWT.io and JWT.ms. In this demonstration I’m using JWT.io.

    Paste your JWT into one of the decoders and copy the following values to your clipboard:

    • iss
    • scope
    • aud

    The values you’ll need:

    Creating the ORDS JWT profile

    Step one: Create your JWT Profile. This process “registers” a JWT profile with ORDS, so when an incoming request comes in, ORDS can “cross-reference” information related to Issuers, Audiences, and Scopes.

    The easiest way to do all this is to first navigate to an SQL Worksheet and then select the schema from the Navigator tab. Then, under the database objects drop-down menu, choose Packages.

    Click the OAUTH package to expand it, scroll to the bottom of that list, right click the CREATE_JWT_PROFILE PL/SQL procedure, and click Run. A slider will appear.

    Enter your details exactly like you see below:

    • P_ISSUER is https://identity.oraclecloud.com
    • P_AUDIENCE should be whatever your Primary audience is, with the trailing slash included!
    • P_JWK_URL
    FYI: The P_JWK_URL is a combination of [Your Domain URL] + /admin/v1/SigningCert/jwk (this is the endpoint identified in the OCI IAM Domains API doc). And since this is a /v1 endpoint, I assume there may be more. So, double-check the docs in case of a different/updated version. 

    Then, execute the PL/SQL procedure.

    Next, you’ll create an ORDS Privilege (to associate with our protected ORDS Resources).

    Creating an ORDS privilege

    Aka, the “thing” we are protecting and making accessible with a valid JWT. Navigate to your REST Workshop. From the Security tab, select Privileges.

    Create a new Privilege and name it exactly the same as the Scope you created in IAM. DO NOT INCLUDE the Primary audience in this scope name (In fact, you can’t; we won’t let you anyway ๐Ÿคฃ)! In the Protected Modules tab, select the Module you want to protect. Either drag it from the Available Modules tab to the Selected Modules tab or use the arrows to move it over. Then click Create.

    A peek at the ORDS API I’m using:

    This just prints out the Current User, using the ORDS :current_user Implicit parameter.

    Accessing your protected Resource (aka ORDS API) with the JWT

    Now, you may access this protected resource. Unless you’ve taken an hour to set ORDS up, your token will still be valid (it’s valid for an hour). Otherwise, you’ll need to obtain a new, fresh JWT. Using the target ORDS API (mine is the “Hello :current_user” endpoint) in your Postman request field, click Send. You’ll see two things happen (if you are viewing your Postman Console):

    1. An initial POST request to the Token server, and
    2. A subsequent GET request to your target ORDS API

    I should clarify…you might not see that initial POST request because you would have accomplished this before you opened the Postman Console. So, if you’d like to see these requests in real time, do this:

    • Clear out your cookies
    • Delete your existing token
    • Clear out the Console
    • Open the Console back up
    • Request a new JWT
    • Request your ORDS API (your protected Resource)

    The End

    And that’s it, finished! If you’ve made it this far, congratulations. That was a lot of work. Time for a coffee break!

    Follow

    And don’t forget to follow, like, subscribe, share, taunt, troll, or stalk me!

    1. Read up on Scopes here. โ†ฉ๏ธŽ
    2. There are four different Grant Types in the OAuth 2.0 framework: Authorization Code, Implicit, Resource Owner Password Credentials, and Client Credentials. You can read more about them here. โ†ฉ๏ธŽ

  • Microsoft Entra OAuth2.0 JWTs and ORDS secure APIs Tutorial: Configuration and Testing

    Microsoft Entra OAuth2.0 JWTs and ORDS secure APIs Tutorial: Configuration and Testing

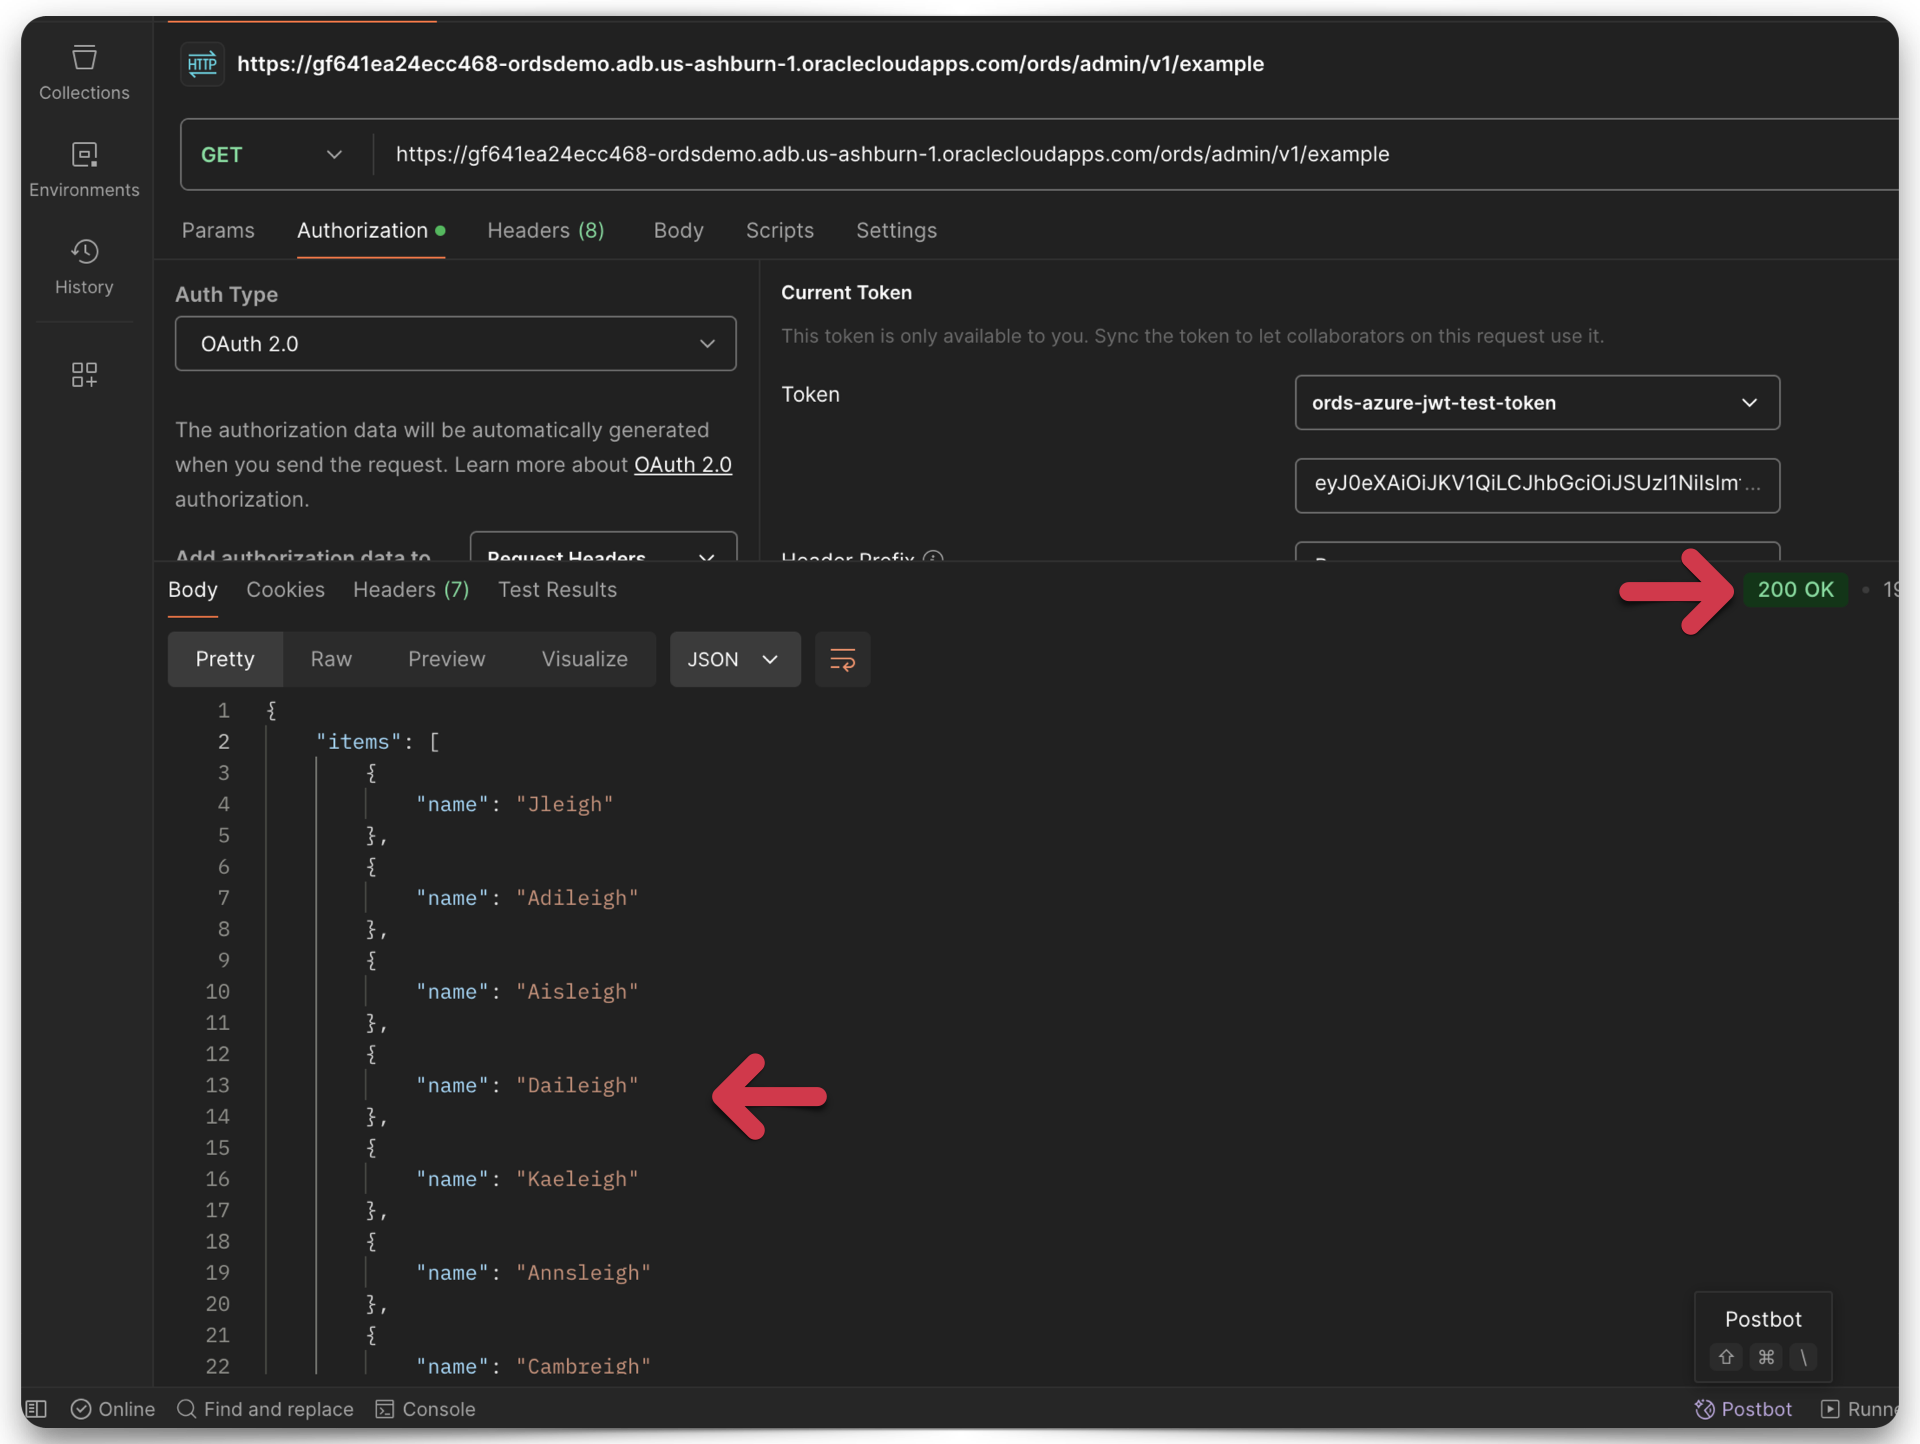
    Since ORDS first introduced support for authenticating with JWTs, there have been many questions surrounding configuration and testing. In this example, I cover, from start to finish:

    1. Registering an application in Microsoft Entra
    2. Creating a Client ID, Secret, and related Scope
    3. Use Postman and OAuth2.0 to request a JWT from Microsoft
    4. Decode the JWT (token) so you can use parts of it to create a JWT profile in ORDS
    5. Create an ORDS privilege with relevant roles, which you’ll use later for testing a protected ORDS endpoint (in Postman)

    If this sounds like what you are looking for, then read on.

    There’s a lot to cover here, so there’s no faffing about on this one. Let’s go!

    Configuring Microsoft Entra

    I assume you know how to locate Microsoft Entra (formerly Microsoft AD; details here).

    App registration

    Locate the Applications category, and from the drop-down menu, select App registrations.

    Fill out the information that best fits your scenario. Make sure you understand which Supported account type to use. I chose option three: Accounts in any organizational directory and personal Microsoft accounts.

    NOTE: If you want to test this OAuth code flow with a personal Microsoft email, GitHub, Skype, or another Microsoft "property" then you'll want to make the same choice as me.

    Retrieve the Callback URL from Postman

    You’ll notice in the Redirect URL section that there is another drop-down menu. You’ll want to select “Web.” You’ll need the Postman-provided “Callback” URL for this to work.

    NOTE: This walkthrough assumes you are using Postman, but Insomnia, cURL, and language-specific libraries will have similar, but distinct procedures for the "URL redirect."

    The Callback URL looks disabled in Postman, but you can still highlight and copy it. Copy and save it, then return to the App registration page (in Microsoft Entra).

    Complete app registration

    Click Register. A message will appear, notifying you of the successful app registration. Copy the Application (Client) ID and save it to your clipboard or a text editor. I’m using TextEdit, which you’ll see later.

    Create a new Client Secret ID and Value

    Next, you must create a Client Secret ID and Secret Value. Navigate to the Certificates & Secrets category. Then click the New client secret button. Add a description of the client’s secret along with an expiration date. 180 days is the recommendation.

    Once you’ve completed all the fields, click the Add button. Another confirmation message will appear. You should see your Client Secret Value and Client Secret ID in plain text. COPY your Client Secret Value now, this will be the only time it is visible! Copy your Client Secret ID, too.

    Paste them to your clipboard or text editor. We’ll be using them shortly and in more than one place!

    Add a scope pt 1

    Next, you’ll need to add a scope. Click the Expose an API category and the Add a scope button.

    Application ID URI

    If you haven’t added an Application ID URI, this wizard will prompt you to set one up before you can proceed. You’ll see this screen if this is your first time doing this.

    Microsoft Entra will have prepopulated the Application ID URI field for you. Click the Save and continue button.

    Add a scope pt 2

    The scope name appends to the Application ID URI as you fill in the first field. In this example, I’ve used a “dot notation” for the scope name. Since this is the naming convention we use in ORDS for privileges, I decided to keep everything standardized.

    Once you’ve filled in all the fields, click the Add scope button. Copy the scope name and save it to your clipboard or text editor. This scope name should combine your Application ID URI + the scope you just created. In my case, it looks like this:

    api://367ad5fd-a417-49f9-aed2-7b2290bd4ce3/my.ords.app.scope

    Obtain required OAuth endpoints

    The final step in Microsoft Entra is to retrieve all relevant OAuth2.0 and JWT endpoints. You’ll find 2/3rds of these from the Overview. Click Overview, then the Endpoints tab. You’ll want to copy and save the following endpoints:

    • OAuth 2.0 authorization endpoint(v2)
    • OAuth 2.0 token endpoint (v2)

    The final endpoint identifies the public keys used for decoding JWTs. For some reason, it’s not found in Microsoft Entra, so save this link and copy it to your clipboard or text editor.

    That’s it for Microsoft Entra configuration! Two more steps, and then we can test our secure ORDS endpoint.

    Request a JWT

    With any luck, you’ve been following along and saved all the required information for Postman. Here is what my clipboard looks like, hopefully yours does too:

    Configuring Postman

    Open Postman and enter the following information:

    • Authorization URL
    • Access Token URL
    • Client ID
    • Client Secret
    • Scope
    • Client Authentication

    Once you’ve filled everything in, click the Get New Access Token button.

    Granting access

    If you’ve kept everything identical to what I have, you should see the following prompts asking you to authorize/grant permission to this app so that you may acquire a JWT (Access Token).

    Redirecting back to Postman

    After the browser redirects you back to Postman, copy the token value. You’ll need to decode it next. You’ll use some of the properties (referred to as “claims” in this context) in the JWT when configuring ORDS.

    Decode the JWT

    There are many language libraries available to decode these JWTs. However, for a quick test scenario, these browser-based tools work well:

    Copy and paste the JWT string into one of the decode boxes to decode the “claims” contained in the JWT. Whichever one you choose, it doesn’t matter, they’ll look identical. Copy the “iss”, or issuer value, and the “aud”, or audience value. Save both of these values to your clipboard or text editor.

    Database Actions

    Finally, we move to Database Actions! There are two areas of focus here:

    1. The SQL Worksheet and
    2. The REST Workshop

    Navigate to the SQL Worksheet first.

    SQL Worksheet

    Regardless of whether you are an ADMIN user, a user with the ORDS ADMINISTRATOR role, or a regular database user, you can find the relevant CREATE_JWT_PROFILE PL/SQL procedure in the ORDS_SECURITY or ORDS_SECURITY_ADMIN packages. You can find them in the ORDS_METADATA schema. I could use either as the ADMIN.

    ORDS_SECURITY_ADMIN & ORDS_SECURITY

    After you’ve located the procedure, select and copy it.

    Obtaining the CREATE_JWT_PROFILE procedure

    Open a new SQL Worksheet and paste the procedure. It is missing a lot; hopefully, you’ve been taking notes.

    Editing the CREATE_JWT_PROFILE procedure

    To “fix” this procedure, you’ll need most of the things you’ve been saving along the way:

    • Issuer value
    • Audience value
    • Public keys (also known as JWKs or JSON Web Keys)

    Once your PL/SQL procedure looks the same (with your unique details, obviously), click the Run Script button. You’re done with the SQL Worksheet and can move on to the REST Workshop!

    REST Workshop

    You’ll need to create a privilege next. Remember, this privilege will be identical to the application’s scope name (which you created in Microsoft Entra). Navigate to Privileges, then click the Create Privilege button.

    ORDS privilege setup

    You can choose whatever you like for the Label and Description, but the name MUST match your application’s scope name.

    You’ll need to select SQL Developer for the Role and

    CORRECTION: Role is not necessary for this implementation. The association between the ORDS privilege name and the Application's scope takes care of this for you.

    choose the “target” resource you want to protect. In my case, it’s just an SQL statement that I’ve REST-enabled (it performs a simple query on a database table).

    When complete, you should see a privilege tile similar to the one in my example. The name of that privilege tile should match the name of your application’s scope.

    Test a secure ORDS resource with JWTs

    Believe it or not, you’ve finished the configuration. Onto testing!

    Test an ORDS endpoint

    Here, I select an endpoint I’ve protected (with the privilege I just created). I’ll use that in my Postman example.

    Executing in Postman

    I return to Postman, ensuring that none of my configurations has changed. This time, I’m adding my ORDS URI to the GET address bar. To be safe, I request a new Access Token and add that to my configuration. You’ll see that in the “Current Token” Field in the image below.

    Next, I click the Send button, and voliร , it works like a charm!

    Success

    You’ll see a 200 OK Successful Response Status Code and my ORDS payload. And just like that, you’ve done it. You’ve just learned how to access a secure ORDS resource using JWTs!

    And what exactly are we looking at here? Well, these are baby names from 2023 US Social Security Card applications filtered using the following SQL:

    SELECT DISTINCT
        NAME
    FROM
        NAMES2023
    WHERE
        NAME LIKE '%eigh%'

    Forcing a 401 Response Status Code

    And in case you think I’m lying, set Auth Type to “No Auth” and reattempt the GET request. You should see a 401 Unauthorized Response Status Code. If you don’t, “Houston, we have a problem!

    The end

    I think this could help many people, so if you have made it this far, please share and bookmark it for later use. I’m also including the PDF version of the images. I didn’t include notes but placed the arrows and boxes with the utmost precision.

    Follow

    And don’t forget to follow, like, subscribe, share, taunt, troll, or stalk me!